

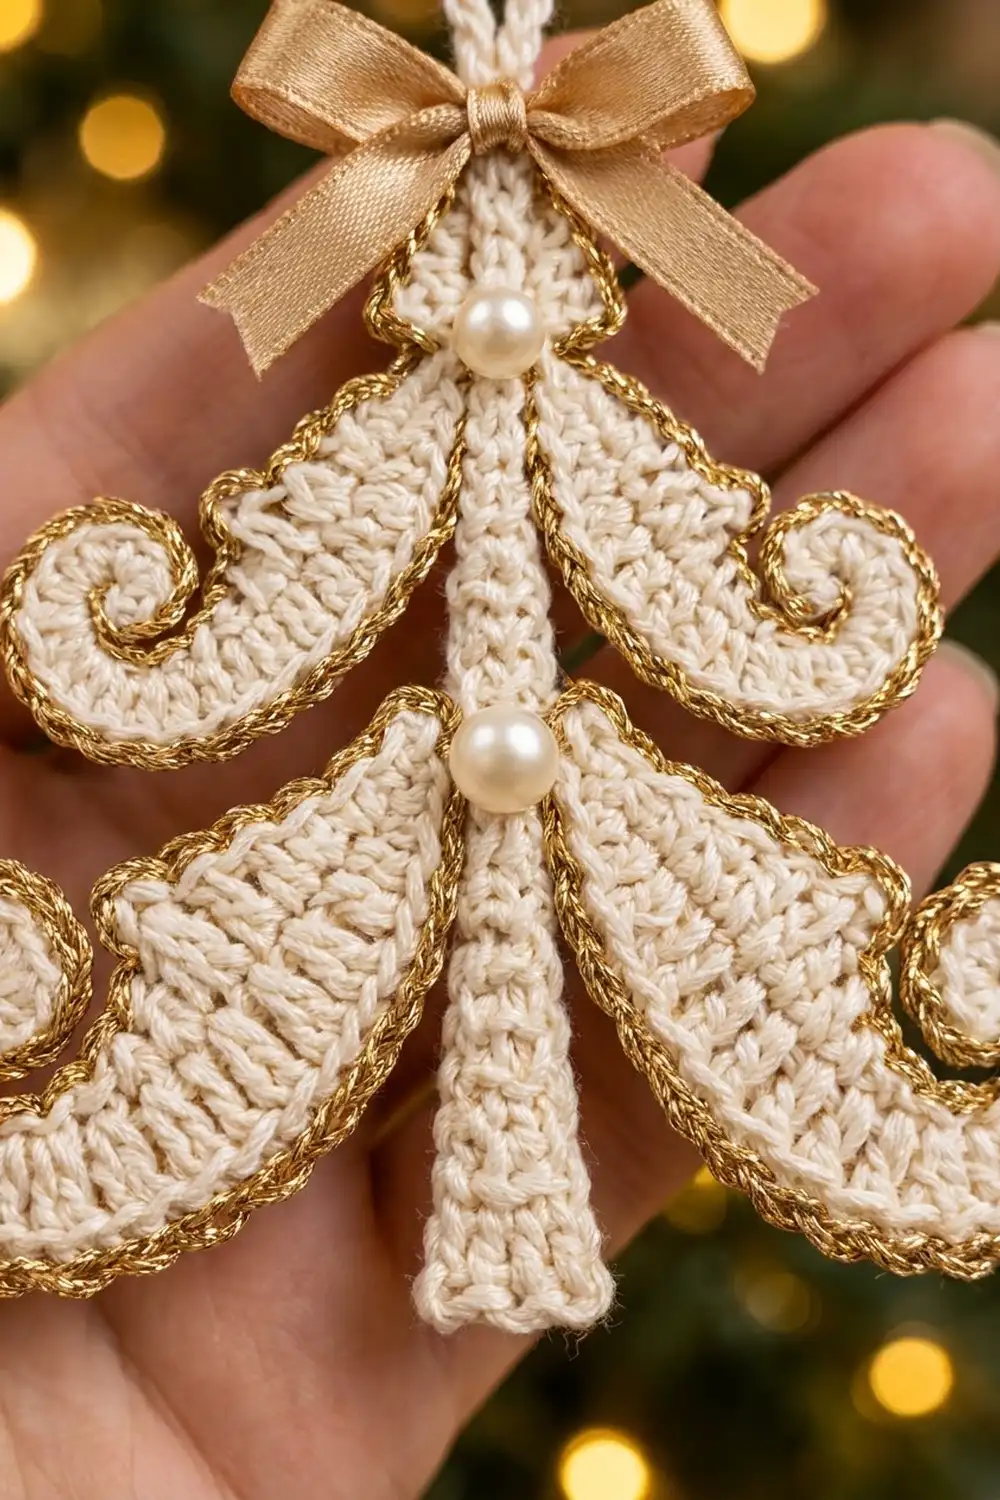
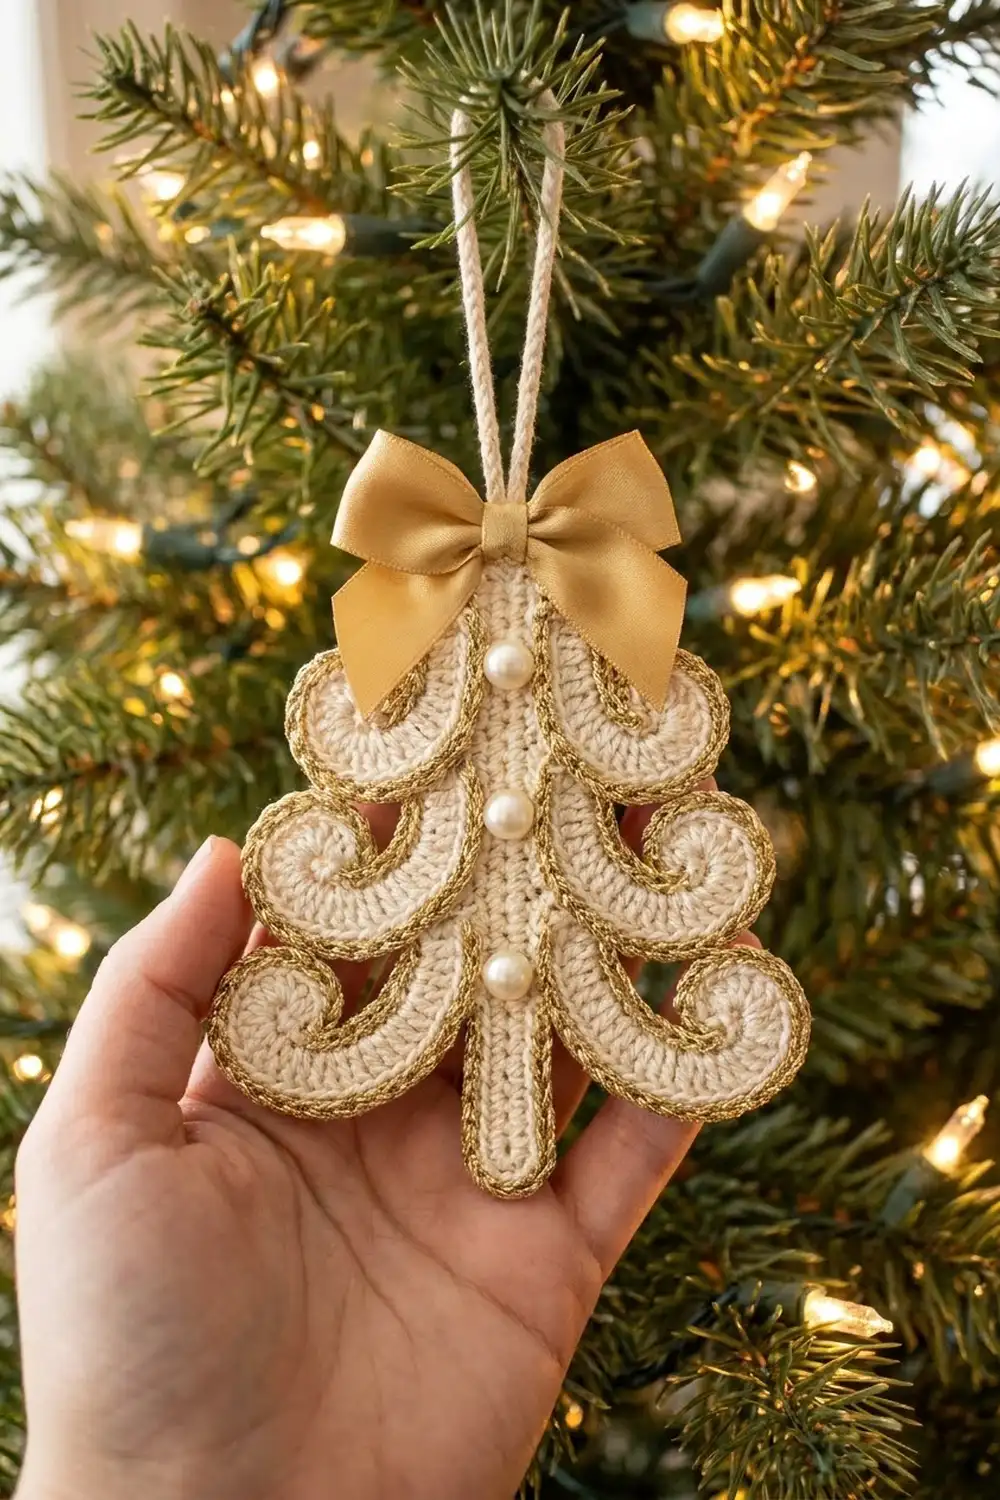
This little tree is built from scrolls. Three tiers of curled, paisley-like branches sweep down and out from a slim central trunk. Each branch ends in a tight spiral, and a twisted gold edge outlines every one.
The palette is simple and warm: cream cotton thread for the body, gold metallic thread for the rope-like edging, three ivory pearls down the center, and a gold satin bow at the top. It reads as vintage lace, and it looks lovely hung against fairy lights.
The pattern uses US crochet terms. The finished ornament measures about 4 in (10.2 cm) wide and 5.4 in (13.7 cm) tall, or 6.9 in (17.5 cm) with the hanging loop.
You crochet one narrow trunk, six curls in three sizes, and a slip-stitch hanging cord. Each curl starts as a single row of graded stitches on a chain. Heavy increases at one end make that end coil into a spiral. One round of single crochet then goes all the way around, and a round of gold reverse single crochet finishes the edge. Everything is sewn onto the trunk, then the pearls and bow go on last.
Finished Size and Construction
- Finished size: about 4 in (10.2 cm) wide × 5.4 in (13.7 cm) tall; 6.9 in (17.5 cm) tall including the loop
- Skill level: Intermediate
- Terminology: US crochet terms
- Yarn weight: Size 3 mercerized cotton crochet thread (Super Fine #1 range)
- Hook: 2.25 mm (US B-1)
- Number of pieces: 8 (1 trunk, 2 small curls, 2 medium curls, 2 large curls, 1 hanging cord)
- Layout: 3 tiers of mirrored curl pairs on a vertical trunk, smallest tier at the top
- Piece sizes (finished): large curl 2 in × 1.1 in (5.1 × 2.8 cm); medium curl 1.6 in × 0.9 in (4.1 × 2.3 cm); small curl 1.3 in × 0.8 in (3.3 × 2.0 cm); trunk 5.4 in × 0.6 in (13.7 × 1.5 cm) at the base
- Curl size before border: large 1.8 in × 0.9 in (4.6 × 2.3 cm); medium 1.4 in × 0.7 in (3.6 × 1.8 cm); small 1.1 in × 0.6 in (2.8 × 1.5 cm)
- Border depth: about 0.1 in (0.3 cm) on every edge of each curl
Materials
Choose a smooth, mercerized cotton thread in size 3. It has crisp stitch definition and holds a coil well after starching. For the gold, use a fine metallic crochet thread or a metallic-wrapped cotton of a similar thickness. Very thin metallic sewing threads are too fine for the edge to show.
- Cream cotton thread (main color): 10 g, about 45 m
- Gold metallic thread (border): 3 g, about 20 m
These quantities include a margin of about 30 percent for swatching and sewing tails.
Tools and notions:
- 2.25 mm (US B-1) crochet hook
- Fine tapestry needle with an eye that fits size 3 thread
- 3 ivory pearl beads, 6 mm (0.2 in)
- Gold satin ribbon, 3/8 in (1 cm) wide × 8 in (20.3 cm) long
- Sewing needle and cream sewing thread for the pearls and bow
- Rustproof pins, a foam blocking board, and spray starch
- Scissors and a ruler
Abbreviations (US Terms)
- ch – chain
- sl st – slip stitch
- sc – single crochet
- hdc – half double crochet
- dc – double crochet
- rev sc – reverse single crochet
- st(s) – stitch(es)
- RS – right side
Special stitch – reverse single crochet (rev sc): Work from left to right (right to left if you crochet left-handed). Insert the hook into the next stitch to the right, yarn over, and pull up a loop. Yarn over and draw through both loops on the hook. This makes a twisted, rope-like edge.
Free loop: The single strand on the underside of a foundation chain that is left over after you work Row 1 into it.
Gauge and Checkpoints
Gauge: 7 sc and 8 rows = 1 in (2.5 cm) in cream thread with the 2.25 mm hook. A swatch of 14 sc × 16 rows should measure 2 in (5.1 cm) square.
Make one large curl before anything else. It uses every technique in the pattern and shows you right away whether your tension works.
Checkpoints:
- Large curl, Row 1: Measure only the straight (non-increase) part: 12 stitches should be about 1.7 in (4.3 cm) long.
- Large curl, Rnd 2: Lightly flattened and coiled, the piece is about 1.8 in × 0.9 in (4.6 × 2.3 cm).
- Large curl, Rnd 3: After blocking, about 2 in × 1.1 in (5.1 × 2.8 cm).
- Trunk, Row 1: 38 sc are about 5.4 in (13.7 cm) long.
- Trunk, Row 3: The strip is 0.4 in (1.0 cm) wide.
- Trunk, Row 4: The base end is 0.6 in (1.5 cm) wide.
If your pieces are too big: Go down a hook size to 2.0 mm, or hold the thread a little tighter.
If your pieces are too small: Go up to 2.5 mm. If your spiral will not coil, your increases are probably too tight. Loosen up on the 2-dc stitches only.
Trunk (Make 1)
Use cream thread.
Foundation: Ch 39. The slip knot end will be the top of the trunk.
Row 1 (RS): Sc in 2nd ch from hook and in each ch across. (38 sc)
Row 2: Ch 1, turn. Sc in each st across. (38 sc)
Row 3: Ch 1, turn. Sc in each st across. (38 sc)
Row 3 finishes at the slip knot end, which is the top.
Row 4 (taper row): Ch 1, turn. Sl st in first 16 sts, sc in next 12 sts, hdc in next 6 sts, dc in last 4 sts. (38 sts: 16 sl st, 12 sc, 6 hdc, 4 dc)
The sl sts keep the top of the trunk at 3 rows, 0.4 in (1.0 cm) wide. The taller stitches gradually widen the lower part to 0.6 in (1.5 cm) at the base. Fasten off, leaving a 6 in (15.2 cm) tail.
Curls (Make 2 of Each Size)
Every curl is made the same way:
- Row 1 runs along a chain. The first group of chains gets 2 stitches each, which forces that end to coil into a spiral. The rest gets 1 stitch each, shortening from dc to sl st, so the curl tapers to a narrow tail.
- Rnd 2 goes all the way around in sc.
- Rnd 3 is the gold border (see the Border section).
Work Row 1 and Rnd 2 in cream.
Large Curl
Foundation: Ch 21.
Row 1 (RS): 2 sc in 2nd ch from hook, 2 hdc in each of next 3 ch, 2 dc in each of next 4 ch, dc in next 4 ch, hdc in next 4 ch, sc in next 3 ch, sl st in last ch. (28 sts: 16 in the spiral section + 12 in the body and tail)
The spiral section should already twist. Don’t flatten it.
Rnd 2: Ch 1. Rotate the piece so you can work along the free loops of the foundation chain. Work 3 sc in the free loop of the last ch (tail tip). Sc in each of the next 18 free loops. Work 3 sc in the free loop of the first ch (spiral tip). Sc in each of the 28 sts of Row 1. Join with a sl st to the first sc. (52 sc: 3 + 18 + 3 + 28)
Fasten off cream and weave in the tail.
Medium Curl
Foundation: Ch 18.
Row 1 (RS): 2 sc in 2nd ch from hook, 2 hdc in each of next 3 ch, 2 dc in each of next 3 ch, dc in next 3 ch, hdc in next 3 ch, sc in next 3 ch, sl st in last ch. (24 sts: 14 in the spiral section + 10 in the body and tail)
Rnd 2: Ch 1. Work 3 sc in the free loop of the last ch, sc in each of the next 15 free loops, and 3 sc in the free loop of the first ch. Sc in each of the 24 sts of Row 1. Join with a sl st to the first sc. (45 sc: 3 + 15 + 3 + 24)
Fasten off cream and weave in the tail.
Small Curl
Foundation: Ch 15.
Row 1 (RS): 2 sc in 2nd ch from hook, 2 hdc in each of next 2 ch, 2 dc in each of next 3 ch, dc in next 2 ch, hdc in next 2 ch, sc in next 3 ch, sl st in last ch. (20 sts: 12 in the spiral section + 8 in the body and tail)
Rnd 2: Ch 1. Work 3 sc in the free loop of the last ch, sc in each of the next 12 free loops, and 3 sc in the free loop of the first ch. Sc in each of the 20 sts of Row 1. Join with a sl st to the first sc. (38 sc: 3 + 12 + 3 + 20)
Fasten off cream and weave in the tail.
Coiling the Spiral
Roll each spiral end toward the Row 1 side (the outer edge) into a snail shape, about 0.5 in (1.3 cm) across on the large curl. Hold it with 2 or 3 small cream tacking stitches on the back. Coil before you add the border so the gold edge outlines the finished shape.
Hanging Cord (Make 1)
Use cream thread.
Ch 26. Sl st in 2nd ch from hook and in each ch across. (25 sl st, about 3.6 in / 9.1 cm)
Fasten off and leave both tails for sewing.
Make All Pieces
Cream: 1 trunk, 1 hanging cord, 2 large curls, 2 medium curls, 2 small curls.
Gold: border on all 6 curls. The trunk and cord stay plain cream.
Mirroring: For each pair, lay one curl RS up with its spiral pointing right. Lay its partner wrong side up so its spiral points left. At this scale, the dc texture and the rev sc rope look almost the same on both faces.
Layout grid (front view):
              [ loop ]
              [  bow ]
   (S-curl) --  pearl  -- (S-curl)
  (M-curl) ---  pearl  --- (M-curl)
 (L-curl) ----  pearl  ---- (L-curl)
              [trunk ]
              [ base ]
Measured down from the top of the trunk, the tier tails meet at:
- Small tier: 0.5 in (1.3 cm)
- Medium tier: 1.6 in (4.1 cm)
- Large tier: 2.8 in (7.1 cm)
About 0.8 in (2.0 cm) of trunk shows below the large curls.
Joining
Method: Whipstitch with cream thread and a tapestry needle, working through the back loops of Rnd 2 so no cream stitching shows on the gold border.
Stitch-to-stitch logic:
- Pin each curl so its narrow tail tip sits on the front of the trunk. The 3-sc tail tip should overlap the trunk edge by about 0.2 in (0.5 cm), and the two tails of a tier should meet at the center.
- Angle each curl downward and outward so the spiral sits at the outer, lower end and curls up and in toward the trunk.
- Sew the 3 tip stitches plus the next 4 sts on each side of the tail to the trunk, using 1 whipstitch per Rnd 2 stitch. That makes 11 stitches per curl.
- Catch only the top loop of the trunk sts so the stitching doesn’t show through to the back.
- Tack the underside of each curl to the curl below it with 1 or 2 hidden stitches so the tiers don’t flip forward.
Tension: Pull each whipstitch just snug. If you pull too hard, the trunk puckers and the tiers tilt.
Size checkpoint: The large tier spans 4 in (10.2 cm) from spiral to spiral. The medium tier should be about 3.3 in (8.4 cm) and the small tier about 2.6 in (6.6 cm).
Hanging cord: Fold the cord in half. Sew both ends to the back of the trunk top, overlapping 0.3 in (0.8 cm), so the loop stands 1.5 in (3.8 cm) above the trunk.
Trims:
- Sew one pearl over each tier’s center joint.
- Tie the ribbon into a bow about 1.5 in (3.8 cm) wide and trim the tails at an angle.
- Stitch the bow to the top of the trunk, just above the top pearl, where it covers the base of the loop.
Border
The gold border is Rnd 3 of each curl. Work it after you coil the spiral and before you join the pieces.
Border gauge: 1 rev sc per Rnd 2 stitch. That’s about 7 rev sc per 1 in (2.5 cm) of edge, and it adds about 0.1 in (0.3 cm) of depth on each side.
Rnd 3 (all sizes): With RS facing, join gold with a sl st in the center sc of the tail tip. Ch 1, then rev sc in each st around. Join with a sl st to the first rev sc and fasten off. Weave the gold tail into the back of the cream stitches.
Counts per edge:
| Curl | Outer edge (Row 1 side) | Inner edge (chain side) | Tail tip | Spiral tip | Total |
|---|---|---|---|---|---|
| Large | 28 | 18 | 3 | 3 | 52 rev sc |
| Medium | 24 | 15 | 3 | 3 | 45 rev sc |
| Small | 20 | 12 | 3 | 3 | 38 rev sc |
Why the math works:
- Rev sc goes 1 into each Rnd 2 stitch, so the border never adds or loses stitches.
- The extra ease is already built in. The 3-sc tips let the border turn around the ends without pulling.
- The outer edge carries Row 1’s spiral increases, so it is longer than the inner edge. That difference is exactly what holds the coil.
- If you added stitches in Rnd 3, the edge would ruffle. If you skipped stitches, the spiral would cup.
Final Blocking
- Lightly mist the finished ornament with water until it is just damp.
- Lay it RS up on a foam board.
- Pin the trunk straight at the top and base, checking that it measures 5.4 in (13.7 cm).
- Pin each spiral round and flat, then smooth each curl body into its sweep.
- Check the large tier width: 4 in (10.2 cm).
- Spray starch evenly, let it soak in, and spray again lightly.
- Let it dry completely, at least 6 hours, before you unpin.
- Fluff the bow loops once the ornament is dry.
Final Quality-Control Checklist
- Trunk is 5.4 in (13.7 cm) long and tapers from 0.4 in to 0.6 in (1.0 to 1.5 cm).
- Curl counts in Rnd 2 are correct: 52, 45, 38.
- Each curl pair mirrors, with both spirals at the same height.
- The gold border is continuous, with no cream showing through gaps.
- Tiers are evenly spaced at 0.5 in, 1.6 in, and 2.8 in (1.3, 4.1, and 7.1 cm).
- Pearls are centered and firmly sewn.
- The loop is 1.5 in (3.8 cm) and secure, and the bow covers its base.
- All tails are woven in invisibly on the back.
Troubleshooting
Spiral won’t coil: The increases are too tight or were skipped. Recount Row 1: 16, 14, or 12 sts in the spiral section.
Curl twists like a corkscrew: That’s normal before blocking. Coil and tack it first, then block it flat.
Border ruffles: You added stitches. Rework it with exactly 1 rev sc per stitch.
Border pulls the curl into a cup: Your rev sc is too tight. Work it with the next hook size up.
Trunk curves sideways: Row 4 makes one edge longer. Pin it straight while blocking, and use extra starch.
Tiers sag forward: Add hidden tacking stitches between the tiers on the back.
Metallic thread splits: Use shorter lengths, about 20 in (50.8 cm), and a hook with a smooth throat.
Care
Spot clean only with a damp cloth. Store the ornament flat in a box with tissue so the spirals keep their shape, and restarch if it softens over time.
Final Notes
The measurement chain is short and reliable:
- Gauge of 7 sc and 8 rows per 1 in (2.5 cm)
- Trunk of 38 sts = 5.4 in (13.7 cm)
- Large curl at 1.8 in (4.6 cm) before the border and 2 in (5.1 cm) after
- Tier spacing of 0.5, 1.6, and 2.8 in (1.3, 4.1, and 7.1 cm)
- Finished tree of 4 in × 5.4 in (10.2 × 13.7 cm), or 6.9 in (17.5 cm) with the loop
If each checkpoint matches, the ornament will too.
Happy crocheting!