

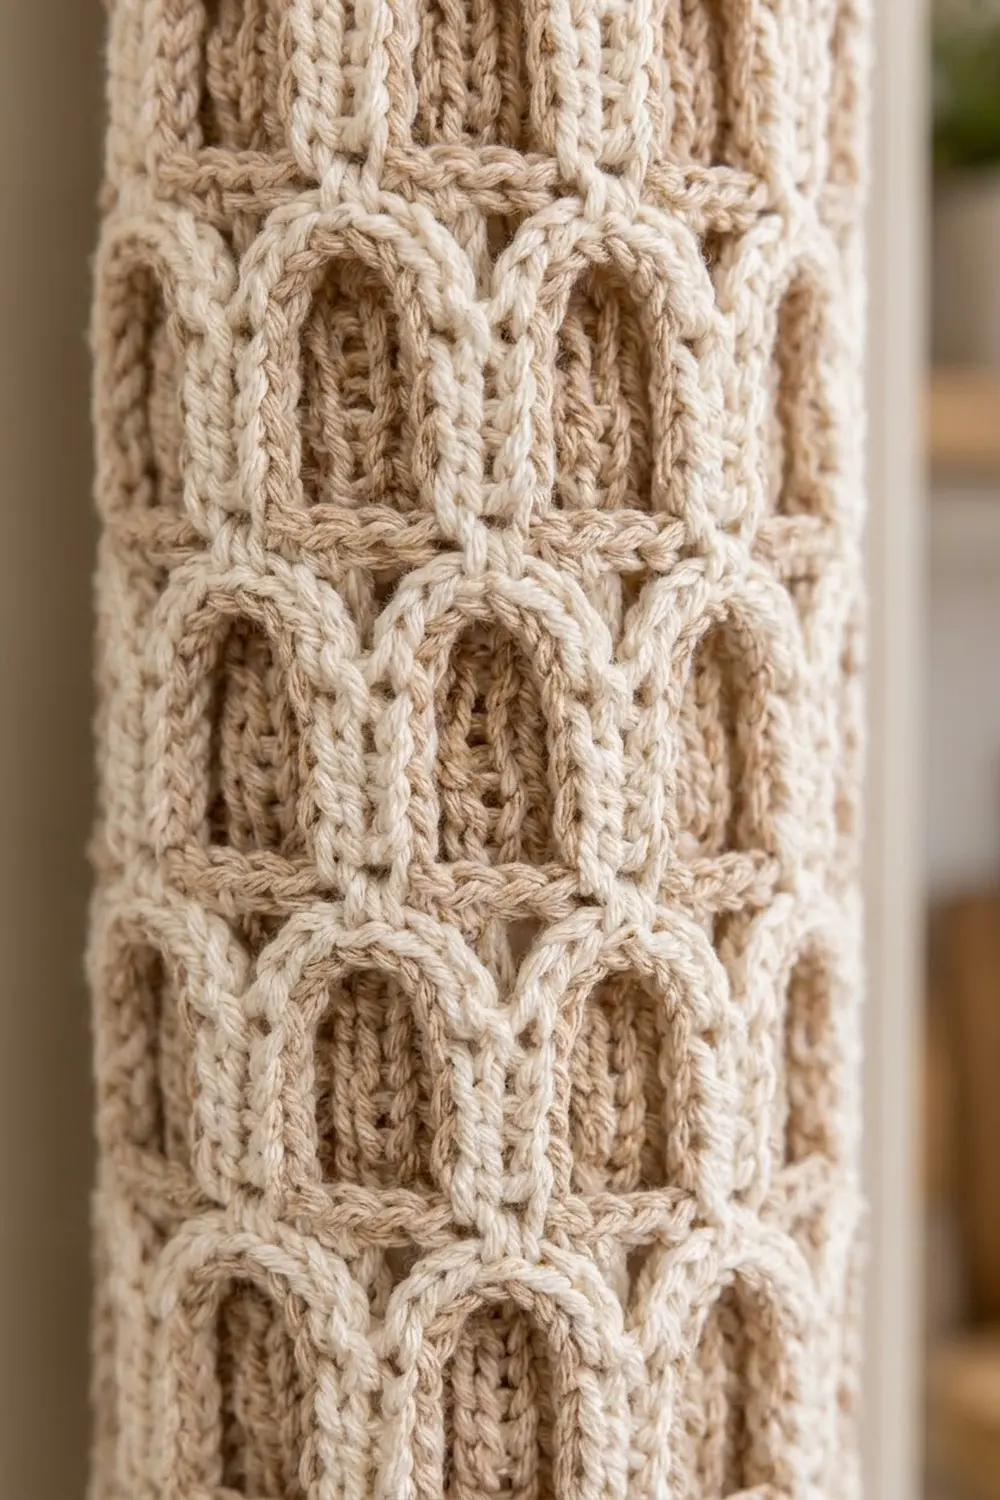
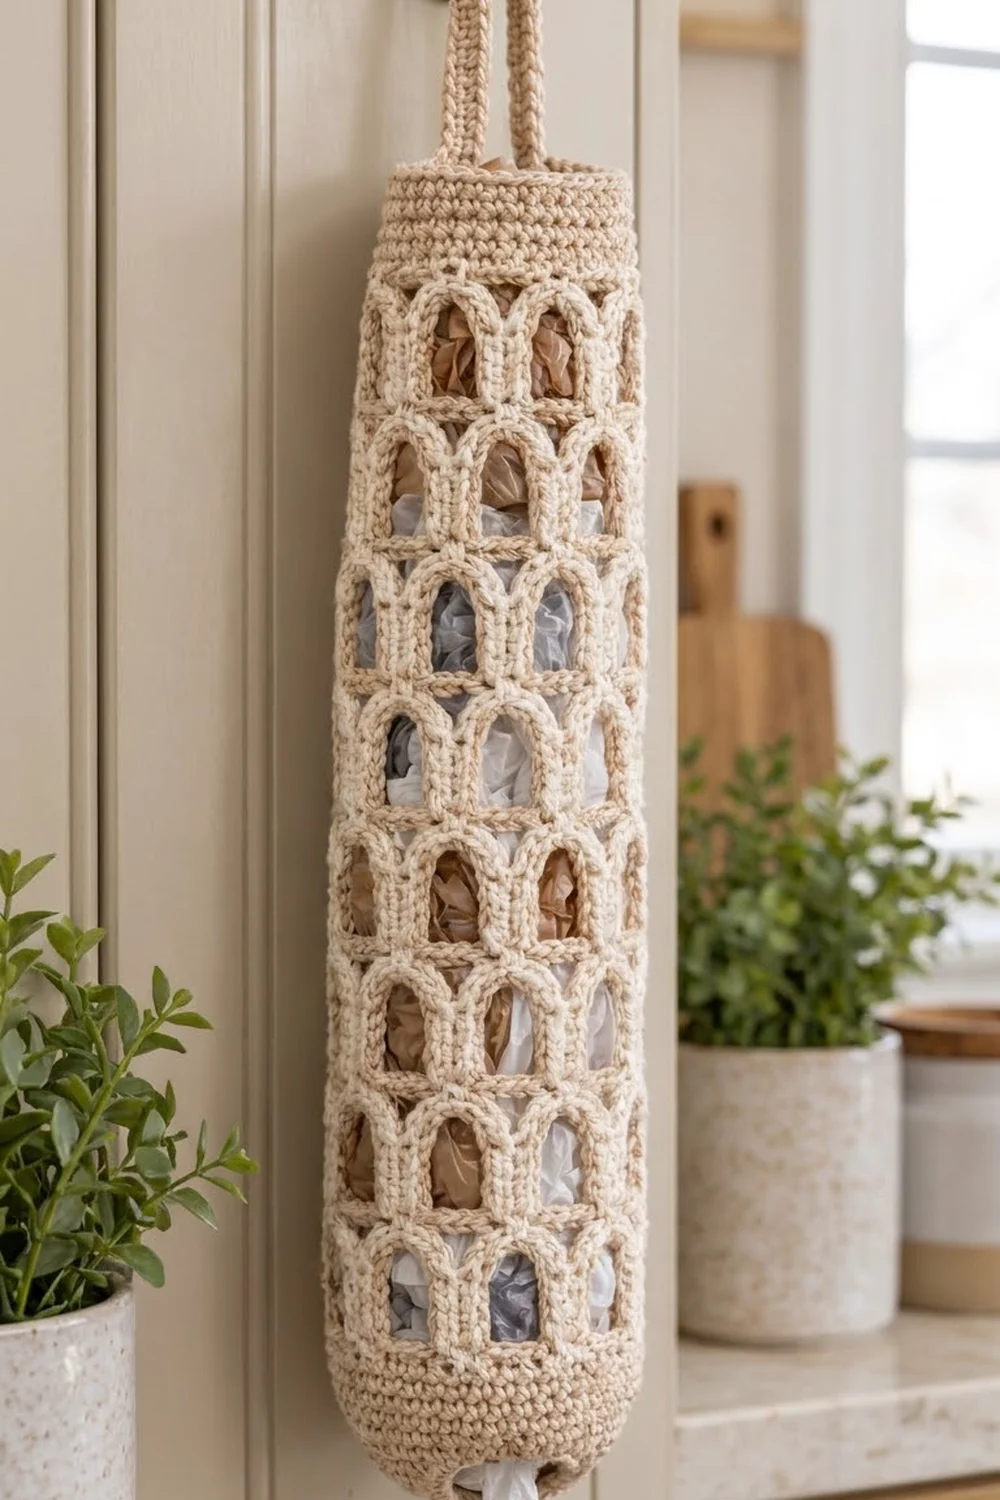
This is a tall, tidy holder for plastic grocery bags. Rows of rounded arched windows climb up the tube like the arcade of an old stone building. Each tier of arches sits offset from the one below, so the openings stack like bricks and the whole surface looks textured but still airy.
The sample is made in a soft oatmeal-beige heathered cotton. It suits a neutral kitchen, a pantry door or a laundry nook. Plain cream works just as well, and a pair in two neutrals looks lovely side by side. You stuff bags in at the top and pull them out one at a time through the gathered opening at the bottom.
The pattern uses US crochet terms. The finished holder measures about 5.7 in (14.5 cm) wide when flat and 18.75 in (47.6 cm) long. The hanging loop adds about 4 in (10.2 cm), for an overall length of about 22.75 in (57.8 cm).
You make one flat rectangular panel from the bottom up. The panel has a solid band, twelve tiers of arches and a second solid band. You then sew it into a tube with a single vertical seam. To finish, you add a rim round at the top, decrease the bottom edge into a small dispenser opening, and work a strap that folds into the hanging loop.
Finished Size and Construction
- Finished size: 5.7 in (14.5 cm) wide flat × 18.75 in (47.6 cm) long, plus a 4 in (10.2 cm) loop
- Skill level: Intermediate
- Terminology: US
- Yarn weight: Worsted (#4), cotton or cotton blend
- Hook: 5.0 mm (H-8)
- Number of pieces: 1 (a single panel seamed into a tube)
- Layout: Vertical tube, with the seam and loop at the center back
- Panel size: 12 in (30.5 cm) wide × 17.75 in (45.1 cm) tall before seaming
- Size before border: 11.4 in (29.0 cm) around, 5.7 in (14.5 cm) flat, 17.75 in (45.1 cm) long
- Border depth: 0.25 in (0.6 cm) at the top rim, about 0.75 in (1.9 cm) at the bottom edging
Materials
Choose a smooth worsted-weight cotton or cotton blend. Cotton keeps the arches crisp and doesn’t stretch out much when the holder is full. Acrylic also works, but the windows will look softer. A yarn of about 170 m per 100 g matches the sample.
- Main color, Oatmeal/Light Beige heather: 130 g, about 220 m (241 yd)
- Optional second holder, Cream: 130 g, about 220 m (241 yd)
Tools:
– 5.0 mm (H-8) crochet hook
– Tapestry needle
– 4 locking stitch markers
– Scissors
– Tape measure
– Rust-proof pins
– Spray bottle
– A rolled towel or tube about 3.5 in (8.9 cm) across, for blocking
The yarn amounts include a margin of about 15% for your gauge swatch and seaming.
Abbreviations (US Terms)
- ch: chain
- sc: single crochet
- dc: double crochet
- sc2tog: single crochet 2 together
- sk: skip
- sl st: slip stitch
- sp: space
- st(s): stitch(es)
- tch: turning chain
- rnd: round
Selvedge dc: the first and last stitch of every double crochet row. At the start of a row it is the ch 3, and at the end it is a dc worked into the top of the turning chain. These two edge stitches are taken up by the seam.
Arch crowding: working 4 sc into a ch-2 space. Crowding the stitches makes the top of each window bulge upward into a dome.
Gauge and Checkpoints
Base gauge: 14 sc and 16 rows = 4 in (10.2 cm).
Pattern gauge: one tier (2 dc rows plus 1 sc row) = 1.25 in (3.2 cm). One 8-stitch repeat = 2.3 in (5.8 cm).
Test swatch first. Chain 19. Make 18 sc and work 3 rows of sc. Then work two tiers using the Tier A and Tier B rows below, scaled down to: selvedge, 2 dc, one window, 4 dc, one window, 2 dc, selvedge. The swatch should measure 5.1 in (13.0 cm) wide and 3.25 in (8.3 cm) tall.
Checkpoints:
– After Row 6: the panel is 12 in (30.5 cm) wide and 1.5 in (3.8 cm) tall.
– After Row 18: 6.5 in (16.5 cm) tall.
– After Row 42: 16.5 in (41.9 cm) tall.
– After Row 47: 17.75 in (45.1 cm) tall.
– After seaming: 11.4 in (29.0 cm) around, 5.7 in (14.5 cm) flat.
If your fabric is too big, go down 0.5 mm in hook size. If it is too small, go up 0.5 mm. If only the tier height is off, adjust how tall you pull up your double crochets rather than changing hooks.
Pattern
Bottom Band
Foundation: Ch 43.
Row 1: Sc in 2nd ch from hook and in each ch across, turn. (42 sc)
Rows 2–6: Ch 1 (does not count as a stitch), sc in each st across, turn. (42 sc)
The band should now measure 12 in × 1.5 in (30.5 cm × 3.8 cm). Row 6 also serves as the base row for the first tier.
Tier A (Rows 7–9)
Row 7 (window row): Ch 3 (counts as selvedge dc), dc in next 2 sts, ch 4, sk 4 sts, dc in next 4 sts; repeat from * 3 more times, ch 4, sk 4 sts, dc in next 2 sts, dc in last st, turn.
Count: 1 + 2 + (4 ch + 4 dc) × 4 + 4 ch + 2 + 1 = 42 sts and chs* (5 windows).
Row 8 (shoulder row): Ch 3 (counts as selvedge dc), dc in next 2 dc, ch 2, sk ch-4 sp, dc in next 4 dc; repeat from * 3 more times, ch 2, sk ch-4 sp, dc in next 2 dc, dc in top of tch, turn.
Count: 1 + 2 + (2 ch + 4 dc) × 4 + 2 ch + 2 + 1 = 32 sts and chs*.
The ch-2 is shorter than the ch-4 below it, so it pulls the tops of the stitch columns inward. This creates the arch shoulders.
Row 9 (arch row): Ch 1, sc in first 3 sts, 4 sc in ch-2 sp, sc in next 4 dc; repeat from * 3 more times, 4 sc in ch-2 sp, sc in last 3 sts, turn.
This is a conversion row: 28 sc worked one per existing dc, plus 4 sc in each of 5 ch-2 spaces (20) = 42 sc*.
Tier B (Rows 10–12), Offset
Row 10: Ch 3 (counts as selvedge dc), ch 2, sk next 2 sts, dc in next 4 sts, ch 4, sk 4 sts, dc in next 4 sts; repeat from * 3 more times, ch 2, sk 2 sts, dc in last st, turn.
Count: 1 + 2 ch + 4 + (4 ch + 4 dc) × 4 + 2 ch + 1 = 42 sts and chs*.
Each group of 4 dc sits directly above a Tier A window, which gives the brick offset.
Row 11: Ch 3 (counts as selvedge dc), ch 1, sk ch-2 sp, dc in next 4 dc, ch 2, sk ch-4 sp, dc in next 4 dc; repeat from * 3 more times, ch 1, sk ch-2 sp, dc in top of tch, turn.
Count: 1 + 1 ch + 4 + (2 ch + 4 dc) × 4 + 1 ch + 1 = 32 sts and chs*.
Row 12: Ch 1, sc in first st, 2 sc in ch-1 sp, sc in next 4 dc, 4 sc in ch-2 sp, sc in next 4 dc; repeat from * 3 more times, 2 sc in ch-1 sp, sc in last st, turn.
This is a conversion row: 18 sc worked one per existing dc, plus 16 sc in the four ch-2 spaces, plus 4 sc in the two ch-1 spaces (24 extra) = 42 sc*.
The two half-windows at the edges will meet at the seam to form one full window at the center back.
Body
Rows 13–42: Repeat Rows 7–12 five more times. You will have 12 tiers in total, alternating A and B, with a Tier B at the top. (42 sc after Row 42)
The panel should now be 16.5 in (41.9 cm) tall.
Top Band
Rows 43–47: Ch 1, sc in each st across, turn. (42 sc)
Fasten off and leave a 30 in (76.2 cm) tail for seaming. The panel should measure 12 in × 17.75 in (30.5 cm × 45.1 cm).
Seaming the Tube
Fold the panel with the right sides facing out and bring the two long edges together. Using the tail, mattress stitch the selvedge stitches together, matching them row to row so that all 47 row ends on one side meet the 47 row ends on the other.
Pull each stitch snug enough to close the seam but not so tight that it puckers. Check your work against the opposite edge every 10 rows.
On Tier A rows, the seam disappears into a column 4 dc wide. On Tier B rows, the two joined selvedge dc form a thin divider through the window at the center back. That side faces the wall when the holder hangs.
Checkpoint: 11.4 in (29.0 cm) around and 5.7 in (14.5 cm) flat.
Border
Border gauge: 14 sc = 4 in (10.2 cm). In the round, each round adds about 0.25 in (0.6 cm) of height.
Place markers at the center back (on the seam) and at the center front, so that each side of the flattened tube holds 20 stitches.
Top Rim
Rnd 1: Join yarn at the seam in the top of Row 47. Ch 1, then sc in each of the 40 visible stitches around, skipping the 2 selvedge stitches inside the seam. Sl st to the first sc.
40 sc: 20 on the front, 20 on the back.
Fasten off.
Bottom Dispenser Edging
Rnd 1: Join yarn at the seam in the foundation chain. Ch 1, then sc in each of the 40 visible foundation loops, skipping the 2 selvedge loops. Sl st to the first sc.
40 sc: 20 per side.
Rnd 2: Ch 1, sc in next 3 sts, sc2tog; repeat from * around, sl st to the first sc.
32 sc: 16 per side.*
Rnd 3: Ch 1, sc in next 2 sts, sc2tog; repeat from * around, sl st to the first sc.
24 sc: 12 per side.*
Rnd 4: Ch 1, sc in each st around, sl st to the first sc.
24 sc: 12 per side.
Fasten off. The opening measures 6.9 in (17.5 cm) around, or about 2.2 in (5.6 cm) across.
Why the math works: Each round counts 40 stitches because the 42-stitch panel loses its 2 selvedge stitches to the seam. Rounds 2 and 3 each remove 8 stitches, 4 per side, spread evenly. That pulls the edge in steadily without forming points. Twenty-four stitches leave an opening tight enough to hold the bags in but stretchy enough to pull one out.
Hanging Strap
Join yarn on the top rim at the seam. You’ll work 4 sc, 2 on each side of the seam.
Row 1: Ch 1, sc in the 2 sts before the seam and the 2 sts after it, turn. (4 sc)
Rows 2–36: Ch 1, sc in each st across, turn. (4 sc)
The strap is 1.1 in (2.8 cm) wide and 9 in (22.9 cm) long. Fold it over to the inside and sew the last row to the inside of the top band, 1 in (2.5 cm) below the rim. This makes a loop about 4 in (10.2 cm) tall.
Final Blocking
- Weave in all ends along the seam, inside the solid bands.
- Spray the holder until it is evenly damp, but not dripping.
- Slide it over a rolled towel or tube.
- Gently push each arch into a round dome with your fingertips.
- Line up the window columns so they run straight from bottom to top, and pin the bands level.
- Check that the holder measures 18.75 in (47.6 cm) long and 5.7 in (14.5 cm) flat.
- Let it dry completely before you remove the pins.
Final Quality-Control Checklist
- 12 tiers, alternating A and B, with each column centered over a window below
- 42 sc at the end of every arch row
- A straight seam with no puckering
- 40 sc on the top rim, 24 sc at the bottom opening
- A securely stitched loop about 4 in (10.2 cm) tall
- Finished size 5.7 × 18.75 in (14.5 × 47.6 cm)
Troubleshooting
- Windows are square instead of arched: Make sure you work only ch 2 over each window on the shoulder rows, and crowd 4 sc into each space on the arch rows.
- The brick offset doesn’t line up: Recount Tier B. It must start and end with a 2-chain half-window.
- The panel is getting narrower: Check that every arch row ends with 42 sc.
- The seam puckers: Loosen your stitches and re-sew the seam row by row.
- Bags fall out of the bottom: Repeat Rnd 3 once more to bring the opening to 18 sc.
Care
Hand wash in cool water and lay flat to dry, reshaping the arches while the holder is still damp. If you use cotton, avoid hot dryer cycles.
Final Notes
The measurements build on each other in this order:
- Gauge: 14 sc = 4 in (10.2 cm), and one tier = 1.25 in (3.2 cm)
- The 42-stitch panel is 12 in (30.5 cm) wide
- Twelve tiers between two solid bands make a 17.75 in (45.1 cm) panel
- Seaming gives a tube 11.4 in (29.0 cm) around
- The rim and bottom edging bring the finished length to 18.75 in (47.6 cm)
Check each stage against these numbers and your holder will match the sample.
Happy crocheting!