

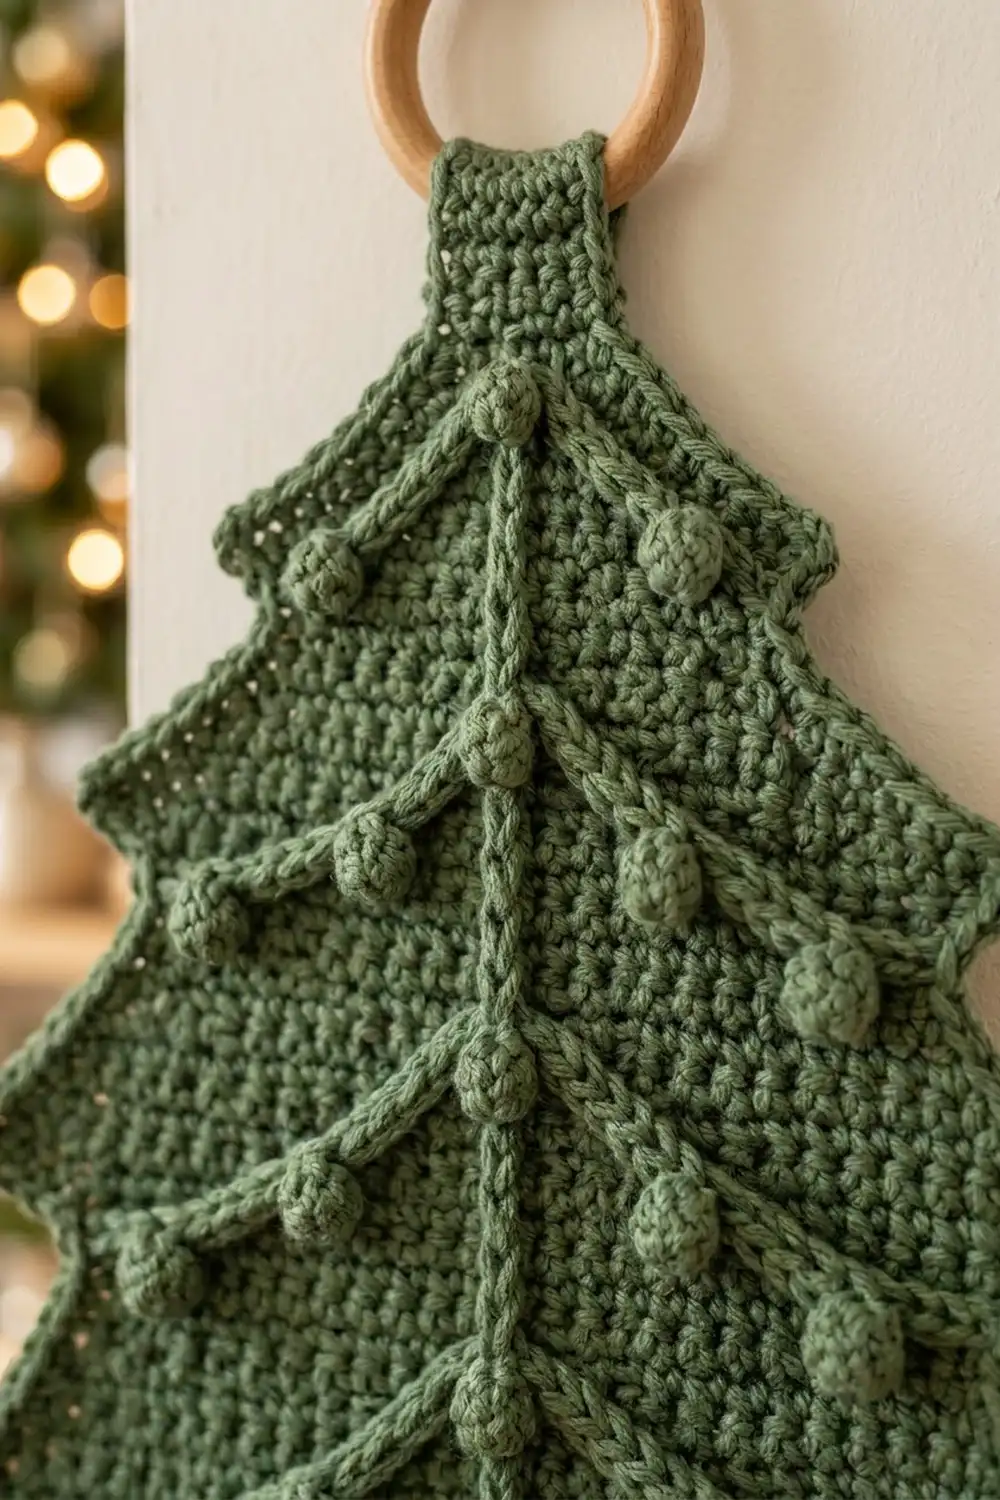
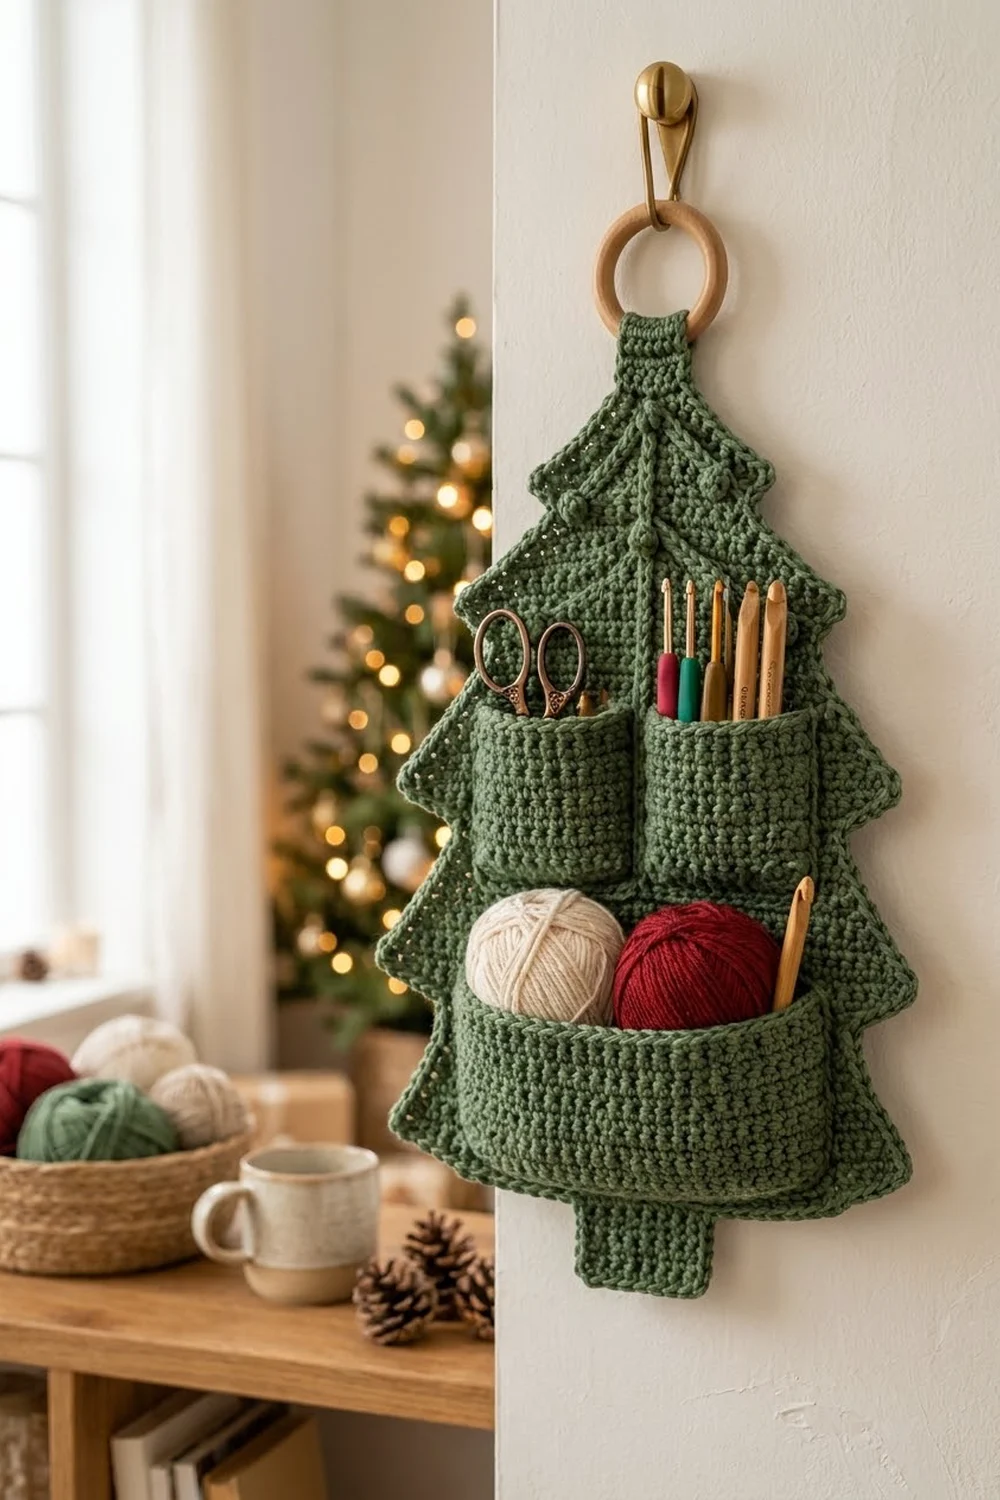
This tree-shaped organizer hangs flat on the wall and keeps your crochet tools in reach. It has three stepped tiers, a square trunk, a twisted corded edge, and bobble garlands draped across the top tier. Two small pockets hold hooks and scissors, and a deep front pocket holds a couple of yarn balls.
The piece uses a single sage green yarn, so the texture carries the look. Dense single crochet makes a firm fabric that stays flat. A reverse single crochet (crab stitch) edge gives the outline a rope-like finish, and the pockets get the same finish along their top rims.
This pattern uses US crochet terms. The finished tree measures 11.5 in (29.2 cm) wide and 15.8 in (40.1 cm) tall from the trunk to the tip. The organizer is about 17.75 in (45.1 cm) tall when measured to the top of the folded hanging tab.
For construction, you work the tree back in rows from the trunk up, adding stitches at the base of each tier and decreasing along the diagonals. Next you crochet three pockets and three garland cords. You sew everything onto the tree, work the border around the outline, and fold the tab over a wooden ring.
Finished Size and Construction
- Finished size: 11.5 × 15.8 in (29.2 × 40.1 cm); 17.75 in (45.1 cm) to the top of the tab
- Skill level: Intermediate
- Terminology: US
- Yarn weight: Worsted (#4)
- Hook: 5.0 mm (H-8)
- Number of pieces: 4 main pieces (tree back, 2 small pockets, 1 large pocket) plus 3 garland cords
- Layout: small pockets side by side on the middle tier, large pocket across the bottom tier, garlands on the top tier
- Tree back before border: 11 × 15.3 in (27.9 × 38.9 cm)
- Border depth: 0.25 in (0.6 cm), 2 rounds
- Small pocket: 2.75 × 2.9 in (7.0 × 7.4 cm) edged
- Large pocket: 9.5 × 3.6 in (24.1 × 9.1 cm) edged
Materials
Use a smooth worsted-weight cotton or cotton blend of about 170 m per 100 g. Cotton holds its shape and makes the stitches look crisp. Avoid fuzzy acrylic, because it hides the bobbles and the crab-stitch edge.
- Sage green: 160 g (about 272 m). The estimated use is about 135 g (230 m): roughly 100 g for the tree back, tab and border, 30 g for the pockets, and 5 g for the garlands and center line.
These quantities include a margin of about 20%.
Tools:
– 5.0 mm (H-8) hook
– Wooden ring, 3 in (7.6 cm) diameter
– Tapestry needle
– Locking stitch markers (at least 10)
– Rust-proof pins
– Tape measure
– Blocking mat and spray bottle
Abbreviations (US Terms)
- ch: chain
- sc: single crochet
- sc2tog: single crochet 2 together
- fsc: foundation single crochet
- sl st: slip stitch
- rev sc: reverse single crochet (crab stitch)
- st(s): stitch(es)
- yo: yarn over
- rep: repeat
Chain bobble (chb): Ch 3. [Yo, insert the hook in the 3rd ch from the hook, yo, pull up a loop, yo, draw through 2 loops] 4 times (5 loops on hook). Yo and draw through all 5 loops. The bobble pops forward on the chain.
Gauge and Checkpoints
Gauge: 16 sc × 18 rows = 4 in (10.2 cm) in sc worked flat. That works out to 4 sts and 4.5 rows per inch.
Make one small pocket first as your gauge test. Before edging, it should measure 2.25 × 2.4 in (5.7 × 6.1 cm).
Checkpoints on the tree back:
– After Row 9: 3 in (7.6 cm) wide, 2 in (5.1 cm) tall
– After Row 10: 11 in (27.9 cm) wide
– After Row 27: 8 in (20.3 cm) wide; 6 in (15.2 cm) total height
– After Row 43: 5.5 in (14.0 cm) wide; 9.6 in (24.4 cm) total height
– After Row 69: 1 in (2.5 cm) wide; 15.3 in (38.9 cm) total height
If your pieces come out too big, go down one hook size. If they come out too small, go up one size. If only the height is off, check your tension on the turning chains before you change hooks.
Tree Back
Ch 1 at the start of each row does not count as a stitch. Each dec row is worked like this: ch 1, sc2tog, sc across to the last 2 sts, sc2tog. That takes 2 sts off the row.
Trunk
Foundation: Ch 13.
Row 1: Sc in the 2nd ch from the hook and in each ch across. Turn. (12 sc)
Rows 2–9: Ch 1, sc in each st across. Turn. (12 sc)
At the end of Row 9, do not turn. Ch 17.
Tier 1
Row 10: Sc in the 2nd ch from the hook and in the next 15 ch (16 sc). Sc in each of the 12 trunk sts (12 sc). Then work 16 fsc off the last st. Turn. (44 sts)
Row 11: Ch 1, sc across. Turn. (44)
Rows 12–27: Work a dec row on Rows 12, 15, 18, 21, 24 and 27. On every other row, ch 1 and sc across.
– The count is 42 after Row 12, 40 after Row 15, 38 after Row 18, 36 after Row 21 and 34 after Row 24.
– After Row 27 you have 32 sts.
At the end of Row 27, ch 4.
Tier 2
Row 28: Sc in the 2nd ch from the hook and in the next 2 ch (3 sc). Sc across the 32 sts. Work 3 fsc. Turn. (38 sts)
Rows 29–43: Work a dec row on every odd row (29, 31, 33, 35, 37, 39, 41, 43). Work even rows straight.
– The count is 36 after Row 29, 30 after Row 35 and 26 after Row 39.
– After Row 43 you have 22 sts.
At the end of Row 43, ch 5.
Tier 3
Row 44: Sc in the 2nd ch from the hook and in the next 3 ch (4 sc). Sc across the 22 sts. Work 4 fsc. Turn. (30 sts)
Rows 45–69: Work a dec row on every odd row and work even rows straight.
– The count is 28 after Row 45, 18 after Row 55 and 10 after Row 63.
– After Row 69 you have 4 sts.
Hanging Tab
Rows 70–85: Ch 1, sc in each st across. Turn. (4 sc)
The tab measures about 3.5 in (8.9 cm). Fasten off.
Center Line
Hold the yarn behind the work. Work surface sl sts up the center of the tree, between the 2 middle sts of each row, from Row 10 to Row 69. That is 1 sl st per row, 60 sl sts in total. Keep the sl sts loose so the fabric doesn’t pucker.
Pockets
Small Pocket (make 2)
Foundation: Ch 10.
Row 1: Sc in the 2nd ch from the hook and in each ch across. Turn. (9 sc)
Rows 2–11: Ch 1, sc across. Turn. (9)
The pocket should now measure 2.25 × 2.4 in (5.7 × 6.1 cm).
Edging Rnd 1: Sc around, working 3 sc into each of the 4 corner sts. Sl st to the first sc. Counts:
– Top and bottom: 13 sc each (9 sts plus 4 extra corner sc)
– Sides: 11 sc each, 1 per row-end
– Total: 48 sc
Edging Rnd 2 (top only): Rev sc across the 13 top sts. Fasten off and leave a 24 in (61.0 cm) tail.
The edged pocket measures 2.75 × 2.9 in (7.0 × 7.4 cm).
Large Pocket (make 1)
Foundation: Ch 37.
Row 1: Sc in the 2nd ch from the hook and across. Turn. (36 sc)
Rows 2–14: Ch 1, sc across. Turn. (36)
The pocket should now measure 9 × 3.1 in (22.9 × 7.9 cm).
Edging Rnd 1: Sc around with 3 sc in each corner st. Counts:
– Top and bottom: 40 sc each (36 sts plus 4 extra corner sc)
– Sides: 14 sc each
– Total: 108 sc
Edging Rnd 2 (top only): Rev sc across the 40 top sts. Leave a 36 in (91.4 cm) tail.
The edged pocket measures 9.5 × 3.6 in (24.1 × 9.1 cm).
Garland Cords
For each cord, ch 4, then work chb, ch 4 for the number of bobbles listed. Fasten off with 10 in (25.4 cm) tails. Each 4-ch section is about 1 in (2.5 cm) and each bobble adds about 0.25 in (0.6 cm).
- G1 (top): 3 bobbles, about 4.75 in (12.1 cm)
- G2 (middle): 5 bobbles, about 7.25 in (18.4 cm)
- G3 (lower): 7 bobbles, about 9.75 in (24.8 cm)
Make All Pieces
All pieces use sage green:
- 1 tree back with tab and center line
- 2 small pockets
- 1 large pocket
- 3 garland cords (G1, G2, G3)
Layout (front view, top to bottom):
            [ tab + ring ]
                 /\
           G1   /  \   Row ~63
           G2  /    \  Row ~55
           G3 /      \ Row ~47
        ------ Tier 2 ------
   [Small][gap][Small]  Rows 27–39
   ------ Tier 1 ------
   [   Large Pocket   ]  Rows 11–26
            [trunk]
Joining
Use the yarn tails and a tapestry needle. Whipstitch through the back loop of each pocket edge stitch and one strand of the matching tree stitch. Pin every piece in place before you sew.
Large Pocket
- Mark the center 32 sts of Row 11 (sts 7–38). This line spans 8 in (20.3 cm).
- Sew the 40-st bottom edge to those 32 sts. Sew 5 pocket sts to every 4 tree sts. The extra 1.5 in (3.8 cm) of width bows the pocket outward.
- Sew each side to the tree, going straight up from st 7 and st 38. Each side has 16 sts from corner to corner: the 14 row-end sc plus the side-facing sc of each corner group. Sew 1 pocket st to each tree row, covering Rows 11–26. The pocket’s top edge stays open.
Small Pockets
- On Row 27 (32 sts), place the pockets on sts 5–15 and sts 18–28. That leaves a 2-st gap of 0.5 in (1.3 cm) over the center line.
- Sew each 13-st bottom edge across its 11 tree sts, easing in the 2 extra stitches.
- Sew each side of 13 sts (11 row-end sc plus the 2 corner side sc) over 13 rows, so the top sits at Row 39. Row 39 has 26 sts, so 1 tree st stays clear outside each pocket.
Garlands
Tack the ends of each garland to the tree edges at its row. Tack the center to the center line 1.25 in (3.2 cm) above the ends, so each cord forms an inverted V that dips slightly between tacks.
Tension: Pull each whipstitch snug but not tight. The tree should still lie flat after sewing.
Size checkpoint: The tree back should still measure 11 × 15.3 in (27.9 × 38.9 cm). If it measures smaller, take the seams out and sew again more loosely.
Border
Border gauge:
– 4 sc per inch along stitch edges
– 4.5 sc per inch along row-ends (1 sc per row)
Join the yarn at the bottom right corner of the trunk.
Rnd 1: Sc around the whole tree outline. Work 3 sc into each outer corner stitch. At inner corners (where a tier meets the edge below it), work 1 sc with no increase or skip. The counts below include all corner groups.
Right side (going up):
– Trunk side: 9
– Tier 1 underside: 18 (16 sts + 2 extra corner sc)
– Tier 1 diagonal: 18 (Rows 10–27)
– Tier 2 underside: 5 (3 + 2)
– Tier 2 diagonal: 16 (Rows 28–43)
– Tier 3 underside: 6 (4 + 2)
– Tier 3 diagonal: 26 (Rows 44–69)
– Tab side: 16 (Rows 70–85)
– Right side total: 114
Tab top: 8 (4 sts + 4 extra corner sc)
Left side: 114, mirroring the right side
Trunk bottom: 16 (12 sts + 4 extra corner sc)
Total: 114 + 8 + 114 + 16 = 252 sc. Sl st to the first sc.
Rnd 2: Ch 1, rev sc in each sc around. (252) Join and fasten off.
Why the math works:
– Every sc row adds exactly 1 row-end, so the diagonal counts match the row counts exactly. That keeps both sides symmetrical.
– The 3-sc outer corners give the edge enough length to turn without cupping.
– Rev sc pulls the edge in very slightly. That balances the 4.5-per-inch row-end density against the 4-per-inch stitch gauge, so the edge lies flat.
Attach the ring: Fold the top 1.75 in (4.4 cm) of the tab to the back around the 3 in (7.6 cm) ring. Whipstitch the tab’s top edge to the back of its own base.
Final Blocking
- Spray the organizer until it is evenly damp, but not soaked.
- Lay it face up on the mat and pin the trunk corners first.
- Pin the tier tips so the piece measures 11.5 in (29.2 cm) across at the base of Tier 1.
- Pin the tip so the tree measures 15.8 in (40.1 cm) tall.
- Straighten each diagonal edge with pins every 1 in (2.5 cm).
- Stuff the large pocket lightly with a rolled towel so it dries rounded.
- Shape the bobbles with your fingertips.
- Let it dry completely before you unpin it.
Final Quality-Control Checklist
- Each tier’s stitch count matches: 44, 38 and 30 at the tier bases, and 4 at the tip.
- The tree is 11.5 × 15.8 in (29.2 × 40.1 cm).
- Border Rnd 1 has 252 sts and both sides mirror each other.
- The center line is straight and centered between the small pockets.
- The pocket tops are open, and the side seams are secure to the top corners.
- The garlands are symmetrical and their bobbles face forward.
- The ring is secure and the tree hangs straight.
- All ends are woven in on the back.
Troubleshooting
- Diagonal edges look jagged: Work the sc2tog into the edge stitches, not one stitch in from the edge.
- Tiers are different on each side: Count the fsc. The fsc side must match the chain side exactly.
- Bobbles lie flat: Push them to the right side, or use 5 dc in each bobble instead of 4.
- Border ruffles: Skip 1 row-end every 9 rows along the diagonals, and do the same on the matching side.
- Border cups: Go up one hook size for Rnd 2.
- Organizer tilts on the wall: Recenter the tab fold on the ring and restitch it.
- Large pocket sags: Tack its center to the tree at Row 18.
Care
Hand wash in cool water and press out the water in a towel. Dry flat, then reshape the pocket while it is still damp.
Final Notes
Here is the full measurement chain:
- Gauge is 16 sc × 18 rows = 4 in (10.2 cm).
- The trunk is 3 in (7.6 cm), and the Tier 1 base is 11 in (27.9 cm).
- The tree back before the border is 11 × 15.3 in (27.9 × 38.9 cm).
- The 252-st border, 0.25 in (0.6 cm) deep, brings it to 11.5 × 15.8 in (29.2 × 40.1 cm).
The pockets fit their rows because each pocket’s edge-stitch count matches the tree rows and stitches it is sewn to. If you check your gauge on the first small pocket, the rest of the measurements will come out as listed.
Happy crocheting!