

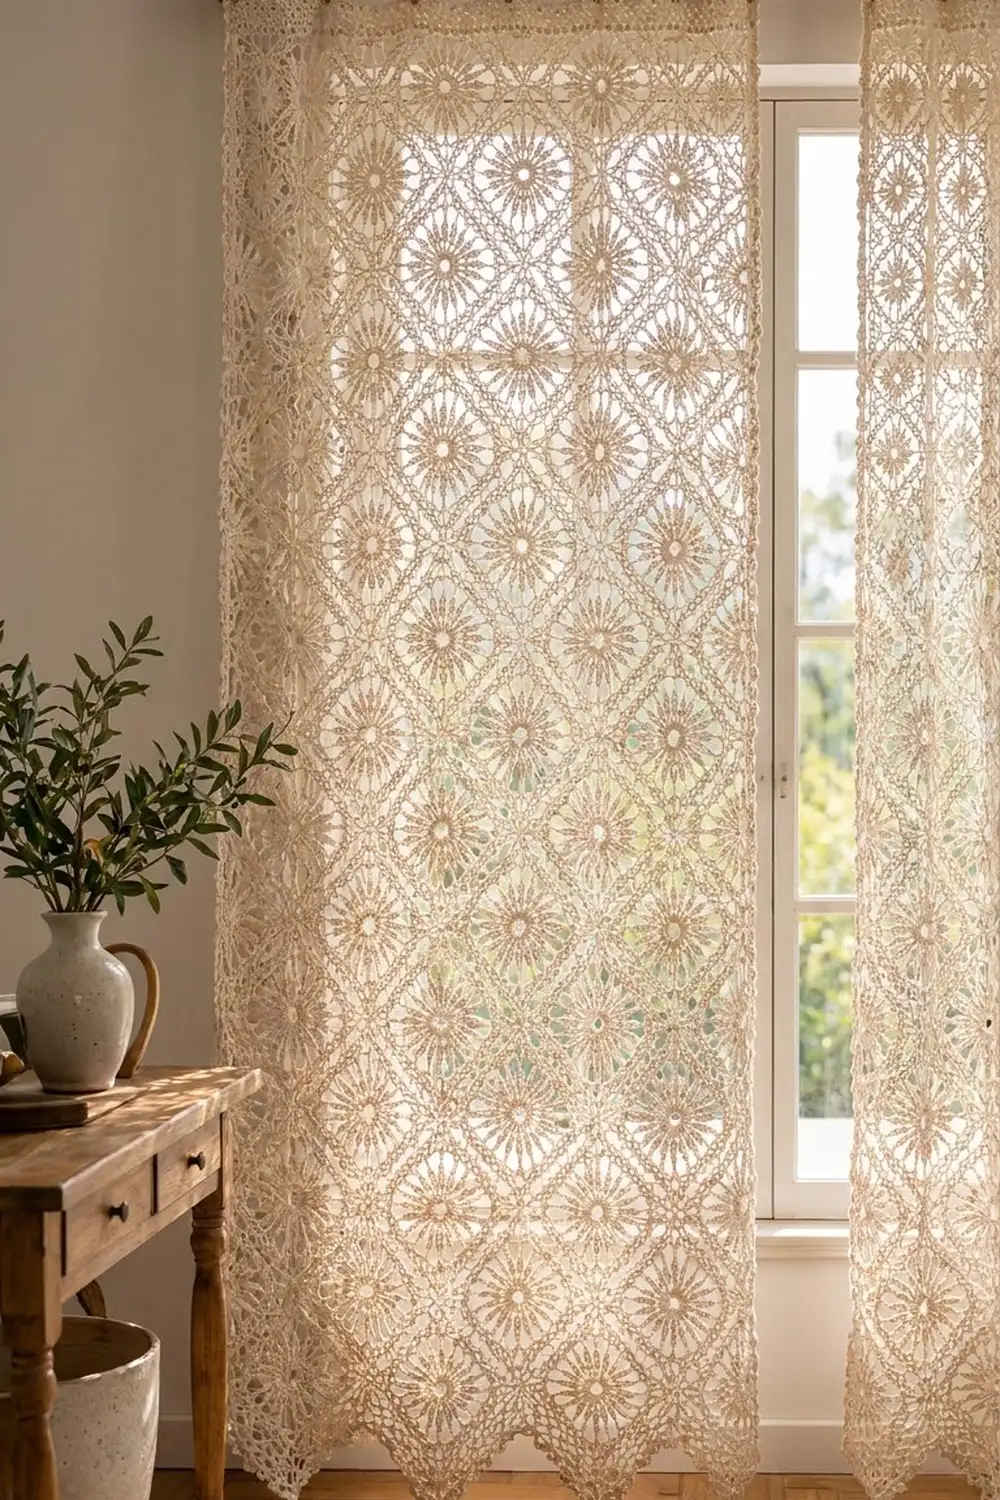
This curtain panel is made of airy square motifs set on point, so each square reads as a diamond with a sunburst inside. Sixteen tall spokes radiate from a small open center. A solid frame and a lacy loop edge surround each sunburst, and the bottom of the panel ends in five crisp zigzag points.
The panel is worked in a single natural ecru cotton thread. That keeps it soft and timeless, and lets daylight show off the open mesh between motifs. The style is classic farmhouse lace: simple to look at, easy to hang on clip rings, and pretty from both sides.
This pattern uses US crochet terms. One finished panel measures 30.75 in wide x 75.75 in long (78.1 x 192.4 cm) to the bottom points. For a pair like the one in the photo, make two identical panels.
You’ll make full square motifs and half-square triangles and join them as you go in the last round. Then you’ll add a two-round border with sc and picots around the whole panel.
Finished Size and Construction
- Finished size: 30.75 x 75.75 in (78.1 x 192.4 cm), measured to the bottom points
- Skill level: Intermediate
- Terminology: US
- Yarn weight: Size 3 mercerized cotton crochet thread (light fingering)
- Hook: 2.25 mm (US B-1)
- Number of pieces: 108 full square motifs + 29 half-square triangles = 137 pieces
- Layout: squares on point; 5 diamonds across, 25 staggered rows
- Motif size: 4.25 in (10.8 cm) per side; 6 in (15.2 cm) point to point
- Size before border: 30 x 75 in (76.2 x 190.5 cm)
- Border depth: 0.375 in (1.0 cm)
Materials
Choose a smooth, tightly plied mercerized cotton for crisp stitch definition and good drape. This pattern assumes about 125 m per 50 g (roughly 2.5 m per gram).
- Ecru / natural: 850 g, about 2,125 m (17 balls of 50 g)
Quantities include a margin of about 15%. One full motif uses about 5.5 g (14 m) and one half-triangle about 3 g (7.5 m). The border uses about 35 g (88 m).
Tools:
– 2.25 mm (US B-1) crochet hook
– Tapestry needle
– Locking stitch markers
– Rust-proof pins and a large blocking surface
– Spray bottle or steamer
– Measuring tape
– 10–12 clip curtain rings for hanging
Abbreviations (US Terms)
- ch – chain
- sl st – slip stitch
- sc – single crochet
- dc – double crochet
- tr – treble crochet
- sc2tog – single crochet 2 together
- sk – skip
- sp(s) – space(s)
- MR – magic ring
- beg – beginning
Picot: ch 3, sl st in 3rd ch from hook.
Join-loop: in place of a ch-3 loop, work ch 1, sl st in the matching loop of the neighboring piece, ch 1.
Gauge and Checkpoints
Make one full motif and block it before you start the panel. Gauge matters more than usual here, because a tiny error repeats across 25 rows.
- After Round 2: 2 in (5.1 cm) across
- After Round 4: 3.25 in (8.3 cm) per side
- After Round 5: 3.75 in (9.5 cm) per side
- After Round 6 (blocked): 4.25 in (10.8 cm) per side, 6 in (15.2 cm) point to point
Too big: go down to a 2.0 mm (US 4 steel) hook. Too small: go up to a 2.5 mm hook. If only the side length is off but the diagonal is right, check that your corners have exactly 3 ch in Round 4 and 2 ch in Round 5.
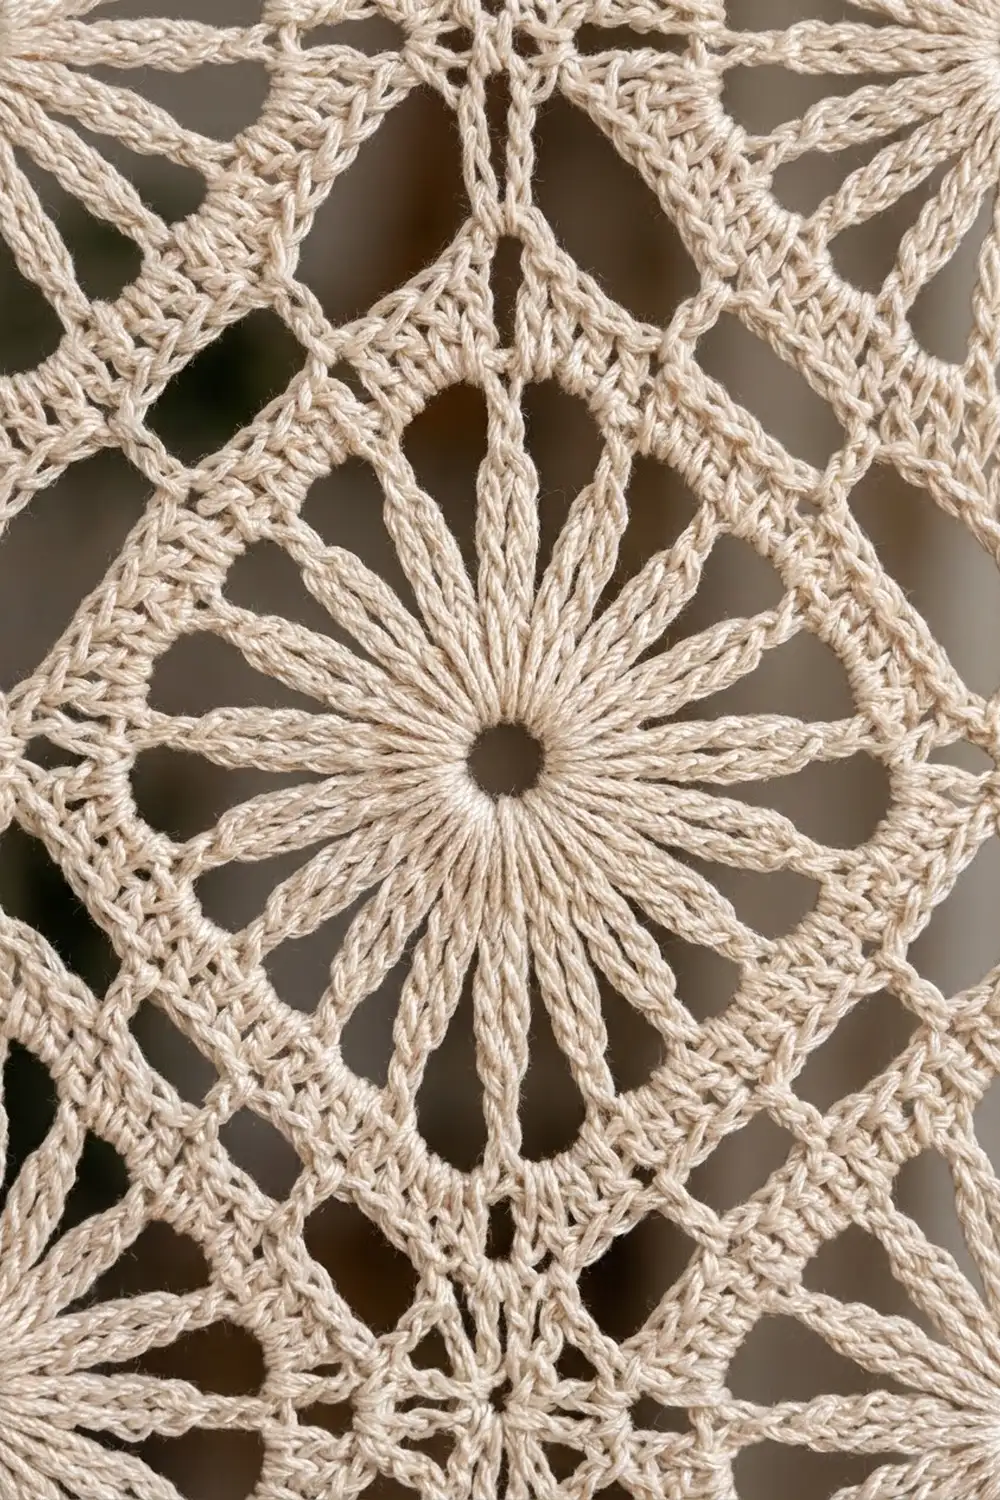
Full Square Motif (make 108)
Round 1: MR, ch 1, 16 sc in ring, sl st to first sc. Pull the ring nearly closed, leaving a small center hole. (16 sc)
Round 2: Ch 6 (counts as tr + ch 2), [tr in next sc, ch 2] 15 times, sl st in 4th ch of beg ch-6. (16 tr spokes, 16 ch-2 sps)
Round 3: Sl st in first ch-2 sp, ch 1, sc in same sp, ch 4, [sc in next ch-2 sp, ch 4] 15 times, sl st to first sc. (16 sc, 16 ch-4 loops)
Round 4 (squaring round): Sl st in first ch-4 loop, ch 3 (counts as dc), (2 dc, ch 3, 3 dc) in same loop for the corner. *[3 dc in next ch-4 loop] 3 times, (3 dc, ch 3, 3 dc) in next loop; repeat from * 2 more times. [3 dc in next loop] 3 times, sl st to top of beg ch-3.
(60 dc: 15 dc per side, 4 corner ch-3 sps)
Round 5: Sl st in next 2 dc and into the corner sp. Ch 3 (counts as dc), (dc, ch 2, 2 dc) in same sp. *Dc in next 15 dc, (2 dc, ch 2, 2 dc) in next corner sp; repeat from * 2 more times. Dc in next 15 dc, sl st to top of beg ch-3.
(76 dc: 19 dc per side between the corner ch-2 sps, plus 4 corner ch-2 sps)
Round 6 (lace edge): Sl st in next dc and into the corner sp. Ch 1, (sc, ch 3, sc) in corner sp. *Ch 3, sk next dc, [sc in next dc, ch 3, sk next dc] 9 times, (sc, ch 3, sc) in next corner sp; repeat from * around, omitting the last corner on the final repeat. Sl st to first sc. Fasten off.
(Per side: 10 ch-3 loops, plus 1 corner ch-3 loop at each corner)
For the first motif only, work Round 6 as written. Every later motif is joined during Round 6 (see Joining).
Half-Square Triangle (make 29)
The triangle is half a square cut corner to corner. Its two short sides (legs) match a motif side exactly, and its long side (hypotenuse) forms the panel edge. It is worked in rows. Turn at the end of each row.
Row 1: MR, ch 1, 9 sc in ring. Do not join. (9 sc)
Row 2: Ch 6 (counts as tr + ch 2), [tr in next sc, ch 2] 7 times, tr in last sc. (9 tr, 8 ch-2 sps)
Row 3: Ch 1, sc in first tr, ch 2, [sc in next ch-2 sp, ch 4] 7 times, sc in last ch-2 sp, ch 2, sc in 4th ch of beg ch-6. (7 ch-4 loops, plus 1 ch-2 half-loop at each end)
Row 4: Ch 3 (counts as dc), 2 dc in first ch-2 sp, [3 dc in next ch-4 loop] 3 times, (3 dc, ch 3, 3 dc) in next loop for the apex, [3 dc in next loop] 3 times, 3 dc in last ch-2 sp. Leave the final sc unworked. (30 dc: 15 per leg)
Row 5: Ch 3 (counts as dc), 2 dc in first dc, dc in next 14 dc, (2 dc, ch 2, 2 dc) in apex sp, dc in next 14 dc, 3 dc in top of turning ch. (38 dc: 19 per leg)
Row 6: Ch 1, sc in first dc, [ch 3, sk next dc, sc in next dc] 9 times, ch 3, (sc, ch 3, sc) in apex sp, ch 3, sc in next dc, [ch 3, sk next dc, sc in next dc] 9 times. Fasten off. (10 ch-3 loops per leg, plus 1 apex loop)
Checkpoint: the blocked hypotenuse is 6 in (15.2 cm), each leg is 4.25 in (10.8 cm), and the height from hypotenuse to apex is 3 in (7.6 cm).
Make All Pieces
Everything is ecru. Make:
– 108 full motifs (D): 60 for the five-across rows and 48 for the four-across rows
– 5 top triangles (T): hypotenuse along the top edge, apex pointing down
– 24 side triangles (S): 12 per side, hypotenuse along the side edge, apex pointing inward
Layout, top to bottom:
Row 1:      T   T   T   T   T
Row 2:    S   D   D   D   D   S
Row 3:      D   D   D   D   D
Rows 4-25: repeat Rows 2-3 eleven more times
           (Row 25 is a five-diamond row; its
            bottom points form the zigzag edge)
That gives 12 four-diamond rows (48 D + 24 S) and 12 five-diamond rows (60 D). Each row sits half a diamond lower than the row above it.
Joining
Join each new piece during its final round or row. Wherever that piece’s edge lies next to an already-finished piece, replace each ch-3 loop with a join-loop. Join loop to loop: loop 1 to loop 1, through loop 10 to loop 10. Every motif side and every triangle leg has exactly 10 loops, so the edges always match one to one and no stitches are added at seams.
Corners: replace the corner ch-3 with ch 1, sl st into the neighbor’s corner loop, ch 1. Where four corners meet, sl st into the same sl st made by the first join, so all corners share one point.
Triangle ends: where a diamond’s top or side corner touches the hypotenuse ends of two triangles, work ch 1, sl st in the end sc of the first triangle, sl st in the end sc of the second triangle, ch 1.
Order: make the 5 top triangles first; they connect only through the diamonds below them. Work Row 2 left to right. Each diamond joins its upper-left and upper-right sides to the triangles above, plus its left side to the piece before it. Continue down the panel, joining each piece to every neighbor that’s already in place.
Tension: keep each join-loop’s chains the same size as a regular ch-3. If the joins are tight, the panel pulls narrower and puckers. If they’re loose, the diagonal mesh lines sag.
Checkpoint: after Rows 1–3, the panel is 30 in (76.2 cm) wide and 9 in (22.9 cm) deep from the top edge to the bottom points of Row 3. Before the border, the full panel measures 30 x 75 in (76.2 x 190.5 cm): 72 in (182.9 cm) of straight side plus 3 in (7.6 cm) of zigzag points.
Border
Border gauge: 6 sc per inch (2.4 sc per cm) along the straight edges.
Hypotenuse allocation: each triangle’s long edge gets 36 sc, 18 per half. Working from a hypotenuse end toward the center, place 1 sc in the Row 6 end, 3 in the Row 5 end, 3 in Row 4, 3 in Row 3, 5 around the Row 2 tr, and 3 over the Row 1 end and ring. Mirror this on the second half.
Round 1: With the right side facing, join at the top-left corner. Ch 1.
– Top: 36 sc across each of the 5 T triangles = 180 sc. Ch 2 for the corner.
– Right side: 36 sc across each of the 12 S triangles = 432 sc.
– Bottom-right transition: 2 sc in the corner loop of the last diamond.
– Each zigzag side (10 total): [2 sc in next loop, 3 sc in next loop] 5 times = 25 sc.
– Each bottom point (5 total): (2 sc, ch 3, 2 sc) in the corner loop.
– Each notch (4 total): sc2tog, with the first leg in this diamond’s corner loop and the second in the next diamond’s corner loop.
– Bottom-left transition: 2 sc in the corner loop of the first diamond.
– Left side: 432 sc. Ch 2 for the corner. Sl st to first sc.
Bottom total: 250 + 20 + 4 + 4 = 278 sc, plus 5 ch-3 sps. Round 1 total: 1,322 sc, 2 corner ch-2 sps, 5 point ch-3 sps.
Round 2: Ch 1.
– Top: [sc in next 2 sc, picot, sc in next sc] 60 times. (180 sc, 60 picots)
– Each top corner: (sc, picot, sc) in the ch-2 sp.
– Sides: [sc in next 2 sc, picot, sc in next sc] 144 times on each side. (432 sc, 144 picots)
– Transitions: sc in each of the 2 sc.
– Each zigzag side: [sc in next 2 sc, picot, sc in next sc] 8 times, sc in next sc. (25 sc, 8 picots)
– Each point: sc in next 2 sc, (2 sc, picot, 2 sc) in ch-3 sp, sc in next 2 sc.
– Each notch: sl st in the sc2tog.
Sl st to first sc and fasten off.
Why the math works: every straight edge is made of hypotenuses, each worked in exactly 36 sc. The top is 5 x 36 = 180 and each side is 12 x 36 = 432. Both are divisible by 3, so the picots repeat evenly and land at the same spot on every triangle. The 36 sc over 6 in (15.2 cm) and 432 sc over 72 in (182.9 cm) both match the 6 sc per inch gauge. The 25 sc on each zigzag side over 4.25 in (10.8 cm) is about 5.9 per inch, close enough to lie flat without ruffling.
Final Blocking
- Weave in all ends securely along dc rows, not through the open mesh.
- Soak the panel in cool water for 15 minutes and press out the water in towels. Don’t wring it.
- Lay it flat on a blocking surface and pin the top edge straight to 30.75 in (78.1 cm).
- Pin both sides straight to the full length, then pin each of the 5 bottom points to 75.75 in (192.4 cm) from the top edge.
- Pin a few motif centers and corners so the diagonal mesh lines run straight.
- Let it dry completely before unpinning. Then steam the picot edge lightly if needed.
Final Quality-Control Checklist
- All 108 motifs and 29 triangles are joined; no corner points are left loose.
- Every seam is joined loop to loop, 10 loops per edge.
- The top edge is straight and measures 30.75 in (78.1 cm).
- The sides are straight and equal in length.
- All 5 bottom points sit at the same level.
- Picots are evenly spaced, with no ruffling or cupping.
- All ends are woven in and invisible from both sides.
Troubleshooting
- Motif cups: your Round 2 spokes are too short. Loosen the tr or add a yarn-over to the ch-6 start.
- Motif ruffles: the ch-4 loops in Round 3 are too long. Tighten your chains.
- Seams don’t line up: count the loops on both edges. Each must have 10.
- Side edge waves: you have too many sc per triangle. Recount to exactly 36.
- Points curl: block them firmly and check the (2 sc, ch 3, 2 sc) point groups.
- Panel is narrower than 30 in (76.2 cm): the join-loops are too tight. Re-block with more stretch across the width.
Care
Hand wash in cool water with a mild detergent and dry flat, reshaping the points. Avoid hanging the panel to dry wet, because the weight will stretch it lengthwise.
Final Notes
The measurement chain is simple. Round 2 is 2 in (5.1 cm) across. The finished motif is 4.25 in (10.8 cm) per side and 6 in (15.2 cm) point to point. Five points across give 30 in (76.2 cm), and 25 half-diamond rows give 75 in (190.5 cm). The border adds 0.375 in (1.0 cm) on each edge, for a finished panel of 30.75 x 75.75 in (78.1 x 192.4 cm). Check each link as you go and the panel will hang straight and even.
Happy crocheting!