

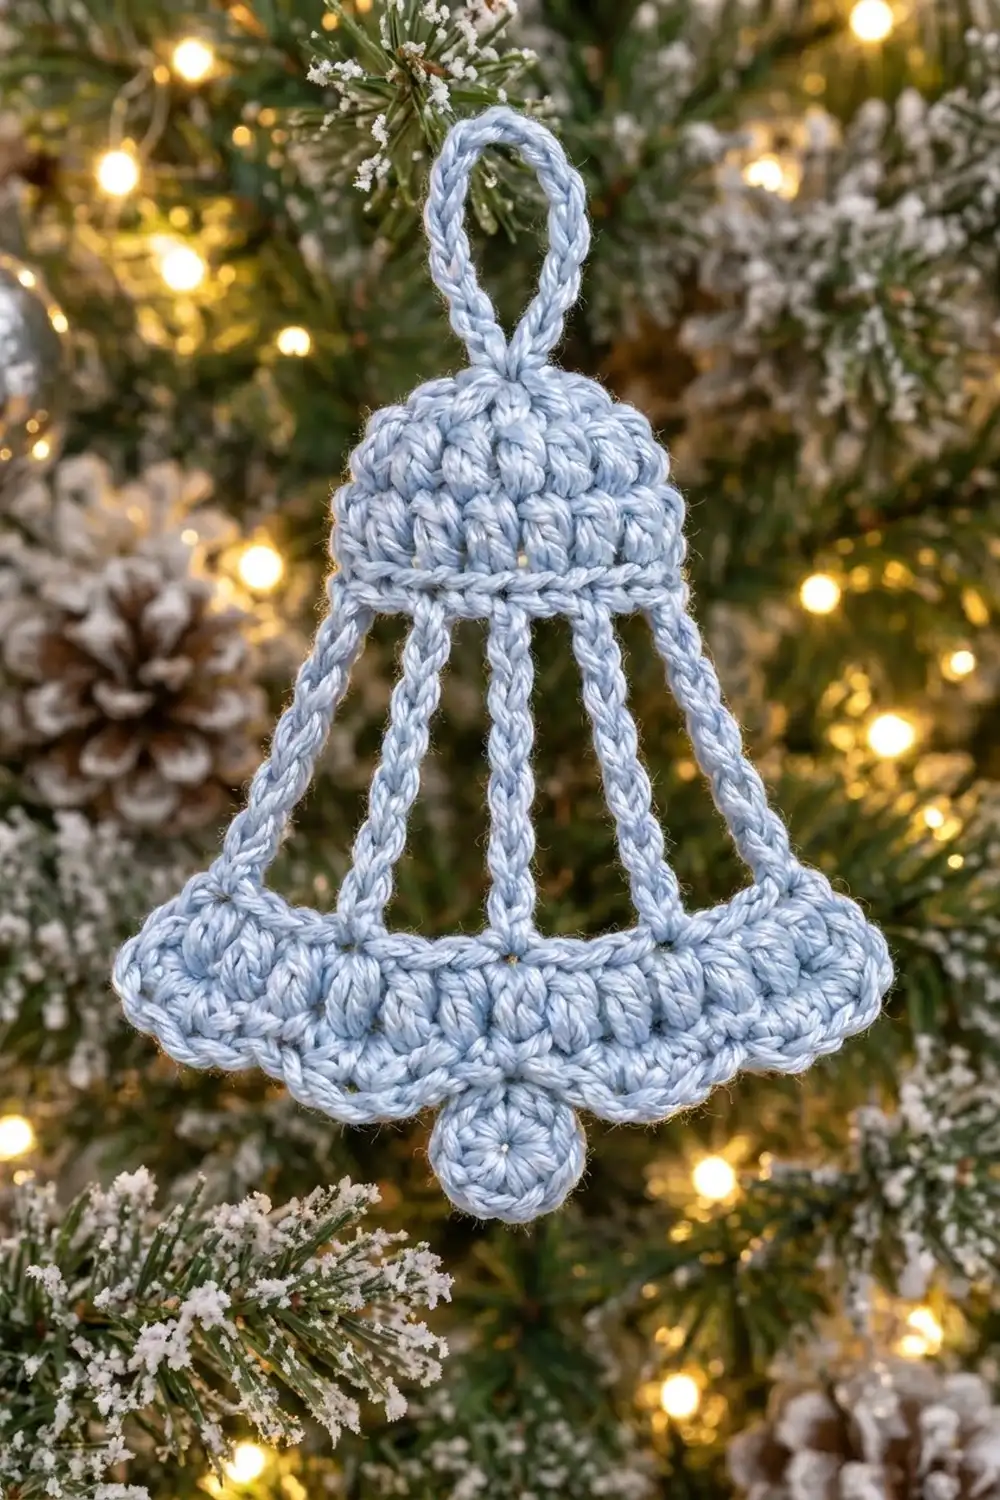
This bell ornament has a solid, textured crown, an open lattice of corded struts, and a flared hem with puff stitches and soft scallops. A small round clapper hangs from the center of the hem. Worked in one pale powder blue, it looks frosty and delicate against green branches and warm tree lights.
The design is a flat ornament worked in one piece. You don’t sew on any parts: the struts, the hem, the scalloped edge, the clapper, and the hanging loop all grow from the same piece of crochet. The finished bell is about 4.5 in (11.4 cm) wide and 5 in (12.7 cm) tall, and the hanging loop adds about 1.25 in (3.2 cm), for an overall height of about 6.25 in (15.9 cm).
The pattern uses US crochet terms throughout.
Here’s the construction in brief. You work the crown in rows from the top down, increasing at both edges. Next you make five slip-stitch cords that hang from the crown’s base, then work the hem band across their tips. A scalloped edge around the hem, with the clapper made right in the middle of it, and a corded hanging loop finish the piece.
Finished Size and Construction
- Finished size: 4.5 in (11.4 cm) wide × 5 in (12.7 cm) tall, plus a 1.25 in (3.2 cm) loop
- Skill level: Easy-intermediate
- Terminology: US crochet terms
- Yarn weight: #3 light / DK cotton
- Hook: 3.5 mm (E-4)
- Number of pieces: 1 (the clapper is worked in during the border)
- Layout: Single ornament with no joining
- Crown size: 2.2 in (5.6 cm) wide × 1.75 in (4.4 cm) tall
- Size before border: 4.2 in (10.7 cm) wide × 4.1 in (10.4 cm) tall
- Border depth: 0.4 in (1.0 cm) of scallops, with the clapper hanging 0.5 in (1.3 cm) below them
Materials
Yarn: Use a smooth, tightly plied cotton or cotton blend in #3 weight. Cotton shows the puff stitches clearly, keeps the struts crisp, and blocks flat. Fuzzy or very splitty yarns blur the lattice.
- Pale powder blue: 15 g / 38 m (42 yd)
The quantity includes a comfortable margin. One bell uses about 10 g.
Tools:
– 3.5 mm (E-4) crochet hook
– Tapestry needle
– Scissors
– Stitch markers (2–3)
– Blocking mat and rust-proof pins
– Spray bottle with water
– Optional: diluted fabric stiffener or spray starch
Abbreviations (US Terms)
- ch – chain
- sl st – slip stitch
- sc – single crochet
- dc – double crochet
- sk – skip
- st(s) – stitch(es)
- sp – space
- RS / WS – right side / wrong side
- yo – yarn over
Special stitch – puff: (Yo, insert hook in the stitch, yo and pull up a loop to dc height) 3 times; you now have 7 loops on the hook. Yo and pull through all 7 loops. One puff counts as 1 stitch.
Scallop: Sk 1 st, 5 dc in next st, sk 1 st, sl st in next st. Each scallop uses 4 stitches.
Gauge and Checkpoints
Gauge: 20 dc and 10 dc rows = 4 in (10.2 cm). That works out to 5 sts per inch, and each dc row is about 0.4 in (1.0 cm) tall.
Since the whole ornament is one piece, your first bell is your test piece. Check it at these points:
- After crown Row 4: 11 dc measure 2.2 in (5.6 cm) across.
- After crown Row 5: The crown measures 2.2 in (5.6 cm) wide × 1.75 in (4.4 cm) tall.
- After Row 7: The hem base measures 3.8 in (9.7 cm) across when gently straightened.
- After Row 10: The hem measures 4.2 in (10.7 cm) wide and 1.1 in (2.8 cm) deep.
- After the border: The bell measures 4.5 in (11.4 cm) × 5 in (12.7 cm).
If your bell is too big, go down half a hook size (3.25 mm). If it’s too small, go up to 3.75 mm. Changing the hook keeps every stitch count the same. Don’t try to fix the size by adding or removing stitches.
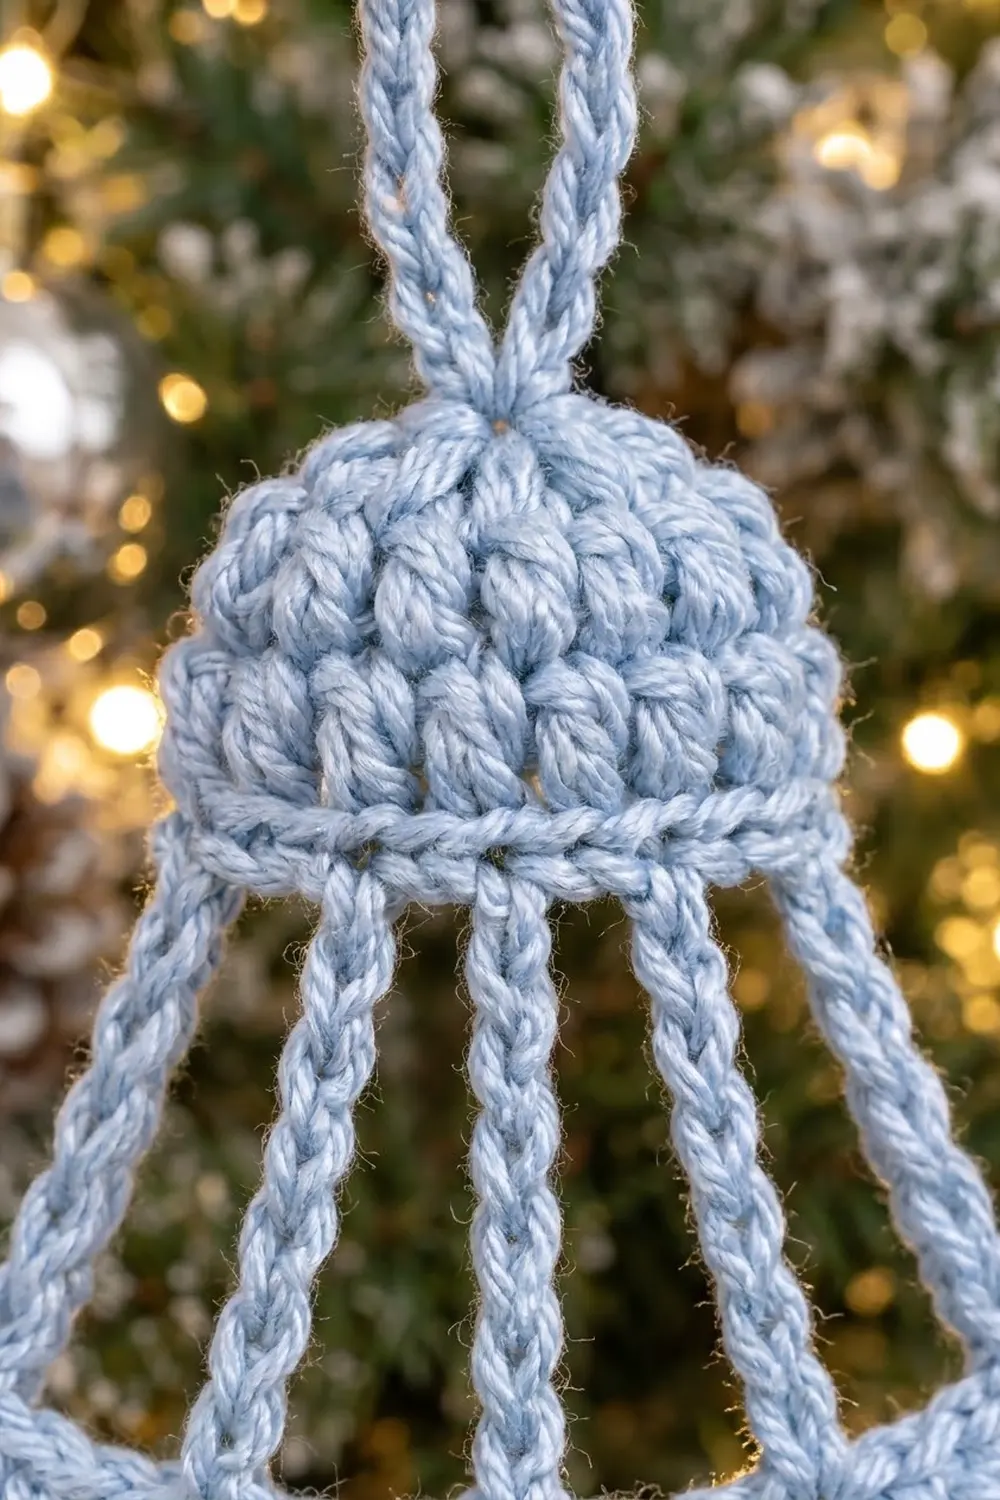
Crown
The crown is worked in rows from the top edge down. Turning chains do not count as stitches.
Row 1 (RS): Ch 6, sc in 2nd ch from hook and in each ch across. (5 sc)
Row 2 (WS): Ch 2, turn. 2 dc in first st, dc in next 3 sts, 2 dc in last st. (7 dc)
Row 3 (RS): Ch 2, turn. 2 dc in first st, dc in next 5 sts, 2 dc in last st. (9 dc)
Row 4 (WS): Ch 2, turn. 2 dc in first st, dc in next 7 sts, 2 dc in last st. (11 dc)
Checkpoint: 2.2 in (5.6 cm) wide.
Row 5 (RS): Ch 1, turn. Sc in each st across. (11 sc)
This sc row is the firm base line for the struts. Number the stitches 1–11 in your head, starting from the stitch you just worked, which is st 11.
Checkpoint: the crown measures 2.2 in (5.6 cm) × 1.75 in (4.4 cm).
Lattice Struts
Each strut is a chain with slip stitches worked back along it. This makes a firm, rounded cord.
Row 6 (strut row): Turn so the WS faces you. Your hook is in st 11.
- Strut 1: Ch 11. Sl st in 2nd ch from hook and in each of the next 9 ch (10 sl st). Sl st again in st 11 of Row 5. The ch you skipped is the strut’s tip.
- Sl st in the next 2 sc, which brings you to st 9. Strut 2: Repeat the strut instructions, anchoring in st 9.
- Sl st in the next 3 sc (st 6, the center stitch). Strut 3: Repeat the strut.
- Sl st in the next 3 sc (st 3). Strut 4: Repeat the strut.
- Sl st in the next 2 sc (st 1). Strut 5: Repeat the strut.
Fasten off.
(5 struts of 10 sl st each, plus 1 tip ch each.)
The struts sit at stitches 1, 3, 6, 9, and 11, so the gaps between them are 2, 3, 3, and 2 stitches. That spacing is symmetric around the center stitch, st 6. The slip stitches worked along the top of Row 5 also form the raised ridge line below the crown.
Each strut is about 1.5 in (3.8 cm) long. Lay the piece flat with the struts hanging straight and untwisted before you start the hem.
Hem Band
Row 7 (RS): With the RS facing, join yarn with a sc in the tip of the outer strut on your right. Then work:
- ch 3, sc in tip of next strut
- ch 4, sc in tip of next strut
- ch 4, sc in tip of next strut
- ch 3, sc in tip of last strut
(5 sc + 14 ch = 19 sts)
The chains between the strut tips (3, 4, 4, 3) make the hem wider than the crown, so the struts angle outward and the bell flares. Checkpoint: 3.8 in (9.7 cm) across.
Row 8 (WS, growth row): Ch 1, turn. 2 sc in first sc. Sc in each ch and sc across to the last st. 2 sc in last sc. (21 sc)
Work into the chains themselves, not into the spaces, so the hem stays solid.
Row 9 (RS, puff row): Ch 2, turn. Puff in first st. Ch 1, sk 1 st, puff in next st; repeat from * across. (11 puffs + 10 ch-1 sps = 21 sts)*
Row 10 (WS): Ch 1, turn. Sc in each puff and in each ch-1 sp across. (21 sc)
This is a conversion row: 11 sc go into the puffs and 10 sc go into the ch-1 spaces, for 21 sc. That matches Row 9’s count.
Fasten off.
Checkpoint: the bell measures 4.2 in (10.7 cm) wide × 4.1 in (10.4 cm) tall.
Border: Scallops and Clapper
Border gauge: One scallop covers 4 stitches, which is 0.8 in (2.0 cm), and stands 0.4 in (1.0 cm) deep.
The border is worked in one continuous pass with the RS facing. It starts at the top right corner of the hem, goes down the right edge, across the bottom, and up the left edge.
Right side edge: Join yarn with a sl st in the side of Row 7 at the right edge. Work 5 dc around the end post of Row 9. Sl st in the first sc of Row 10 (st 1). (1 side scallop)
Bottom edge:
- Scallop A: Sk st 2, 5 dc in st 3, sk st 4, sl st in st 5.
- Scallop B: 5 dc in st 7, sl st in st 9, skipping sts 6 and 8.
- Scallop C with clapper: Sk st 10. Work 3 dc in st 11. Then make the clapper:
- Ch 6, sl st in 4th ch from hook to form a ring. This leaves a 2-ch stem.
- Ch 3 (counts as 1 dc), 11 dc in the ring, sl st to top of ch-3. (12 dc)
- Sl st in each of the 2 stem chains.
- Work 2 more dc in st 11, so st 11 holds 5 dc in total. Sk st 12, sl st in st 13.
- Scallop D: 5 dc in st 15, sl st in st 17.
- Scallop E: 5 dc in st 19, sl st in st 21.
Left side edge: Work 5 dc around the end post of Row 9 on the left edge. Sl st in the side of Row 7.
Fasten off.
(7 scallops of 5 dc each = 35 dc, plus the 12-dc clapper.)
Why the math works: The bottom edge has 21 sts. That’s 1 starting sl st plus 5 scallops of 4 stitches each (1 + 20 = 21). The edge begins and ends on a slip stitch, and the middle scallop falls exactly on st 11, the center of 21. So the clapper hangs directly below the center strut at st 6 of the crown. Each side edge gets exactly one scallop, worked around the tallest row end (the Row 9 puffs). That keeps the scallops at the corners the same size as the ones along the bottom.
The scallops add about 0.15 in (0.4 cm) at each side, which brings the width to 4.5 in (11.4 cm). The clapper disk is 0.75 in (1.9 cm) across and hangs 0.5 in (1.3 cm) below the scallops.
Hanging Loop
With the RS facing, join yarn with a sl st in st 3 of Row 1 (the center of the top edge). Ch 22. Give the chain one half twist so the base crosses over itself, then sl st in the same st. Sl st in each of the 22 ch around the loop, then sl st into the base again.
Fasten off. The loop stands about 1.25 in (3.2 cm) tall. Weave in all ends along the struts or inside the solid rows.
Final Blocking
- Mist the bell evenly until it’s damp but not dripping.
- Lay it RS up on the blocking mat.
- Pin the crown’s top edge at 2.2 in (5.6 cm) wide. Gently round the shoulders into a dome.
- Pin the hem at 4.2 in (10.7 cm) across Row 10, keeping it centered under the crown.
- Straighten each strut with a pin at its top and bottom. Check that the four windows are mirror images.
- Pin the peak of each scallop outward, with the clapper hanging straight down.
- Pin the loop upright.
- If you want a crisper finish, dab on diluted stiffener or starch.
- Leave it to dry completely, at least 6 hours, before unpinning.
Final Quality-Control Checklist
- [ ] The crown has 11 sc across its base and measures 2.2 in (5.6 cm).
- [ ] Five struts sit at sts 1, 3, 6, 9, and 11, with none twisted.
- [ ] Rows 8 and 10 each have 21 stitches.
- [ ] There are 11 puffs, all evenly sized.
- [ ] There are 7 scallops: 5 along the bottom and 1 at each side.
- [ ] The clapper is centered below the middle strut.
- [ ] The bell measures 4.5 in (11.4 cm) × 5 in (12.7 cm).
- [ ] All ends are hidden and the loop is secure.
Troubleshooting
The struts look slack or wavy. Your slip stitches are too loose. Work them on a hook 0.5 mm smaller, or snug each one down.
The hem cups or ruffles. Check that Row 7 has 3-4-4-3 chains and that Row 8 has exactly 21 sc.
The clapper sits off-center. You’ve lost a stitch somewhere in Row 10. Count to 21 and redo the border.
The puffs lean or look flat. Pull each loop up to full dc height before the final yo.
The crown edges are jagged. Work the 2-dc increases right into the edge stitches, then shape the dome during blocking.
The windows are uneven. Re-pin the struts while they’re damp. A gentle stretch evens them out.
Care
Hand wash in cool water, press out the water in a towel, and re-block flat to dry. Store the bell flat or hanging so the struts don’t crease.
Final Notes
Every measurement leads to the next one:
- The 11-stitch crown measures 2.2 in (5.6 cm).
- Five 1.5 in (3.8 cm) struts drop to a 19-stitch hem base of 3.8 in (9.7 cm).
- The hem grows to 21 stitches, or 4.2 in (10.7 cm).
- Seven scallops bring the bell to its finished 4.5 in (11.4 cm) × 5 in (12.7 cm).
If your gauge and the counts at each checkpoint match, the shape will take care of itself. Once your first bell is right, the rest come quickly.
Happy crocheting!