

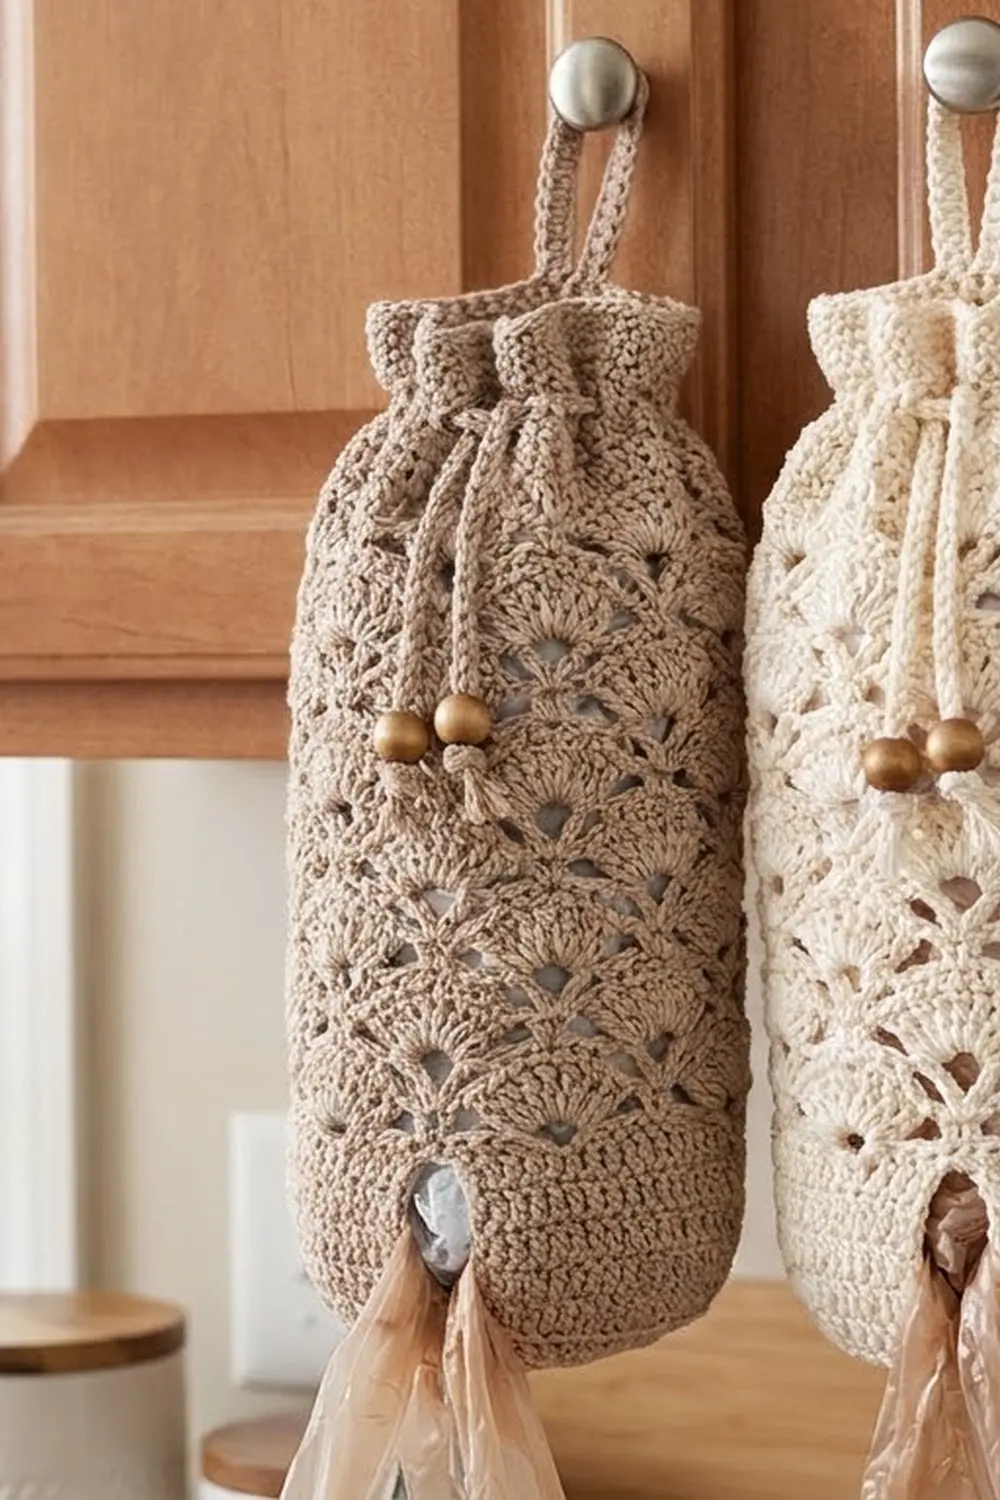
This grocery bag holder is a slim, lacy tube that hangs from a cabinet knob or hook. You stuff plastic bags in at the top and pull them out one at a time through the narrow bottom opening. The body is an allover fan-and-lattice stitch: rows of rounded 9-dc fans sit in a net of chain spaces, so the fabric reads as offset seashells framed by diamond-shaped openings.
The sample uses one warm beige/taupe cotton. A cream version looks just as good and suits a white or farmhouse kitchen. A chain drawstring with wooden beads gathers the top shut, and a sturdy single-crochet loop hangs above it.
The pattern uses US crochet terms. The finished holder is 12 in (30.5 cm) around, 6 in (15.2 cm) wide when flattened, and 18 in (45.7 cm) long before the top is gathered.
You make one flat lace panel in rows, then seam it lengthwise into a tube. Next you work a single-crochet band in rounds at each end: a narrowing band at the bottom and an eyelet band at the top. To finish, you add a hanging strap and a beaded drawstring.
Finished Size and Construction
- Finished size: 12 in (30.5 cm) around; 6 in (15.2 cm) flat width; 18 in (45.7 cm) long
- Skill level: Intermediate
- Terminology: US crochet terms
- Yarn weight: Worsted (#4) cotton or cotton blend
- Hook: 5.0 mm (H-8)
- Number of pieces: 1 main body panel, plus 1 strap and 1 drawstring
- Layout: one rectangle seamed into a tube; rows run up the length of the holder
- Panel size: 12 in x 15 in (30.5 cm x 38.1 cm)
- Size before bands: 12 in (30.5 cm) around x 15 in (38.1 cm) long
- Band depth: top band 1.75 in (4.4 cm); bottom band 1.25 in (3.2 cm)
Materials
Yarn: Use a smooth, mercerized or matte worsted cotton. Cotton holds the fan shapes, doesn’t stretch much under the weight of the bags, and can be washed. Avoid fuzzy or very stretchy acrylic, which lets the tube sag.
- Beige/taupe (main color): 150 g, about 285 m
The amount includes a margin of about 25% for your gauge swatch, the seam, and the drawstring.
Tools:
- 5.0 mm (H-8) crochet hook
- 4 wooden beads, about 16–20 mm, with holes at least 6 mm wide
- Tapestry needle
- 2 locking stitch markers
- Scissors
- Rust-proof pins and a spray bottle for blocking
- A rolled towel, about 6 in (15.2 cm) wide when flattened, for shaping
Abbreviations (US Terms)
- ch – chain
- sl st – slip stitch
- sc – single crochet
- hdc – half double crochet
- dc – double crochet
- sk – skip
- sp(s) – space(s)
- tch – turning chain
- sc2tog – single crochet 2 together
- dc2tog – double crochet 2 together
- RS / WS – right side / wrong side
Special stitch – Fan: 9 dc worked in the same stitch.
Half fan: At the start of a row, ch 3 (counts as dc) and 4 dc in the same stitch. At the end of a row, 5 dc in the same stitch.
Gauge and Checkpoints
Single crochet gauge: 16 sc x 16 rows = 4 in (10.2 cm).
Pattern gauge: 1 fan repeat (8 foundation chains) = 2 in (5.1 cm) wide; 10 pattern rows = 6 in (15.2 cm) tall.
Test swatch first: Ch 26. Work Rows 1–10 of the body pattern below with 3 repeats instead of 6. The swatch should measure 6 in x 6 in (15.2 cm x 15.2 cm) after a light steam.
Checkpoints:
- After Row 1: panel width 12 in (30.5 cm)
- After Row 10: panel height 6 in (15.2 cm)
- After Row 25: panel height 15 in (38.1 cm)
- After seaming: 12 in (30.5 cm) around, 6 in (15.2 cm) flat
- After the bottom band: opening 7.5 in (19.1 cm) around
- After the top band: total length 18 in (45.7 cm)
If your swatch is too big, go down 0.5 mm. If it’s too small, go up 0.5 mm. Width matters most, because the band stitch counts depend on 4 sc per inch matching the 12 in (30.5 cm) tube.
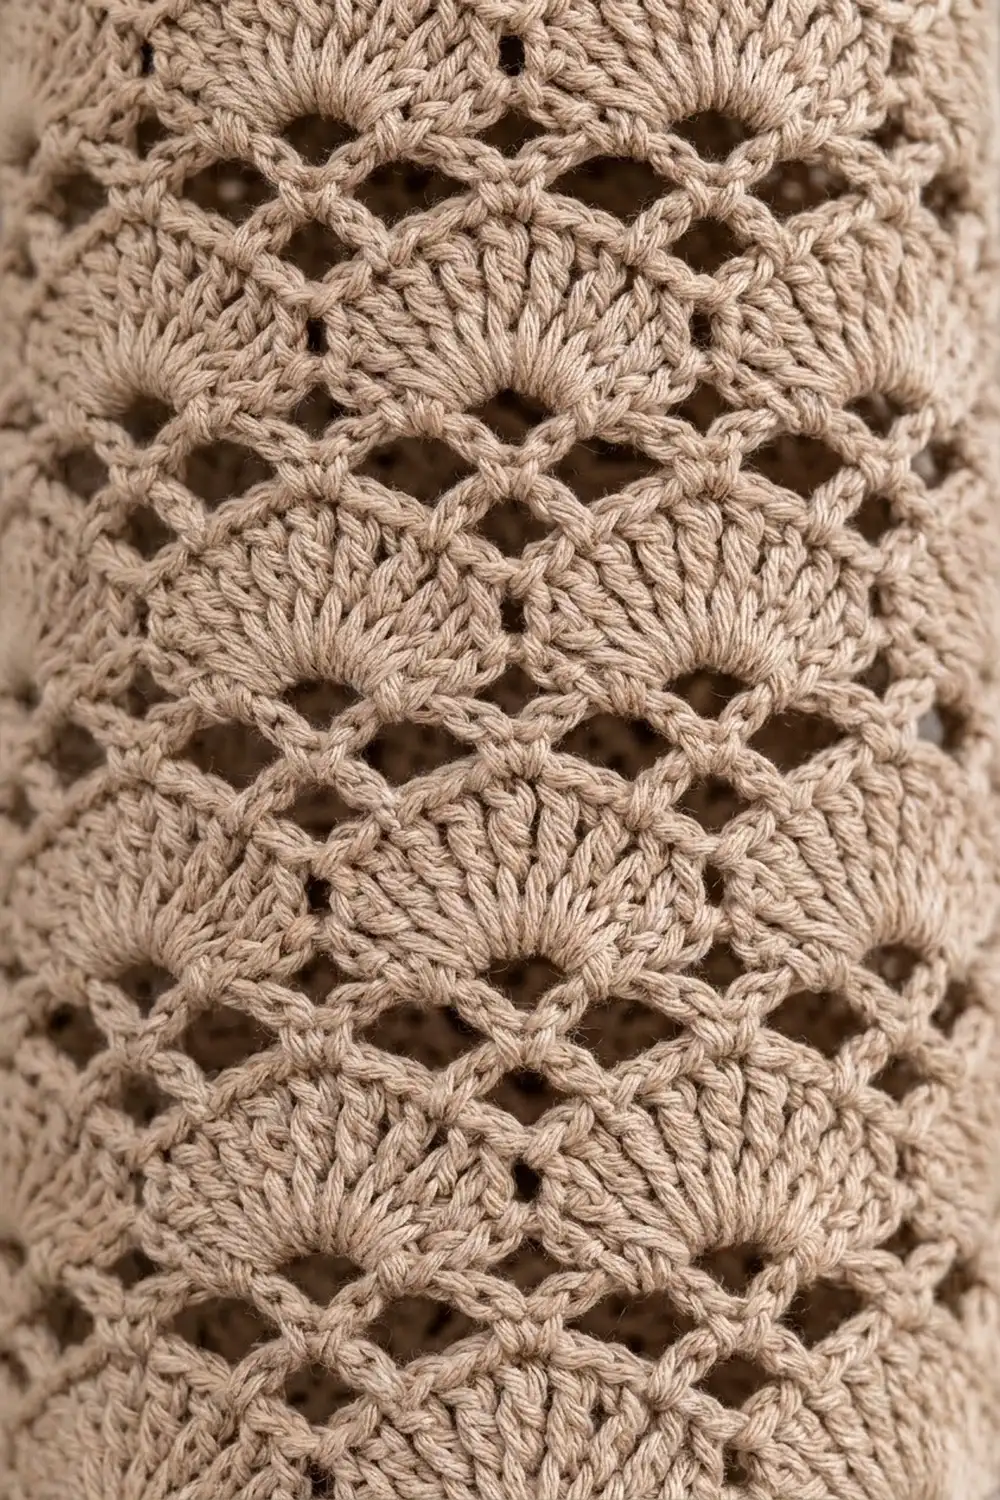
Body Panel
The panel is worked flat in rows. The foundation chain becomes the bottom edge, and the last row becomes the top edge.
Foundation: Ch 50 (49 base chains + 1 for turning).
Row 1 (RS, fan row): Sc in 2nd ch from hook, sk 3 ch, 9 dc in next ch, sk 3 ch, sc in next ch; rep from * 5 more times. Turn.
(6 fans + 7 sc = 61 sts)*
Row 2 (net row): Ch 6 (counts as dc + ch 3), sc in 5th (center) dc of next fan, ch 3, dc in next sc, ch 3; rep from * 5 more times, ending last rep at . Turn.
(7 dc + 6 sc = 13 sts and 12 ch-3 sps)*
Row 3 (offset fan row): Ch 3 (counts as dc), 4 dc in first dc (half fan made), sc in next sc, 9 dc in next dc, sc in next sc; rep from * 4 more times, 5 dc in 3rd ch of tch (half fan made). Turn.
(2 half fans of 5 dc + 5 fans + 6 sc = 61 sts)*
The new fans sit on the dc of Row 2, directly between the fans of Row 1. This offset forms the diamond openings.
Row 4 (net row): Ch 1, sc in first dc, ch 3, dc in next sc, ch 3, sc in 5th dc of next fan, ch 3, dc in next sc, ch 3; rep from * 4 more times, sc in 3rd ch of tch. Turn.
(7 sc + 6 dc = 13 sts and 12 ch-3 sps)*
Row 5 (fan row): Ch 1, sc in first sc, 9 dc in next dc, sc in next sc; rep from * 5 more times. Turn.
(6 fans + 7 sc = 61 sts)*
Row 5 matches Row 1, so the fans line up with those two rows below.
Rows 6–25: Repeat Rows 2–5 five more times. Row 25 is a fan row with 61 sts. Don’t fasten off. Mark the last loop and set the panel aside.
Checkpoint: 61 sts across, 12 in x 15 in (30.5 cm x 38.1 cm).
Edge note: Odd fan rows alternate between sc ends (Rows 1, 5, 9…) and half-fan ends (Rows 3, 7, 11…). Once the edges are seamed, the two half fans meet and form one full fan, so the pattern runs unbroken around the tube.
Seaming the Tube
Fasten off, leaving a 24 in (61 cm) tail. Fold the panel lengthwise with RS together so the two row-end edges meet.
Using the tail and your hook, sl st through both layers along the edge, working about 2 sl sts into each row end (about 50 sl sts in total). Keep the sl sts loose: the seam should be 15 in (38.1 cm) long, the same as the panel. Fasten off and turn RS out.
Checkpoint: The tube measures 12 in (30.5 cm) around and 6 in (15.2 cm) wide when flattened.
Border Bands
Band gauge: 4 sc per inch (2.5 cm), so 48 sc = 12 in (30.5 cm), which is exactly the tube’s circumference. That’s why both bands start at 48 sts: they sit flat without ruffling or pulling in. With the tube flattened, 48 sts means 24 sts per side.
All band rounds are worked with RS facing. Don’t turn. Join each round with a sl st to the first st.
Bottom Band
Hold the tube with the foundation edge at the top. Join yarn at the seam in the free loop of the foundation chain.
Rnd 1 (conversion round): Ch 1, sc2tog over the last and first foundation ch (across the seam), sc in each of the remaining 47 ch. Join.
(47 sc + 1 sc2tog = 48 sts; 24 per flattened side)
Rnd 2: Ch 1, sc in next 2 sts, sc2tog; rep from * 11 more times. Join.
(36 sts; 18 per side)*
Rnd 3: Ch 1, sc in each st around. Join. (36 sts)
Rnd 4: Ch 1, sc in next 4 sts, sc2tog; rep from * 5 more times. Join.
(30 sts; 15 per side)*
Rnd 5: Ch 1, sc in each st around. Join. (30 sts)
Finishing round: Sl st loosely in each st around. Fasten off.
Why it works: 48 ÷ 4 = 12 repeats in Rnd 2, and 36 ÷ 6 = 6 repeats in Rnd 4, so the decreases are spaced evenly. At 4 sc per inch, 30 sts gives a 7.5 in (19.1 cm) opening. That’s firm enough to hold the bags in and loose enough to pull one out. The 5 rounds plus the sl st edge measure 1.25 in (3.2 cm).
Top Band
Turn the tube over. Join yarn in the first of the two sc that sit side by side at the seam on Row 25.
Rnd 1 (leveling conversion round): Ch 2, dc in next sc (the ch 2 and this dc count as a dc2tog over the 2 seam sc). Sk next dc, hdc in next dc, sc in next 5 dc, hdc in next dc, sk next dc, dc in next sc; rep from * 5 more times, ending the last rep at . Join to the top of the first dc.
(6 valley dc + 12 hdc + 30 sc = 48 sts; 24 per side)*
The math: Row 25 has 61 sts. 12 fan dc are skipped and the 2 seam sc merge into 1, so 61 − 12 − 1 = 48. The taller dc fill each dip between fans, so the edge becomes level.
Rnd 2: Ch 1, sc in each st around. Join. (48 sts)
Rnd 3 (eyelet round): Ch 3 (counts as dc), dc in next st, ch 2, sk 2, dc in next 2 sts, ch 2, sk 2; rep from * 10 more times. Join to the top of ch 3.
(24 dc + 12 ch-2 sps = 48 sts; 6 eyelets per side)*
Rnd 4: Ch 1, sc in each dc and 2 sc in each ch-2 sp around. Join.
(24 + 24 = 48 sts)
Rnd 5: Ch 1, sc in each st around. Join. (48 sts)
Finishing round: Sl st loosely in each st around. Fasten off.
Checkpoint: The top band measures 1.75 in (4.4 cm). The total length is 15 + 1.75 + 1.25 = 18 in (45.7 cm).
Hanging Strap
Foundation: Ch 5.
Row 1: Sc in 2nd ch from hook and in each ch across. Turn. (4 sc)
Rows 2–36: Ch 1, sc in each st across. Turn. (4 sc)
Fasten off, leaving a 12 in (30.5 cm) tail at each end. The strap measures 1 in x 9 in (2.5 cm x 22.9 cm).
Attaching: On the inside of the top band, place one marker at the seam and another 24 sts away, directly opposite. Lay 1.5 in (3.8 cm) of each strap end flat against the inside of the band at a marker, covering Rnds 1–2 and staying below the eyelets. Whipstitch all 4 edges of each overlap securely.
When the top is gathered, the 2 attachment points meet in the center. The free 6 in (15.2 cm) of strap folds into a loop that stands about 3 in (7.6 cm) tall.
Drawstring
Ch 100 loosely. Sl st into the back bump of the 2nd ch from the hook and of each ch back to the start. Fasten off. The cord measures about 25 in (63.5 cm).
Weave the cord over and under through the 12 eyelets, starting and ending at 2 neighboring eyelets on the front. Thread 2 beads onto each tail and tie an overhand knot below each bead, staggering them as in the photo. Trim the ends to 0.5 in (1.3 cm).
Final Blocking
- Weave in all ends along the seam or inside the bands.
- Slide a rolled towel into the tube so it lies flat at 6 in (15.2 cm) wide.
- Mist it until the whole piece is evenly damp.
- Gently pat each fan into a round shape and open each diamond space with your fingertip.
- Pin the top and bottom bands straight, keeping the total length at 18 in (45.7 cm).
- Let it dry completely, then turn it over and repeat on the other side if needed.
- Remove the towel, gather the drawstring, and hang the holder.
Final Quality-Control Checklist
- [ ] Row 25 ends with 61 sts and the panel is 12 in x 15 in (30.5 cm x 38.1 cm)
- [ ] The seam lies flat and the half fans meet into a full fan
- [ ] Both bands start at 48 sts
- [ ] The bottom opening has 30 sts and is 7.5 in (19.1 cm) around
- [ ] The top band has 12 even eyelets
- [ ] The strap is stitched on firmly at 2 opposite points
- [ ] The beads are knotted securely
- [ ] The holder is 18 in (45.7 cm) long and 6 in (15.2 cm) flat
Troubleshooting
Fans are cupping or ruffling: Your dc are too loose for the net rows. Go down a hook size, or loosen the ch-3 sps slightly.
Net rows look tight or pull the fans in: Work the ch-3 sps more loosely, or use a ch 4 for each space.
Wrong stitch count in a fan row: In Row 3 and similar rows, make sure each fan goes into a dc, not into a ch-3 space.
The seam puckers: The sl sts are too tight. Rip back and redo them with a larger hook.
Top band ruffles: Recheck Rnd 1. Both fan dc at each edge must be skipped.
Bags fall out of the bottom: Add another sc round with 6 more decreases, working sc 3, sc2tog to get 24 sts.
The holder stretches when full: Use cotton, not acrylic, and don’t overfill it.
Care
Hand wash or machine wash on a gentle cycle in a mesh bag. Lay flat to dry, reshaping it over a rolled towel. Remove the beads first if they aren’t sealed.
Final Notes
Each stage builds on the one before. The gauge swatch confirms 2 in (5.1 cm) per fan and 6 in (15.2 cm) per 10 rows. That gives a 12 in x 15 in (30.5 cm x 38.1 cm) panel. Seamed, the panel becomes a 12 in (30.5 cm) tube. At 4 sc per inch, 48 band stitches fit that tube exactly. Adding the 1.75 in (4.4 cm) top band and the 1.25 in (3.2 cm) bottom band brings the holder to 18 in (45.7 cm). If you check each stage as you go, the finished holder will hang straight and hold plenty of bags.
Happy crocheting!