

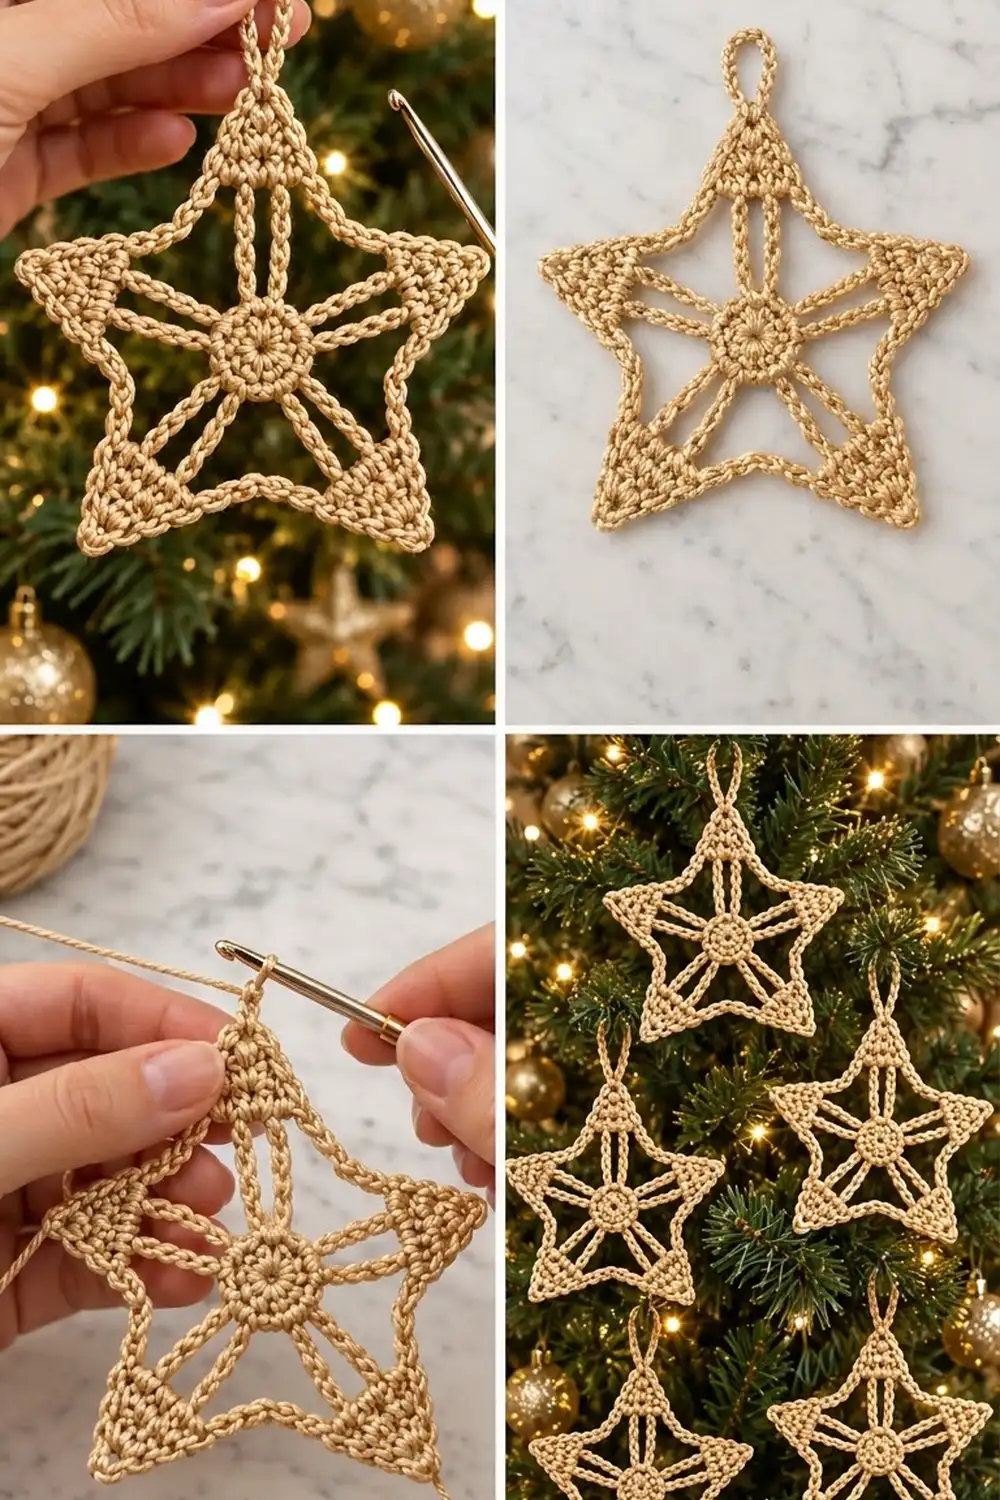
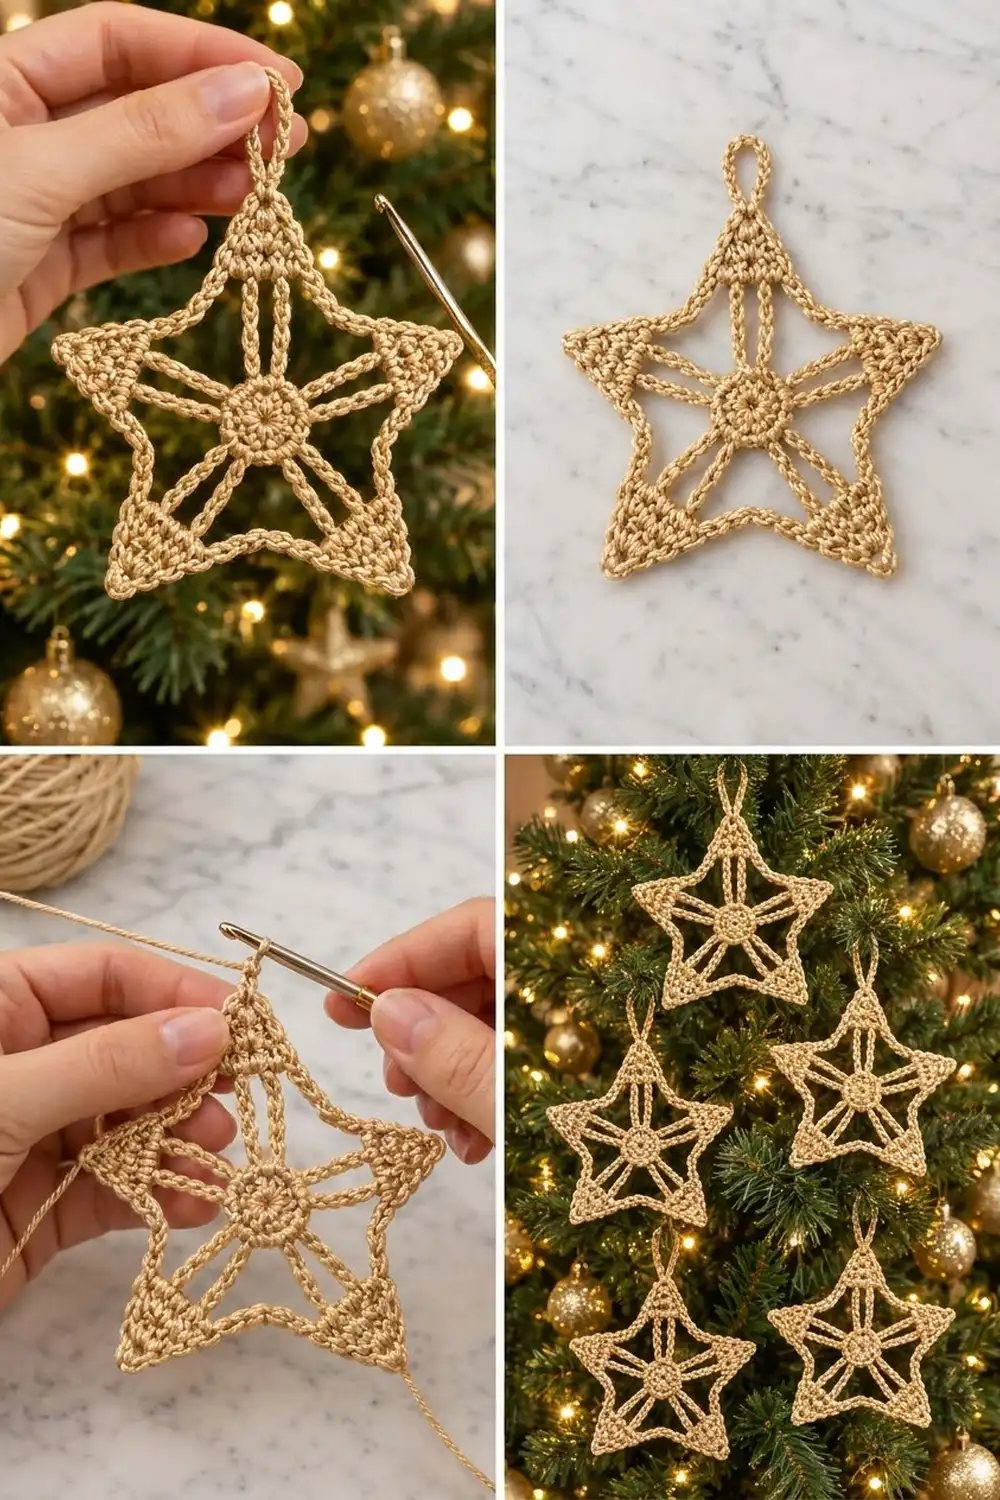
The Gilded Spoke Star is a light, lacy five-pointed ornament made for hanging on the tree. A small solid disc sits in the center. Pairs of slim chain spokes run out to five solid triangle points, and an open frame connects the points. A twisted rope edge outlines the whole star, so it holds its shape even though it is mostly open space.
The sample uses a single warm gold-beige thread with a soft sheen. It shows up well against green branches and warm lights. In white it looks like a snowflake, and in red it reads as a classic Scandinavian ornament.
This pattern uses US crochet terms. The finished star is about 4.75 in (12.1 cm) wide and 4.5 in (11.4 cm) tall, plus a 1 in (2.5 cm) hanging loop.
Construction is in the round from the center out. You crochet the disc, add five long chain loops (each one becomes a pair of spokes), and work a small decreasing triangle on the middle of each loop. Then you work a frame round that links the points with chain edges and adds the hanging loop, and finish with a reverse single crochet rope edge.
Finished Size and Construction
- Finished size: 4.75 in (12.1 cm) wide x 4.5 in (11.4 cm) tall, not counting the loop
- Skill level: Intermediate (working into chains and row ends, reverse single crochet)
- Terminology: US
- Yarn weight: Size 3 crochet thread (super fine)
- Hook: 2.25 mm (US B-1)
- Number of pieces: 1
- Layout: One single star motif, no assembly
- Piece size: 4.75 in x 4.5 in (12.1 cm x 11.4 cm)
- Size before border: about 4.25 in x 4 in (10.8 cm x 10.2 cm)
- Border depth: about 0.25 in (0.6 cm) per edge
Materials
Yarn: Use a smooth, tightly plied size 3 cotton crochet thread. Mercerized cotton gives the gentle sheen in the sample and blocks crisply. Metallic-blend threads also work, but they can be slippery, so check your gauge carefully.
- Gold-beige (main color): 6 g, about 18 m, for one star
To make a set of five like the tree photo, plan on 30 g (about 90 m).
Tools:
– 2.25 mm (US B-1) crochet hook
– 2 locking stitch markers
– Tapestry needle
– Scissors
– Blocking board or foam mat, and rustproof pins
– Spray starch or a fabric stiffener, diluted 1:1 with water
The quantities include a margin of about 25% for your gauge swatch, joining tails and weaving in ends.
Abbreviations (US Terms)
- ch – chain
- sl st – slip stitch
- sc – single crochet
- dc – double crochet
- sc2tog – single crochet 2 together
- sc3tog – single crochet 3 together
- rev sc – reverse single crochet (crab stitch)
- st(s) – stitch(es)
- sp – space
- RS – right side
Special stitch – reverse single crochet (rev sc): With the RS facing, work from left to right (right-handed). Insert the hook into the next stitch to the right, yarn over, pull up a loop, then yarn over and pull through both loops. Each stitch twists slightly, which gives the rope-like edge.
Gauge and Checkpoints
Gauge: 7 sc and 8 rows = 1 in (2.5 cm). 8 ch = 1 in (2.5 cm).
The star itself is the best gauge swatch, because it is small. Make one complete star before you make a set, and measure it at each of these checkpoints:
- After Round 2: the disc is 1 in (2.5 cm) across.
- After Round 3: each spoke section (10 ch) is 1.25 in (3.2 cm) long when gently straightened.
- After Round 4: each triangle is 1 in (2.5 cm) wide at the base and 0.5 in (1.3 cm) tall.
- After Round 5: the star is about 4.25 in (10.8 cm) wide.
- After Round 6 and blocking: the star is 4.75 in x 4.5 in (12.1 cm x 11.4 cm).
If your star is too big: go down to a 2.0 mm hook, or chain more tightly. Loose chains are the most common cause, because the spokes and frame are almost all chains.
If your star is too small: go up to a 2.5 mm hook. Do not add chains to the spokes to make up the difference, because that throws off the spoke-to-frame proportions and the points will buckle.
Pattern
Center Disc
Round 1: Make a magic ring. Ch 1, then work 10 sc into the ring. Join with a sl st to the first sc. Pull the ring tight. (10 sc)
Round 2: Ch 3 (counts as dc), dc in the same st as the join. Work 2 dc in each of the next 9 sc. Join with a sl st to the top of the ch-3. (20 dc)
Checkpoint: the disc is 1 in (2.5 cm) across and lies flat.
Spoke Loops
Each loop is made of 27 chains: 10 for the first spoke, 7 for the base of a triangle, and 10 for the second spoke.
Round 3: Ch 1. Sc in the next dc (the first time, this is the same st as the join). Ch 27. Sc in the next dc, then sc in each of the next 2 dc. Repeat from * to * 4 more times. Join with a sl st to the first sc. Fasten off. (20 sc and 5 ch-27 loops)
Each repeat uses 4 dc, and 5 repeats x 4 dc = 20 dc, so the whole disc is used. The two sc at each end of a loop are the anchors for that point’s pair of spokes. The 2 sc between loops are the gaps between points.
Marking: On each loop, count 10 ch from the first anchor and mark chains 11 and 17. Chains 11 through 17 are the 7 chains that will form the triangle base. You can move the 2 markers from loop to loop as you go.
Point Triangles
Work this on each of the 5 loops in turn. Each triangle is worked in rows on the 7 marked chains, and it decreases toward the tip, which points away from the center.
Row 1: With the RS facing, join the thread with a sl st in chain 11 of the loop. Ch 1, then sc in the same ch and in each of the next 6 ch, ending in chain 17. Turn. (7 sc)
Row 2: Ch 1, sc2tog, sc in each of the next 3 sts, sc2tog. Turn. (5 sc)
Row 3: Ch 1, sc2tog, sc in the next st, sc2tog. Turn. (3 sc)
Row 4: Ch 1, sc3tog. Fasten off. (1 st, the tip)
Repeat Rows 1 to 4 on the other 4 loops, so you have 5 triangles. The 10 ch on each side of every triangle now form the 2 spokes, and the spokes spread slightly apart as they leave the disc.
Checkpoint: each triangle is 1 in (2.5 cm) wide at the base and 0.5 in (1.3 cm) tall.
Border
The border has two rounds. Round 5 builds the frame and adds the hanging loop, and Round 6 adds the rope edge.
Border gauge: row-end sc are worked 1 per row end, and the frame chains follow the 8 ch = 1 in (2.5 cm) gauge.
Round 5 (frame and loop): With the RS facing, join the thread with a sl st in the tip st of any triangle. This is now the top point.
Ch 1, then work (sc, ch 16, sc) in the tip st. This makes the hanging loop.
Work 1 sc in each of the 4 row ends down the side of the triangle (Rows 4, 3, 2 and 1), ending at the base corner where the spoke meets the triangle. Ch 10 for the valley edge. Moving to the next triangle, work 1 sc in each of its 4 row ends going up (Rows 1, 2, 3 and 4). Work (sc, ch 2, sc) in the tip st.
Repeat from * to * 3 more times. Then work 4 sc down the side of the fifth triangle, ch 10, and 4 sc up the side of the top triangle. Join with a sl st to the first sc. Do not fasten off.
Round 5 counts:
– Per point: 2 sc at the tip + 8 side sc (4 on each side) = 10 sc
– Per valley: 10 ch
– Total: 50 sc, 50 ch, 4 ch-2 tip spaces and 1 ch-16 loop
Checkpoint: the star is about 4.25 in (10.8 cm) wide, and each valley edge is a straight 1.25 in (3.2 cm).
Round 6 (rope edge): Ch 1. Working rev sc from left to right:
– Work 1 rev sc in each sc and in each valley ch.
– Work 3 rev sc in each ch-2 tip space.
– At the top point, work 1 rev sc in each tip sc on either side of the hanging loop, and leave the loop itself unworked.
Join with a sl st to the first rev sc and fasten off. (112 rev sc)
Counts per edge: The star has 10 outer edges, each running from a tip to the middle of a valley. Each edge has 1 tip sc + 4 side sc + 5 valley ch = 10 rev sc, so 10 edges x 10 = 100. The 4 lower tips add 3 rev sc each, which is 12 more. 100 + 12 = 112 rev sc.
Why the math works: Rev sc is worked one per stitch, so it adds about 0.25 in (0.6 cm) of depth without making the edge longer or shorter. The 3 extra stitches in each tip space give the rope edge room to turn the sharp corner without pulling the tip flat. The top tip gets no extra stitches, because the hanging loop takes up that corner.
Final Blocking
- Weave in all ends along the disc or inside the solid triangles, never along a single chain spoke.
- Soak the star in cool water for 5 minutes, then press out the water in a towel.
- On a blocking board, draw or place a five-pointed star template 4.75 in (12.1 cm) wide.
- Pin the center of the disc and each of the 5 tips to the template.
- Pin each pair of spokes straight, with the two spokes slightly spread, so they line up with the triangle base corners.
- Pin the middle of each valley so that edge is straight, not sagging.
- Spray with diluted starch, or brush on fabric stiffener, until the star is damp all over.
- Let it dry completely, for at least 6 hours, before unpinning.
- Straighten the hanging loop by hand and let it dry flat as well.
Final Quality-Control Checklist
- The disc is flat, 1 in (2.5 cm) across, and the ring is closed tight.
- There are exactly 5 points, each with 2 spokes.
- All 10 spokes are the same length and lie straight.
- Every triangle has a sharp tip and a 1 in (2.5 cm) base.
- All 5 valley edges are straight and the same length.
- The rope edge twists evenly all the way around.
- The hanging loop is centered on the top point.
- The star measures 4.75 in x 4.5 in (12.1 cm x 11.4 cm).
- No tails are visible from either side.
Troubleshooting
The spokes look wavy after blocking. The chains are uneven. Re-wet the star and pin each spoke under light tension. Next time, chain at a steady, even tension.
The points curl forward. Row 1 was worked too tightly into the chains. Block with extra starch, or work Row 1 with a 2.5 mm hook.
The valleys sag. Your chains are loose. Use ch 9 instead of ch 10 for each valley, and note that Round 6 will then total 102 rev sc.
The rope edge ruffles at the tips. Work 2 rev sc instead of 3 in each tip space.
The disc cups. Your Round 2 dc are tight. Go up half a hook size for Round 2 only.
The star is lopsided. Count each loop again. Every loop needs exactly 27 ch.
Care
Hand wash in cool water and lay flat to dry, re-shaping or re-starching as needed. Store flat between layers of tissue so the points stay crisp.
Final Notes
The measurements build on each other:
– a 1 in (2.5 cm) disc
– 1.25 in (3.2 cm) spokes
– 1 in (2.5 cm) by 0.5 in (1.3 cm) triangles
– a 4.25 in (10.8 cm) framed star after Round 5
– a finished 4.75 in x 4.5 in (12.1 cm x 11.4 cm) ornament with a 0.25 in (0.6 cm) rope edge
If each checkpoint matches, the next stage will fit. Make one star, check it, then make as many as your tree needs.
Happy crocheting!