

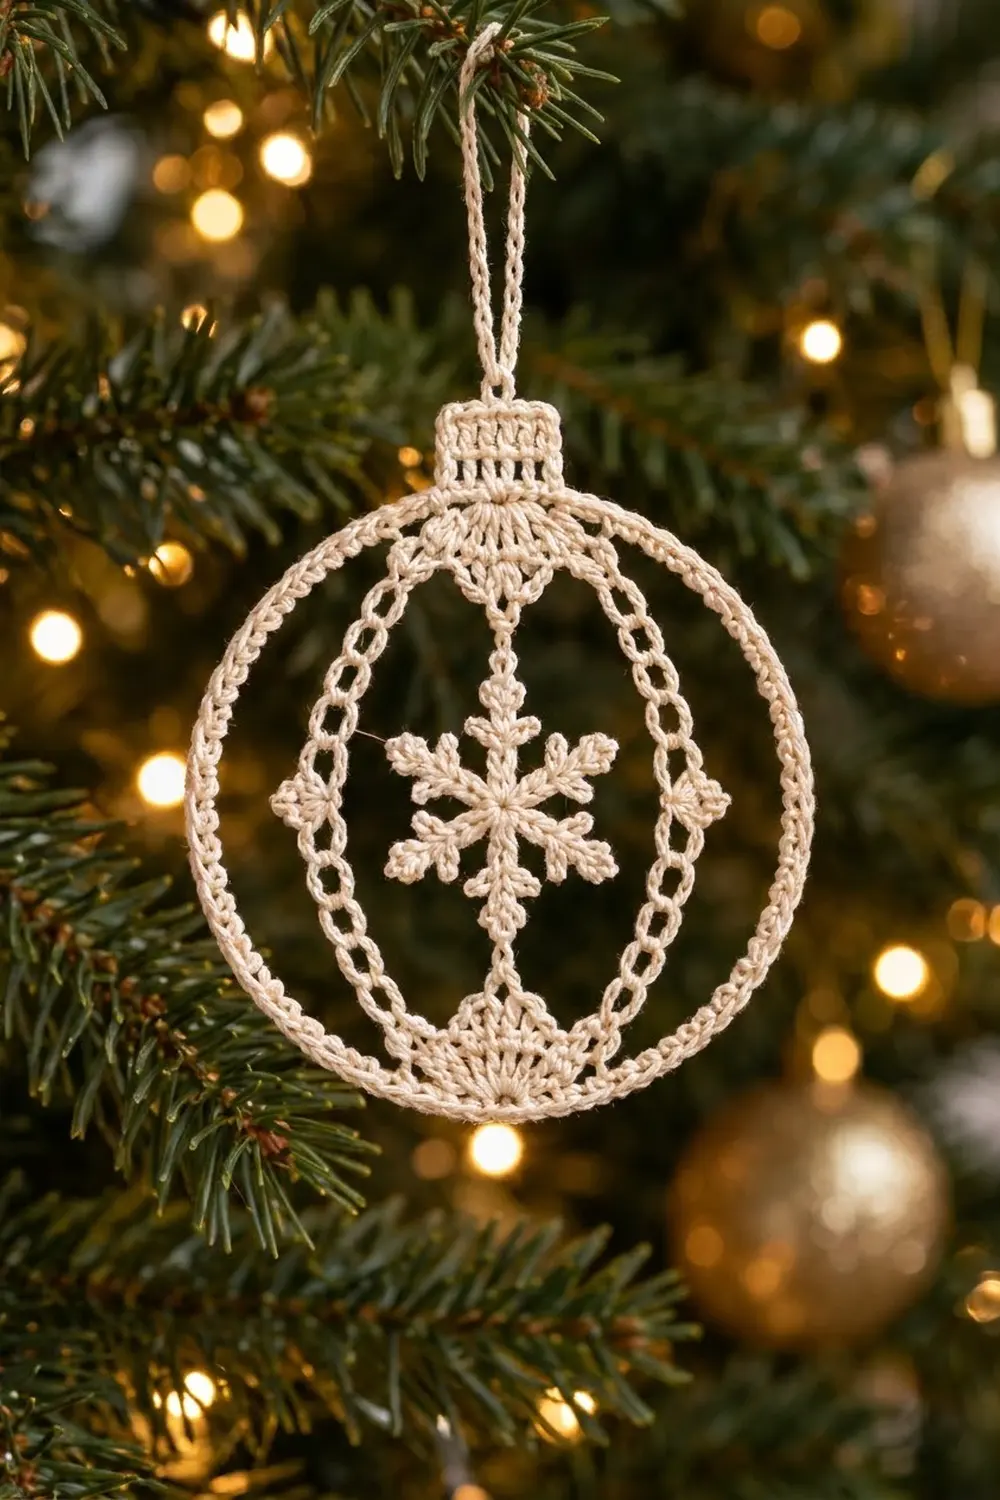
This lace ornament is shaped like a classic Christmas bauble. A round outer ring holds a vertical oval of ladder lace. A small six-armed snowflake sits in the middle, held in place by a dense little fan at the top and bottom. A ribbed cap and a slim chain loop finish the top.
It uses one color, ivory or cream crochet thread, so the snowflake and the open lacework stand out against tree lights. The style is soft and vintage, close to traditional starched doily ornaments. All instructions use US crochet terms.
The finished ring is 3.5 in (8.9 cm) across. With the cap, the ornament is 3.9 in (9.9 cm) tall, and the hanging loop adds about 1.3 in (3.3 cm).
You work it in stages that connect as you go. First comes the snowflake, then the ladder oval and two small side bridges. Next are the top and bottom fans that attach the snowflake, then the outer ring, and finally the cap and loop. Starching sets the oval shape.
Finished Size and Construction
- Finished size: 3.5 in (8.9 cm) ring diameter; 3.9 in (9.9 cm) tall with cap; about 5.2 in (13.2 cm) including the loop
- Skill level: Intermediate (thread work, joining as you go)
- Terminology: US
- Yarn weight: Lace (0), size 10 crochet cotton thread
- Hook: 1.75 mm steel hook
- Number of pieces: 1 single ornament, built in connected stages
- Layout: snowflake centered inside a vertical oval, oval centered inside a circle, cap on top
- Snowflake size: 1.4 in (3.6 cm) tip to tip
- Size before border (oval unit): 2.1 in (5.3 cm) wide x 3.0 in (7.6 cm) tall
- Border depth (outer ring): 0.25 in (0.6 cm)
Materials
Use a mercerized size 10 cotton thread. It shows stitches clearly, takes starch well, and has a slight sheen that suits tree lights. Avoid fuzzy or acrylic thread, because it won’t hold the oval shape after blocking.
- Ivory/cream thread: 8 g, about 45 m (49 yd)
Size 10 thread runs about 5.6 m per gram, so check your label if you substitute.
Tools:
- 1.75 mm steel crochet hook
- Fine tapestry needle
- Small sharp scissors
- 4 stitch markers
- Fabric stiffener or homemade starch
- Blocking board or foam, plus rustproof pins
- Plastic wrap to protect the board
The quantities include a margin of roughly 30% for a gauge test and weaving in ends.
Abbreviations (US Terms)
- ch: chain
- sl st: slip stitch
- sc: single crochet
- dc: double crochet
- st(s): stitch(es)
- sp: space
- BLO: back loop only
- beg: beginning
- rep: repeat
- RS: right side
Special stitches:
- Picot: ch 3, sl st in 3rd ch from hook.
- dc2tog: [yarn over, insert hook in next st, pull up a loop, yarn over, pull through 2 loops] twice, yarn over, pull through all 3 loops.
- sc5tog: [insert hook in next st, pull up a loop] 5 times, yarn over, pull through all 6 loops.
- Ladder repeat: (dc, ch 1), meaning one dc plus its ch-1 sp.
Gauge and Checkpoints
Gauge: 9 sc = 1 in (2.5 cm). 10 ladder repeats = 2.1 in (5.3 cm). One dc stands about 0.2 in (0.5 cm) tall.
Make one complete snowflake first and measure it. It is your test piece.
Checkpoints:
- Snowflake: 1.4 in (3.6 cm) tip to tip, pinned flat.
- Ladder oval, unblocked: lies as a rough circle about 2.4 in (6.1 cm) across. Measured along the middle of the band, it is about 7.6 in (19.3 cm) around.
- Oval unit, pinned: 2.1 in (5.3 cm) wide x 3.0 in (7.6 cm) tall at the outer edge.
- After ring Round B: about 3.2 in (8.1 cm) across.
- After ring Round C: 3.5 in (8.9 cm) across.
Too big? Go down to a 1.5 mm hook. Too small? Go up to a 2 mm hook. If only the ring is off, keep your hook and adjust your chain tension in Round A instead, since loose chains are the usual cause.
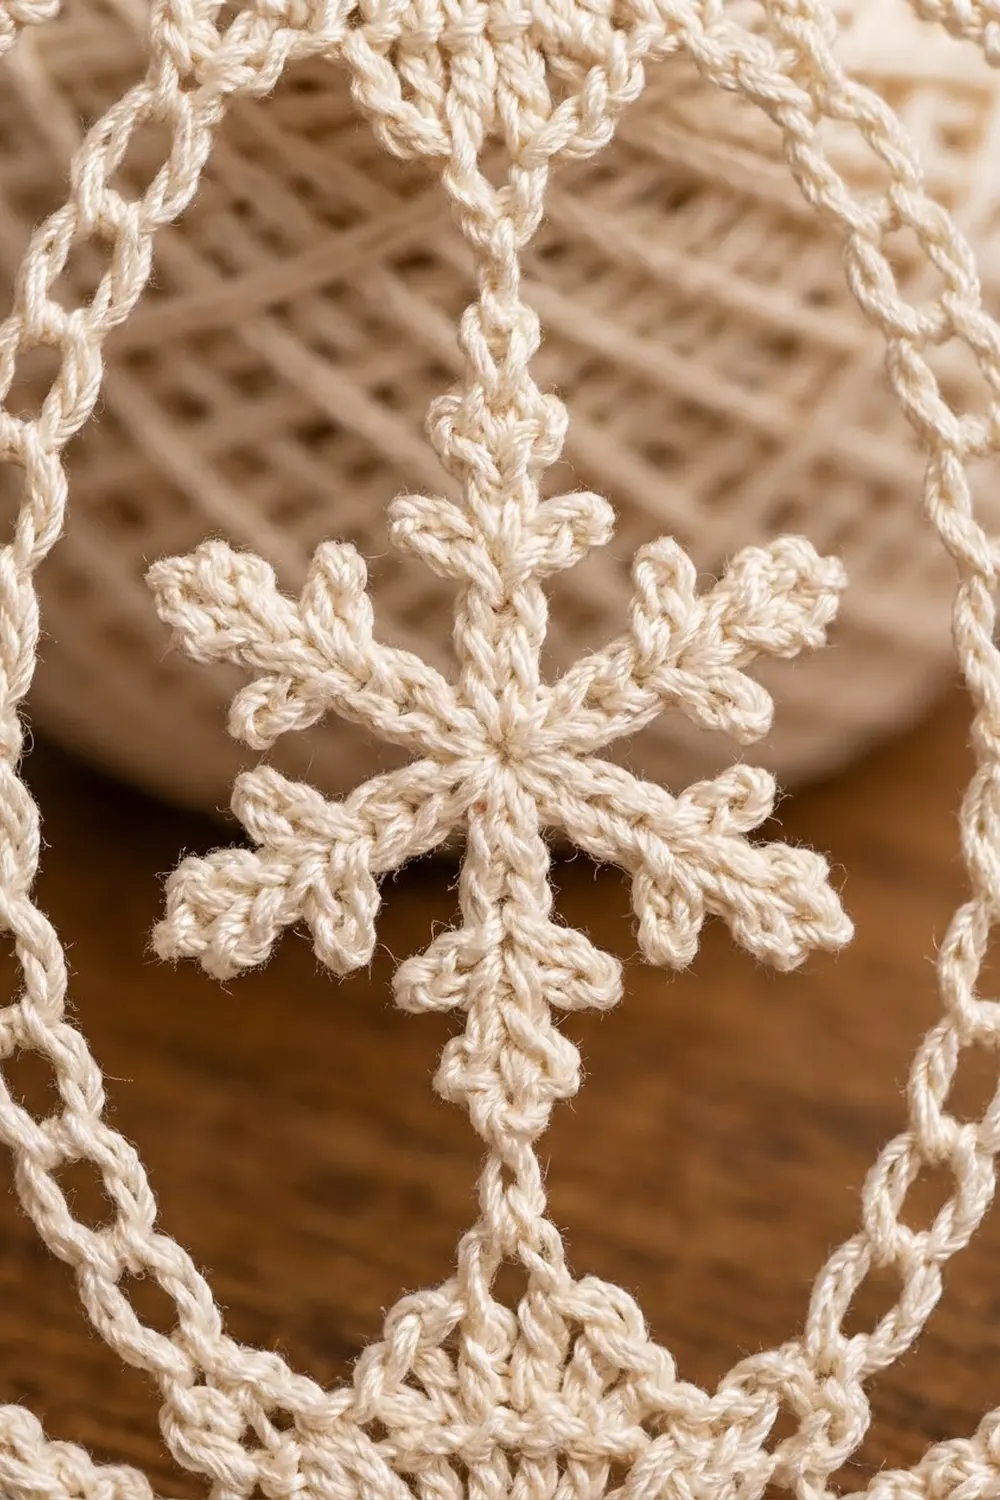
Part 1: Snowflake
Ch 6, sl st in first ch to form a ring.
Round 1: Ch 1, 12 sc in ring, sl st in first sc to join. (12 sc)
Round 2 (arms): Sl st in first sc.
Ch 9. Sl st in 4th ch from hook (tip picot). Sl st in next 2 ch. [Ch 3, sl st in same ch as last sl st] twice (2 branch picots). Sl st in last 3 ch. Sl st in same sc at base of arm. Sl st in next 2 sc.
Rep from * to * 5 more times. On the last repeat, the second sl st lands in the first sc; fasten off there. (6 arms, each with 1 tip picot and 2 branch picots; 18 picots total)
Each arm uses 9 ch: 3 form the tip picot, and 6 are covered by sl sts (1 + 2 + 3). Arms sit on every other sc, so 6 arms use all 12 sc.
Pin the snowflake flat. Checkpoint: 1.4 in (3.6 cm) tip to tip. Mark one arm as the top arm and the opposite arm as the bottom arm.
Part 2: Ladder Oval
Ch 72, sl st in first ch to form a ring, taking care not to twist. Number the chains 1 to 72. Ch 1 is the one you joined into.
Round 1: Ch 4 (counts as dc + ch 1), skip next ch. Dc in next ch, ch 1, skip next ch. Rep from * to * 34 more times. Sl st in 3rd ch of beg ch-4 to join. (36 dc, 36 ch-1 sps)
Each dc sits in chain number (2 x its number − 1). So dc 1 sits in ch 1, dc 10 in ch 19, dc 19 in ch 37, and dc 28 in ch 55.
Fasten off. The foundation chain forms the inner line of the band. The dc tops and the ch-1 sps form the outer line. The dc look like the rungs of a ladder, which gives the double chain-link look.
Place markers: dc 1 = top, dc 10 = right side, dc 19 = bottom, dc 28 = left side.
Checkpoint: a rough circle about 2.4 in (6.1 cm) across.
Part 3: Side Bridges (Make 2)
These short loops link the sides of the oval to the outer ring.
Right bridge: With RS facing, join thread with sc in the ch-1 sp just before dc 10. Ch 3, picot, ch 3. Sc in the ch-1 sp just after dc 10. Fasten off.
Left bridge: Rep the same steps around dc 28.
Each bridge is a small diamond: two 3-ch legs meet at a picot. After blocking, the picot tip sits about 0.45 in (1.1 cm) out from the oval edge, which matches the gap to the ring.
Part 4: Fans and Stems
The fans sit inside the oval. You work them into the free loops of the foundation chain. Each fan narrows to a point, and a short stem joins the point to a snowflake arm.
Top fan:
Row 1: With RS facing, join thread with sl st in ch 70. Ch 3 (counts as dc), dc in ch 71, 72, 1, 2, 3 and 4. Turn. (7 dc, centered on ch 1)
Row 2: Ch 2 (does not count). Dc2tog over first 2 sts, dc in next 3 sts, dc2tog over last 2 sts (the last one is the top of the beg ch-3). Turn. (5 sts)
Row 3: Ch 1, sc5tog over all 5 sts. (1 st, the fan point)
Stem: Hold the snowflake inside the oval with the top arm pointing straight up. Ch 2, sl st in the tip picot of the top arm, sl st in each of the 2 ch, sl st in the sc5tog. Fasten off.
Bottom fan: Work Rows 1–3 the same way, joining in ch 34 and working across ch 34 to 40 (7 dc, centered on ch 37). Work the stem into the tip picot of the bottom arm.
Checkpoint: the oval’s inner height is about 2.6 in (6.6 cm). From top to bottom it holds a fan of 0.5 in (1.3 cm), a stem, the snowflake at 1.4 in (3.6 cm), a stem, and a second fan. The snowflake should hang centered, not slack.
Border: Outer Ring
The outer ring is the border. You join it to the oval at four quarter points while you make the foundation chain.
Border gauge: 9 sc = 1 in (2.5 cm). Count everything in quarters: top, right, bottom, left.
Round A (foundation, joined as you go): Join thread with sl st in the top of dc 1 (top of oval). Ch 22, sl st in the picot of the right bridge. Ch 22, sl st in the top of dc 19. Ch 22, sl st in the picot of the left bridge. Ch 22, sl st in the top of dc 1. (88 ch total, 22 ch per quarter)
Keep each 22-ch arc loose and even. The joining sl sts do not count as stitches.
Round B: Ch 1. Working into the outer side of the chains and skipping every joining sl st, sc in each ch around. Sl st in first sc to join. (88 sc: 22 per quarter)
Checkpoint: about 3.2 in (8.1 cm) across.
Round C (increase round): Ch 1. Sc in next 10 sc, 2 sc in next sc. Rep from * to * 7 more times. Sl st in first sc to join. (88 sc worked 1 per stitch + 8 increases = 96 sc: 24 per quarter)
Fasten off.
Why the math works: At 9 sc per inch, 88 sc make a circle about 9.8 in (24.9 cm) around. Measured through the middle of Round B, that circle is about 3.1 in (7.9 cm) across. Round C sits farther out. Its 96 sc make a circle about 10.7 in (27.2 cm) around and about 3.4 in (8.6 cm) across through its middle, so the outer edge lands at 3.5 in (8.9 cm).
The inner edge of the chain sits at about 3.0 in (7.6 cm), which is exactly the height of the oval unit. That lets the oval touch the ring at top and bottom without stretching. The larger outer circle needs 8 more stitches (2 per quarter) to stay flat, and Round C adds exactly those. Every quarter has the same count, so the joins stay at 12, 3, 6 and 9 o’clock.
Cap and Hanging Loop
Place markers in the 3 sts on each side of the top center of Round C (6 sts total).
Row 1: With RS facing, join thread in the first marked st. Ch 1, sc in each of the 6 marked sts. Turn. (6 sc)
Row 2: Ch 3 (counts as dc), dc in next 5 sts. Turn. (6 dc)
Row 3: Ch 1, sc in BLO of each st across. (6 sc) Fasten off.
The dc row gives the cap its vertical ribs, and the BLO row adds a crisp top ridge. The cap is about 0.7 in (1.8 cm) wide and 0.4 in (1.0 cm) tall.
Hanging loop: Join thread in the 3rd sc of Row 3. Ch 30, sl st in the 4th sc. Fasten off. The loop stands about 1.3 in (3.3 cm) tall.
Weave in all ends along the ring and fan stitches, where they hide best.
Final Blocking
- Wash gently in cool water and press out the water in a towel.
- Soak the ornament in fabric stiffener or starch. Squeeze out the extra so no film bridges the ladder spaces.
- Cover your board with plastic wrap and draw a 3.5 in (8.9 cm) circle as a guide.
- Pin the outer ring to the circle at the four quarter joins first, then every 0.5 in (1.3 cm) around.
- Pin the oval into shape: 2.1 in (5.3 cm) wide x 3.0 in (7.6 cm) tall. Pull each side bridge straight so the picot meets the ring.
- Center the snowflake. Pin each tip picot and both branch picots open.
- Pull the stems taut and straight, and square the cap.
- Pin the hanging loop flat and let everything dry completely, at least 12 hours.
Final Quality-Control Checklist
- Ring measures 3.5 in (8.9 cm) across and is round, not egg-shaped.
- Round B has 88 sc and Round C has 96 sc.
- Oval has 36 dc and 36 ch-1 sps, with no twist in the band.
- Oval measures 2.1 in (5.3 cm) x 3.0 in (7.6 cm) and touches the ring at top and bottom.
- Both side bridges are the same length and straight.
- Snowflake has 6 arms and 18 open picots, with the top and bottom arms vertical.
- Each fan has 7, then 5, then 1 st and points straight at the snowflake.
- Cap is centered over the top join, and the loop is centered on the cap.
- All ends are woven in and trimmed close.
Troubleshooting
The ring ruffles. The Round A chains were too loose, or extra stitches crept in. Recount 22 sc per quarter in Round B.
The ring cups. Round C increases were skipped. Check for 96 sc.
The oval bulges past the ring. Your ladder gauge is loose. Rework Part 2 with a smaller hook or tighter chains.
The snowflake sags. The stems are too long. Work each stem with 1 ch instead of 2.
The snowflake is tilted. The stems are attached to arms that aren’t opposite each other. Count 2 arms between them on each side.
Picots disappear. Pin them open while blocking and use a firmer starch.
The cap leans. Recount the 6 marked sts so there are 3 on each side of the top center.
Care
Hand wash in cool water, reshape, and dry flat. Re-starch and pin out again if the ornament softens after a season in storage.
Final Notes
Each stage sets up the next. A 1.4 in (3.6 cm) snowflake hangs inside a ladder oval that blocks to 2.1 x 3.0 in (5.3 x 7.6 cm). The oval’s 3.0 in (7.6 cm) height matches the ring’s inner edge. The ring builds from 88 ch to 88 sc to 96 sc and finishes at 3.5 in (8.9 cm). The cap adds 0.4 in (1.0 cm), for a 3.9 in (9.9 cm) ornament plus a 1.3 in (3.3 cm) loop.
Check each stage against its checkpoint, and your bauble will come out round, balanced and crisp.
Happy crocheting!