

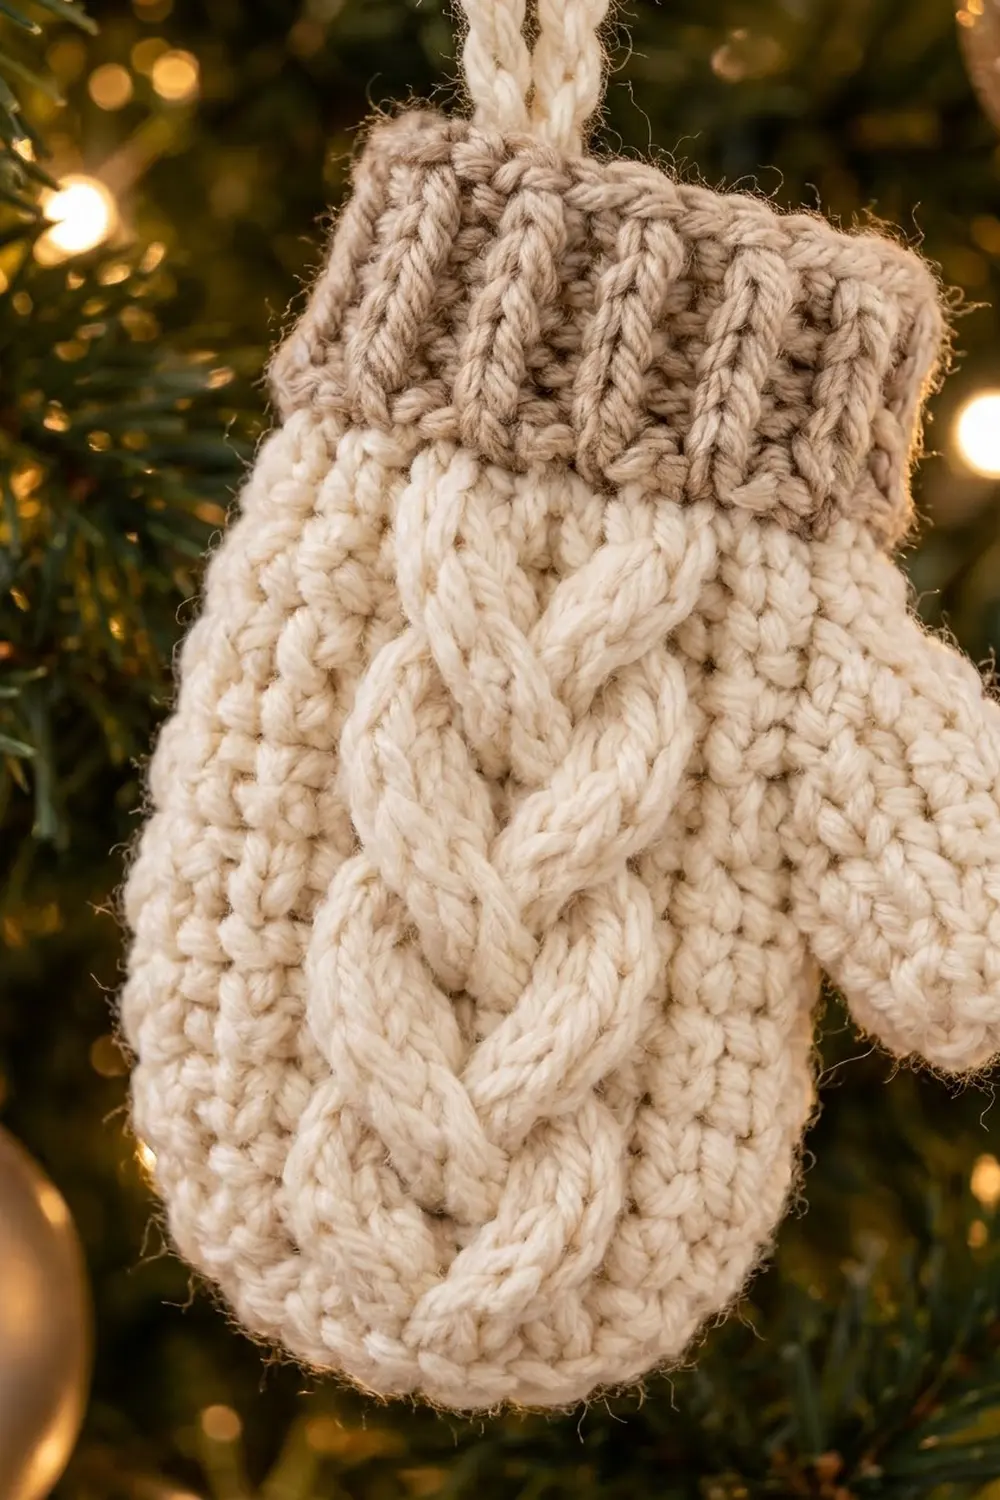
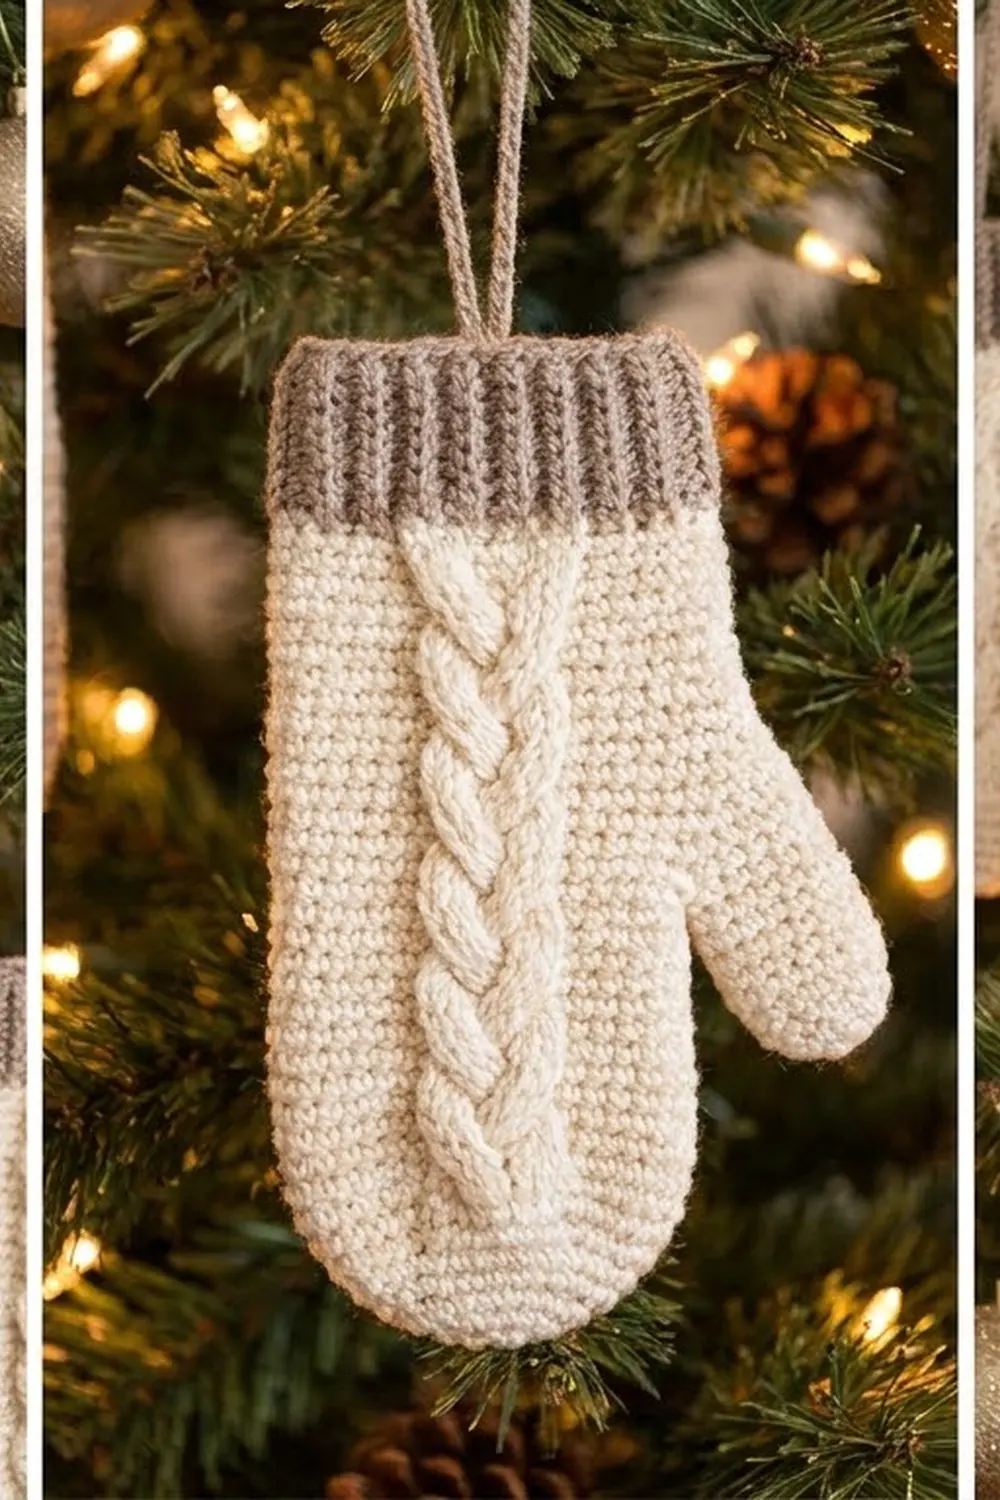
The Fireside Braid Mitten is a small, flat ornament. A raised braided cable runs from the fingertips to the wrist. A ribbed taupe cuff sits across the top, a rounded thumb points out to one side, and a slim cream loop lets it hang from a branch.
The colors are kept calm: warm cream for the hand, thumb, edging and loop, and soft taupe for the cuff. It suits a neutral, Scandinavian-style tree. It also makes a nice gift topper or an extra on a holiday card.
This pattern uses US crochet terms. The finished mitten is about 4″ (10.2 cm) wide across the hand, 5″ (12.7 cm) wide including the thumb, and 5.5″ (14.0 cm) tall from fingertip to cuff top. The hanging loop adds about 2.5″ (6.4 cm).
Here is how it’s built. You work the hand flat in single crochet rows from the fingertips up, with front post treble cables over the six center stitches. Then you add the thumb into the side row ends, work one cream edging round, crochet the ribbed cuff onto the top edge and finish with a slip-stitch loop.
Finished Size and Construction
- Finished size: 5″ wide x 5.5″ tall (12.7 x 14.0 cm), not including the loop
- Skill level: Intermediate (post-stitch cables)
- Terminology: US crochet terms
- Yarn weight: Worsted (#4)
- Hook: 4.0 mm (US G-6)
- Number of pieces: 1 (a single flat mitten, worked in one piece)
- Layout: one mitten, with the thumb on the right edge when the right side faces you
- Hand size before border: 3.5″ wide x 4″ tall (8.9 x 10.2 cm)
- Border depth: a 0.25″ (0.6 cm) cream edging on the sides and fingertips, plus a 1.25″ (3.2 cm) ribbed cuff on top
Materials
Choose a smooth worsted-weight yarn with good stitch definition. Wool, wool blends and soft acrylic all show the cable well. Avoid fuzzy or highly textured yarn, because it blurs the braid.
- Cream (main color): 15 g, about 30 m (33 yd)
- Taupe (cuff): 5 g, about 10 m (11 yd)
Tools:
- 4.0 mm (US G-6) crochet hook
- Tapestry needle
- Scissors
- 2 stitch markers
- Rust-proof pins and a blocking mat or folded towel
- Ruler or tape measure
These amounts include a small extra for your test piece and for weaving in ends.
Abbreviations (US Terms)
- ch: chain
- sl st: slip stitch
- sc: single crochet
- hdc: half double crochet
- sc2tog: single crochet 2 together
- FPtr: front post treble crochet
- FPhdc / BPhdc: front post / back post half double crochet
- RS / WS: right side / wrong side
- st(s): stitch(es)
Special stitches
- FPtr (front post treble): Yarn over twice. Insert the hook from front to back to front around the post of the stitch two rows below, then pull up a loop. [Yarn over, pull through 2 loops] 3 times. Always skip the sc behind each FPtr so the stitch count stays the same.
- Front Cross (FC): Skip the next 2 FPtr two rows below. FPtr around each of the next 2. Then, working in front of the stitches you just made, FPtr around each of the 2 skipped stitches.
- Back Cross (BC): Skip the next 2 FPtr two rows below. FPtr around each of the next 2. Then, working behind the stitches you just made, FPtr around each of the 2 skipped stitches.
Alternate a Front Cross on the first four cable stitches with a Back Cross on the last four. This makes the three-strand braid.
Gauge and Checkpoints
Gauge: 16 sc and 18 rows = 4″ (10.2 cm) in sc. That is 4 sts and 4.5 rows per inch (2.5 cm).
Cuff gauge: 4 hdc per inch (2.5 cm), and about 3.2 hdc rows per inch.
Make one test mitten before you start a batch. For this design, the test mitten is the best gauge swatch.
Checkpoints:
- After Row 3: the hand is 14 sts and measures 3.5″ (8.9 cm) wide.
- After Row 18: the hand measures 4″ (10.2 cm) tall.
- After the thumb: the thumb sticks out about 0.9″ (2.3 cm) from the side.
- After the edging: the hand measures 4″ (10.2 cm) wide and 4.25″ (10.8 cm) tall.
- After the cuff: the total height is 5.5″ (14.0 cm).
If your mitten comes out too big, change to a smaller hook (3.75 mm). If it comes out too small, change to a larger hook (4.5 mm). The cables pull the center in a little, so measure across the widest flat part of the hand.
Pattern: Hand
Work in cream. Turn at the end of every row. The ch 1 at the start of each row does not count as a stitch.
Row 1 (RS): Ch 11. Sc in the 2nd ch from the hook and in each ch across. (10 sc)
Row 2 (WS): Ch 1, 2 sc in the first st, sc in the next 8 sts, 2 sc in the last st. (12 sc)
Row 3 (RS): Ch 1, 2 sc in the first st, sc in the next 2 sts. FPtr around each of the 6 center sts of Row 1, skipping the 6 sc behind them. Sc in the next 2 sts, 2 sc in the last st. (14 sts: 4 sc, 6 FPtr, 4 sc)
The increases in Rows 2 and 3 round off the fingertip end of the mitten.
Row 4 (WS): Ch 1, sc in each st across. (14 sc)
Row 5 (RS): Ch 1, sc in the next 4 sts, FC over the first 4 FPtr, FPtr around each of the last 2 FPtr, sc in the next 4 sts. (14 sts)
Row 6 (WS): Repeat Row 4. (14 sc)
Row 7 (RS): Ch 1, sc in the next 4 sts, FPtr around each of the first 2 FPtr, BC over the last 4 FPtr, sc in the next 4 sts. (14 sts)
Rows 8–15: Repeat Rows 4–7 twice.
Rows 16–17: Repeat Rows 4–5.
Row 18 (WS): Repeat Row 4. Fasten off, leaving a 4″ (10.2 cm) tail.
The cable rows run in this order: Row 5 FC, Row 7 BC, Row 9 FC, Row 11 BC, Row 13 FC, Row 15 BC, Row 17 FC. Every row from Row 3 on has 14 sts.
Tip: On each RS row, the FPtr stitches go around the FPtr stitches two rows below, which are the cable stitches you made on the last RS row. Count them in panel order from 1 to 6 before you cross. Once you cross, the strands swap places, but you still work them in order from left to right of the panel as they now sit.
Checkpoint: The hand is 14 sts wide and 18 rows tall, and it measures 3.5″ x 4″ (8.9 x 10.2 cm). You should see seven crossings forming a neat braid up the center.
Pattern: Thumb
You work the thumb in rows straight into the row ends on the right edge. Hold the piece RS facing, with the fingertips at the bottom.
Row 1 (RS): Join cream with a sl st in the row end of Row 9. Ch 1. Work 6 sc up the 8 row ends of Rows 9 to 16: sc in Rows 9, 10, 12, 13, 15 and 16, skipping Rows 11 and 14. (6 sc)
Row 2 (WS): Ch 1, sc in each st across. (6 sc)
Row 3 (RS): Ch 1, sc2tog, sc in the next 2 sts, sc2tog. (4 sts)
Row 4 (WS): Ch 1, [sc2tog] twice. (2 sts)
Fasten off and weave in the tail.
Checkpoint: The thumb is 1.5″ (3.8 cm) wide at the base and sticks out about 0.9″ (2.3 cm) from the hand.
Border, Cuff and Hanging Loop
Border Gauge
The edging uses the same gauge as the hand: 4 sc per inch (2.5 cm) along stitches and 4.5 rows per inch along row ends. Row ends are packed a little more tightly than stitches, so you need about 8 sc for every 9 row ends. That’s why you skip a row end every so often along the sides. This keeps the edge flat, without ruffling or cupping.
Edging Round (Cream)
Hold the piece RS facing. Join cream with a sl st in the row end of Row 18 on the left edge, the side without the thumb. Ch 1.
- Left side: Work 16 sc down the 18 row ends, skipping the row ends of Rows 12 and 6. (16 sc)
- Fingertip edge: Working into the free loops of the foundation chain, 2 sc in the first ch, sc in the next 8 ch, 2 sc in the last ch. (12 sc)
- Right side below the thumb: Work 7 sc up the row ends of Rows 1 to 8, skipping Row 6. (7 sc)
- Thumb, lower edge: 1 sc in each of the 4 thumb row ends. (4 sc)
- Thumb tip: 2 sc in each of the 2 sts of thumb Row 4. (4 sc)
- Thumb, upper edge: 1 sc in each of the 4 thumb row ends. (4 sc)
- Right side above the thumb: 1 sc in each row end of Rows 17 and 18. (2 sc)
Total: 16 + 12 + 7 + 4 + 4 + 4 + 2 = 49 sc. The right side, thumb included, has 21 sc.
Fasten off. Leave the top edge unworked for now.
Why the math works: The left side has 16 sc over 4″ (10.2 cm) of rows, which matches the 4 sc per inch gauge. The fingertip edge adds only 2 sts over the 10 foundation chains, because Rows 2 and 3 already made the curve. On the right side, the thumb covers 8 row ends. The 7 sc below it and the 2 sc above it cover the other 10, so all 18 rows are covered.
Checkpoint: The hand measures 4″ (10.2 cm) wide and 4.25″ (10.8 cm) tall. The edging adds 0.25″ (0.6 cm) to each side and to the fingertip end.
Cuff (Taupe)
You work the cuff across the top edge, into 16 sts: the last edging sc at the top right, the 14 sts of Row 18, and the first edging sc at the top left.
Cuff Row 1 (RS): Join taupe in the top-right edging sc. Ch 2 (does not count as a st). 2 hdc in the same st, hdc in each of the next 14 sts, 2 hdc in the last st. (18 hdc: 16 sts worked into + 2 increases)
Adding 2 sts makes the cuff sit just a little wider than the hand, like a real knitted cuff.
Cuff Row 2 (WS): Ch 2, hdc in the first st. *FPhdc around the next st, BPhdc around the next st; repeat from * 7 more times. Hdc in the last st. (18 sts: 1 hdc, 16 post sts, 1 hdc)
Cuff Rows 3–4: Repeat Row 2. (18 sts per row)
There are 16 post stitches between the end hdc, which is an even number. Because of that, repeating the same row lines the raised ribs up on the RS every time. Fasten off and weave in the ends.
Checkpoint: The cuff measures 1.25″ (3.2 cm) tall. Laid out unstretched, 18 sts would be 4.5″ (11.4 cm), but the ribbing pulls in to about 4.25″ (10.8 cm). The mitten is now 5.5″ (14.0 cm) tall.
Hanging Loop (Cream)
Hold the piece RS facing. Join cream with a sl st in the 9th st of Cuff Row 4. Ch 24. Sl st in the back bump of the 2nd ch from the hook and in each ch across. (23 sl st)
Fold the strip into a loop and sl st into the 10th st of Cuff Row 4. Fasten off. Use both tails to fasten the two ends of the loop firmly to the cuff.
Checkpoint: The loop stands about 2.5″ (6.4 cm) above the cuff. Hanging, the ornament is about 8″ (20.3 cm) tall overall.
Final Blocking
- Weave in all remaining ends on the WS. Hide cream tails in cream stitches and taupe tails in the cuff.
- Lay the mitten RS up on a blocking mat or folded towel.
- Pin it to 5″ (12.7 cm) wide including the thumb and 5.5″ (14.0 cm) tall. Pin only through the edging, never through the cable.
- Use your fingers to gently round the fingertip end and the thumb tip.
- Hold a steam iron about 1″ (2.5 cm) above the piece, or mist it lightly with water. Do not press down on the cable or the cuff ribbing.
- Let it dry completely before you take out the pins. This takes at least 2 hours.
Final Quality-Control Checklist
- The hand is 14 sts wide and 18 rows tall.
- The braid has 7 crossings, alternating front and back crosses.
- There are no holes beside the FPtr stitches.
- The thumb is on the right edge (RS facing) and has a smooth, rounded tip.
- The edging has 49 sc and lies flat, with no ripples.
- The cuff has 18 sts, and the ribs run straight up the RS.
- The loop is centered and firmly attached.
- The finished size is 5″ x 5.5″ (12.7 x 14.0 cm).
Troubleshooting
The cable looks flat. Make sure each FPtr goes around the post of the stitch two rows below, not into its top loops. Pull up the first loop to the height of the current row.
The stitch count drifts to 15 or 16. You missed skipping the sc behind an FPtr. Every RS row should count 4 sc, 6 FPtr and 4 sc.
There are holes beside the cable. Work the sc next to the cable more snugly, or use a smaller hook for just those stitches.
The braid twists the same way every time. You used the same cross twice in a row. Front Crosses always go on the first four cable stitches and Back Crosses on the last four.
The edging ruffles. Skip one more row end on each long side. If the edge cups instead, add one sc.
The cuff ribs zigzag. Check that every cuff row has exactly 16 post stitches between the end hdc.
The thumb points straight out. Block it again, angling the tip slightly toward the fingertips.
Care
Hand wash in cool water with a mild wool wash. Lay flat to dry, reshaping the cable and thumb. Store it flat or hanging, out of direct sunlight, so the cream stays bright.
Final Notes
Here are all the measurements, in order. The hand is 14 sts x 18 rows, or 3.5″ x 4″ (8.9 x 10.2 cm). The thumb adds about 0.9″ (2.3 cm). The 49-sc edging brings the hand to 4″ x 4.25″ (10.2 x 10.8 cm). The 18-st ribbed cuff adds 1.25″ (3.2 cm), for a finished mitten of 5″ x 5.5″ (12.7 x 14.0 cm). The loop adds 2.5″ (6.4 cm) above the cuff.
If your mitten matches each checkpoint as you go, the finished piece will match too. Make one, check it, then make as many as your tree needs.
Happy crocheting!