

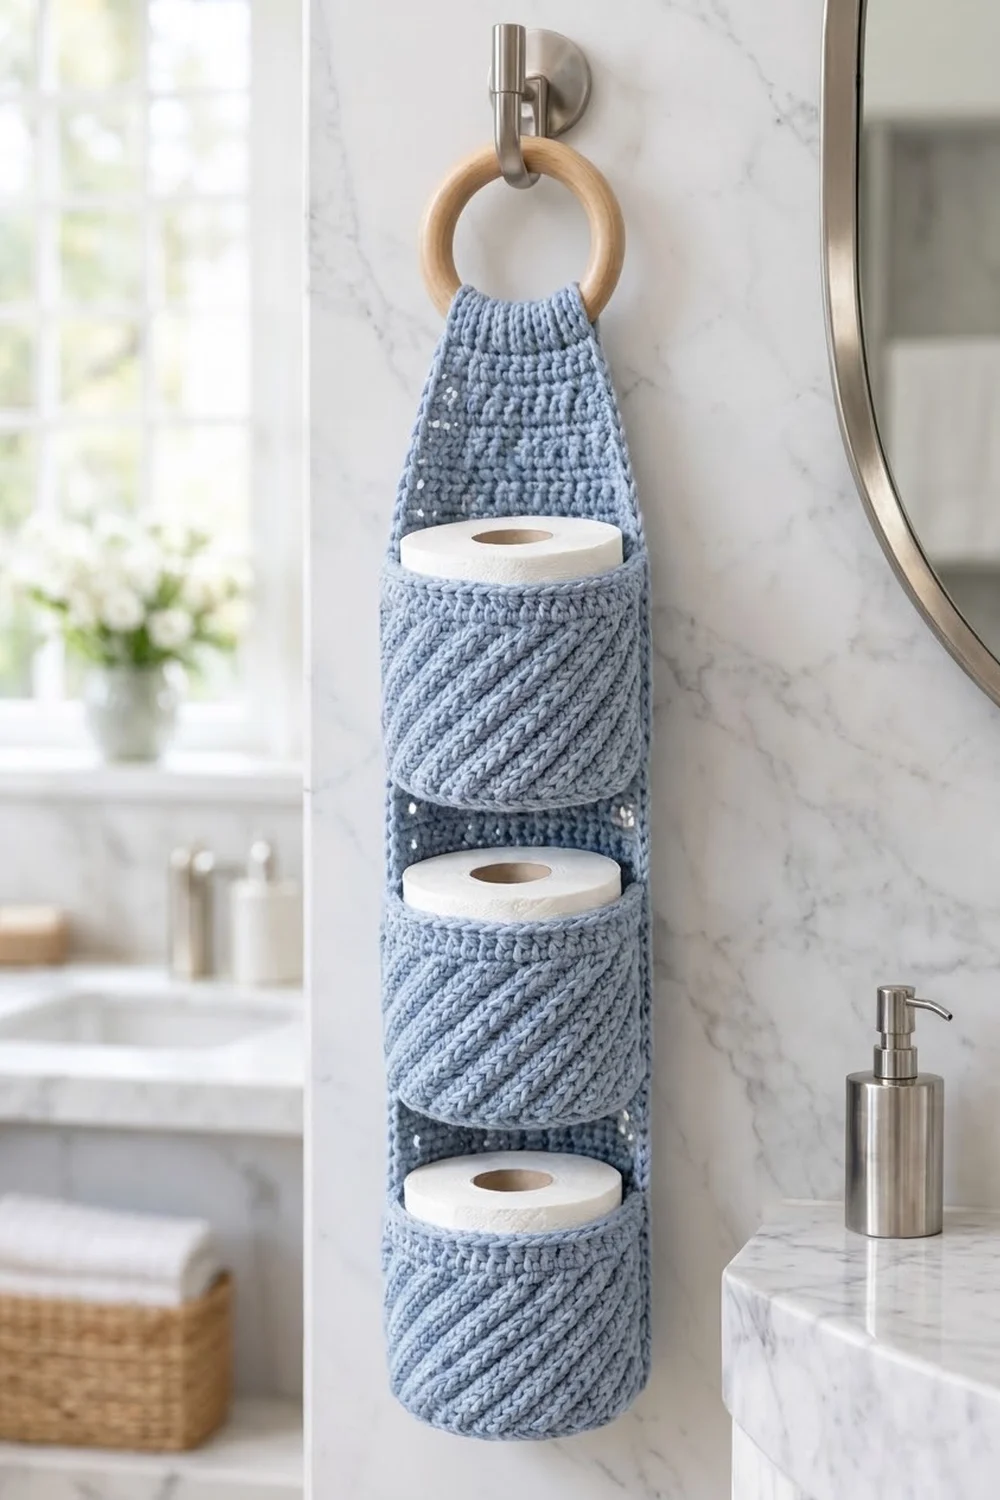
This hanging toilet paper holder keeps three spare rolls tidy and in reach. A long back panel hangs from a natural wooden ring, and three round-bottomed pockets are sewn down its front. Each pocket holds a standard roll upright.
The whole piece is made in one soft sky blue cotton. On each pocket, raised front post double crochet stitches move one stitch over every round, so diagonal ridges spiral around it. The back panel uses the same diagonal rib. At the top, the panel narrows into a ridged single crochet tab that folds over the ring.
The pattern uses US crochet terms. The finished back panel is 5.4 in (13.7 cm) wide and 29 in (73.7 cm) long before you fold the tab. When it hangs, the panel is about 27 in (68.6 cm) from the bottom edge to the fold. Each pocket is about 4.9 in (12.4 cm) across and 3.75 in (9.5 cm) tall.
Here’s how it goes together:
1. Crochet one flat back panel in rows, from the bottom up.
2. Make three pockets in joined rounds, starting each one with a flat circular base.
3. Sew the pockets onto the panel.
4. Add a single crochet border around the panel.
5. Fold the tab over the ring and sew it down.
Finished Size and Construction
- Finished panel size: 5.4 in x 29 in (13.7 cm x 73.7 cm) before folding
- Hanging length: about 27 in (68.6 cm) of panel, plus the ring
- Skill level: Intermediate (post stitches, shaping, seaming)
- Terminology: US crochet terms
- Yarn weight: Worsted / medium (#4) cotton
- Hook: 5.0 mm (H-8)
- Number of pieces: 4 (1 back panel and 3 pockets), plus 1 wooden ring
- Layout: 3 pockets stacked in one vertical column
- Pocket size: 4.9 in (12.4 cm) diameter x 3.75 in (9.5 cm) tall
- Panel size before border: 4.9 in x 28.5 in (12.4 cm x 72.4 cm)
- Border depth: 0.25 in (0.6 cm) on each edge
Materials
Choose a smooth worsted weight cotton or cotton blend. Cotton holds its shape, copes with bathroom humidity, and makes the post-stitch ridges stand out clearly. Avoid fuzzy or very drapey yarn, because the pockets need to stand open.
Yarn:
– Sky Blue: 300 g, about 510 m. That’s roughly 90 g for the panel, 50 g for each pocket, and 20 g for the border and seaming.
These amounts include a margin of roughly 15 percent for your gauge swatch and for differences in tension.
Tools:
– 5.0 mm (H-8) crochet hook
– Wooden ring, 3.5 in (8.9 cm) outer diameter and about 2.75 in (7.0 cm) inner diameter
– Tapestry needle
– 6 locking stitch markers
– Rustproof pins
– Measuring tape
– Scissors
Abbreviations (US Terms)
- ch – chain
- sl st – slip stitch
- sc – single crochet
- dc – double crochet
- dc2tog – double crochet 2 together
- BLO – back loop only
- st(s) – stitch(es)
- RS / WS – right side / wrong side
Special stitches:
– fpdc (front post double crochet): Yarn over. Insert the hook from front to back to front around the post of the stitch indicated, pull up a loop, and finish it like a normal dc.
– bpdc (back post double crochet): Yarn over. Insert the hook from back to front to back around the post of the stitch indicated, and finish it like a normal dc. When you work it on a WS row, it shows as a raised ridge on the RS.
The ch 2 at the start of a row or round never counts as a stitch.
Gauge and Checkpoints
Gauge:
– Diagonal rib pattern: 14 sts and 8 rows = 4 in (10.2 cm).
– Sc tab: 14 sts and 16 rows = 4 in (10.2 cm).
Make one pocket first. It’s quick, it uses the same stitches as the panel, and it shows you right away whether a roll will fit.
Checkpoints:
– Pocket base after Rnd 5: about 4.9 in (12.4 cm) across, lying flat.
– Pocket base circumference: about 15.4 in (39.1 cm).
– Pocket height after Rnd 14: 3.75 in (9.5 cm).
– Panel width at Row 2: 4.9 in (12.4 cm).
– Panel length after Row 44: 22 in (55.9 cm).
If your size is off:
– Too big: go down one hook size.
– Too small, or the roll won’t fit: go up one hook size.
– Base cups up: your tension is tight. Loosen up instead of adding stitches.
– Base ripples: use a smaller hook.
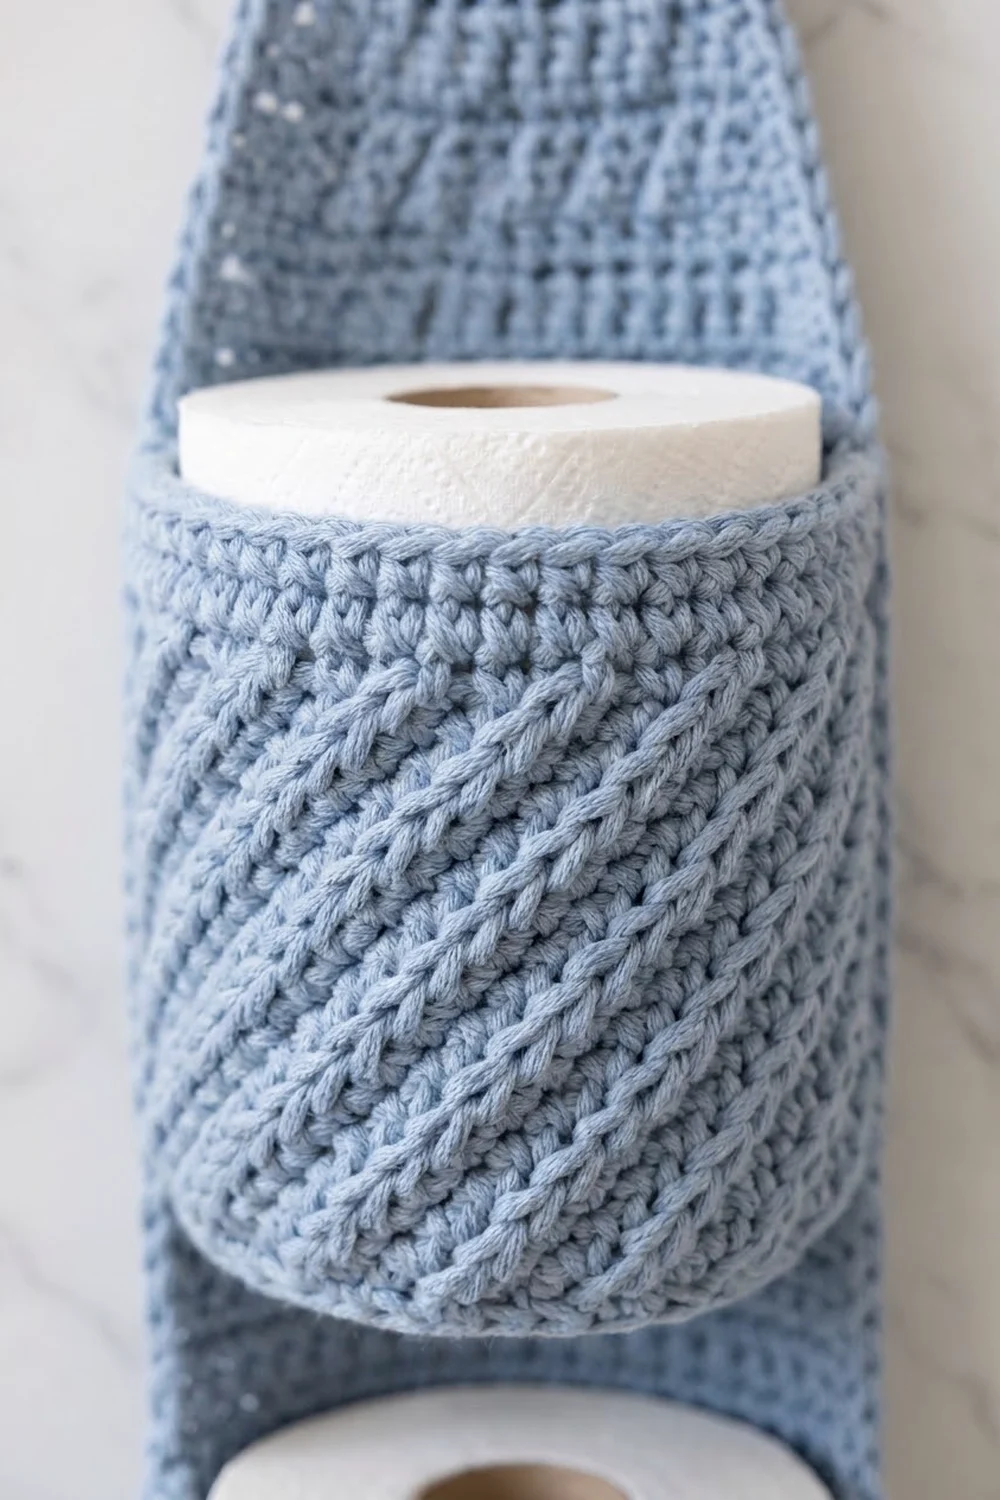
Pockets (Make 3)
Work in joined rounds with the RS facing you. Do not turn.
Rnd 1: Make a magic ring, ch 2, work 12 dc in the ring, then sl st to the first dc to join. (12 sts)
Rnd 2: Ch 2, 2 dc in each st around, join. (24 sts)
Rnd 3: Ch 2, dc in next st, 2 dc in next st 12 times, join. (36 sts)
Rnd 4: Ch 2, dc in next 2 sts, 2 dc in next st 12 times, join. (48 sts)
Rnd 5: Ch 2, dc in next 7 sts, 2 dc in next st 6 times, join. (54 sts)
Check the base now. It should lie flat and measure about 4.9 in (12.4 cm) across.
Rnd 6 (turning round): Ch 1, sc in BLO of each st around, join. (54 sts) The unworked front loops make a crisp ridge where the base turns up into the wall.
Rnd 7: Ch 2, fpdc around next st, dc in next 2 sts 18 times, join. (54 sts: 18 fpdc, 36 dc)
Rnd 8: Ch 2, dc in first st, fpdc around next st, dc in next 2 sts 17 times, fpdc around next st, dc in last st, join. (54 sts: 18 fpdc, 36 dc)
Rnd 9: Ch 2, dc in first 2 sts, fpdc around next st, dc in next 2 sts 17 times, fpdc around last st, join. (54 sts: 18 fpdc, 36 dc)
On each round, every fpdc goes around the dc just to the left of the post below it. That one-stitch shift is what builds the diagonal ridges.
Rnds 10–12: Repeat Rnds 7–9. (54 sts each round)
Rnds 13–14: Ch 1, sc in each st around, join. (54 sts each round) Fasten off and leave a 40 in (101.6 cm) tail for sewing.
The pocket wall is 3.75 in (9.5 cm) tall:
– Rnd 6: 0.25 in (0.6 cm)
– Rnds 7–12: 3 in (7.6 cm)
– Rnds 13–14: 0.5 in (1.3 cm)
Back Panel
You’ll work the panel in rows from the bottom up. Even-numbered rows are RS rows.
The diagonal rib repeats every 6 rows and uses three stitch sequences. In the sequences, “post” means a fpdc on RS rows and a bpdc on WS rows.
- Sequence X: Ch 2, dc in first st, post around next st, dc in next 2 sts 5 times, dc in last st. (17 sts)
- Sequence Y: Ch 2, dc in first 2 sts, post around next st, dc in next 2 sts 5 times. (17 sts)
- Sequence Z: Ch 2, dc in first 3 sts, post around next st, dc in next 2 sts 4 times, post around next st, dc in last st. (17 sts)
Every row has 5 posts, and the first and last stitches are always plain dc.
Row 1 (WS): Ch 19, dc in 3rd ch from hook and in each ch across, turn. (17 sts)
Row 2 (RS): Work Sequence X using fpdc, turn.
Row 3 (WS): Work Sequence Y using bpdc, turn.
Row 4 (RS): Work Sequence Z using fpdc, turn.
Row 5 (WS): Work Sequence Z using bpdc, turn.
Row 6 (RS): Work Sequence Y using fpdc, turn.
Row 7 (WS): Work Sequence X using bpdc, turn.
From the RS, the ridges move one stitch to the left on every row.
Rows 8–43: Repeat Rows 2–7 six more times, for 7 repeats in all. (17 sts each row)
Row 44 (RS): Ch 2, dc in each st across, turn. (17 sts)
Checkpoint: the panel measures 4.9 in x 22 in (12.4 cm x 55.9 cm).
Taper
Row 45: Ch 2, dc2tog, dc in each st to the last 2 sts, dc2tog, turn. (15 sts)
Rows 46–49: Repeat Row 45. (13, 11, 9, then 7 sts)
The taper adds 2.5 in (6.4 cm).
Tab
Rows 50–65: Ch 1, sc in BLO of each st across, turn. (7 sts each row)
The tab is 2 in (5.1 cm) wide and 4 in (10.2 cm) long. Fasten off and leave a short tail. You’ll come back to this corner to start the border.
Checkpoint: before the border, the panel measures 4.9 in x 28.5 in (12.4 cm x 72.4 cm).
Make All Pieces
All pieces are in Sky Blue:
– Back panel: 1
– Pockets: 3
Layout (front view, top to bottom):
      [ RING ]
      [ TAB  ]
     /  TAPER \
    | panel    |
    | POCKET 3 |  rim at Row 33
    | panel    |
    | POCKET 2 |  rim at Row 21
    | panel    |
    | POCKET 1 |  rim at Row 9
    |__________|
Joining
Sew the pockets on before you work the border. That way the pocket seams sit inside the panel’s edge stitches, and the border stays smooth.
Method: Whipstitch with each pocket’s yarn tail, going through both loops.
Stitch-to-stitch logic:
– On each pocket, mark 17 sts in a row on Rnd 14 as the back section.
– Place the round joins inside this section so they’re hidden against the panel.
– Sew those 17 rim sts one-to-one to the 17 sts across the top of a panel row.
– The other 37 rim sts form the curved front of the pocket.
Placement:
– Pocket 1: rim on top of Row 9, 4.5 in (11.4 cm) from the bottom edge. Base along Row 2.
– Pocket 2: rim on top of Row 21, 10.5 in (26.7 cm) from the bottom edge. Base along Row 14.
– Pocket 3: rim on top of Row 33, 16.5 in (41.9 cm) from the bottom edge. Base along Row 26.
The rims are 6 in (15.2 cm) apart. That leaves a 2.25 in (5.7 cm) gap between one rim and the next pocket’s base, so each roll has room to stick out above its pocket.
Steps:
1. Pin the 17 back rim sts along the chosen row. Whipstitch across, joining one rim st to one panel st.
2. Sew down each side of the pocket, from the rim to the Rnd 6 ridge, through the outermost column of panel stitches.
3. Sew the 17 back sts of the Rnd 6 ridge across the base row.
Tension: Pull each stitch snug but not tight. If the seam gathers, it’s too tight. If it gaps, it’s too loose.
Checkpoint: The panel is still 4.9 in (12.4 cm) wide at every pocket, and each pocket opens to about 4.9 in (12.4 cm) across.
Border
Border gauge: 14 sc = 4 in (10.2 cm), the same as the body gauge.
With the RS facing, join the yarn in the top corner of the tab, at the end of Row 65. Work down the first long side, across the bottom, up the second long side, and across the top.
Rnd 1:
– Side 1 (103 sts):
– Tab: 16 sc, 1 in the end of each sc row.
– Taper: 10 sc, 2 in the end of each dc row.
– Body: 77 sc across the 44 body rows. Work the row-ends in groups of 4, putting 2 sc, 2 sc, 2 sc and 1 sc in them.
– Bottom (21 sts): Work into the foundation chains. Put 3 sc in the first ch, sc in the next 15 chs, and 3 sc in the last ch.
– Side 2 (103 sts): Work the same as Side 1 in reverse: 77 sc on the body, 10 sc on the taper, then 16 sc on the tab.
– Top (11 sts): 3 sc in the first st, sc in the next 5 sts, 3 sc in the last st.
Join with a sl st. (238 sts: 103 + 21 + 103 + 11)
Rnd 2: Sl st in the BLO of each st around. (238 sl sts) Fasten off.
Why the math works:
– At 3.5 sts per inch, the 22 in (55.9 cm) body needs 77 sc.
– Each dc row is 0.5 in (1.3 cm) tall, so it needs 1.75 sc. That’s 7 sc per 4 rows, and 11 groups of 4 rows give exactly 77.
– The taper edges slant, so they need the fuller 2 sc per row.
– The sc tab rows are 0.25 in (0.6 cm) tall, so 1 sc per row lies flat.
– The 3-sc corners are already counted in the bottom and top totals: 3 + 15 + 3 = 21 and 3 + 5 + 3 = 11.
Final panel: 5.4 in x 29 in (13.7 cm x 73.7 cm).
Attach the Ring
- Pass the tab through the ring from front to back.
- Fold the tab in half so its top edge meets the WS at the base of the tab (Row 50).
- Whipstitch the 11 top border sts across that row.
The fold takes up 2 in (5.1 cm), so the panel now hangs 27 in (68.6 cm).
Final Blocking
- Weave in all ends along the seams or through the backs of the post stitches.
- Mist the whole piece with water until it’s damp but not dripping.
- Lay the panel flat with the RS up and smooth it to 5.4 in (13.7 cm) wide.
- Put a toilet roll wrapped in a plastic bag inside each pocket so the pockets dry round.
- Pin the panel edges straight and keep the diagonal ridges parallel.
- Let it dry completely, for at least 12 hours, before you hang it.
Final Quality-Control Checklist
- Each pocket base lies flat and measures 4.9 in (12.4 cm) across.
- Each pocket has 54 sts on every round and 18 diagonal ridges.
- The panel has 17 sts in every body row and 7 sts in every tab row.
- The border has 238 sts, with clean 3-sc corners.
- The pocket rims are level and 6 in (15.2 cm) apart.
- All round joins are hidden against the panel.
- The tab fold is secure and the ring hangs centered.
- No yarn ends show on the RS.
Troubleshooting
The ridges stack straight up instead of slanting. You worked the post around the same stitch as the round below. Move one stitch to the left on every round.
The pocket base cups. Your tension is tight. Use a larger hook for Rnds 1–5 only.
The roll won’t fit. Your gauge is tight. Remake the pocket with a hook one size larger.
The panel edges ripple. There are too many border sc. Count each side and make sure it has exactly 103.
The panel pulls in at the pockets. The rim seam is too tight. Resew it with looser whipstitches.
The tab won’t go through the ring. Use a ring with an inner diameter of at least 2.75 in (7.0 cm).
Care
Hand wash in cool water with mild soap, then roll it in a towel to press out the water. Dry flat with the pockets reshaped, and don’t tumble dry.
Final Notes
Here’s the full measurement chain:
– Each pocket base grows to 54 sts and 4.9 in (12.4 cm) across, and the wall rises 3.75 in (9.5 cm).
– The panel is 17 sts, or 4.9 in (12.4 cm), wide.
– The body is 22 in (55.9 cm) long, and the taper and tab bring it to 28.5 in (72.4 cm).
– The border brings the panel to 5.4 in x 29 in (13.7 cm x 73.7 cm).
– After the fold, it hangs 27 in (68.6 cm).
Check each stage as you go, and the pockets will line up and the rolls will fit.
Happy crocheting!