

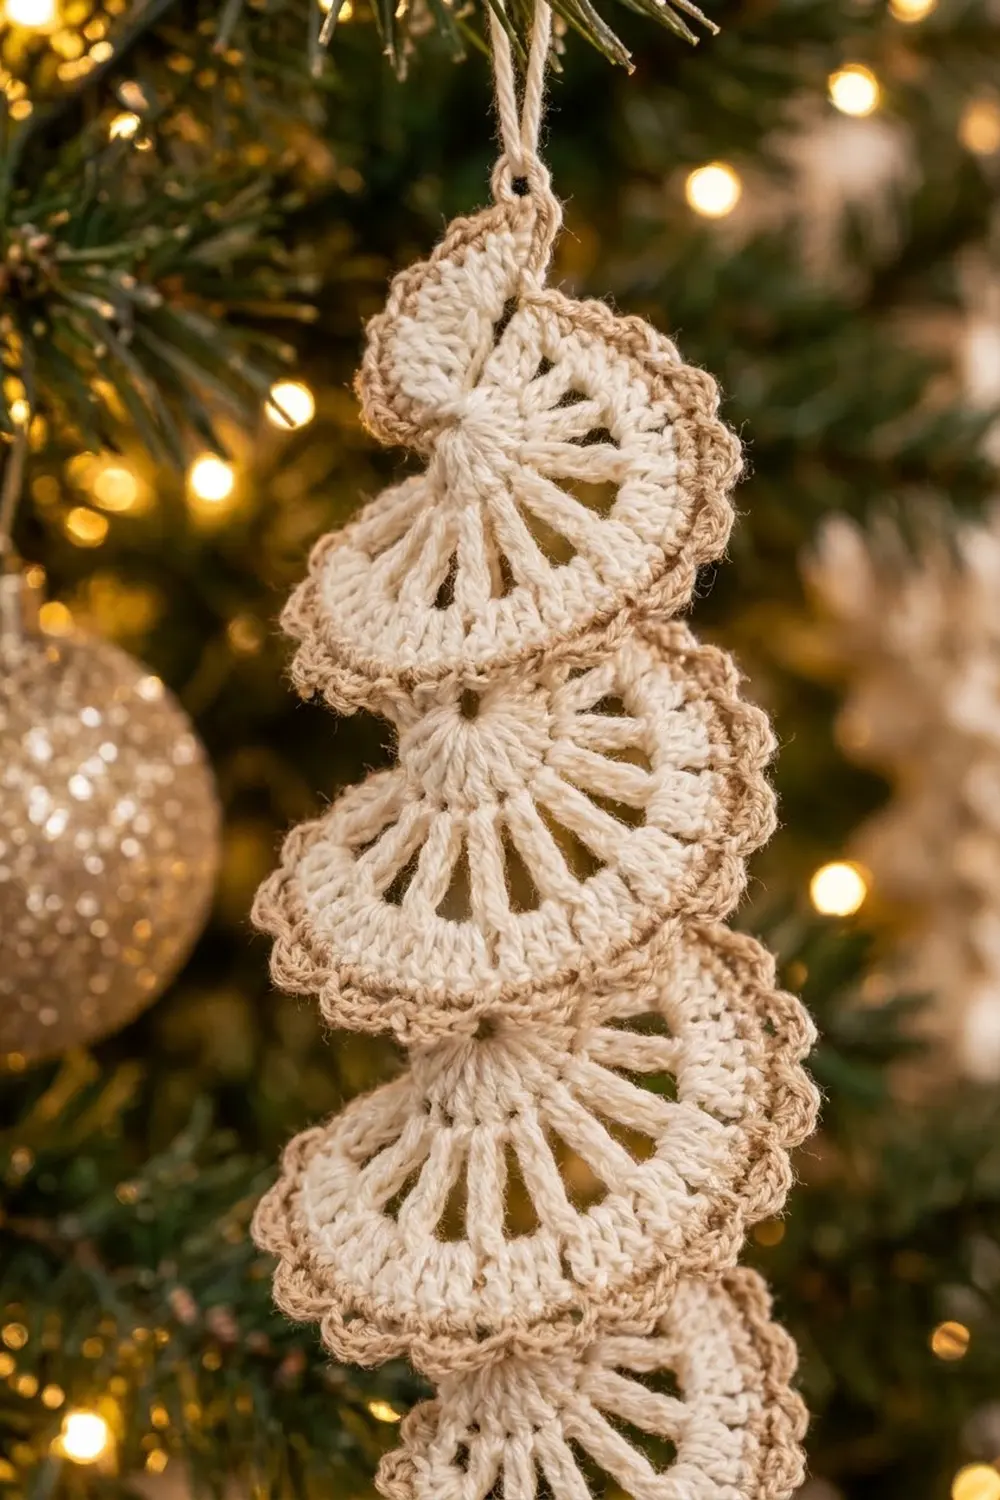
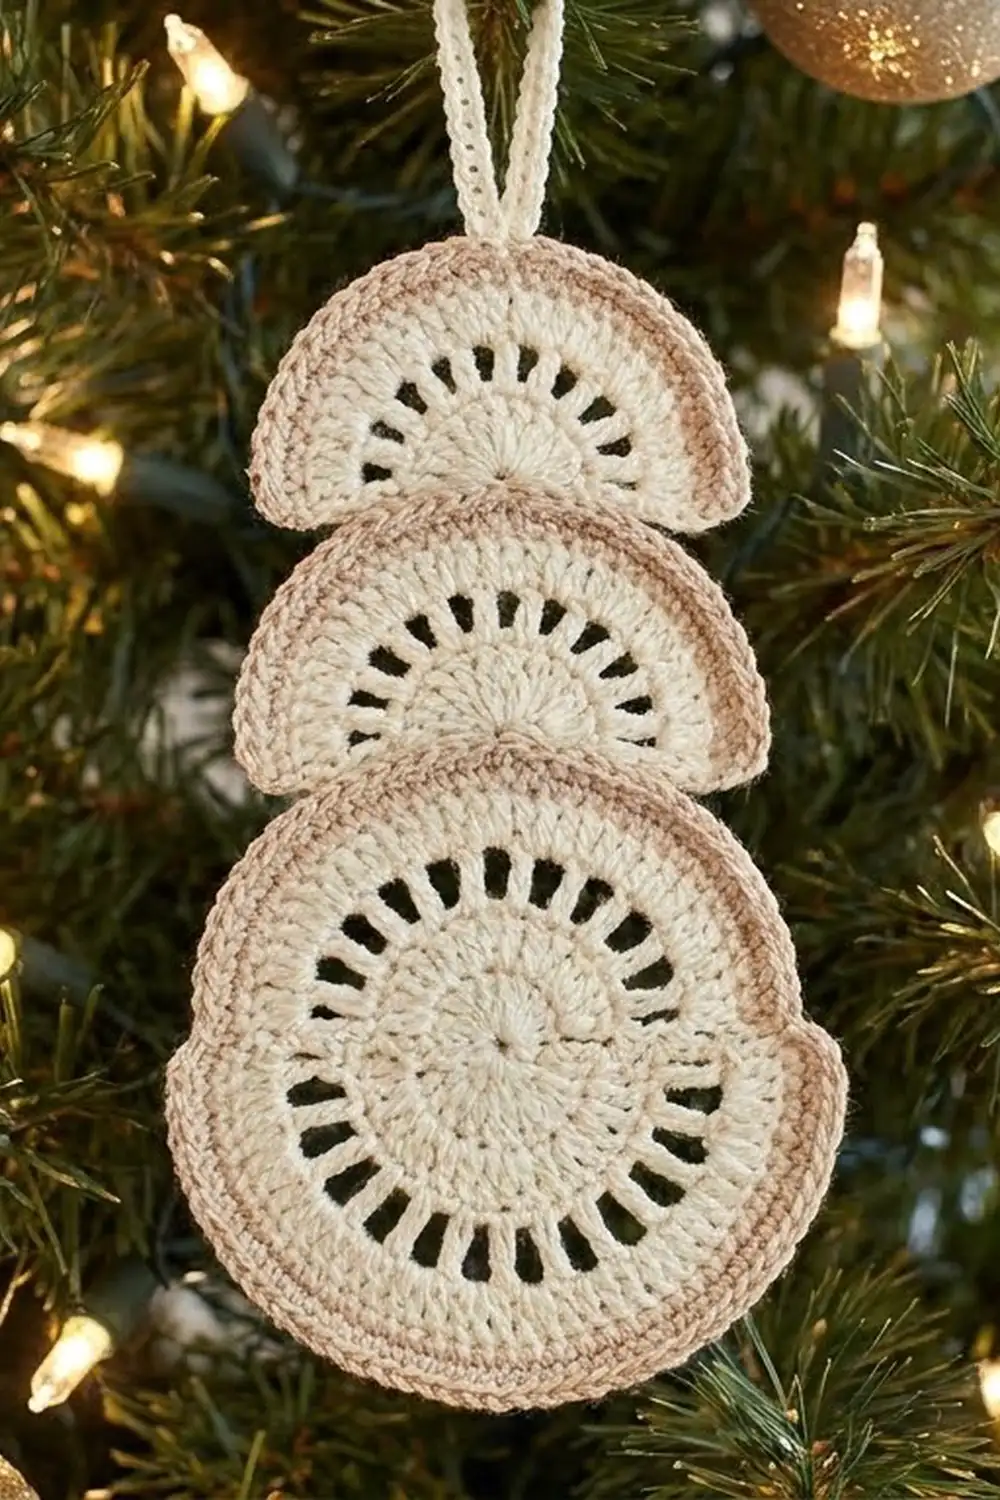
This Spiral Fan Tree Ornament is a stack of five little lace fans that hang in a column like a slim, twisting Christmas tree. Each fan has a solid cream center, a ring of open spokes, a smooth cream band and a fine tan scalloped edge.
The palette is soft and neutral: cream thread for the fans and a warm tan for the edging and hanging loop. It looks at home with gold and champagne baubles, and it also works well on a farmhouse or Scandinavian-style tree.
The pattern uses US crochet terms. The finished ornament measures about 3.5 in (8.9 cm) wide and 6.5 in (16.5 cm) tall, not counting the loop. With the loop, it hangs about 8.5 in (21.6 cm) long.
The construction is simple. You work all five cream fans as one continuous strip. Each fan is made in turned rows into a small ring, and a hidden chain stem leads from one fan to the next. Then you add the tan scalloped border to each curved edge, attach the hanging loop and block the ornament so the tiers lean in turn.
Finished Size and Construction
- Finished size: 3.5 in (8.9 cm) wide x 6.5 in (16.5 cm) tall, plus a 2 in (5.1 cm) loop
- Skill level: Easy+ (simple turned rows, careful counting)
- Terminology: US crochet terms
- Yarn weight: Size 3 cotton crochet thread (Lace / 0)
- Hook: 2.25 mm (US B-1)
- Number of pieces: 1 (all five fans are worked as one continuous strip)
- Layout: 5 fan tiers in a single vertical column, linked by chain stems
- Piece size: Small fan 2.25 in (5.7 cm) across before the border; large fan 2.75 in (7.0 cm) across before the border
- Size before border: about 3 in (7.6 cm) wide x 6.25 in (15.9 cm) tall
- Border depth: 0.25 in (0.6 cm)
Materials
Choose a smooth mercerized cotton thread in size 3. It gives crisp spokes and holds its shape well after blocking. Any thread with roughly 250 to 300 m per 100 g will work.
- Cream (Color A): 12 g, about 34 m, for all fans
- Tan (Color B): 4 g, about 11 m, for the border and hanging loop
These quantities include a small safety margin.
Tools:
– 2.25 mm (US B-1) crochet hook
– Tapestry needle
– Small scissors
– Locking stitch markers
– Ruler or tape measure
– Blocking mat and rust-proof pins
– Spray starch or fabric stiffener (optional)
Abbreviations (US Terms)
- ch – chain
- sl st – slip stitch
- sc – single crochet
- dc – double crochet
- tr – treble crochet
- sp – space
- st(s) – stitch(es)
- RS / WS – right side / wrong side
Special stitch: ch-3 scallop. Ch 3, skip the number of stitches given, then sc in the next stitch. This makes the tiny loop seen along the tan edge.
Gauge and Checkpoints
Gauge: 8 sc = 1 in (2.5 cm) using the 2.25 mm hook.
Gauge isn’t critical for an ornament, but it does control how the fans overlap. Make Fan 1 first and measure it before going on.
Checkpoints:
– After Row 2 of any fan: the straight edge measures 1.4 in (3.6 cm) across.
– After Row 4 of a small fan: 2.25 in (5.7 cm) across the straight edge and 1.1 in (2.8 cm) from the ring to the curved edge.
– After Row 4 of a large fan: 2.75 in (7.0 cm) across.
– After the border: a small fan is 2.75 in (7.0 cm) across and a large fan is 3.25 in (8.3 cm) across.
If your fan is too big, go down to a 2.0 mm hook. If it is too small, go up to a 2.5 mm hook. If the curved edge ruffles a lot, your dc are short compared with your chains. Loosen your dc slightly rather than changing the stitch counts.
Pattern
Fan Structure Overview
Every fan has 4 turned rows worked into a ring:
– Row 1: solid dc center (RS)
– Row 2: increase row (WS)
– Row 3: open spoke row (RS)
– Row 4: solid sc band (WS)
Small fans (Fans 1 and 2) use dc spokes with ch-1 spaces.
Large fans (Fans 3, 4 and 5) use tr spokes with ch-2 spaces.
This is the only difference between the two sizes. It makes the lower tiers slightly larger while keeping the same 14 spokes in every fan.
Keep all Row 1 stitches on one half of the ring. The other half stays free for the stem or the hanging loop.
Fan 1 (Small, Top Tier)
With Color A, ch 4, sl st in first ch to form a ring.
Row 1 (RS): Ch 3 (counts as dc), 6 dc in ring, keeping all sts on one half of the ring. Turn. (7 dc)
Row 2 (WS): Ch 3 (counts as dc), dc in same st, 2 dc in each of next 6 sts. Turn. (14 dc)
Row 3 (RS, spokes): Ch 4 (counts as dc + ch 1), dc in next st, ch 1, dc in next st; repeat from * 12 more times, working the last dc in the top of the turning ch. Turn. (14 dc spokes, 13 ch-1 sps)*
Check: 1 turning-ch spoke + 1 + 12 = 14 spokes. The spaces are 1 + 12 = 13.
Row 4 (WS, conversion row): Ch 1, sc in first dc, sc in next ch-1 sp, sc in next dc; repeat from * 13 times, working the last sc in the 3rd ch of the turning ch. Do not turn. (27 sc)*
Count: 14 sc (1 per dc spoke) + 13 sc (1 per ch-1 sp) = 27 sc.
Travel to the center: Working along the straight edge toward the ring, sl st 1 in the end of Row 4, 2 in the end of Row 3, 2 in the end of Row 2 and 2 in the end of Row 1. Then sl st 1 in the free half of the ring. (8 sl sts) Your hook is now at the center top of the fan.
Stem: Ch 14, sl st in 4th ch from hook to form the next ring. This leaves a 10-ch stem, about 1 in (2.5 cm) long. Let the stem hang down behind Fan 1, on the WS.
Fan 2 (Small)
Work Rows 1 to 4 exactly as for Fan 1 into the new ring. Work Row 1 on the half of the ring farthest from the stem, so the fan opens downward. (7 dc, 14 dc, 14 spokes + 13 sps, 27 sc)
Travel to the center with 8 sl sts as before. Then make the stem: ch 14, sl st in 4th ch from hook.
Checkpoint: The straight top edge of Fan 2 should sit just behind the cream band of Fan 1. If there is a gap above Fan 2, tighten the stem chains. If Fan 2 is buried too deeply, add 1 ch to each later stem.
Fans 3, 4 and 5 (Large)
Row 1 (RS): Ch 3 (counts as dc), 6 dc in ring, on the half farthest from the stem. Turn. (7 dc)
Row 2 (WS): Ch 3 (counts as dc), dc in same st, 2 dc in each of next 6 sts. Turn. (14 dc)
Row 3 (RS, spokes): Ch 6 (counts as tr + ch 2), tr in next st, ch 2, tr in next st; repeat from * 12 more times, working the last tr in the top of the turning ch. Turn. (14 tr spokes, 13 ch-2 sps)*
Row 4 (WS, conversion row): Ch 1, sc in first tr, 2 sc in next ch-2 sp, sc in next tr; repeat from * 13 times, working the last sc in the 4th ch of the turning ch. Do not turn. (40 sc)*
Count: 14 sc (1 per tr spoke) + 26 sc (2 per ch-2 sp x 13) = 40 sc.
Travel to the center: Sl st 1 in the end of Row 4, 3 in the end of Row 3, 2 in the end of Row 2 and 2 in the end of Row 1. Then sl st 1 in the free half of the ring. (9 sl sts)
Stem (after Fans 3 and 4 only): Ch 14, sl st in 4th ch from hook. Begin the next fan.
After Fan 5: Skip the travel and stem. Fasten off Color A after Row 4 and leave a 4 in (10.2 cm) tail.
Checkpoint before the border: Lay the strip flat with each fan overlapping the next. It should measure about 6.25 in (15.9 cm) from the top of the Fan 1 ring to the bottom of Fan 5, and about 3 in (7.6 cm) at its widest.
Border
The tan border is a single row of ch-3 scallops along the curved edge of each fan. You work it with the RS facing, one fan at a time.
Border gauge: About 4 scallops per 1 in (2.5 cm) on the small fans and 3 per 1 in (2.5 cm) on the large fans. The border adds 0.25 in (0.6 cm) all around the curve.
Small Fans (Fans 1 and 2)
With the RS facing, join Color B with a sc in the first sc of Row 4 at the right-hand corner. Ch 3, skip next sc, sc in next sc; repeat from * 13 times. Fasten off. (14 sc, 13 ch-3 scallops)*
Why the math works: The base is 27 sc. The first sc uses 1 st, and each repeat uses 2 sts (1 skipped + 1 sc). 1 + (13 x 2) = 27, so the last sc lands exactly in the corner stitch.
Large Fans (Fans 3, 4 and 5)
With the RS facing, join Color B with a sc in the first sc of Row 4 at the right-hand corner. Ch 3, skip next 2 sc, sc in next sc; repeat from * 13 times. Fasten off. (14 sc, 13 ch-3 scallops)*
Why the math works: The base is 40 sc. The first sc uses 1 st, and each repeat uses 3 sts. 1 + (13 x 3) = 40, so the border ends exactly in the opposite corner.
Every fan has 13 scallops. The edging looks even from top to bottom, and the scallops spread a little wider on the larger tiers. In total there are 65 scallops.
Hanging Loop
Join Color B with a sl st to the free half of the Fan 1 ring at the very top. Ch 40, sl st in the same spot and fasten off. This makes a loop about 2 in (5.1 cm) long when folded. Weave all tails into the back of the cream bands.
Final Blocking
- Dampen the ornament lightly with cool water, or spray it until it is evenly moist.
- Lay it RS up on the blocking mat.
- Pin the top of the hanging loop and the Fan 1 ring to set the vertical line.
- Shape each fan into a smooth half circle and pin both corners of its straight edge.
- Open the spokes evenly so all 13 gaps match.
- Tilt the fans in turn by about 15 degrees: Fans 1, 3 and 5 lean slightly right, and Fans 2 and 4 lean slightly left. The flexible stems allow this.
- Pin out the tan scallops, using one pin per loop or one every other loop.
- Check the overall size: 3.5 in (8.9 cm) wide and 6.5 in (16.5 cm) tall.
- Spray with starch if you want a crisper finish. Let the ornament dry completely before unpinning.
Final Quality-Control Checklist
- Five fans: two small at the top, three large below
- Every fan has 14 spokes and 13 open spaces
- Row 4 counts: 27 sc on small fans, 40 sc on large fans
- Every border has exactly 13 scallops and ends in the corner stitch
- Stems are hidden behind the fan above
- Each straight top edge is tucked under the fan above
- Tiers lean alternately left and right
- Hanging loop is centered and secure
- All tails are woven in invisibly
- Finished size is 3.5 in (8.9 cm) x 6.5 in (16.5 cm), plus a 2 in (5.1 cm) loop
Troubleshooting
The fan cups instead of lying flat. Your Row 2 increases are too tight. Use a hook 0.25 mm larger for Rows 1 and 2 only.
The curved edge ruffles. Your chain spaces are loose. Chain more firmly in Row 3. On large fans only, you can work 1 sc per ch-2 space instead, but then change that fan’s border repeat to skip 1.
The border ends one stitch short or long. Recount Row 4 before adding the border. You should have 27 sc on a small fan or 40 sc on a large fan.
The stems show between tiers. Shorten each stem by 1 or 2 ch, or block the fans with more overlap.
The ornament hangs crooked. Re-pin the loop exactly at the center of the Fan 1 ring and re-block.
The ring hole is too large. Pull the starting tail snugly before you weave it in.
Care
Hand wash in cool water with mild soap, press out the water in a towel and re-block flat to dry. Store the ornament flat or hanging, away from heavy decorations that might crush the fans.
Final Notes
The measurement chain is short and easy to check. Start with a gauge of 8 sc per 1 in (2.5 cm). Row 2 should be 1.4 in (3.6 cm) across. Small fans reach 2.25 in (5.7 cm) and large fans reach 2.75 in (7.0 cm). Before the border, the strip is about 3 in (7.6 cm) x 6.25 in (15.9 cm). The 0.25 in (0.6 cm) border brings it to 3.5 in (8.9 cm) x 6.5 in (16.5 cm), plus the 2 in (5.1 cm) hanging loop.
Check each stage as you go and the fans will stack neatly into a light, twisting little tree. Make several in matching colors for a coordinated tree, or use them as gift toppers.
Happy crocheting!