

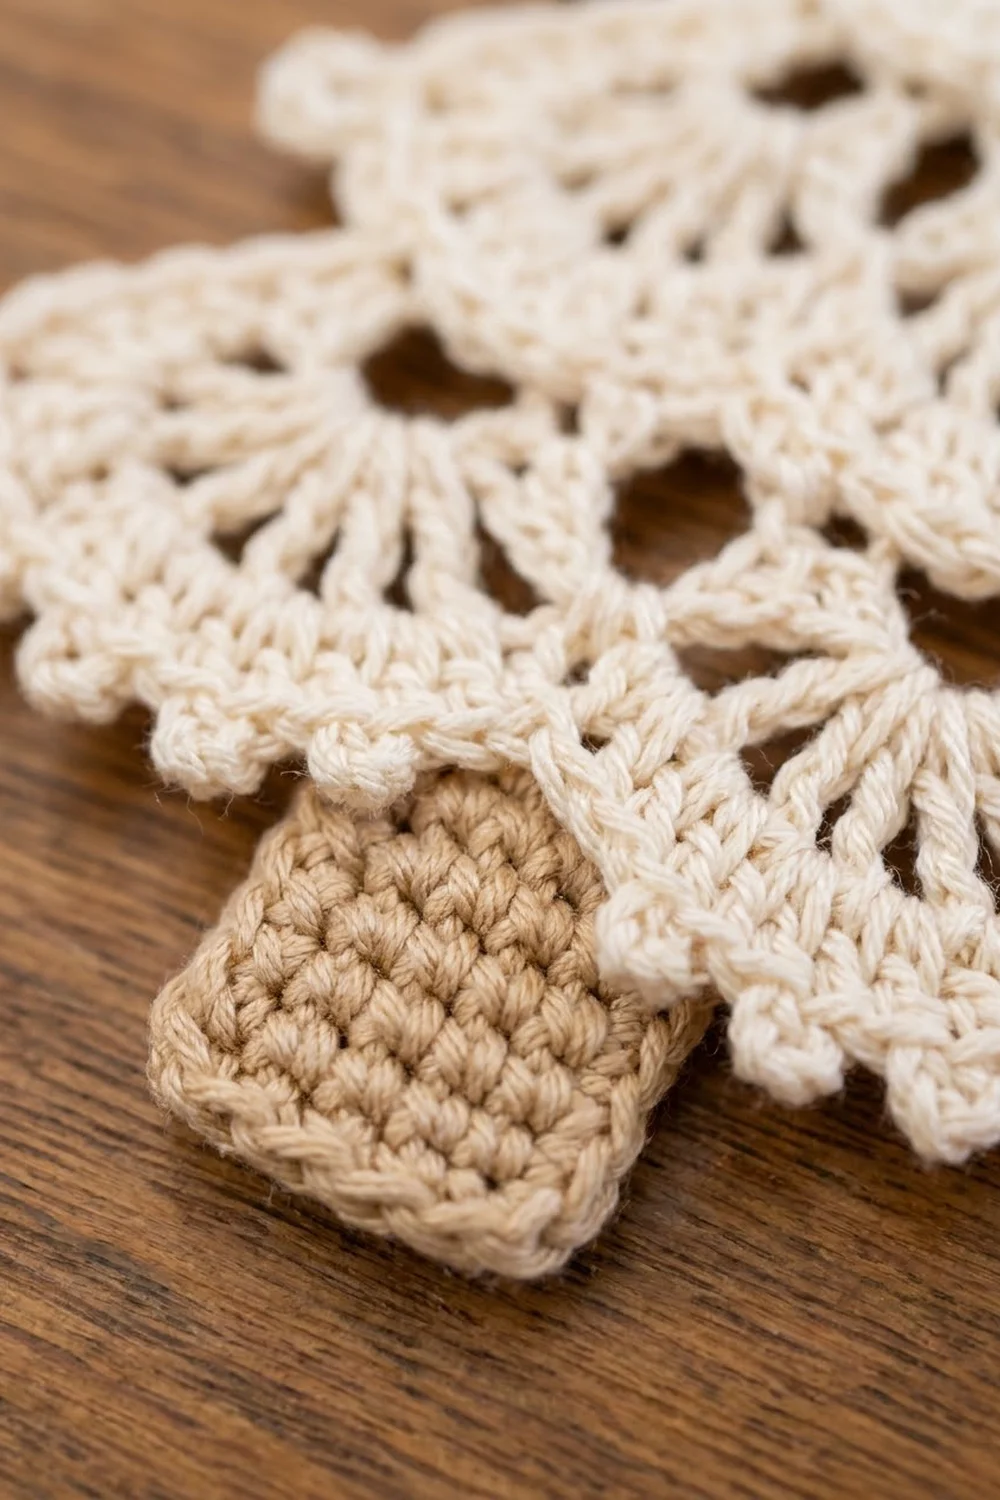
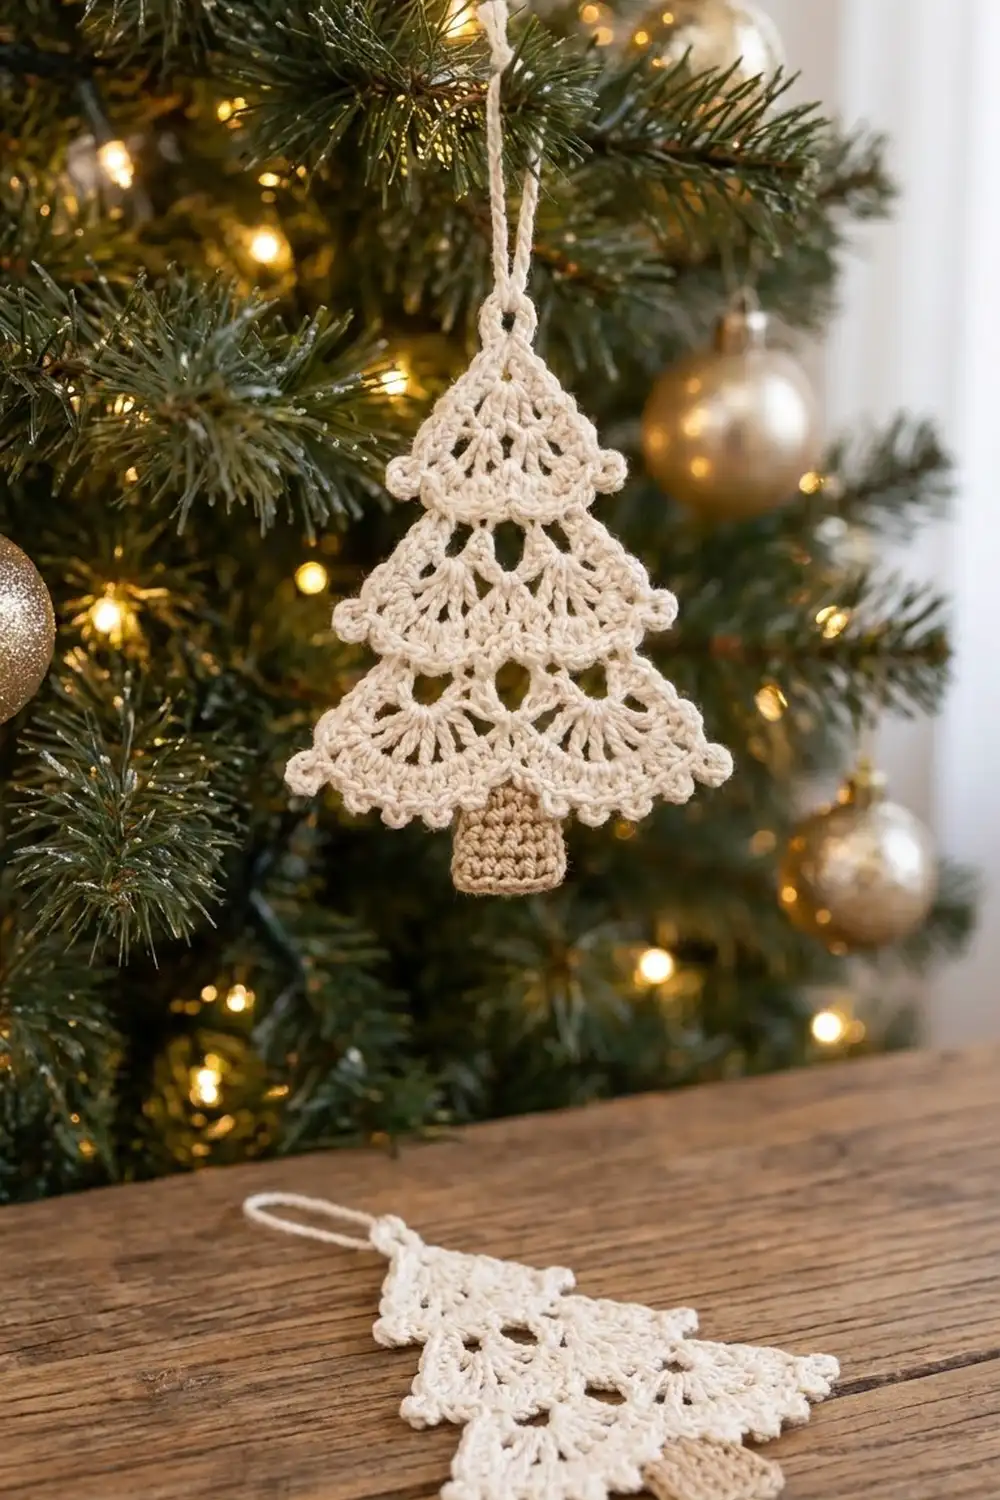
The Frosted Lace Tree is a small, flat ornament that looks like a hand-tatted snowflake shaped into a Christmas tree. Four tiers of lacy fans step outward from a pointed top. Little picots mark every tier tip, and a neat tan trunk sits under the center.
The palette is simple: soft cream for the tree and light tan for the trunk. It suits a natural, Scandinavian-style tree, fits easily in a gift card, and makes a good package topper.
This pattern uses US crochet terms. The finished ornament measures 3.25 in (8.3 cm) wide and 3.75 in (9.5 cm) tall including the trunk. The hanging loop adds about 1.5 in (3.8 cm).
The tree is worked flat in rows from the top tip down. Each new tier adds one fan. A single border round adds the picots and the hanging loop. The trunk is then worked straight off the bottom edge, so there is nothing to sew.
Finished Size and Construction
- Finished size: 3.25 in (8.3 cm) wide × 3.75 in (9.5 cm) tall, not counting the loop
- Skill level: Easy-intermediate
- Terminology: US crochet terms
- Yarn weight: Size 3 mercerized cotton crochet thread (close to fingering weight)
- Hook: 2.25 mm (B-1)
- Number of pieces: 1 (the tree, border and trunk are all one piece)
- Layout: 4 stepped tiers with 1, 2, 3 and 4 fans
- Tree body before border: 3 in (7.6 cm) wide × 2.75 in (7.0 cm) tall
- Tree body after border: 3.25 in (8.3 cm) wide × 3 in (7.6 cm) tall
- Border depth: about 0.125 in (0.3 cm) on each edge
- Trunk: 0.625 in (1.6 cm) wide × 0.75 in (1.9 cm) tall
Materials
Yarn: Use a tightly twisted, mercerized cotton. It gives crisp fans, clear picots and holds its shape well after blocking. Acrylic or soft matte cotton will look fuzzier and lose the lacy definition.
- Cream (tree and border): 10 g, about 16 m
- Light tan (trunk): 2 g, about 3 m
Both quantities include a margin for your gauge swatch, the hanging loop and weaving in ends.
Tools:
- 2.25 mm (B-1) crochet hook
- Fine tapestry needle
- Small scissors
- Rustproof pins and a foam blocking mat
- Spray bottle with water
- Optional: spray starch or fabric stiffener
Abbreviations (US Terms)
- ch – chain
- sl st – slip stitch
- sc – single crochet
- dc – double crochet
- sp – space
- st(s) – stitch(es)
- RS – right side
- [ ] – repeat the steps inside the brackets as many times as stated
Special stitches:
- Fan: 7 dc worked into the same ch-5 space. At the start of a row, a ch-3 counts as the first dc of the first fan.
- Picot: ch 3, then sl st in the 3rd ch from the hook.
Gauge and Checkpoints
Gauge matters for ornaments that need to match each other. Make one complete tree before you start a batch.
Base gauge: One fan (Row 1) measures 0.75 in (1.9 cm) wide and 0.5 in (1.3 cm) tall. For the trunk, 8 sc and 9 rows measure 1 in (2.5 cm).
Checkpoints (measure flat, without stretching):
| After | Width | Height |
|---|---|---|
| Row 1 | 0.75 in (1.9 cm) | 0.5 in (1.3 cm) |
| Row 3 | 1.5 in (3.8 cm) | 1.25 in (3.2 cm) |
| Row 5 | 2.25 in (5.7 cm) | 2 in (5.1 cm) |
| Row 7 | 3 in (7.6 cm) | 2.75 in (7.0 cm) |
| Border | 3.25 in (8.3 cm) | 3 in (7.6 cm) |
| Trunk | 3.25 in (8.3 cm) | 3.75 in (9.5 cm) total |
If your tree is too big, go down to a 2.0 mm hook, or check that your ch-5 arches aren’t loose.
If your tree is too small or cups, go up to a 2.5 mm hook, and loosen your tension on the fan dc.
Small differences of 0.125 in (0.3 cm) usually block out. Larger differences mean you should change the hook.
Tree Body
Work flat in rows, turning at the end of each row. A beginning ch-3 counts as a dc. A beginning ch-5 does not count as a stitch. It is only an arch.
Tier 1
Row 1: With cream, ch 4 and sl st in the first ch to form a ring. Ch 3 (counts as dc), then work 6 dc in the ring. Turn. (7 dc = 1 fan)
Tier 2
Row 2 (arch row): Ch 5, sc in the 4th dc (the center of the fan), ch 5, sc in the top of the beginning ch-3. Turn. (2 ch-5 sps, 2 sc)
The first ch-5 starts from the edge dc and reaches to the center of the fan. That half-fan span is what pushes the next tier outward and creates the step.
Row 3 (fan row): Ch 3 (counts as dc), work 6 dc in the first ch-5 sp, sc in the next sc, then work 7 dc in the last ch-5 sp. Turn. (2 fans: 14 dc + 1 sc = 15 sts)
Checkpoint: 1.5 in (3.8 cm) wide and 1.25 in (3.2 cm) tall.
Tier 3
Row 4 (arch row): Ch 5, sc in the 4th dc of the first fan, [ch 5, sc in the 4th dc of the next fan] once, ch 5, sc in the top of the beginning ch-3. Turn. (3 ch-5 sps, 3 sc)
Row 5 (fan row): Ch 3, work 6 dc in the first ch-5 sp, [sc in the next sc, 7 dc in the next ch-5 sp] twice. Turn. (3 fans: 21 dc + 2 sc = 23 sts)
Checkpoint: 2.25 in (5.7 cm) wide and 2 in (5.1 cm) tall.
Tier 4
Row 6 (arch row): Ch 5, sc in the 4th dc of the first fan, [ch 5, sc in the 4th dc of the next fan] twice, ch 5, sc in the top of the beginning ch-3. Turn. (4 ch-5 sps, 4 sc)
Row 7 (fan row): Ch 3, work 6 dc in the first ch-5 sp, [sc in the next sc, 7 dc in the next ch-5 sp] 3 times. Do not turn, and do not fasten off. (4 fans: 28 dc + 3 sc = 31 sts)
Checkpoint: 3 in (7.6 cm) wide and 2.75 in (7.0 cm) tall.
Why the shape works: Each arch row makes one more space than there are fans, because it adds one space at each outer edge. The fan count therefore grows 1, 2, 3, 4. Every fan adds about 0.75 in (1.9 cm) of width, so the tree widens evenly. The fans of the upper tiers are covered by the next arch row and become the open lace inside the tree. Only the bottom tier’s scallops form the outer edge.
Border
The border is one round in cream. It adds the tier-tip picots, the scallop picots and the hanging loop.
Border gauge: Work 3 sc along each dc row-end, 1 sc in each arch row-end, and 1 sc in each dc across the bottom. Keep the sc snug but not tight, so the points stay sharp and the edge doesn’t ruffle.
You are now at the bottom corner, at the end of Row 7.
Border Round:
Side A (from the bottom corner up to the tip): Ch 1, picot. Work 3 sc evenly along the post of the last dc of Row 7, then 1 sc in the end of Row 6. Picot, then 3 sc along the Row 5 dc end, and 1 sc in the end of Row 4. Picot, then 3 sc along the Row 3 dc end, and 1 sc in the end of Row 2. Picot, then 3 sc along the Row 1 dc end.
(Side A: 15 sc + 4 picots)
Top: In the ring, work sc, ch 30 for the hanging loop, then sc again.
(Top: 2 sc + ch-30 loop)
Side B (from the tip down to the other bottom corner): Work 3 sc along the Row 1 end, then picot. Work 1 sc in the end of Row 2, 3 sc along the Row 3 end, then picot. Work 1 sc in the end of Row 4, 3 sc along the Row 5 end, then picot. Work 1 sc in the end of Row 6, 3 sc along the Row 7 end (the beginning ch-3), then picot at the corner.
(Side B: 15 sc + 4 picots)
Bottom edge: Work across the tops of the Row 7 fans.
- Fan 1: sc in the next 3 dc, (sc, picot) in the next dc, then sc in the next 3 dc.
- Sl st in the sc between the fans.
- Repeat the fan sequence and the sl st across Fans 2 and 3.
- Work Fan 4 the same way, with no sl st after it.
Sl st in the first ch-1 to join. Fasten off.
(Bottom: 28 sc + 4 picots + 3 sl sts)
Round total: 60 sc (15 + 2 + 15 + 28), 12 picots, 3 sl sts and the ch-30 loop.
Why the math works: Across the bottom there is exactly 1 sc per dc, 7 per fan × 4 fans = 28, so the scallops keep their curve without flaring. On the sides, 3 sc per dc row-end matches the height of a dc, and 1 sc per short arch row-end keeps the inner corners of the steps from puckering. Both sides are mirror images at 15 sc each, so the tree stays symmetrical. The ch-30 loop folds to about 1.5 in (3.8 cm).
Trunk
The trunk is worked straight into the center of the bottom border.
Find the sl st between Fans 2 and 3. Counting outward from it, there are 3 sc on each side before you reach a picot. The trunk is worked over the 5 center stitches: the last 2 sc of Fan 2, the sl st, and the first 2 sc of Fan 3.
Row 1 (RS): With RS facing, join tan with a sl st in the 6th sc of Fan 2. Ch 1, sc in the same st, sc in the next sc, sc in the sl st, and sc in the next 2 sc. Turn. (5 sc)
Rows 2–7: Ch 1, sc in each sc across. Turn. (5 sc)
Fasten off, leaving a 6 in (15.2 cm) tail. Weave the tail up the side of the trunk to square it.
The trunk measures 0.625 in (1.6 cm) wide × 0.75 in (1.9 cm) tall. The ornament now measures 3.75 in (9.5 cm) tall in total.
Final Blocking
- Weave in all ends along the backs of the dc posts. Do not knot them on the edge.
- Spray the ornament until it is damp, but not dripping.
- Lay it face up on the blocking mat and pat it into shape so it measures 3.25 in (8.3 cm) wide.
- Pin the top tip, then the 8 tier-tip picots, so the left and right sides mirror each other.
- Pin each bottom-scallop picot, so the four scallops curve evenly.
- Pin the trunk square, with its lower corners level.
- Optional: mist with starch for a crisper ornament.
- Leave it to dry completely, usually 4–6 hours, before you unpin it.
Final Quality-Control Checklist
- [ ] The tiers have 1, 2, 3 and 4 fans, with 7 dc in each fan
- [ ] Width is 3.25 in (8.3 cm) and total height is 3.75 in (9.5 cm)
- [ ] There are 12 picots in total: 8 tier tips and 4 scallop centers
- [ ] Both sides have 15 sc and the steps match
- [ ] The trunk is 5 sc wide and centered under the middle dip
- [ ] The hanging loop is secure and about 1.5 in (3.8 cm) long
- [ ] No ends show on the front
Troubleshooting
Tiers don’t step out. Your ch-5 arches are too tight. Chain more loosely, or go up 0.25 mm for the arch rows only.
Bottom edge ruffles. You worked more than 1 sc per dc. Recount: there should be 28 sc across the bottom.
Sides pucker at the steps. You worked too many sc into the arch row-ends. Use exactly 1 sc there.
Tree leans to one side. One side’s border count is off. Recount both sides; each should have 15 sc and 4 picots.
Picots disappear. Tighten the sl st that closes each picot and pin them out firmly during blocking.
Trunk is off-center. Count 3 sts outward from the center sl st on each side before you join the tan.
Care
Hand wash in cool water with mild soap, press out the water in a towel, and re-block flat. Store flat or hanging, away from damp, so the starch keeps its shape.
Final Notes
Here is the measurement chain to keep each tree true:
- One fan measures 0.75 in (1.9 cm) wide.
- Row 7 measures 3 in (7.6 cm) wide and 2.75 in (7.0 cm) tall.
- The border brings it to 3.25 in (8.3 cm) × 3 in (7.6 cm).
- The trunk adds 0.75 in (1.9 cm), for a finished height of 3.75 in (9.5 cm).
If each checkpoint matches, every ornament in your batch will hang as a matching set.
Happy crocheting!