

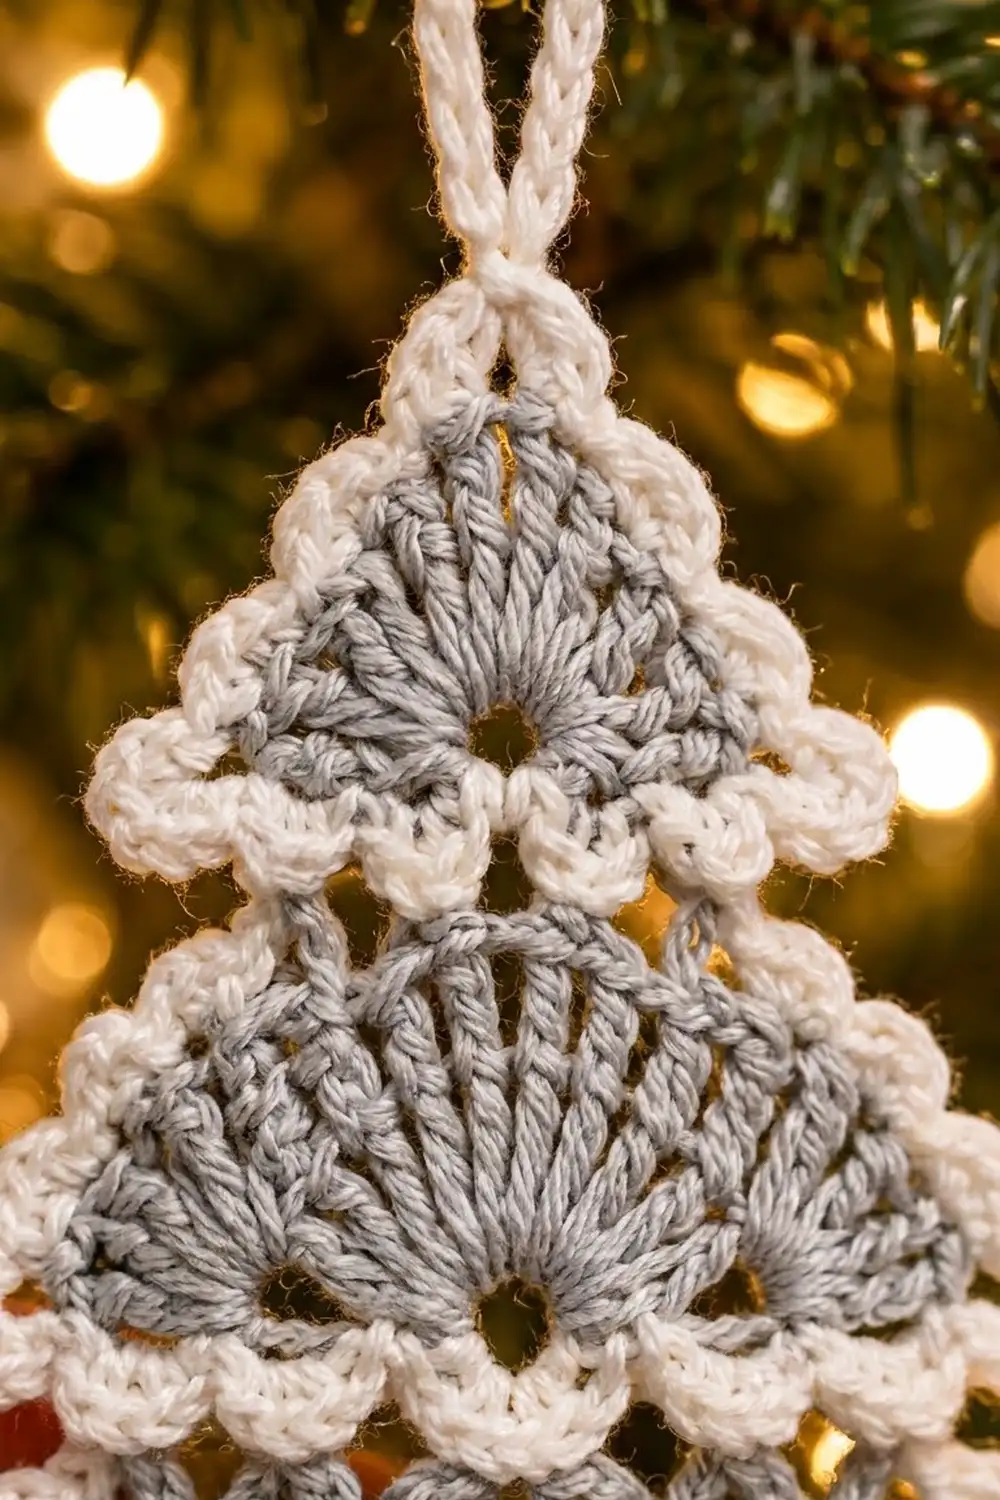
This little tree is built from three silver-gray fans stacked on top of each other. Each fan is outlined in soft white scallops, so the tiers read clearly even from across the room. A solid white trunk and a slim white hanging cord finish the shape.
The color scheme is quiet and wintry: light gray for the fans and white for every edge. It looks at home on a natural evergreen with warm lights, and it is also a nice gift-topper or package tie-on.
All instructions use US crochet terms. The finished ornament measures 4.2 in (10.7 cm) wide and 4.7 in (11.9 cm) tall from the top point to the bottom of the trunk. With the hanging loop it is 6.2 in (15.7 cm) tall.
Here is how it goes together. You work three gray half-circle fans in turned rows from a small chain ring, using 3, 4, and 5 rows. Next you edge each fan in white, make a single-crochet trunk and a slip-stitch cord, and then stack and sew everything into one ornament.
Finished Size and Construction
- Finished size: 4.2 in (10.7 cm) wide x 4.7 in (11.9 cm) tall, plus a 1.5 in (3.8 cm) loop
- Skill level: Easy
- Terminology: US crochet terms
- Yarn weight: Fingering weight (Super Fine, #1) mercerized cotton
- Hook: 2.25 mm (US B-1)
- Number of pieces: 5 small parts (3 tiers, 1 trunk, 1 cord), sewn into 1 ornament
- Layout: 3 tiers stacked vertically, trunk centered below, loop at the top
- Piece sizes after edging (width x height):
- Tier A: 2.8 x 1.55 in (7.1 x 3.9 cm)
- Tier B: 3.5 x 1.9 in (8.9 x 4.8 cm)
- Tier C: 4.2 x 2.25 in (10.7 x 5.7 cm)
- Gray fan size before edging (width x height):
- Tier A: 2.3 x 1.15 in (5.8 x 2.9 cm)
- Tier B: 3.0 x 1.5 in (7.6 x 3.8 cm)
- Tier C: 3.7 x 1.85 in (9.4 x 4.7 cm)
- Border depth: 0.25 in (0.6 cm) on the curved edge and 0.15 in (0.4 cm) on the flat edge
- Trunk: 0.85 x 0.9 in (2.2 x 2.3 cm)
Materials
Use a smooth mercerized cotton in fingering weight, at about 170 m per 50 g. Cotton holds the fan spokes crisply and blocks into a flat ornament that keeps its shape. Avoid fuzzy yarns, because they hide the eyelet and blur the white loops.
- Color 1 (light gray): 5 g, about 17 m
- Color 2 (white): 4 g, about 14 m
These amounts are for one ornament and include a margin of about 25% for your gauge swatch and weaving in ends. If you are making a set, multiply by the number of trees. For example, 6 trees use about 30 g gray and 24 g white.
Tools
- 2.25 mm (US B-1) crochet hook
- Tapestry needle
- Scissors
- Rustproof pins and a foam blocking mat
- Spray bottle with water
- Small ruler or tape measure
Abbreviations (US Terms)
- ch: chain
- sl st: slip stitch
- sc: single crochet
- dc: double crochet
- sk: skip
- st(s): stitch(es)
- tch: turning chain
- RS: right side
Special stitch: ch-3 picot loop. Ch 3, sk the next st, sc in the following st. Each repeat uses 2 base sts and makes one small rounded loop.
Turning chain note: In the fan rows, ch 3 at the start of a row counts as the first dc.
Gauge and Checkpoints
Gauge: 7 dc = 1 in (2.5 cm), and 1 dc row = 0.35 in (0.9 cm). For the trunk, 7 sc and 8 sc rows = 1 in (2.5 cm).
Before making a whole tree, test with Tier A. Its gray fan is the quickest gauge check, and you will use it in the ornament anyway.
Checkpoints (measured straight across the flat lower edge of the gray fan):
- After Row 1: 0.9 in (2.3 cm)
- After Row 3: 2.3 in (5.8 cm)
- After Row 4: 3.0 in (7.6 cm)
- After Row 5: 3.7 in (9.4 cm)
- After edging: Tier A is 2.8 in (7.1 cm) wide
If your piece is too big, go down to a 2.0 mm hook. If it is too small, go up to a 2.5 mm hook. If only the height is off, check your turning chains: a loose ch 3 makes the side edges stretch.
If a fan cups into a bowl, your increases are too tight. If it ruffles, your stitches are too loose for the yarn.
Gray Fan Tiers
All three tiers start the same way. Tier A stops after Row 3, Tier B after Row 4, and Tier C after Row 5. Rows are turned, and the flat lower edge of the tier is formed by the row ends and the ring.
Foundation: With gray, ch 4 and sl st into the first ch to form a ring. Keep the ring open, because it becomes the eyelet at the bottom center of the tier.
Row 1: Ch 3 (counts as dc), work 8 dc into the ring, crowding them onto one half of the ring so they form a half circle. Turn. (9 dc)
Row 2: Ch 3 (counts as dc), dc in the same st. Work 2 dc in each st across, including the top of the tch. Turn. (18 dc)
Row 3: Ch 3 (counts as dc), dc in the same st, dc in the next st. Then 2 dc in the next st, dc in the next st 8 times. Turn. (27 dc)
The fan now measures 2.3 in (5.8 cm) across the flat edge and 1.15 in (2.9 cm) tall.
For Tier A: Fasten off and weave in the starting tail around the ring. Tier A is finished in gray.
Row 4 (Tiers B and C only): Ch 3 (counts as dc), dc in the same st. Then dc in each of the next 2 sts, 2 dc in the next st 8 times. Dc in the next st, then 2 dc in the last st. Turn. (37 dc)
Check the count: you use 27 base sts and add 10 increases, which gives 37. The fan now measures 3.0 in (7.6 cm) across and 1.5 in (3.8 cm) tall.
For Tier B: Fasten off.
Row 5 (Tier C only): Ch 3 (counts as dc), dc in the same st. Then dc in each of the next 3 sts, 2 dc in the next st 9 times. (47 dc)
Check the count: you use 37 base sts and add 10 increases, which gives 47. The fan now measures 3.7 in (9.4 cm) across and 1.85 in (4.7 cm) tall. Fasten off.
The last row of each tier has an odd count (27, 37, 47). This is deliberate, so the picot edging divides evenly.
Trunk
With white, ch 7.
Row 1: Sc in the 2nd ch from the hook and in each ch across. Turn. (6 sc)
Rows 2–7: Ch 1, sc in each st across. Turn. (6 sc)
Fasten off and leave a 10 in (25.4 cm) tail for sewing. The trunk measures 0.85 in (2.2 cm) wide and 0.9 in (2.3 cm) tall.
Hanging Cord
With white, ch 31. Sl st in the 2nd ch from the hook and in each ch across. (30 sl st)
Fasten off and leave a 6 in (15.2 cm) tail. The cord measures about 3 in (7.6 cm) and folds into a 1.5 in (3.8 cm) loop.
Make All Pieces
Gray: 1 Tier A (3 rows), 1 Tier B (4 rows), and 1 Tier C (5 rows).
White: 3 tier edgings (worked directly onto the gray fans in the next section), 1 trunk, and 1 cord.
Stacking layout (top to bottom):
          [ cord loop ]
         [  Tier A  ]
       [    Tier B    ]
     [      Tier C      ]
           [trunk]
Each upper tier sits in front of the tier below it.
Border: White Scallop Edging
Every tier gets the same two-round white edging. Only the stitch counts change with the size.
Border gauge: The sc round adds 0.12 in (0.3 cm), and the picot loops add about 0.13 in (0.3 cm). That makes the curved border 0.25 in (0.6 cm) deep. The flat edge gets only sc and sl st, for a depth of 0.15 in (0.4 cm).
Round 1: With the RS facing, join white in the first st of the last gray row.
- Ch 1. Work 3 sc in the same st for the first corner.
- Sc in each st across the curved edge until 1 st remains. Work 3 sc in the last st for the second corner.
- Turn the work to the flat edge. Work 2 sc into each row end down to the ring.
- Work 2 sc around the lower half of the ring strand. Keep these sc loose so the eyelet stays open.
- Work 2 sc into each row end up the other side.
- Sl st to the first sc to join.
Round 1 counts per side. The curved side includes both 3-sc corner groups. The flat side has no corner sts.
| Tier | Curved side | Flat side | Round total |
|---|---|---|---|
| A | 25 + 6 = 31 sc | 6 + 2 + 6 = 14 sc | 45 sc |
| B | 35 + 6 = 41 sc | 8 + 2 + 8 = 18 sc | 59 sc |
| C | 45 + 6 = 51 sc | 10 + 2 + 10 = 22 sc | 73 sc |
On the curved side, the sc are worked 1 per existing st into all sts except the 2 corners (N – 2). The corner groups add 6 more, so the curved side has N + 4 sts in all.
Round 2:
- Ch 1. Sc in the first sc of the first corner group.
- Work a ch-3 picot loop (ch 3, sk 1, sc in next) repeatedly across the curved side. The last sc lands in the last sc of the second corner group.
- Sl st in each sc along the flat side.
- Join with a sl st to the first sc. Fasten off.
Round 2 counts:
| Tier | Picot loops | Sc on curved side | Sl st on flat side |
|---|---|---|---|
| A | 15 | 16 | 14 |
| B | 20 | 21 | 18 |
| C | 25 | 26 | 22 |
Why the math works: Each picot loop uses 2 sts, plus 1 sc to anchor the start. A curved side of N + 4 sts therefore needs an odd count. Because 27, 37, and 47 are odd, the curved sides come out to 31, 41, and 51, which are also odd. That gives (31 – 1) / 2 = 15, (41 – 1) / 2 = 20, and (51 – 1) / 2 = 25 loops with no leftover st. The extra sc at each corner let the loops turn the corner without pulling, so each tier’s points stay crisp.
After the border, check that Tier A is 2.8 in (7.1 cm), Tier B is 3.5 in (8.9 cm), and Tier C is 4.2 in (10.7 cm) wide.
Joining and Assembly
Block the three tiers lightly before sewing (see Final Blocking, steps 1–3). Flat pieces are much easier to line up.
Method: Use a short running stitch on the back with white yarn, catching only the back loops of the edging. Nothing should show on the front.
Stitch-to-stitch logic:
- Lay Tier C flat, RS up.
- Place Tier B on top of Tier C, centered. Tier B’s flat edge should sit 0.9 in (2.3 cm) below Tier C’s top point. Sew along Tier B’s 18 flat-edge sl st, stitching down into Tier C behind it.
- Place Tier A on Tier B the same way, with its flat edge 0.9 in (2.3 cm) below Tier B’s top point. Sew along Tier A’s 14 flat-edge sl st.
- Tack each corner group of the upper tier to the tier below with one small stitch so the corners don’t flip.
- Center the trunk behind Tier C’s flat edge, leaving 8 flat-edge sts free on each side. Overlap the top row of the trunk behind the edging, which hides about 0.1 in (0.3 cm). Sew across the 6 trunk sts.
- Fold the cord in half. Sew both ends to the back of Tier A’s top point, overlapping by 0.25 in (0.6 cm).
Tension advice: Sew firmly enough that the tiers don’t shift, but don’t pull the edge into a pucker. The flat edges should stay straight.
Size checkpoint: The tiers stack to 3.9 in (9.9 cm) tall: 2.25 + 1.0 + 0.65 in (5.7 + 2.5 + 1.7 cm). The trunk shows about 0.8 in (2.0 cm) below that, for a total of 4.7 in (11.9 cm). The widest point is Tier C at 4.2 in (10.7 cm).
Final Blocking
- Pin each edged tier to the mat, RS up, at its finished width and height.
- Pin the flat edge straight first, then pin both corner groups, then pin the top point so it rises slightly into a soft peak.
- Mist with water until damp, let it dry completely, and unpin.
- After assembly, pin the whole ornament flat. Place one pin in each white picot loop on Tier C’s curved edge so the scallops open evenly.
- Mist again and let it dry overnight.
- Optional: for a stiffer ornament, brush on a little fabric stiffener or diluted craft glue while the piece is pinned.
Final Quality-Control Checklist
- Tier fans have 27, 37, and 47 dc in their last rows.
- The eyelet at the base of each tier is open and round.
- The curved sides have 15, 20, and 25 evenly spaced picot loops.
- The flat edges are straight and sit 0.9 in (2.3 cm) below the top point of the tier underneath.
- The trunk is centered, measures 6 sts wide, and shows 0.8 in (2.0 cm) below Tier C.
- The cord loop is centered and securely attached.
- All ends are woven in on the back.
- The ornament measures 4.2 x 4.7 in (10.7 x 11.9 cm).
Troubleshooting
The fan cups instead of lying flat. Your increase stitches are tight. Loosen your dc or go up a hook size.
The fan ruffles. Your stitches are loose. Go down a hook size, or check that you didn’t add extra increases.
The picot count doesn’t come out even. Recount Round 1. The curved side must be odd (31, 41, or 51). An extra or missing corner sc is the usual cause.
The eyelet closed up. The sc around the ring in Round 1 were pulled too tight. Work them more loosely, or block with a pin in the eyelet.
The tiers lean to one side. Re-center them by measuring from each corner, then re-sew.
The trunk flares. Check that every row has 6 sc and that the turning ch 1 is not counted as a stitch.
Care
Hand wash in cool water with mild soap, press out the water in a towel, and reshape and dry flat. Store flat or hung, away from crushing weight.

Final Notes
Each measurement depends on the one before it. A gauge of 7 dc per 1 in (2.5 cm) gives fans 2.3, 3.0, and 3.7 in (5.8, 7.6, and 9.4 cm) wide. A 0.25 in (0.6 cm) white edging brings them to 2.8, 3.5, and 4.2 in (7.1, 8.9, and 10.7 cm). Overlapping the tiers by 0.9 in (2.3 cm) stacks them to 3.9 in (9.9 cm), and the trunk brings the finished tree to 4.7 in (11.9 cm). If you check the measurement at each stage, the ornament will come out the right size. Make one and hang it, or make a whole set for the tree.
Happy crocheting!