

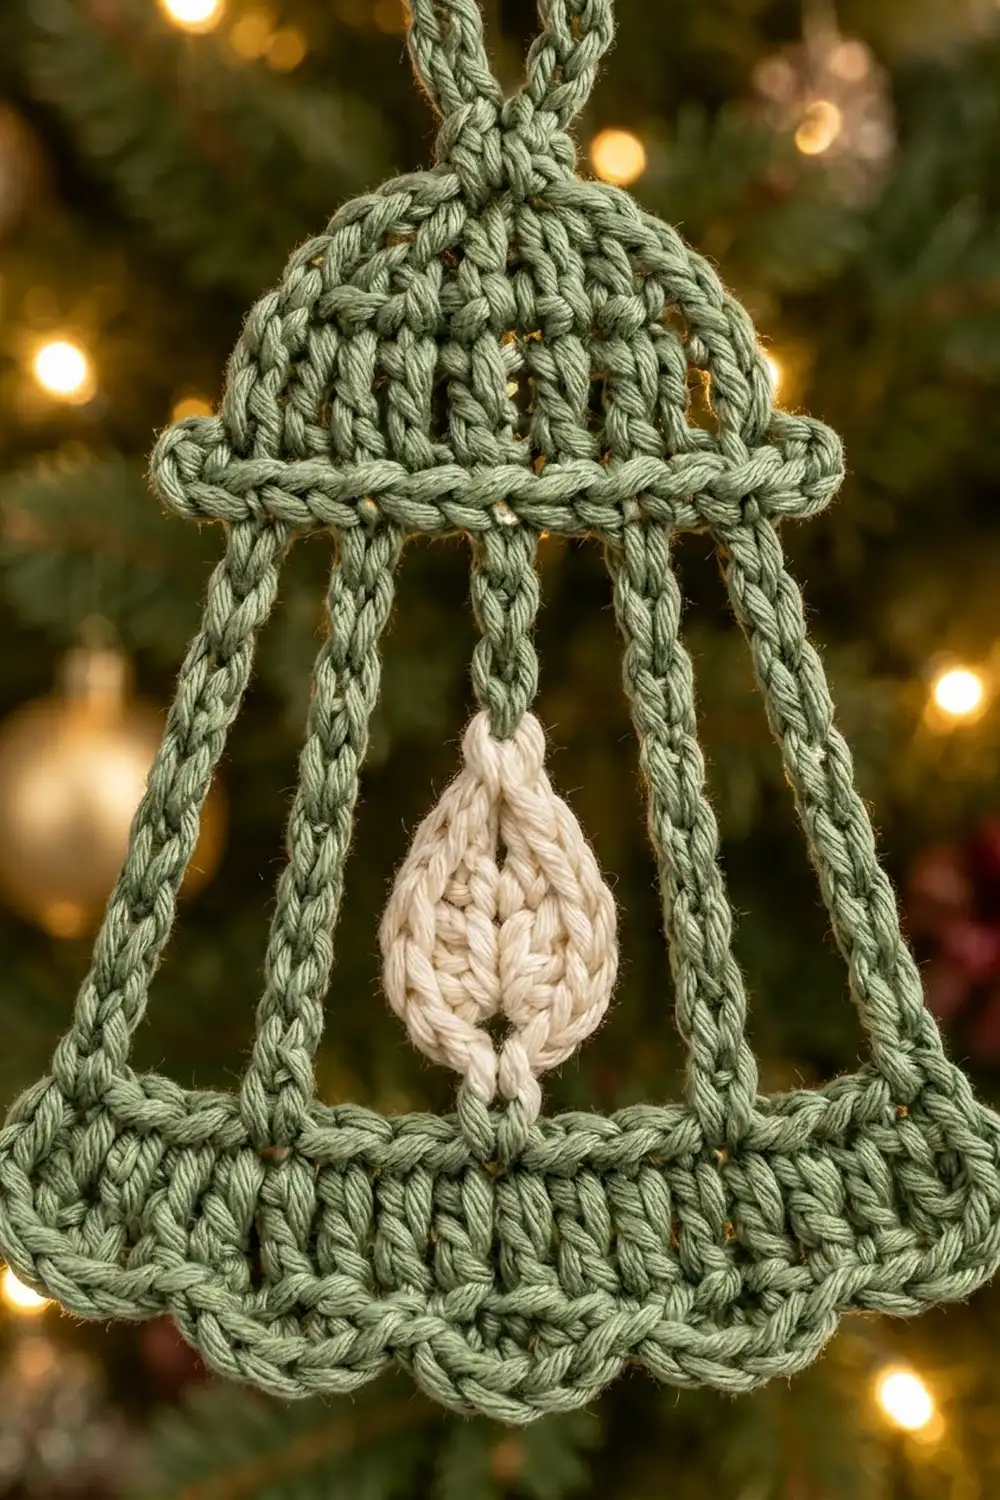
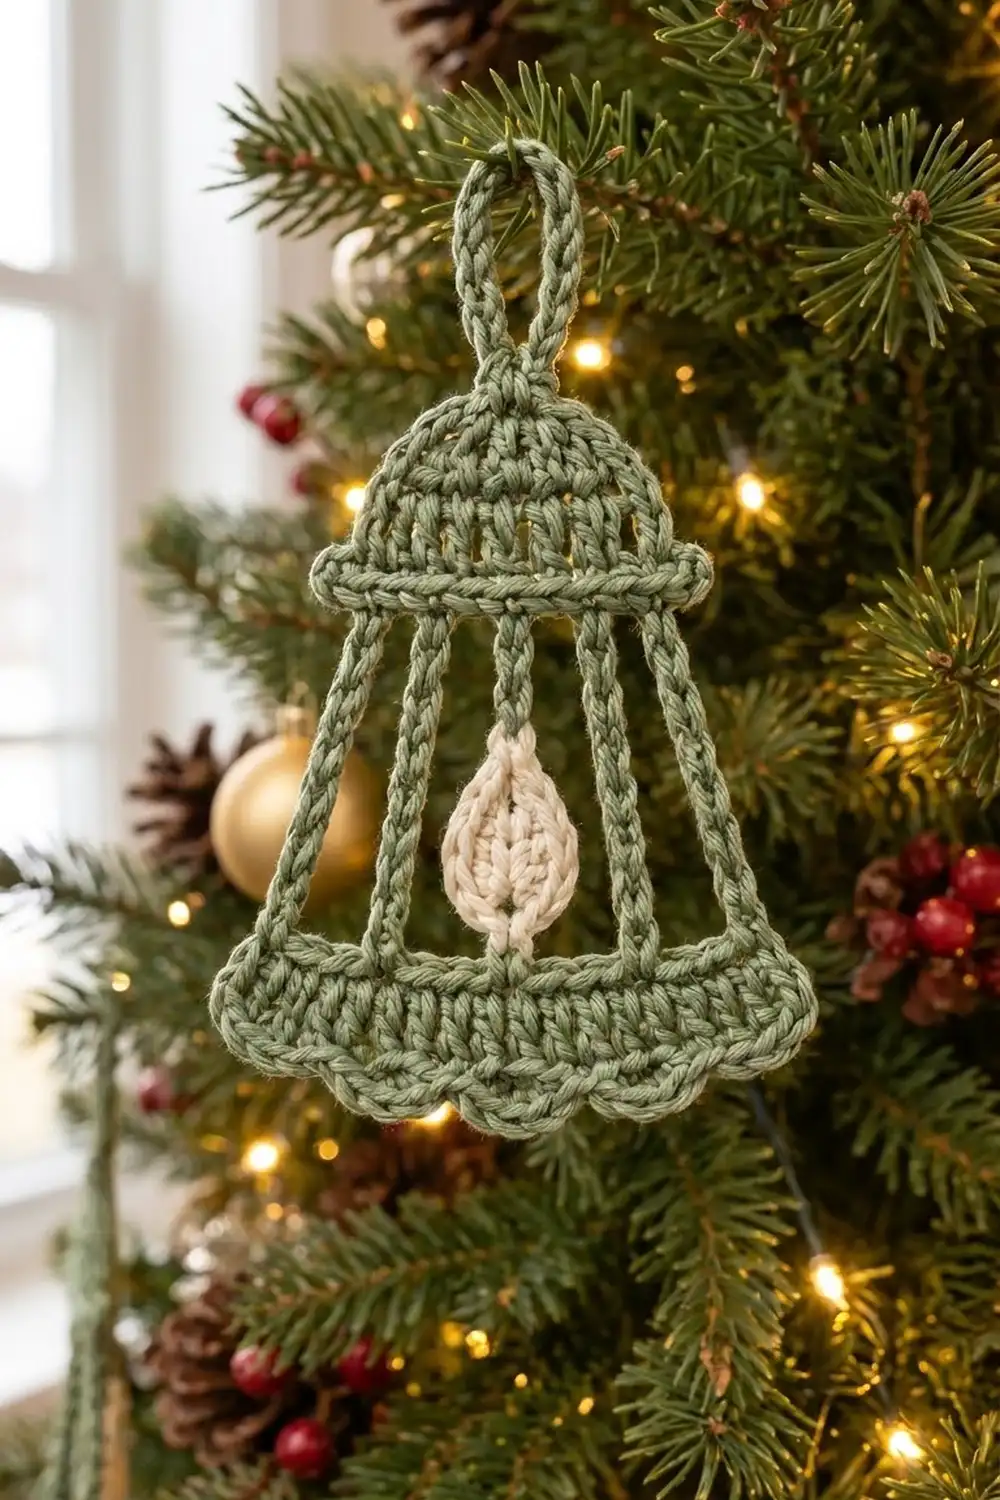
This little lantern is one flat ornament in soft sage green, with a cream teardrop flame hanging in the middle. It has a rounded dome cap with a ledge rim, five thin corded bars, a solid base band with a scalloped bottom edge, and a twisted hanging loop at the top.
The style is simple and quiet. It uses two colors: sage green for the frame and warm cream for the flame. The open bars let tree branches and lights show through, so the ornament looks light even though the cap and base are solid.
The pattern uses US crochet terms. The finished ornament is about 4.7 in (11.9 cm) wide at the base. It is 5.5 in (14.0 cm) tall from the top of the cap to the scallop tips, or 6.5 in (16.5 cm) including the hanging loop.
Construction is easy to follow. You work the cap in rows from the top down, then work the base band in rows from a foundation chain. Corded chain bars connect the two sections into one ornament. After that you add the hanging loop and the scalloped edge, and sew a small flame appliqué over the center bar.
Finished Size and Construction
- Finished size: 4.7 in (11.9 cm) wide x 5.5 in (14.0 cm) tall; 6.5 in (16.5 cm) with loop
- Skill level: Easy to intermediate
- Terminology: US terms
- Yarn weight: Worsted (#4) cotton
- Hook: 4.0 mm (G-6)
- Number of pieces: 1 ornament (cap and base band joined by bars) plus 1 flame appliqué
- Layout: Single flat ornament, with the cap on top, bars in the middle and the base band at the bottom
- Cap rim width: 3.3 in (8.4 cm)
- Base band before the scallop edge: 4.7 in (11.9 cm) wide, 0.75 in (1.9 cm) deep
- Scallop edge depth: 0.5 in (1.3 cm)
Materials
Choose a smooth cotton in worsted weight, either mercerized or matte. Cotton keeps the bars straight and the stitches crisp. Acrylic also works, but the bars will be springier.
- Sage green (Color A): 12 g, about 20 m
- Cream (Color B): 3 g, about 5 m
These amounts include about 25% extra for swatching and weaving in ends.
Tools:
- 4.0 mm (G-6) crochet hook
- Tapestry needle
- Scissors
- 6 stitch markers
- Ruler or tape measure
- Blocking mat and rust-proof pins
- Spray bottle with water
Abbreviations (US Terms)
- ch – chain
- sl st – slip stitch
- sc – single crochet
- hdc – half double crochet
- dc – double crochet
- st(s) – stitch(es)
- sk – skip
- RS – right side
- FO – fasten off
Special technique (corded bar): Chain the stated number and sl st into the target stitch. Then sl st into the back bump of each chain, working back up to where the bar started. This doubles the chain into a firm, rounded cord.
Gauge and Checkpoints
Gauge:
- 18 sc and 20 rows = 4 in (10.2 cm)
- 18 dc and 8 rows = 4 in (10.2 cm)
- Relaxed chains: about 5 ch per 1 in (2.5 cm)
Make the cap first and treat it as your test piece. It is small, and it tells you right away whether your gauge is on track.
Checkpoints:
- Cap Row 1: 1.6 in (4.1 cm) wide
- Cap Row 3: 2.4 in (6.1 cm) wide, 1.5 in (3.8 cm) tall
- Cap Row 4 (rim): 3.3 in (8.4 cm) wide, 1.75 in (4.4 cm) tall
- Base band after Row 2: 4.7 in (11.9 cm) wide, 0.75 in (1.9 cm) deep
- Gap between rim and band: 2.5 in (6.4 cm)
If the cap comes out too big, use a hook 0.5 mm smaller. If it is too small, use a hook 0.5 mm larger. Don’t add or remove stitches, because the bar positions depend on the exact counts.
Part 1: Cap
With Color A.
Row 1: Ch 9. Dc in 4th ch from hook and in each ch across, turn. (7 dc; the skipped ch-3 counts as 1 dc)
Row 2: Ch 3 (counts as dc), dc in same st, dc in next 5 sts, 2 dc in top of turning ch, turn. (9 dc)
Row 3: Ch 3 (counts as dc), dc in same st, dc in next 7 sts, 2 dc in top of turning ch, turn. (11 dc)
The increases at both ends of each row create the stepped dome shape.
Row 4 (rim ledge):
- Ch 3, then sc in 2nd ch from hook and in next ch. This makes the first 2-sc tab.
- Sc in each of the 11 sts across.
- Ch 3, then sc in 2nd ch from hook and in next ch.
- Sl st in the last sc of the main row to curl the second tab.
Count: 2 tab sc + 11 sc + 2 tab sc = 15 sc.
The two small tabs give the rim its slightly curled ledge ends. FO and weave in the ends.
Checkpoint: Rim 3.3 in (8.4 cm) wide, cap 1.75 in (4.4 cm) tall.
Part 2: Base Band
With Color A.
Row 1: Ch 22. Sc in 2nd ch from hook and in each ch across, turn. (21 sc)
Row 2: Ch 3 (counts as dc), dc in each st across. (21 dc)
Don’t fasten off. Put a marker in the live loop and set the band aside. The scallop edge goes into Row 2 later.
Checkpoint: 4.7 in (11.9 cm) wide, 0.75 in (1.9 cm) deep.
The foundation chain edge is the top of the base band. Its 21 free loops sit under the 21 sc of Row 1 and form a neat corded line where the bars land.
Part 3: Corded Bars
Lay both sections flat, RS up. Place the cap rim 2.5 in (6.4 cm) above the foundation edge of the band, with the centers lined up.
Number the stitches from left to right:
- Rim: sts 1–15 (sts 1 and 15 are the outer tab sc)
- Band foundation edge: free loops 1–21
Mark rim sts 3, 6, 8, 10 and 13. These are where the five bars start. The bars mirror each other around the center: rim st 8 is the center of 15, and band loop 11 is the center of 21.
With Color A, join with a sl st in rim st 3.
Bar 1 (left outer): Ch 14, sl st in band loop 1. Sl st in back bump of each ch back up (14 sl st), then sl st in rim st 3.
Move along the rim: Sl st in rim sts 4, 5 and 6. (3 sl st)
Bar 2 (left inner): Ch 13, sl st in band loop 7. Sl st in back bump of each ch back up (13 sl st), then sl st in rim st 6.
Move along the rim: Sl st in rim sts 7 and 8. (2 sl st)
Bar 3 (center): Ch 12, sl st in band loop 11. Sl st in back bump of each ch back up (12 sl st), then sl st in rim st 8.
Move along the rim: Sl st in rim sts 9 and 10. (2 sl st)
Bar 4 (right inner): Ch 13, sl st in band loop 15. Sl st in back bump of each ch back up (13 sl st), then sl st in rim st 10.
Move along the rim: Sl st in rim sts 11, 12 and 13. (3 sl st)
Bar 5 (right outer): Ch 14, sl st in band loop 21. Sl st in back bump of each ch back up (14 sl st), then sl st in rim st 13. FO.
The outer bars are longer because they slant outward:
- Rim st 3 is about 1.1 in (2.8 cm) from the center.
- Band loop 1 is about 2.2 in (5.6 cm) from the center.
- Over the 2.5 in (6.4 cm) drop, that slant needs about 2.75 in (7.0 cm) of chain.
The inner bars slant only slightly, and the center bar hangs straight.
Checkpoint: All five bars lie flat with no sag, and the gap is 2.5 in (6.4 cm) at every bar. If a bar sags, pull it out and work it with 1 ch fewer.
Part 4: Hanging Loop
With Color A, join with a sl st at the top center of the cap. Work into the free loop of the foundation chain under the 4th of the 7 Row 1 sts.
Ch 14, give the chain one half-twist, and sl st into the same st to close the loop. The twist makes the crossed base at the top of the ornament.
Ch 1, work 20 sc into the loop, then sl st in the starting st. FO.
Checkpoint: The loop stands about 1 in (2.5 cm) above the cap.
Part 5: Flame Appliqué
With Color B. You work around both sides of a foundation chain, so the chain becomes a center vein.
Round 1:
- Ch 7.
- Sl st in 2nd ch from hook, sc in next ch, hdc in next ch, dc in next 2 ch, 7 dc in last ch.
- Rotate and work along the other side of the chain: dc in next 2 ch, hdc in next ch, sc in next ch, sl st in last ch.
Count: 5 + 7 + 5 = 17 sts.
Round 2:
- Ch 1. Sc in each of the next 5 sts.
- Work 2 sc in each of the 7 end dc.
- Sc in each of the next 5 sts.
- Work (sc, ch 2, sc) in the ch-1 tip, then sl st in first sc.
Count: 5 + 14 + 5 + 2 = 26 sc, plus a ch-2 point.
The 7-dc fan makes the round bottom, and the ch-2 makes the pointed top. FO, leaving a 10 in (25.4 cm) tail.
Checkpoint: Flame measures 1 in (2.5 cm) wide x 1.5 in (3.8 cm) tall.
Attach the flame: Center it over Bar 3, point up.
- Leave 0.75 in (1.9 cm) between the rim and the flame tip.
- Leave 0.25 in (0.6 cm) between the bottom of the flame and the band.
- That adds up to 0.75 + 1.5 + 0.25 = 2.5 in (6.4 cm), the full gap.
Whipstitch around the edge through the bar. Catch only the back loops of the flame so the stitches stay hidden.
Border: Scalloped Edge
With Color A, work into the dc of base band Row 2. Continue from the live loop you marked. If you cut the yarn, join at the first dc.
Border gauge: Each scallop uses 4 base sts, about 0.9 in (2.3 cm). It adds 0.5 in (1.3 cm) of depth below the dc row.
Row 3: Ch 1, sc in first st. Sk 1 st, 5 dc in next st, sk 1 st, sc in next st. Repeat from * 4 more times. (5 scallops; 6 sc + 25 dc = 31 sts)
Why the math works: The first sc uses 1 st, and each repeat uses 4 sts (skip, fan, skip, sc). That gives 1 + (4 x 5) = 21, exactly the 21 dc in Row 2. The last sc lands in the turning ch, so both ends finish with a sc and the edge stays symmetrical.
The base band is now 1.25 in (3.2 cm) deep including the scallops. FO and weave in all ends.
Checkpoint: Total body height is 1.75 + 2.5 + 1.25 = 5.5 in (14.0 cm).
Final Blocking
- Lightly spray the ornament until it is damp, not soaked.
- Lay it RS up on the blocking mat.
- Pin the cap rim straight at 3.3 in (8.4 cm) wide, then curl the tabs slightly upward with a pin.
- Pin the base band straight at 4.7 in (11.9 cm) wide.
- Pin the rim 2.5 in (6.4 cm) above the band so all five bars are taut and straight.
- Pin the tip of each scallop to shape the curve.
- Pin the loop into a neat oval about 1 in (2.5 cm) tall.
- Let it dry fully, at least 6 hours, before unpinning.
For extra stiffness, spray it lightly with starch before it dries.
Final Quality-Control Checklist
- Cap has 7, 9 and 11 dc in Rows 1–3 and 15 sc on the rim
- Rim tabs curl evenly at both ends
- Base band has 21 sc and 21 dc
- Five bars, mirrored left to right, land in band loops 1, 7, 11, 15 and 21
- Gap is 2.5 in (6.4 cm) at every bar
- Five even scallops, 31 sts total
- Flame is centered on Bar 3, point up
- Loop is twisted once and centered on the cap
- All ends are woven in and invisible from the RS
- Overall size is 4.7 in (11.9 cm) x 6.5 in (16.5 cm) with loop
Troubleshooting
Bars sag or wave: Your chain is loose. Rework the bar with 1 ch fewer, or use a smaller hook for the bars only.
Ornament pulls in at the middle: The bars are too short. Add 1 ch to each bar, keeping both sides equal.
Dome looks flat at the sides: Check that you worked 2 dc in the first and last st of Rows 2 and 3.
Scallops don’t fit evenly: Recount Row 2. You need exactly 21 dc, including the turning ch.
Flame twists or puckers: Pin it flat before sewing, and keep the stitches loose.
Loop leans to one side: Make sure it starts at the exact center st of Row 1.
Care
Hand wash in cool water with mild soap. Press out the water in a towel, reshape the ornament and dry it flat. Store it flat or hanging so it doesn’t get crushed in an ornament box.
Final Notes
Every size in this ornament comes from the one before it. The cap grows from 1.6 in (4.1 cm) to 2.4 in (6.1 cm), and the rim sets the top width at 3.3 in (8.4 cm). The base band sets the bottom width at 4.7 in (11.9 cm). The bars hold a steady 2.5 in (6.4 cm) gap, and the scallops add the last 0.5 in (1.3 cm). Check each number as you go, and the lantern will come out flat, balanced and ready to hang.
Make one, then make a few more in the same sage and cream for a matching set on your tree.
Happy crocheting!