

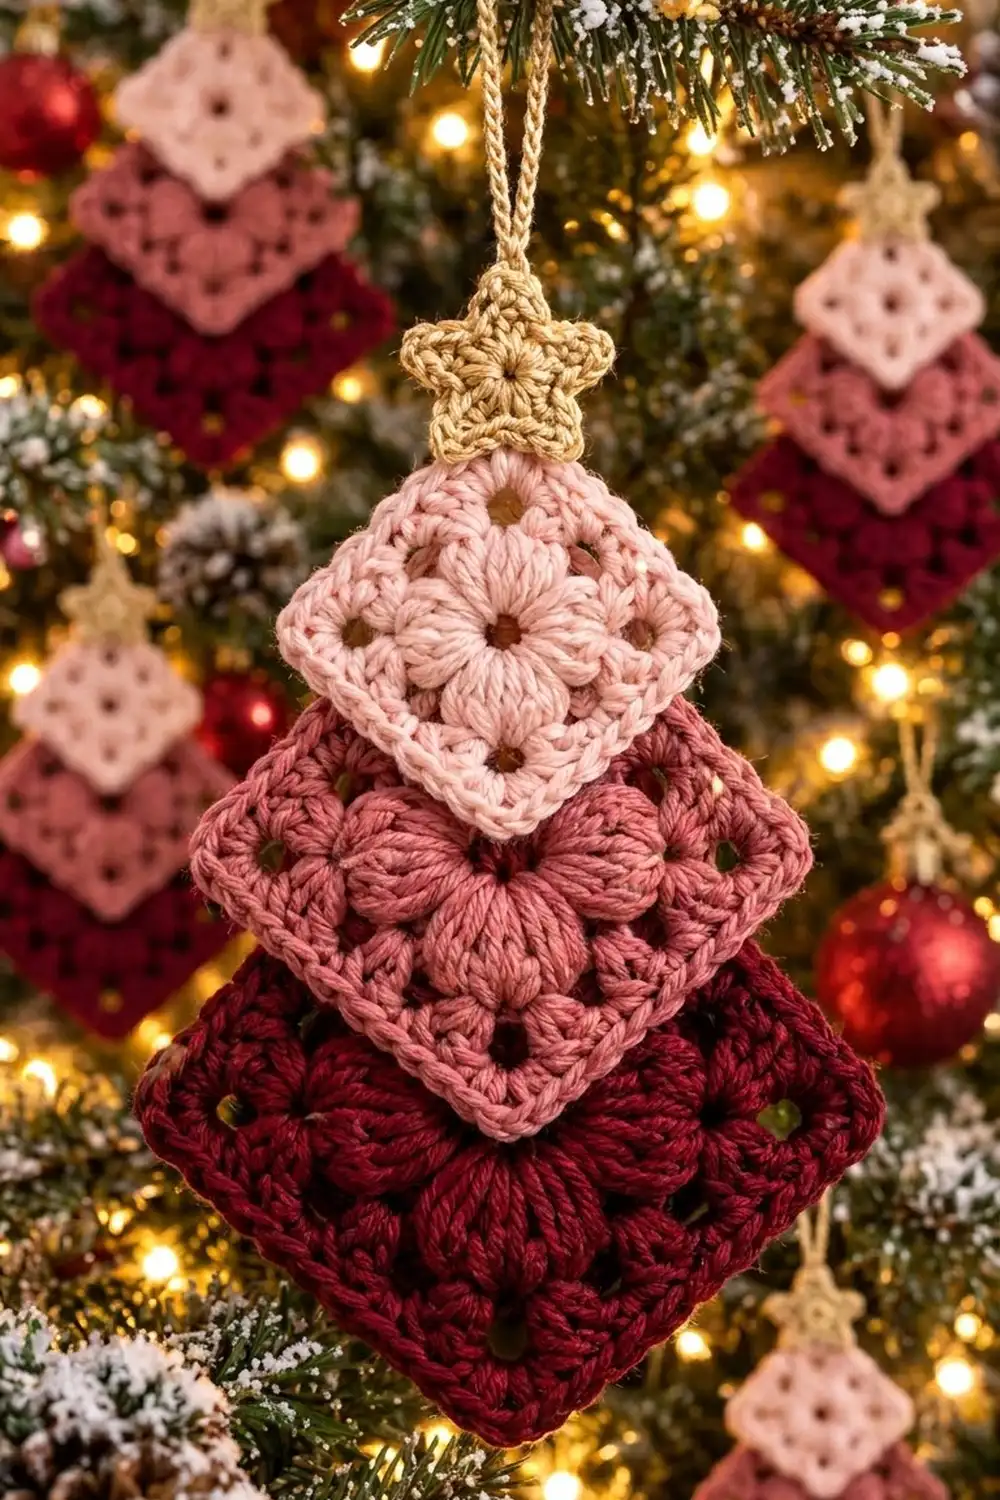
The Rosy Puff Tree is a small Christmas tree ornament made from three puff-flower granny squares. Each square is turned on point and they are stacked from smallest to largest, so the diamonds overlap to form a tiered tree. A chunky gold star sits on top, and a slip-stitch cord makes the hanging loop.
The palette runs from light blush pink at the top, through dusty rose, to deep burgundy at the base. Gold on the star and loop ties it together. The style is soft and vintage, and it looks just as good on a traditional tree as on a pastel one.
This pattern uses US crochet terms. The finished tree, without the star, measures about 5.7 in (14.5 cm) wide and 8.7 in (22.1 cm) tall. With the star it is about 9.7 in (24.6 cm) tall, and the loop adds 2.75 in (7.0 cm).
All three squares follow the same pattern and simply stop at different rounds. You give each square its own single crochet edge, make the star and the cord, then sew everything together and block.
Finished Size and Construction
- Finished ornament: about 5.7 in (14.5 cm) wide x 9.7 in (24.6 cm) tall including the star
- Skill level: Advanced beginner (puff stitches, working in the round, simple sewing)
- Terminology: US crochet terms
- Yarn weight: DK (light worsted, #3) cotton
- Hook: 3.5 mm (US E-4)
- Number of pieces: 5 (3 squares, 1 star, 1 hanging cord)
- Layout: 3 squares stacked on point in a single vertical column, each overlapping the one below
- Piece sizes (finished, side to side): small 2.5 in (6.4 cm), medium 3.25 in (8.3 cm), large 4 in (10.2 cm)
- Size before border: small 2.25 in (5.7 cm), medium 3 in (7.6 cm), large 3.75 in (9.5 cm)
- Border depth: 0.125 in (0.3 cm) on each side, adding 0.25 in (0.6 cm) to the width of each square
Materials
Choose a smooth DK cotton with good stitch definition. Cotton keeps the puff petals crisp and holds a sharp diamond point. Fuzzy yarns hide the petals and eyelets, so avoid them.
- Color A, light blush pink (small square): 4 g, about 10 m (11 yd)
- Color B, dusty rose (medium square): 6 g, about 15 m (16 yd)
- Color C, burgundy (large square): 9 g, about 22 m (24 yd)
- Color D, gold or tan (star and loop): 3 g, about 7 m (8 yd)
These quantities include a small margin for swatching, joining tails and sewing.
Tools:
- 3.5 mm (US E-4) crochet hook
- Tapestry needle
- Scissors
- 2 locking stitch markers
- Rust-proof pins and a blocking mat
- Spray bottle with clean water
- Ruler or tape measure
Abbreviations (US Terms)
- ch – chain
- sl st – slip stitch
- sc – single crochet
- hdc – half double crochet
- dc – double crochet
- sp – space
- st(s) – stitch(es)
- MR – magic ring
- rep – repeat
- puff – puff stitch (see below)
Puff stitch: (Yarn over, insert hook in the stitch, yarn over and pull up a loop to the height of a dc) 3 times, giving 7 loops on the hook. Yarn over and pull through all 7 loops. Pull the yarn snug so the puff stays closed.
Gauge and Checkpoints
The exact gauge matters less than keeping the three squares in proportion. Make the small square first and measure it before you go on.
Gauge is about 5 dc = 1 in (2.5 cm) with the 3.5 mm hook.
Checkpoints, measured flat from side to side, not point to point:
- After Round 2 (flower): about 1.5 in (3.8 cm) across
- After Round 3: 2.25 in (5.7 cm)
- After Round 4: 3 in (7.6 cm)
- After Round 5: 3.75 in (9.5 cm)
- After border: add 0.25 in (0.6 cm) to the last measurement
If the square is too big: go down to a 3.25 mm (US D-3) hook, or pull the puff loops up a little shorter.
If the square is too small: go up to a 3.75 mm (US F-5) hook.
Use the same hook and the same tension for all three squares. The size difference between them comes only from the number of rounds.
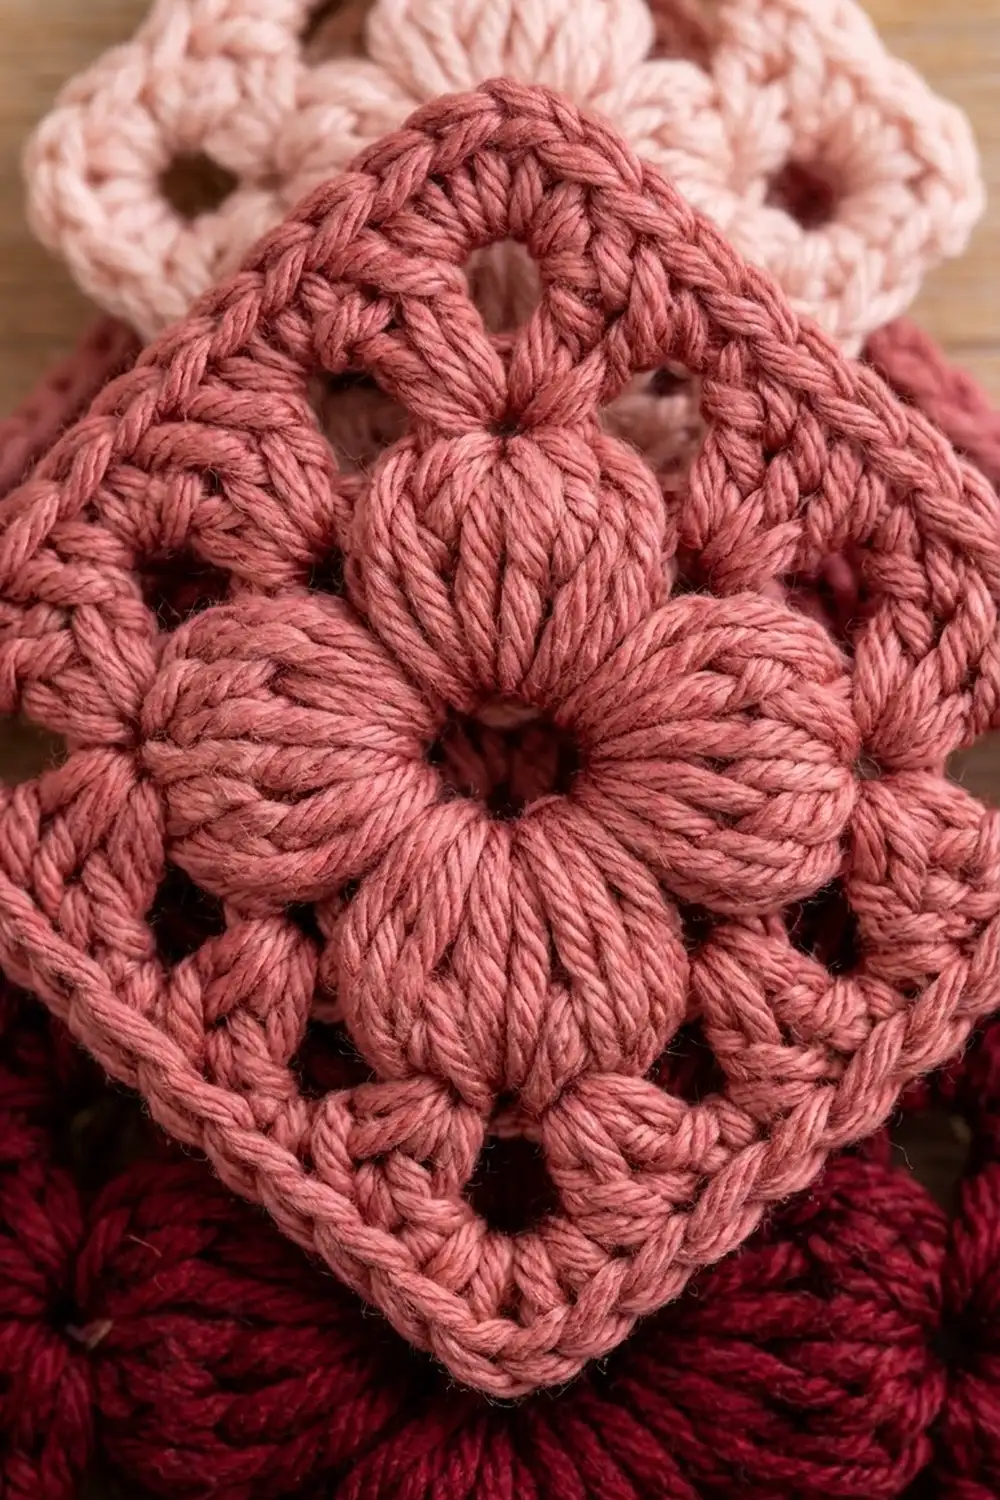
Puff Flower Square (Base Pattern)
Work in the round with the right side facing you. Do not turn.
Round 1: Make a MR. Ch 1, work 8 sc into the ring. Pull the ring closed, leaving a small hole in the center. Sl st to the first sc. (8 sc)
Round 2 (petals): Ch 2 (does not count as a stitch). Puff in the next sc, ch 1, puff in the next sc, ch 3; rep from * 3 more times. Sl st to the top of the first puff. (8 puffs, 4 ch-1 sps, 4 ch-3 sps)*
Each pair of puffs with its ch-1 sp forms one petal. The four petals point to the four corners, and the ch-3 sps fall at the middle of each side.
Round 3 (squaring round): Sl st into the next ch-1 sp. Ch 3 (counts as dc), work (dc, ch 2, 2 dc) in the same ch-1 sp for the first corner. *Ch 1, 3 dc in the next ch-3 sp, ch 1, (2 dc, ch 2, 2 dc) in the next ch-1 sp; rep from * 2 more times. Ch 1, 3 dc in the last ch-3 sp, ch 1, sl st to the top of the beginning ch-3.
Each side, counting between the corner ch-2 sps, has 2 dc + ch 1 + 3 dc + ch 1 + 2 dc = 9 sts. (28 dc + 8 ch-1 sps = 36 sts, which is 9 sts per side, plus 4 corner ch-2 sps)
The ch-1 sps make the eyelets between the petals, and the ch-2 sps make the corner eyelets.
For the small square, stop here. Fasten off and go to the Border.
Round 4: Sl st in the next dc and into the corner ch-2 sp. Ch 3 (counts as dc), work (dc, ch 2, 2 dc) in the same sp. *Dc in each of the next 9 sts, treating each ch-1 sp as one stitch, then (2 dc, ch 2, 2 dc) in the next corner ch-2 sp; rep from * 2 more times. Dc in each of the last 9 sts, then sl st to the top of the beginning ch-3.
Each side has 2 corner dc + 9 dc + 2 corner dc = 13 dc. (52 dc, which is 13 per side, plus 4 corner ch-2 sps)
For the medium square, stop here. Fasten off and go to the Border.
Round 5: Sl st in the next dc and into the corner ch-2 sp. Ch 3 (counts as dc), work (dc, ch 2, 2 dc) in the same sp. *Dc in each of the next 13 dc, (2 dc, ch 2, 2 dc) in the next corner sp; rep from * 2 more times. Dc in each of the last 13 dc, then sl st to the top of the beginning ch-3.
Each side has 2 + 13 + 2 = 17 dc. (68 dc, which is 17 per side, plus 4 corner ch-2 sps)
The large square stops here. Fasten off and go to the Border.
Gold Star
With Color D:
Round 1: Make a MR. Ch 1, work 10 sc into the ring. Pull it closed tightly and sl st to the first sc. (10 sc)
Round 2 (points): Ch 4, sl st in the 2nd ch from the hook, sc in the next ch, hdc in the next ch, skip the next sc, sl st in the following sc; rep from * 4 more times. The last sl st lands in the same sc where the round began. (5 points, each made of 3 sts along the chain)*
The star measures about 1.25 in (3.2 cm) from point to point. Fasten off and leave a 10 in (25.4 cm) tail for sewing.
Hanging Cord
With Color D, ch 36. Sl st in the 2nd ch from the hook and in each ch across. (35 sl sts)
The cord should measure about 5.5 in (14.0 cm). Fold it in half to make a loop about 2.75 in (7.0 cm) tall. Fasten off and leave a 6 in (15.2 cm) tail.
Make All Pieces
- Color A (light blush pink): 1 small square, Rounds 1–3 + border
- Color B (dusty rose): 1 medium square, Rounds 1–4 + border
- Color C (burgundy): 1 large square, Rounds 1–5 + border
- Color D (gold): 1 star and 1 hanging cord
Layout (front view, top to bottom):
        [ loop ]
        [ star ]
     [ A  small  ]
   [  B  medium   ]
 [   C   large     ]
All three squares are centered on one vertical line, with their top and bottom corners on that line.
Border
Work the border on each square separately, before joining. Because the squares are stacked rather than seamed edge to edge, no stitches are added or shared between pieces.
Border gauge: one round of sc adds about 0.125 in (0.3 cm) to each edge.
Join the square’s own color in any corner ch-2 sp.
Border round: Ch 1, work (sc, ch 2, sc) in the same corner sp. *Sc in each st along the side, then (sc, ch 2, sc) in the next corner sp; rep from * 2 more times. Sc in each st along the last side, then sl st to the first sc. Fasten off. On the small and medium squares, leave a 12 in (30.5 cm) tail for sewing.
Counts per side (each count includes that side’s 2 corner sc):
- Small square: 9 + 2 = 11 sc per side, 44 sc total
- Medium square: 13 + 2 = 15 sc per side, 60 sc total
- Large square: 17 + 2 = 19 sc per side, 76 sc total
Why the math works: Each side gets exactly one sc per stitch of the round before, so the edge neither ruffles nor pulls in. Each corner sc belongs to one side only, with the ch-2 between them. That means 4 sides x the side count gives the true total, and no corner is counted twice.
Joining
Sew the pieces with a tapestry needle and the tails you left, working from the top down.
Small onto medium:
- Turn both squares on point. Lay the small square over the medium one so the small square’s bottom corner ch-2 sp sits right over the medium square’s center ring.
- Check that the top and bottom points of both squares sit on one vertical line.
- With the Color A tail, tack the bottom corner ch-2 sp to the medium square’s Round 1 ring.
- Working up each lower side of the small square, sew through the back loop of each border sc and then through the medium square underneath. Sew the first 6 sc on each side, counting from the bottom corner. The rest of each edge lies past the medium square’s top edges.
- Sew one tacking stitch per sc. Keep the stitches snug but not tight, so the small square lies flat without dimpling.
Medium onto large: Repeat these steps. Center the medium square’s bottom corner over the large square’s center ring, then use the Color B tail to sew the first 8 border sc on each lower side.
Star: Center the star over the small square’s top corner and sew around the star’s center ring with the gold tail.
Loop: Fold the cord in half and sew both ends to the back of the star, behind the top point.
Size checkpoint: Without the star, the joined tree should measure about 5.7 in (14.5 cm) across the large square’s side points. It should be 8.7 in (22.1 cm) from the small square’s top point to the large square’s bottom point.
Final Blocking
- Spray the whole ornament until it is evenly damp, not soaked.
- Lay it face up on the blocking mat.
- Pin each square’s side points first, checking them against the measurements.
- Pin the top and bottom points along a straight vertical line.
- Shape the puff petals gently with your fingertips.
- Pin out each star point to its tip.
- Let it dry completely, at least 6 hours.
Final Quality-Control Checklist
- Each square has 4 even petals and a tightly closed center
- Border counts are 11, 15 and 19 sc per side
- Corner eyelets are open and the points are sharp
- All points line up on one vertical center line
- Each upper square’s bottom point is centered on the square below it
- Tacking stitches don’t show from the front
- The star is centered and has 5 even points
- The loop is secure and lets the ornament hang straight
- All tails are woven in on the back
Troubleshooting
Petals look flat: Pull each puff loop up to full dc height and close it firmly.
Square cups: Your stitches are too tight. Loosen your tension or go up a hook size.
Square ruffles: Check that you worked exactly one dc per stitch along each side.
Wrong side count: Count between the corner ch-2 sps, and count each Round 3 ch-1 sp as a stitch.
Ornament tilts when hung: Re-sew the loop exactly on the center line.
Star curls: Block it flat and pin out every point.
Care
Hand wash in cool water with mild soap, then roll it in a towel to remove the water. Reshape, dry flat, and re-block if needed.
Final Notes
Here is the measurement chain. Round 3 makes a 2.25 in (5.7 cm) square, Round 4 makes 3 in (7.6 cm), and Round 5 makes 3.75 in (9.5 cm). The border adds 0.25 in (0.6 cm), giving finished squares of 2.5 in (6.4 cm), 3.25 in (8.3 cm) and 4 in (10.2 cm). Stacked on point, they make a tree about 5.7 in (14.5 cm) wide and 8.7 in (22.1 cm) tall, and the star brings it to about 9.7 in (24.6 cm). If you check these numbers at each step, every ornament in your set will match.
Happy crocheting!