

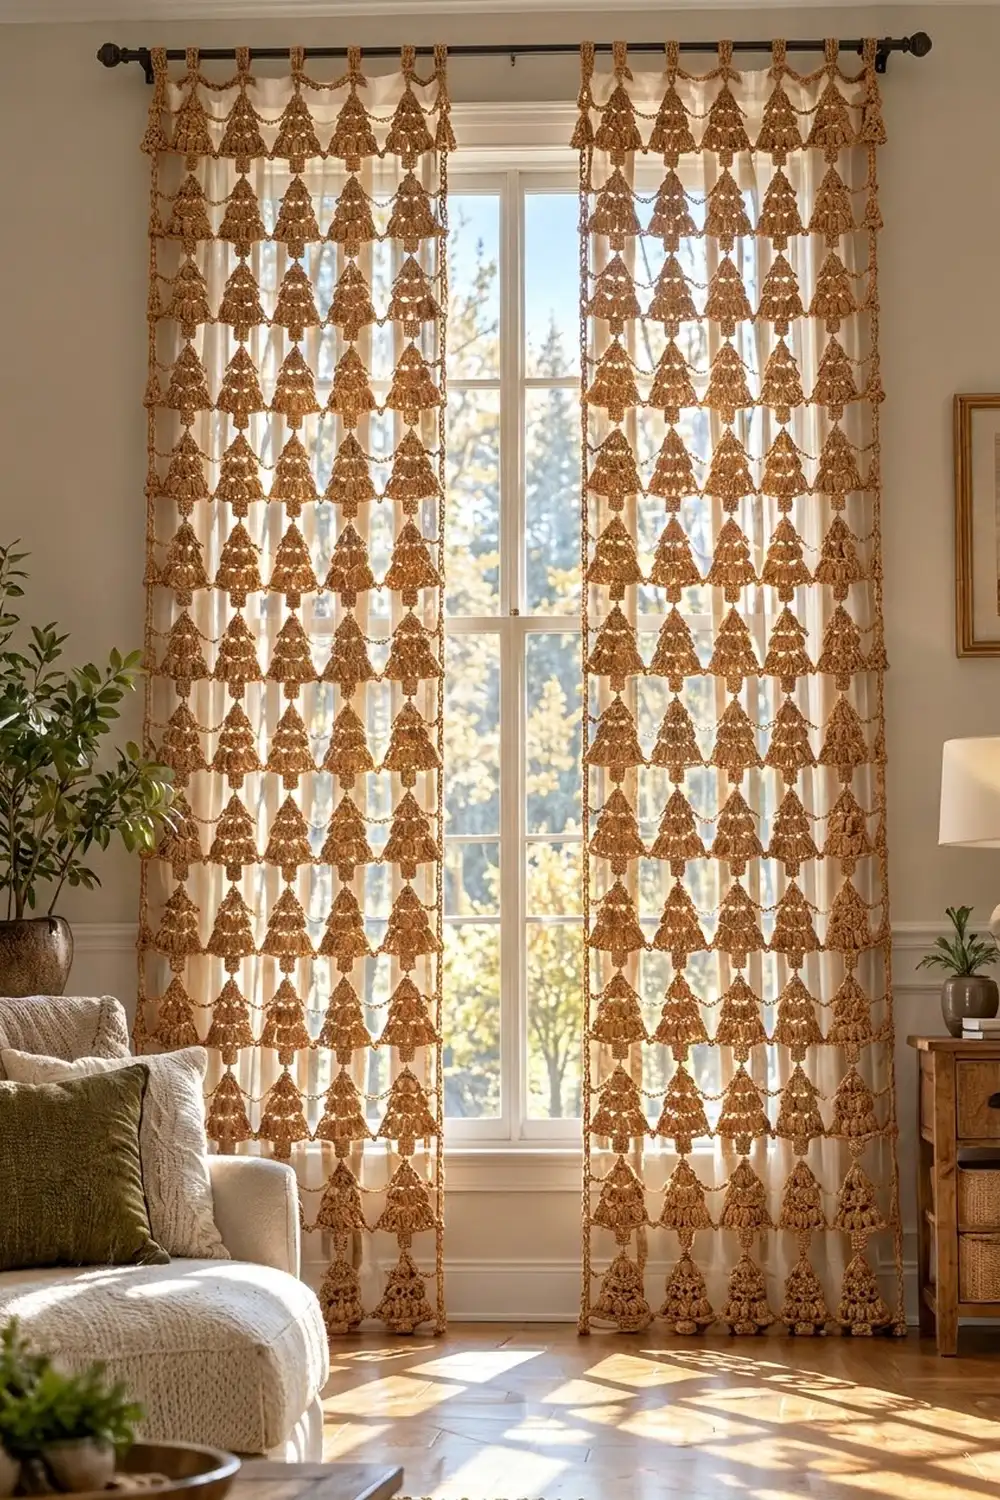
The Golden Pine Curtain is an open, airy mesh panel made from rows of little puff-stitch Christmas trees. Each tree has three stacked tiers of plump puffs, a rope-like edge under every tier, small open windows between the tiers, and a solid square trunk. Thin chain links tie the trees into a lacy grid that lets winter light pour through.
The sample uses one warm caramel (golden tan) cotton-blend yarn. Hung over plain white sheers, the trees read like a festive, Scandinavian-style lattice that is still neutral enough to leave up all winter. The photo shows a matching pair of panels. This pattern makes one panel, so work it twice for a pair.
All instructions use US crochet terms. One finished panel measures 40.5 in (102.9 cm) wide and 83.75 in (212.7 cm) long, from the top of the header to the bottom of the last trunk. The hanging loops add about 2 in (5.1 cm).
The construction is simple and repetitive. You work each column of 12 trees as one continuous strip, top down, with a chain link between each trunk and the next tip. You then tie seven strips together sideways with chain bridges. Finally, you work a solid single crochet header with hanging loops across the top.
Finished Size and Construction
- Finished panel size: 40.5 in (102.9 cm) wide x 83.75 in (212.7 cm) long, plus loops
- Skill level: Intermediate (puff stitches, careful counting, simple joining)
- Terminology: US crochet terms
- Yarn weight: Worsted (#4)
- Hook: 5.0 mm (H-8)
- Number of pieces: 84 tree motifs per panel (168 for a pair), worked as 7 strips of 12
- Layout: 7 trees across x 12 trees down
- Single tree size: 4.5 in (11.4 cm) wide x 5.5 in (14.0 cm) tall
- Size before header: 40.5 in (102.9 cm) x 82.5 in (209.6 cm)
- Header depth: 1.25 in (3.2 cm), plus 2 in (5.1 cm) loops
Materials
Choose a smooth, firm worsted cotton or cotton blend with about 200 m per 100 g. Cotton shows the puff texture clearly and hangs straight without stretching as much as acrylic does. Avoid fuzzy or very splitty yarn, because puffs need loops that slide cleanly.
- Caramel / golden tan: 500 g (1,000 m) per panel; 1,000 g (2,000 m) for a pair
These quantities include a margin of about 15-20 percent over the sample’s actual use. The sample used about 4.5 g / 9 m per tree, plus the yarn for joining and the header.
Tools:
- 5.0 mm (H-8) crochet hook
- Tapestry needle
- Scissors
- Locking stitch markers
- Tape measure
- Blocking mats, or a large clean floor area covered with towels, plus rust-proof pins
- Spray bottle
Abbreviations (US Terms)
- ch – chain
- sc – single crochet
- sl st – slip stitch
- sk – skip
- sp – space
- st(s) – stitch(es)
- RS – right side
- [ ] – repeat the steps in brackets the stated number of times
Puff stitch (puff): [Yarn over, insert hook in the indicated st, yarn over and pull up a loop to about 0.75 in (1.9 cm)] 4 times (9 loops on hook). Yarn over and pull through all 9 loops, then ch 1 to close. The closing ch 1 is part of the puff and is not counted separately.
Gauge and Checkpoints
Gauge: 16 sc and 16 rows = 4 in (10.2 cm) square. Every measurement in this pattern depends on 4 sc and 4 rows per 1 in (2.5 cm).
Make one complete tree first and block it lightly. This tree is your real gauge swatch, because puff height varies between crocheters more than sc height does.
Checkpoints for one tree:
- After Row 4: 2.5 in (6.4 cm) point to point, 1.5 in (3.8 cm) tall
- After Row 8: 3.5 in (8.9 cm) point to point, 3 in (7.6 cm) tall
- After Row 12: 4.5 in (11.4 cm) point to point, 4.5 in (11.4 cm) tall
- After Row 16: 5.5 in (14.0 cm) tall, with a trunk 1.25 in (3.2 cm) wide
If your tree is too big: go down to a 4.5 mm hook and pull your puff loops up slightly shorter. If it is too small: go up to a 5.5 mm hook, or pull your puff loops a little taller. Any difference gets multiplied by 12 down the panel, so aim to be within 0.125 in (0.3 cm) per tree.
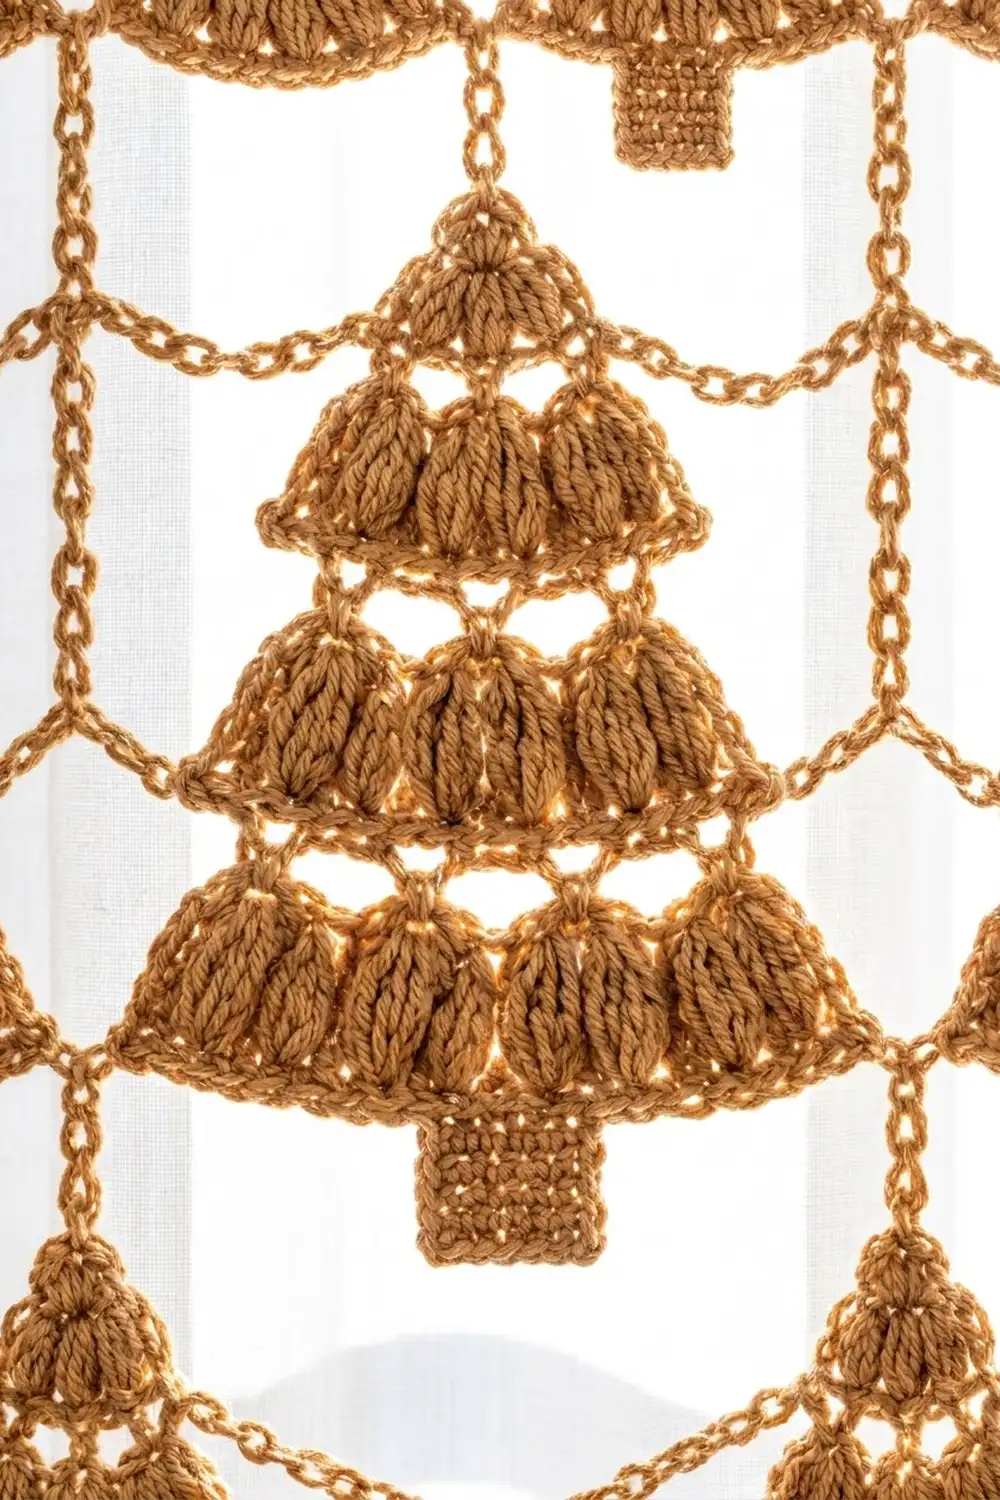
The Tree Motif
Work top down in turned rows, from the tip to the trunk. The first tree of each strip starts with the instructions below. Later trees start from the chain link (see the strip section).
Tier 1 (3 puffs)
Row 1 (RS): Ch 2, 3 sc in 2nd ch from hook. Turn. (3 sc)
Row 2: Ch 1 (the ch 1 never counts as a st, here or anywhere else), 2 sc in first sc, sc in next sc, 2 sc in last sc. Turn. (5 sc)
Row 3: Ch 2 (does not count as a st), puff in first sc, ch 1, sk 1 sc, puff in next sc, ch 1, sk 1 sc, puff in last sc. Turn. (3 puffs, 2 ch-1 sps)
Row 4 (tier edge): Ch 1, (sc, ch 2, sc) in first puff, sc in ch-1 sp, sc in next puff, sc in ch-1 sp, (sc, ch 2, sc) in last puff. Turn. (7 sc, 2 ch-2 corner points)
The ch-2 corners make the tier edge flare out past the puffs, which creates the pointed tier tips.
Window Row and Tier 2 (4 puffs)
Row 5 (windows): Ch 1, sk first sc, sc in ch-2 sp, ch 2, sk 2 sc, sc in next sc (the center sc), ch 2, sk 2 sc, sc in ch-2 sp. Leave the last sc unworked. Turn. (3 sc, 2 ch-2 sps)
The two ch-2 sps become the small open windows between the tiers.
Row 6: Ch 1, sc in first sc, 2 sc in ch-2 sp, sc in next sc, 2 sc in ch-2 sp, sc in last sc. Turn. (7 sc)
Row 7: Ch 2, puff in first sc, [ch 1, sk 1 sc, puff in next sc] 3 times. Turn. (4 puffs, 3 ch-1 sps)
Row 8 (tier edge): Ch 1, (sc, ch 2, sc) in first puff, [sc in ch-1 sp, sc in next puff] 2 times, sc in ch-1 sp, (sc, ch 2, sc) in last puff. Turn. (9 sc, 2 ch-2 corner points)
Window Row and Tier 3 (5 puffs)
Row 9 (windows): Ch 1, sk first sc, sc in ch-2 sp, ch 3, sk 3 sc, sc in next sc (the center sc), ch 3, sk 3 sc, sc in ch-2 sp. Leave the last sc unworked. Turn. (3 sc, 2 ch-3 sps)
Row 10: Ch 1, sc in first sc, 3 sc in ch-3 sp, sc in next sc, 3 sc in ch-3 sp, sc in last sc. Turn. (9 sc)
Row 11: Ch 2, puff in first sc, [ch 1, sk 1 sc, puff in next sc] 4 times. Turn. (5 puffs, 4 ch-1 sps)
Row 12 (tier edge): Ch 1, (sc, ch 2, sc) in first puff, [sc in ch-1 sp, sc in next puff] 3 times, sc in ch-1 sp, (sc, ch 2, sc) in last puff. Turn. (11 sc, 2 ch-2 corner points)
Each puff row works into exactly (puffs x 2) – 1 stitches of the row below: 5, 7, and 9. Rows 6 and 10 rebuild those counts from the window rows.
Trunk
Row 13: Sl st in first sc, in ch-2 sp, and in next 2 sc (4 sl sts). Ch 1, sc in next 5 sc. Turn. (5 sc)
This centers the trunk under the 9 sc between the corner points. On the far side, 2 sc, the ch-2 corner, and the last sc stay unworked.
Rows 14-16: Ch 1, sc in each sc across. Turn. (5 sc)
The trunk is 5 sc x 4 rows, which is 1.25 in (3.2 cm) wide x 1 in (2.5 cm) tall. If you are making a single test tree, fasten off here.
Make All Pieces: The Strips
Each strip is 12 trees connected by 6-ch links and worked in one piece.
- Work Tree 1 through Row 16. Do not fasten off.
- Link: Turn, then sl st in the first 3 sc (your hook is now at the center trunk st). Ch 8. Work 3 sc in the 2nd ch from hook. This is Row 1 of the next tree, and the remaining 6 ch form a link of 1.5 in (3.8 cm).
- Work Rows 2-16 of the new tree.
- Repeat steps 2-3 until you have 12 trees. Fasten off after Row 16 of Tree 12.
Strip length check: 12 trees x 5.5 in + 11 links x 1.5 in = 66 + 16.5 = 82.5 in (209.6 cm). Measure each strip flat, without stretching it.
Per panel: 7 strips (84 trees), all in caramel. Per pair: 14 strips (168 trees).
Layout grid (one panel; T = tree, | = link, – = bridge):
Row 1:   T - T - T - T - T - T - T
         |   |   |   |   |   |   |
Row 2:   T - T - T - T - T - T - T
         |   |   |   |   |   |   |
         ... rows 3-11 repeat ...
         |   |   |   |   |   |   |
Row 12:  T - T - T - T - T - T - T
Joining
Lay all 7 strips side by side, RS up, with the tree rows lined up. The joins connect the outer ch-2 corner points of each Tier 3 (Row 12).
Bridge row: Start at tree row 1. Join yarn with a sc in the right-hand Tier 3 corner point of the far-left tree. Ch 6, sc in the left-hand Tier 3 corner point of the next tree. Sl st through the back loop of each of the 11 sc along that tree’s Row 12 edge, then sc in its right-hand corner point. Repeat from * to * 5 more times, ending at the right-hand corner of tree 7. Fasten off.
Repeat this for all 12 tree rows, for a total of 12 bridge rows per panel.
Stitch logic: Each bridge is 6 ch, the same as the vertical links, so every gap between neighboring trees is 1.5 in (3.8 cm), both across and down. The back-loop sl sts add a rope line under each bottom tier. This strengthens the edge without adding width.
Tension: Chain the bridges at the same tension as the vertical links. Tight bridges pull the panel narrow and make the trees cup. Loose bridges let the trees sag. As you go, check a few bridges against the links.
Size check: 7 trees x 4.5 in + 6 bridges x 1.5 in = 31.5 + 9 = 40.5 in (102.9 cm) across. The column pitch (center to center) is 6 in (15.2 cm), and the row pitch is 7 in (17.8 cm).
Border: Top Header with Hanging Loops
As in the sample, the sides and bottom stay open. Only the top gets a solid header.
Header gauge: 4 sc and 4 rows per 1 in (2.5 cm), the same as the motif gauge.
Row 1 (attach): With RS facing, ch 9, sc in the base ch at the tip of the far-right top tree, [ch 23, sc in the tip of the next tree] 6 times, ch 9. (163 sts: 9 ch + 7 sc + 138 ch + 9 ch)
Row 2: Ch 1, sc in 2nd ch from hook and in each ch and sc across. Turn. (163 sc)
Rows 3-5: Ch 1, sc in each sc across. Turn. (163 sc)
Row 6 (loops): Ch 1, (sc, ch 16, sc) in first sc, [sc in next 26 sc, (sc, ch 16, sc) in next sc] 6 times. Fasten off. (163 sc worked 1 per st + 7 extra sc = 170 sc, plus 7 ch-16 loops)
Why the math works:
- Tip spacing: The tips sit 6 in (15.2 cm) apart, which is 24 sts at gauge. Each repeat is 1 tip sc + 23 ch = 24 sts.
- Ends: Each 9-ch end reaches the outer corner points, 2.25 in (5.7 cm) beyond the outer tips.
- Width: 163 sc measure 40.75 in (103.5 cm). That is 0.125 in (0.3 cm) wider than the trees on each side, which neatly covers the corner points.
- Loops: The loops fall on sts 1, 28, 55, 82, 109, 136, and 163, one every 27 sts (6.75 in / 17.1 cm), so they are perfectly symmetrical.
- Rod fit: Each ch-16 loop folds to about 2 in (5.1 cm) and fits rods up to 1 in (2.5 cm) thick.
Final Blocking
- Weave in all ends, running each one along a trunk or tier edge for at least 2 in (5.1 cm).
- Lay the panel flat, RS up, on mats or towels.
- Pin the header straight to 40.75 in (103.5 cm).
- Pin each column so the tips line up vertically, 7 in (17.8 cm) apart.
- Pin the Tier 3 corner points so the bridges are straight but not stretched and the trees sit 6 in (15.2 cm) apart.
- Mist evenly until damp. Gently pinch each puff into shape.
- Let the panel dry completely, about 24 hours.
- Unpin and check the full length: 83.75 in (212.7 cm), plus loops.
Final Quality-Control Checklist
- Every tree has 3, 4, and 5 puffs in its three tiers
- Two open windows sit between each pair of tiers
- Every trunk is 5 sc x 4 rows and centered
- All vertical links and all bridges are 6 ch
- The panel measures 40.5 in (102.9 cm) across the trees
- The header has 163 sc and 7 evenly spaced loops
- All ends are woven in securely
Troubleshooting
Puffs lean or look flat: Pull every loop to the same height and close each puff firmly with the ch 1.
Tier points curl: The sc in Row 4, 8, or 12 is too tight. Go up one hook size for the edge rows only.
Trunk is off center: Recount the 4 sl sts at the start of Row 13.
Strip is too long: Your puffs are too tall. Shorten the loops, or check your row gauge.
Panel narrows at the bottom: Your bridges got tighter as you worked. Redo the tightest bridge rows.
Header ripples: Check that Row 1 has exactly 23 ch in each section between tips.
Care
Hand wash in cool water, or machine wash on a gentle cycle in a mesh bag, then reshape and dry flat. Do not hang the panel while it is wet, because the weight will stretch the strips.
Final Notes
Every size in this pattern follows from one measurement chain:
- 4 sc per 1 in (2.5 cm) gives a 4.5 in x 5.5 in (11.4 cm x 14.0 cm) tree.
- 12 trees with 1.5 in (3.8 cm) links make an 82.5 in (209.6 cm) strip.
- 7 strips with 1.5 in (3.8 cm) bridges make a 40.5 in (102.9 cm) panel.
- A 1.25 in (3.2 cm) header brings the length to 83.75 in (212.7 cm).
Check your measurements at each step, and the curtain will hang straight and even.
Happy crocheting!