

Lilac Flutter is a light, airy curtain panel made from open-lace butterfly motifs. Each butterfly has four open wings with a fan of tall stitches around a hollow center, a picot edge, a raised body and two knobbed antennae. When it hangs at a window, light shines through the wing centers and the gaps between motifs.
The sample uses one color, a soft lavender cotton. One color keeps the lace clean and lets the texture do the work. It looks cottage-style and romantic without being fussy.
This pattern uses US crochet terms. One finished panel measures 23 in wide x 62 in long (58.4 x 157.5 cm) with the border, plus 2 in (5.1 cm) hanging-tab loops. Make two panels for a pair.
For construction, you make 30 butterfly motifs per panel and join them as you go in the last round, using picot-to-picot joins. Then you work a three-round border around the panel and add five tabs across the top.
Finished Size and Construction
- Finished panel: 23 x 62 in (58.4 x 157.5 cm), not counting tabs
- Skill level: Intermediate
- Terminology: US
- Yarn weight: DK (#3) cotton
- Hook: 4.0 mm (G-6)
- Number of pieces: 30 motifs per panel (60 for a pair)
- Layout: 3 motifs wide x 10 motifs tall
- Motif size: 7 in wide x 6 in tall (17.8 x 15.2 cm)
- Size before border: 21 x 60 in (53.3 x 152.4 cm)
- Border depth: 1 in (2.5 cm) on every edge
- Tabs: 5 per panel, 2 in (5.1 cm) loops
Materials
Yarn: Use a smooth, mercerized or combed DK cotton. Cotton holds the wing shape, blocks crisply and won’t sag much in sunlight. Avoid fuzzy yarns, because they blur the open centers.
- Lavender: 650 g (approx. 1,365 m), which is 13 balls of 50 g / 105 m, for a pair of panels. For one panel, buy 325 g (approx. 683 m).
Each motif uses about 8 g (17 m). Each panel’s border and tabs use about 40 g (84 m). The quantities include a margin of roughly 15% for gauge swatches and dye-lot safety.
Tools:
– 4.0 mm (G-6) crochet hook
– Tapestry needle
– Stitch markers
– Rust-proof pins and blocking mats
– Spray bottle
– Measuring tape
Abbreviations (US Terms)
- ch: chain
- sl st: slip stitch
- sc: single crochet
- hdc: half double crochet
- dc: double crochet
- tr: treble crochet
- sp: space
- sk: skip
- st(s): stitch(es)
Special stitches:
– Picot: Ch 3, sl st in 3rd ch from hook.
– Join-picot: Ch 1, sl st into the matching picot of the finished motif, ch 1, sl st in the 1st ch of this join-picot.
– 5-dc bobble: [Yo, insert hook in st, pull up a loop, yo, draw through 2 loops] 5 times in the same st, then yo and draw through all 6 loops on hook.
– 3-dc cluster (CL): The same as the bobble, but with 3 repeats. Finish by drawing through all 4 loops.
Gauge and Checkpoints
Base gauge: 18 sc and 20 rows = 4 in (10.2 cm) in sc worked flat.
Make one complete motif before you start the rest, and check it at each stage:
- After Rnd 1: The ring is about 1 in (2.5 cm) across.
- After Rnd 3: The wingspan is about 4.5 in (11.4 cm) and the height about 4 in (10.2 cm).
- After Rnd 4: The wingspan is about 6.5 in (16.5 cm).
- After Rnd 5, blocked: The motif is 7 in wide x 6 in tall (17.8 x 15.2 cm).
If the motif is too big, go down to a 3.75 mm hook. If it’s too small, go up to a 4.5 mm hook. Being off by 0.25 in (0.6 cm) per motif adds up: across 10 rows, that’s 2.5 in (6.4 cm) on the panel’s length, so fix it now.
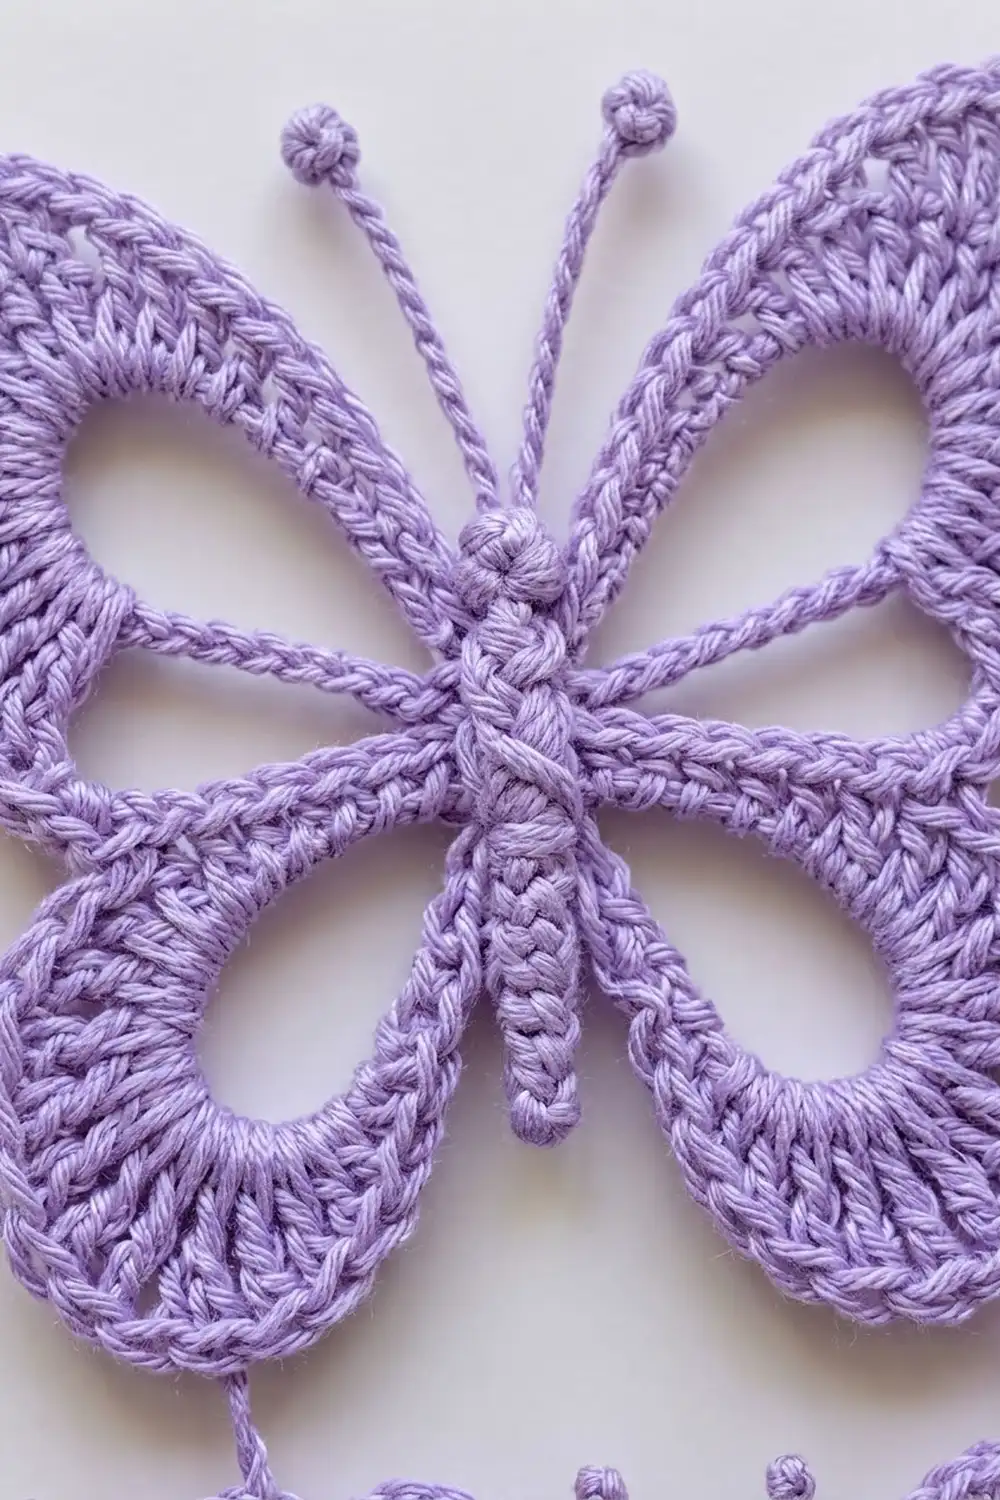
Butterfly Motif (Make 30 per panel)
Hold the motif face up with the head at the top. You work the wings clockwise: upper right (UR), lower right (LR), lower left (LL), upper left (UL).
Rnd 1: Ch 6, sl st to the first ch to form a ring. Ch 1, work 12 sc in the ring, then sl st to the first sc. (12 sc)
Rnd 2 (wing loops): Ch 1, sc in the same st as the join. Then work the four loops:
– Ch 22, sk 1 st, sc in next 2 sts (UR loop).
– Ch 16, sk 1 st, sc in next 2 sts (LR loop).
– Ch 16, sk 1 st, sc in next 2 sts (LL loop).
– Ch 22, sk 1 st, sc in next st (UL loop).
Sl st to the first sc. (8 sc, 2 ch-22 loops, 2 ch-16 loops)
The skipped stitches let each loop stand clear of the center. These loops become the open wing centers.
Rnd 3 (wing base band):
– In the UR ch-22 loop, work (2 sc, 2 hdc, 24 dc, 2 hdc, 2 sc) for 32 sts. Sl st in each of the next 2 sc.
– In the LR ch-16 loop, work (2 sc, 2 hdc, 16 dc, 2 hdc, 2 sc) for 24 sts. Sl st in the next 2 sc.
– Repeat the 24-st group in the LL loop. Sl st in the next 2 sc.
– Repeat the 32-st group in the UL loop. Sl st in the last 2 sc. The final sl st lands on the first sl st of the round.
Count: 32 + 24 + 24 + 32 = 112 wing sts, plus 8 sl sts. Because you work all stitches into the loop, the loop interior stays empty.
Rnd 4 (fan band): This round makes the radiating tall stitches.
– Each upper wing: Sc in the next 2 sc, hdc in the next 2 hdc, [2 tr in next dc, tr in next dc] 12 times, hdc in the next 2 hdc, sc in the next 2 sc. The count is 32 sts worked once + 12 extra tr = 44 sts.
– Each lower wing: Sc 2, hdc 2, [2 dc in next dc, dc in next dc] 8 times, hdc 2, sc 2. The count is 24 sts worked once + 8 extra dc = 32 sts.
– Between wings: Sl st in each of the 2 sl sts.
Count: 44 + 32 + 32 + 44 = 152 wing sts, plus 8 sl sts.
Rnd 5 (picot edge):
– Each upper wing: Sc in the next 4 sts, [picot, sc in the next 4 sts] 10 times. This gives 44 sc and 10 picots.
– Each lower wing: Sc 4, [picot, sc 4] 7 times. This gives 32 sc and 7 picots.
– Between wings: Sl st in each sl st.
Fasten off.
Picot numbering: Number the picots in working order: P1 to P10 on the upper wings and P1 to P7 on the lower wings. Because the round goes clockwise, the left wings mirror the right ones:
– UR P(n) mirrors UL P(11 − n).
– LR P(n) mirrors LL P(8 − n).
Key points on each motif:
– UR P6: outer tip of the upper wing
– UR P2: top of the upper wing
– LR P3: outer side of the lower wing
– LR P5: bottom of the lower wing
Body (Make 1 per motif)
Rnd 1: Ch 12.
– Sc in the 2nd ch from hook (this is the tail tip).
– Hdc in the next 9 ch.
– In the last ch, work (2 hdc, 5-dc bobble, 2 hdc). This is the head knob.
– Working in the unused loops on the other side of the chain, hdc in the next 9 ch.
– Sl st to the first sc.
(24 sts: 1 sc + 9 hdc + 5 head sts + 9 hdc)
Antennae: Do not fasten off. Sl st into the bobble, then work each antenna:
– Ch 10, work a CL in the 4th ch from hook, sl st in each of the next 6 ch, then sl st into the bobble.
– Repeat once more for the second antenna.
Fasten off, leaving a 12 in (30.5 cm) tail. The body is 3 in (7.6 cm) long, and the antennae are about 1.5 in (3.8 cm).
Center the body vertically over Rnd 1 of the wings, with the head at the top. Whipstitch around its base, and leave the antennae free.
Make All Pieces
- One panel: 30 butterfly motifs and 30 bodies, all in lavender
- A pair: 60 motifs and 60 bodies
Finish the first motif completely. Work Rnds 1–4 on all the others, then do Rnd 5 as you join, following the grid below.
Row 1:   [ 1] [ 2] [ 3]
Row 2:   [ 4] [ 5] [ 6]
Row 3:   [ 7] [ 8] [ 9]
...
Row 10:  [28] [29] [30]
Work the motifs in number order: left to right, top to bottom.
Joining
Method: Join as you go in Rnd 5. Replace a normal picot with a join-picot at each join point.
Joining to the left neighbor (2 points):
– This motif’s LL P5 joins the left neighbor’s LR P3.
– This motif’s UL P5 joins the left neighbor’s UR P6.
Joining to the motif above (2 points):
– This motif’s UR P2 joins the upper motif’s LR P5.
– This motif’s UL P9 joins the upper motif’s LL P3.
Each join-picot replaces one picot one-for-one, so the stitch counts don’t change. Each motif still has 44 and 32 sc per wing. The 2 chains plus the sl st in the join-picot match the 3-ch picot length, so the joins neither pull in nor pucker.
Tension: Keep the join chains as relaxed as your normal picots. Tight joins draw the wing tips together and pull the panel narrower than 21 in.
Join totals per panel:
– Side-by-side joins: 10 rows x 2 seams x 2 points = 40
– Top-to-bottom joins: 9 seams x 3 motifs x 2 points = 54
Size checkpoint: Lay the joined panel flat. It should measure 21 x 60 in (53.3 x 152.4 cm).
Border
Border gauge: Rnd 2 sc should match the base gauge, 18 sc = 4 in (10.2 cm). Together, the three rounds add 1 in (2.5 cm) on every edge.
Anchor picots: Every edge motif gives 4 free picots to its side of the panel:
– Top edge, left to right: UL P7, UL P9, UR P2, UR P4
– Right edge, top to bottom: UR P6, UR P8, LR P3, LR P4
– Bottom edge, right to left: LR P5, LR P7, LL P1, LL P3
– Left edge, bottom to top: LL P4, LL P5, UL P3, UL P5
Per-motif side count for Rnd 1: 4 anchor sc + 4 spaces. The 4th space bridges to the next motif. On the last motif of each side, it becomes the ch-9 corner instead of a ch-5.
Rnd 1 (mesh): Join yarn with sc in the top-left motif’s UL P7. Then:
– Ch 5, sc in the next anchor picot. Repeat along the side.
– At each corner, ch 9 instead of ch 5 to reach the first anchor of the next side.
– Sl st to the first sc after the last corner.
| Side | Anchor sc | Ch-5 sps | Corner ch-9 sps |
|---|---|---|---|
| Top and bottom (3 motifs x 4) | 12 each | 11 each | 1 each |
| Each long side (10 motifs x 4) | 40 each | 39 each | 1 each |
Rnd 1 totals: 104 sc, 100 ch-5 sps, 4 ch-9 corners.
Rnd 2 (solid): Ch 1. Sc in each sc, work 5 sc in each ch-5 sp, and work (4 sc, ch 3, 4 sc) in each ch-9 corner.
– Top and bottom: 4 + 12 + (11 x 5) + 4 = 75 sc each
– Long sides: 4 + 40 + (39 x 5) + 4 = 243 sc each
– Total: 636 sc and 4 ch-3 corners
Rnd 3 (picot edge): Ch 1, then work each side:
– Top edge: Sc in each of the 75 sts. Leave this edge plain for the tabs.
– Corners: (Sc, ch 3, sc) in each corner sp.
– Right edge, bottom and left edge: [Sc in the next 3 sts, picot] across. That’s 81 repeats on each long side and 25 repeats on the bottom.
Sl st to the first sc and fasten off.
Why the math works: 75 and 243 are both multiples of 3, so the picot repeat finishes exactly at each corner. Also, 5 sc in each ch-5 sp matches the mesh length, so the edge lies flat.
Hanging tabs: Work across the 75 plain top sc as tab 7, gap 10, repeated, ending with a tab. That’s 5 tabs x 7 + 4 gaps x 10 = 75.
– Tab Row 1: Sc in 7 sts, turn.
– Rows 2–20: Ch 1, sc in 7 sts, turn.
Fasten off with a long tail. Fold the tab to the back and whipstitch Row 20 to the base. The tab is 4 in (10.2 cm) flat, making a 2 in (5.1 cm) loop.
Final Blocking
- Weave in all ends along the stitch posts and trim them.
- Soak the panel in cool water for 15 minutes, then press out the water in a towel. Don’t wring it.
- Pin the outer border to 23 x 62 in (58.4 x 157.5 cm).
- Pin each wing so its center opens into a teardrop. Point the antennae upward.
- Check that the motif grid lines up: every butterfly should be 7 in (17.8 cm) wide and 6 in (15.2 cm) tall.
- Let it dry completely, then unpin.
Final Quality-Control Checklist
- Each upper wing has 44 sc and 10 picots, and each lower wing has 32 sc and 7 picots.
- All 94 joins are present, and no picot is joined twice.
- Every body is centered and the antennae are symmetrical.
- Border Rnd 2 has 75 / 243 / 75 / 243 sc.
- There are 5 evenly spaced tabs with level loops.
- The panel measures 23 x 62 in (58.4 x 157.5 cm).
Troubleshooting
- Wings cup: Your tr are too tight. Loosen up, or go up a hook size for Rnd 4 only.
- Wings ruffle: You’ve probably worked extra increases. Recount Rnd 4 for 44 / 32 sts.
- Panel narrower than 21 in (53.3 cm): The join-picots are too tight. Redo them with relaxed chains.
- Border waves: You may have worked more than 5 sc per ch-5 sp. Check Rnd 2 against the side counts.
- Corners pull in: Make sure each corner has a ch-9 in Rnd 1, not a ch-5.
- Body twists: Pin it straight before you sew it down.
Care
Hand wash cool or machine wash cold on a gentle cycle in a mesh bag. Reshape and dry flat, then rehang while slightly damp to keep it straight.
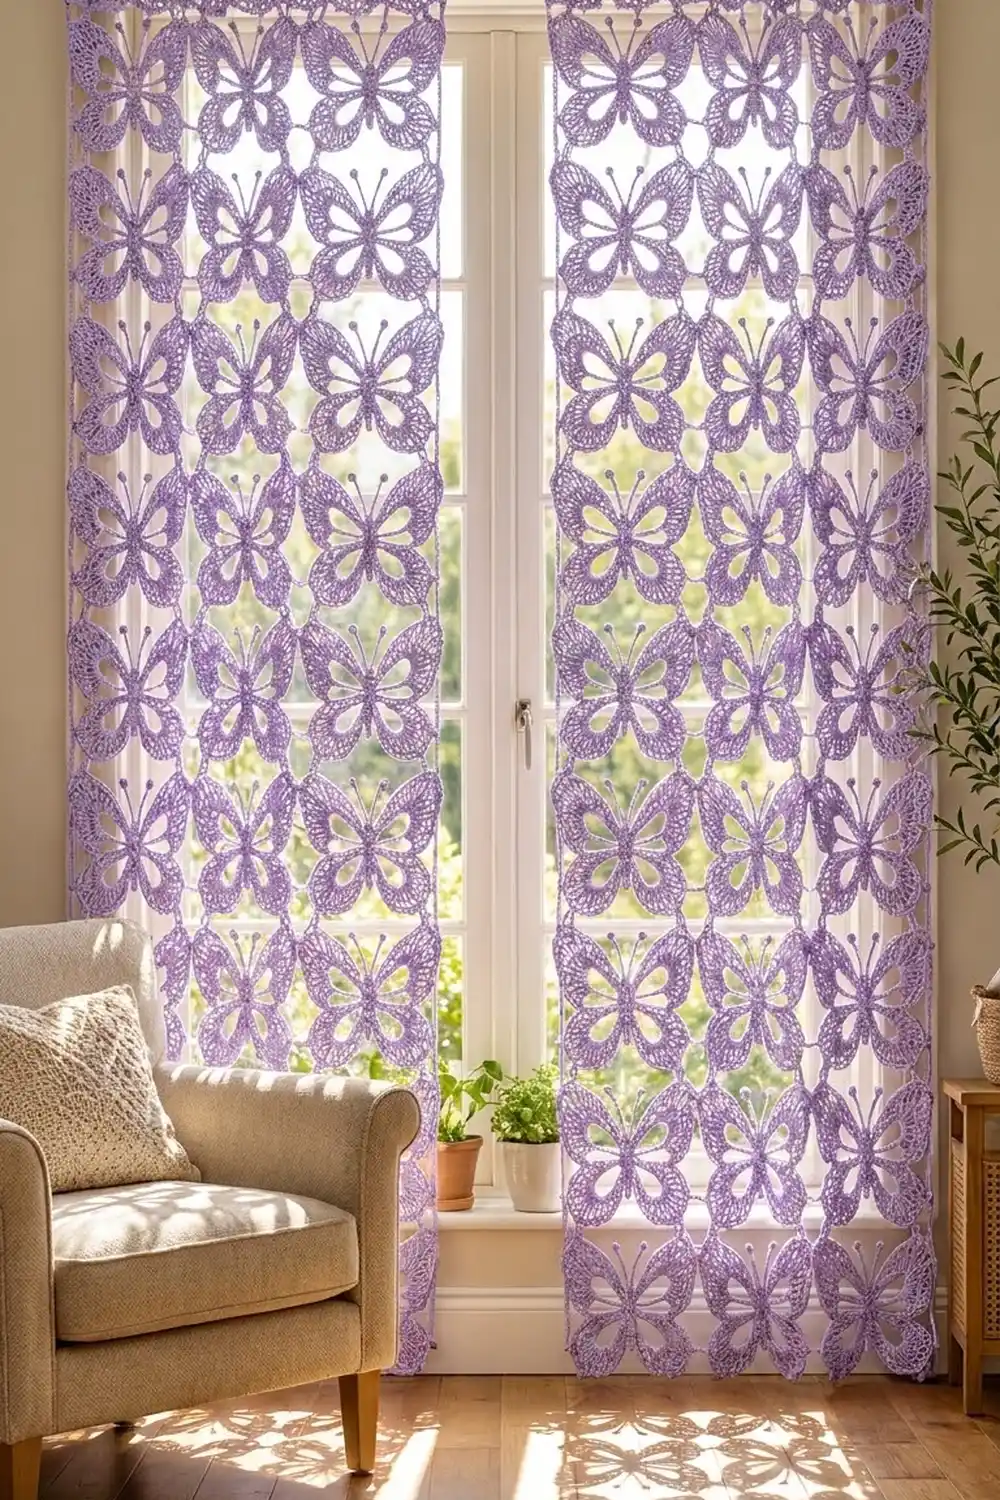
Final Notes
Here is the measurement chain:
– Gauge: 18 sc = 4 in (10.2 cm)
– Motif: 7 x 6 in (17.8 x 15.2 cm)
– Grid: 3 x 10 motifs = 21 x 60 in (53.3 x 152.4 cm)
– Border: 1 in (2.5 cm) per edge = 23 x 62 in (58.4 x 157.5 cm)
– Tabs: 2 in (5.1 cm) loops on top
Check each link in the chain before you move on, and both panels will hang evenly. Happy crocheting!