

This lace curtain is made from small puff-stitch Christmas trees. They sit in neat rows, all pointing up, and are linked by fine chain outlines that let the winter light through. From across the room it looks like a forest; up close you can see each puff tier.
The sample uses one color, a soft sage green, for a calm, natural seasonal look. Cotton DK keeps the stitches crisp and helps the lace hang straight. All terms are US crochet terms.
One finished panel measures 33.25″ wide x 82″ long (84.5 cm x 208.3 cm). The photo shows a matching pair, so make two panels for the same look.
Each tree is worked in rows from the apex down, and the trunk is worked from the center of the last row. A chain-loop outline round finishes each tree and joins it to its neighbors as you go. Once all the trees are joined, a single-crochet heading band is worked across the top for clip rings.
Finished Size and Construction
- Finished panel size: 33.25″ x 82″ (84.5 cm x 208.3 cm)
- Skill level: Intermediate (lots of repetition, simple stitches)
- Terminology: US
- Yarn weight: DK (3), cotton or cotton blend
- Hook: 4.0 mm (G-6)
- Number of pieces: 119 tree motifs per panel (238 for the pair)
- Layout: 7 trees across x 17 trees down per panel
- Motif size: 4.75″ x 4.75″ (12.1 cm x 12.1 cm), measured from loop tip to loop tip
- Size before border: 33.25″ x 80.75″ (84.5 cm x 205.1 cm)
- Border (heading) depth: 1.25″ (3.2 cm), top edge only
Materials
Pick a smooth mercerized cotton or a cotton-blend DK, about 246 yd (225 m) per 100 g. Cotton shows the puff stitches clearly and doesn’t stretch out of shape under its own weight the way acrylic can.
- Sage green: 650 g (1,465 m) per panel; 1,300 g (2,930 m) for the pair
Each tree uses about 5 g (11 m). The quantities above include about a 10% margin for gauge differences and for swatching.
Tools:
– 4.0 mm (G-6) crochet hook
– Tapestry needle
– Scissors
– Rust-proof pins and a large blocking surface (foam mats or a bed)
– Spray bottle
– 9 curtain clip rings per panel (18 for the pair)
– Measuring tape
Abbreviations (US Terms)
- ch: chain
- sc: single crochet
- sl st: slip stitch
- st(s): stitch(es)
- sk: skip
- sp: space
- yo: yarn over
- RS: right side
Puff stitch (puff): (Yo, insert hook in the stitch, yo, pull up a loop to 0.5″ (1.3 cm)) 4 times, so you have 9 loops on the hook. Yo, pull through all 9 loops, then ch 1 to lock. The locking chain does not count as a stitch. The puff counts as 1 stitch. On the next row, work into the top of the puff.
Gauge and Checkpoints
Gauge: 18 sc and 20 rows = 4″ (10.2 cm) in single crochet. One puff row is about 0.4″ (1.0 cm) tall.
Make one complete tree, edging included, before you start production, and check it against these points:
- After Row 4 (9 sc): 2″ (5.1 cm) wide.
- After Row 12 (19 sc): 4.25″ (10.8 cm) wide; the triangle is 3″ (7.6 cm) tall.
- After the trunk: trunk is 1.1″ x 1.2″ (2.8 cm x 3.0 cm); the whole tree is 4.2″ (10.7 cm) tall.
- After the edging: 4.75″ (12.1 cm) both wide and tall, measured from loop tip to loop tip.
If your tree is too big: go down to a 3.75 mm hook. If it is too small: go up to a 4.5 mm hook. Over 7 trees across, an error of just 0.25″ (0.6 cm) per tree adds up to 1.75″ (4.4 cm), so correct it now.
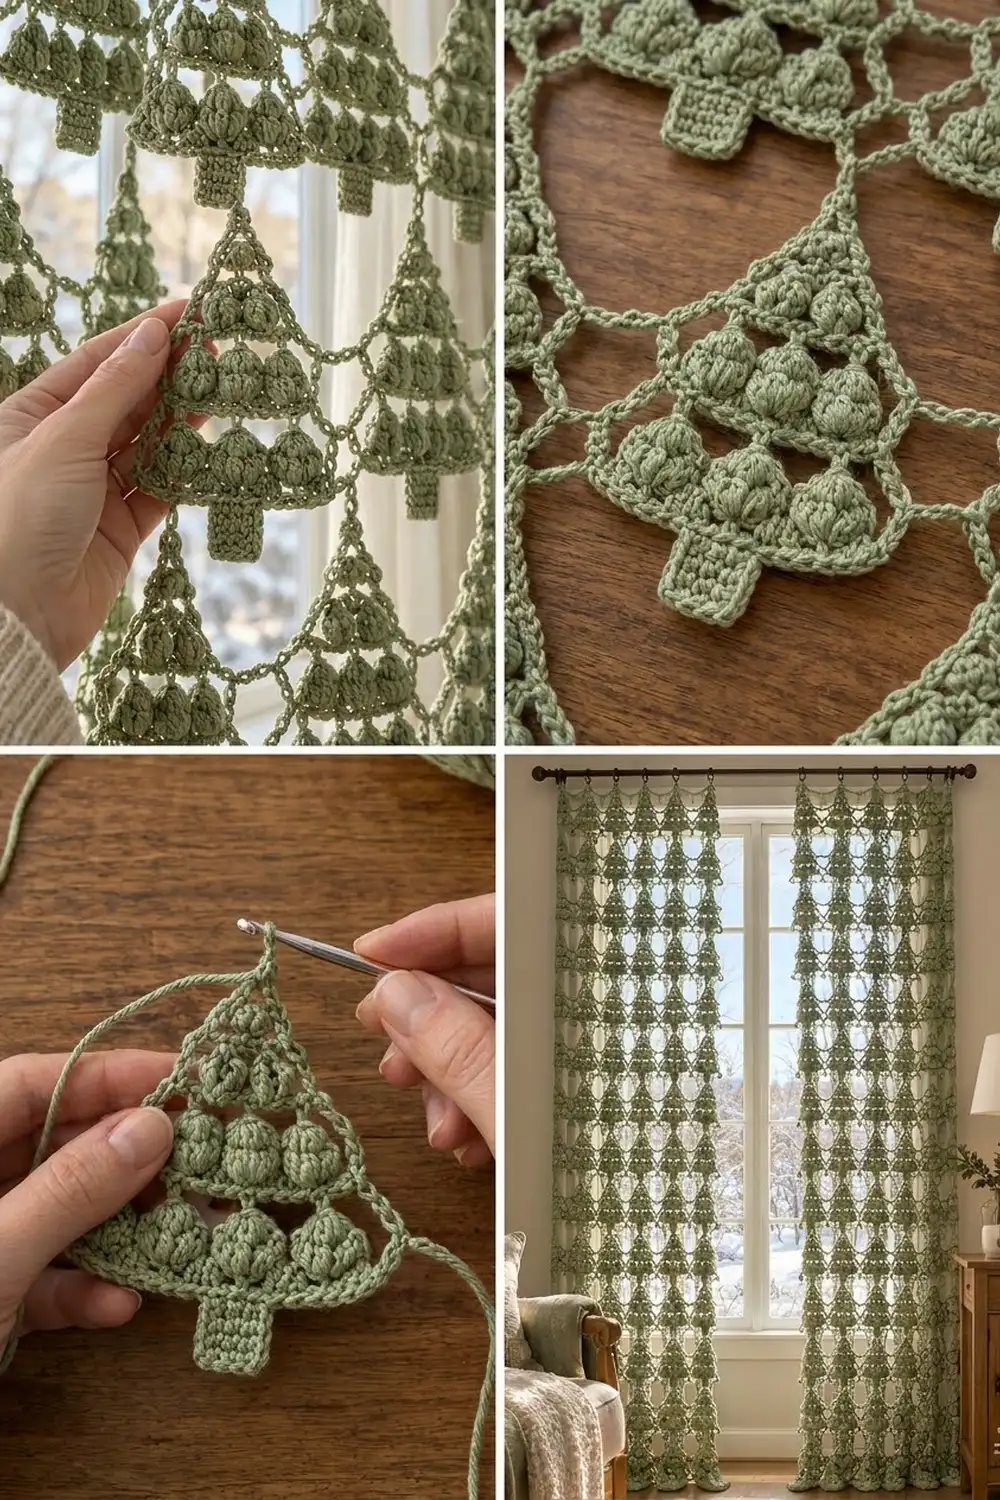
Tree Motif
Work in turned rows, starting at the apex.
Row 1: Ch 2, 3 sc in 2nd ch from hook. (3 sc)
Row 2: Ch 1, turn. 2 sc in first st, sc in next st, 2 sc in last st. (5 sc)
Row 3: Ch 1, turn. 2 sc in first st, sc in each st to last, 2 sc in last st. (7 sc)
Row 4: Repeat Row 3. (9 sc)
Row 5 (top tier, 2 puffs): Ch 1, turn. Sc in first st, [ch 1, sk 1, puff in next st, ch 1, sk 1, sc in next st] 2 times. (9 sts: 3 sc, 2 puffs, 4 ch)
Row 6: Ch 1, turn. 2 sc in first st, sc in each ch, puff and sc to last st, 2 sc in last st. (11 sc)
Row 7: Repeat Row 3. (13 sc)
Row 8 (middle tier, 3 puffs): Ch 1, turn. Sc in first st, [ch 1, sk 1, puff in next st, ch 1, sk 1, sc in next st] 3 times. (13 sts: 4 sc, 3 puffs, 6 ch)
Row 9: Repeat Row 6. (15 sc)
Row 10: Repeat Row 3. (17 sc)
Row 11 (bottom tier, 4 puffs): Ch 1, turn. Sc in first st, [ch 1, sk 1, puff in next st, ch 1, sk 1, sc in next st] 4 times. (17 sts: 5 sc, 4 puffs, 8 ch)
Row 12 (skirt): Repeat Row 6. (19 sc)
How the puff rows work out: each puff row uses 1 + (4 x number of puffs) stitches, so 9, 13 and 17, which matches the row before it exactly. The rows between the tiers add 2 stitches each, which gives the triangle its stepped, tiered edge.
Puffs look nearly the same on both sides, so choose whichever side you like as the RS and use it for every tree.
Trunk
Trunk Row 1: Ch 1, turn. Sl st in first 7 sts, ch 1, sc in next 5 sts. Leave the last 7 sts unworked. (5 sc, centered: 7 + 5 + 7 = 19)
Trunk Rows 2–6: Ch 1, turn, sc in each st across. (5 sc)
Don’t fasten off.
Chain-Loop Outline (Edging Round)
Work this round all the way around the tree, in this order:
- Trunk bottom: Ch 1, turn. Sc in first 2 sts, (sc, ch 3, sc) in center st, sc in last 2 sts. (6 sc, 1 ch-3 trunk loop)
- Trunk side: 6 sc, one in each trunk row-end.
- Skirt underside: Sc in each of the 7 unworked sts of Row 12. (7 sc)
- Corner: Ch 5.
- Slanted side: Sk row-end 12. Sc in row-end 11, [ch 3, sc in row-end 9, 7, 5, 3, 1 in turn]. (6 sc, 5 ch-3 sps)
- Apex: Ch 5, sc in row-end 1 on the other side.
- Slanted side: [Ch 3, sc in row-end 3, 5, 7, 9, 11 in turn]. (6 sc counting the apex sc, 5 ch-3 sps)
- Corner: Ch 5. Sk row-end 12.
- Skirt underside: Sc in each of the 7 slip-stitched sts of Row 12. (7 sc)
- Trunk side: 6 sc in the trunk row-ends. Sl st in first sc to join.
Round total: 44 sc, 10 ch-3 sps along the slanted sides, 1 ch-3 trunk loop, and 3 ch-5 loops (2 corners and the apex). Fasten off and weave in the ends.
The ch-3 spaces skip every other row-end. The puff rows are taller, so the spacing is a little uneven; this is intended and gives the soft chain outline you see in the photo.
Make All Pieces
Make 119 trees per panel, all in sage green: 7 across x 17 down. For the pair, make 238.
You can make the first tree in full and join every other tree on its edging round (see Joining). Each tree is still worked through Trunk Row 6 on its own first.
Layout, viewed from the RS (T = tree, all pointing up):
Row 1:   T T T T T T T   (top, under heading)
Row 2:   T T T T T T T
Row 3:   T T T T T T T
 ...     (identical rows)
Row 16:  T T T T T T T
Row 17:  T T T T T T T   (bottom, trunks hang free)
Every tree in a column sits straight below the one above it, so the apex of each tree meets the trunk of the tree above.
Joining
Method: Join as you go on the edging round. Work the panel row by row from the top, left to right.
Join points: each tree has three joining loops.
– Corner loops: these join to the matching corner loop of the tree beside it.
– Apex loop: this joins to the trunk ch-3 loop of the tree above.
– Trunk loop: this stays open until the tree below joins to it.
How to join: whenever a ch-5 loop meets a finished neighbor, work ch 2, sl st into the neighbor’s loop, ch 2 instead of the ch 5. That replacement fills the same 5 positions (2 + 1 + 2), so the stitch count stays exactly the same and the tree stays square.
- Trees in Row 1 join only at their corner loops.
- From Row 2 down, each tree joins its apex to the tree above. Every tree after the first in a row also joins its left-hand corner to the tree beside it.
Tension: keep the slip stitch at the same tension as your chains. If you pull it tight, the trees pucker toward each other and the panel comes out narrower.
Size checkpoint: with 7 trees joined across, Row 1 should measure 33.25″ (84.5 cm) from outer loop tip to outer loop tip (7 x 4.75″). After all 17 rows, the panel should measure 80.75″ (205.1 cm) long (17 x 4.75″). Check after Row 3 so you can catch any drift early.
Border (Heading Band)
The heading band is worked across the top edge only. The sides and the bottom are left as the chain outlines, so the curtain keeps its open lace edge.
Heading gauge: 18 sc = 4″ (10.2 cm).
Each tree gives the heading a fixed share of 21 stitches: ch 10, 1 sc in its apex loop, ch 10. Neighboring trees share the gap between them, so the chains between two apexes add up to 20. No extra stitches are added at the seams.
Row 1 (RS): With the top of the panel facing, make a slipknot. Ch 10, sc in the apex ch-5 loop of tree 1, [ch 20, sc in the apex ch-5 loop of the next tree] 6 times, ch 10.
Count: 7 sc + 10 + (6 x 20) + 10 = 147 sts, which is 7 trees x 21.
Row 2: Ch 1, turn. Sc in each ch and each sc across. (147 sc)
Rows 3–6: Ch 1, turn, sc across. (147 sc each) Fasten off.
Why the math works: 147 sts ÷ 4.5 sts per inch = 32.75″ (83.2 cm). That’s 0.5″ (1.3 cm) narrower than the lace body, on purpose. The slightly firm heading holds up the weight of 17 rows of trees without flaring or rippling.
Clip ring positions (9 per panel): stitches 1, 11, 32, 53, 74, 95, 116, 137 and 147 of Row 6. The inner seven sit directly above each tree’s apex, and the outer two are on the edges.
Final Blocking
- Weave in all the ends before blocking.
- Lay the panel flat on the mats, RS up. Work in sections if your surface is smaller than the panel.
- Pin the heading straight at 32.75″ (83.2 cm).
- Pin each corner join so that the trees sit 4.75″ (12.1 cm) apart, center to center.
- Pin each column straight down so that the apex-to-trunk joins line up vertically.
- Puff each puff stitch gently with your fingers; don’t flatten it.
- Spray until the panel is damp and let it dry completely before you unpin it.
- Hang the panel while it’s still slightly cool to the touch. Its own weight will settle the lace.
Final Quality-Control Checklist
- [ ] Every tree has 2, 3 and 4 puffs in its three tiers.
- [ ] Every trunk is 5 sts wide and 6 rows tall, centered on the skirt.
- [ ] Every edging round has 44 sc.
- [ ] All the corner and apex joins are secure, with none missed.
- [ ] Panel is 7 x 17 trees.
- [ ] Heading is 147 sts on every row.
- [ ] Width is 33.25″ (84.5 cm) across the lace and 32.75″ (83.2 cm) across the heading.
- [ ] Total length is 82″ (208.3 cm).
- [ ] The ends are woven in securely on the wrong side.
Troubleshooting
Puffs look flat: pull each loop up to a full 0.5″ (1.3 cm) and keep the loops even before you close the puff.
Triangle edges are wavy: check that you work 2 sc in the first and last st only on the increase rows, not on the puff rows.
Trunk is off-center: count the 7 sl sts again; the trunk must start in st 8.
Panel is narrowing: your join slip stitches are too tight. Loosen them, or go up a hook size for the edging round only.
Heading ripples: make sure you chained exactly 20 between apexes, and recount the row (147).
Columns lean: pin and block the columns straight; check that every apex joined the trunk loop directly above it.
Care
Hand wash in cool water with mild soap, press out the water in a towel, and dry flat. Re-pin if needed. Don’t hang the panel wet, because the weight will stretch the lace.

Final Notes
Here is the measurement chain, from one stitch to the full panel. The gauge of 18 sc = 4″ (10.2 cm) makes a 19-stitch skirt 4.25″ (10.8 cm) wide. The edging brings each tree to 4.75″ (12.1 cm) square. Seven trees across give 33.25″ (84.5 cm), and seventeen rows give 80.75″ (205.1 cm). The 147-stitch heading, 21 per tree, adds 1.25″ (3.2 cm), for a finished panel of 33.25″ x 82″ (84.5 cm x 208.3 cm). If your first tree matches its checkpoints, the whole curtain will too.
Happy crocheting!