

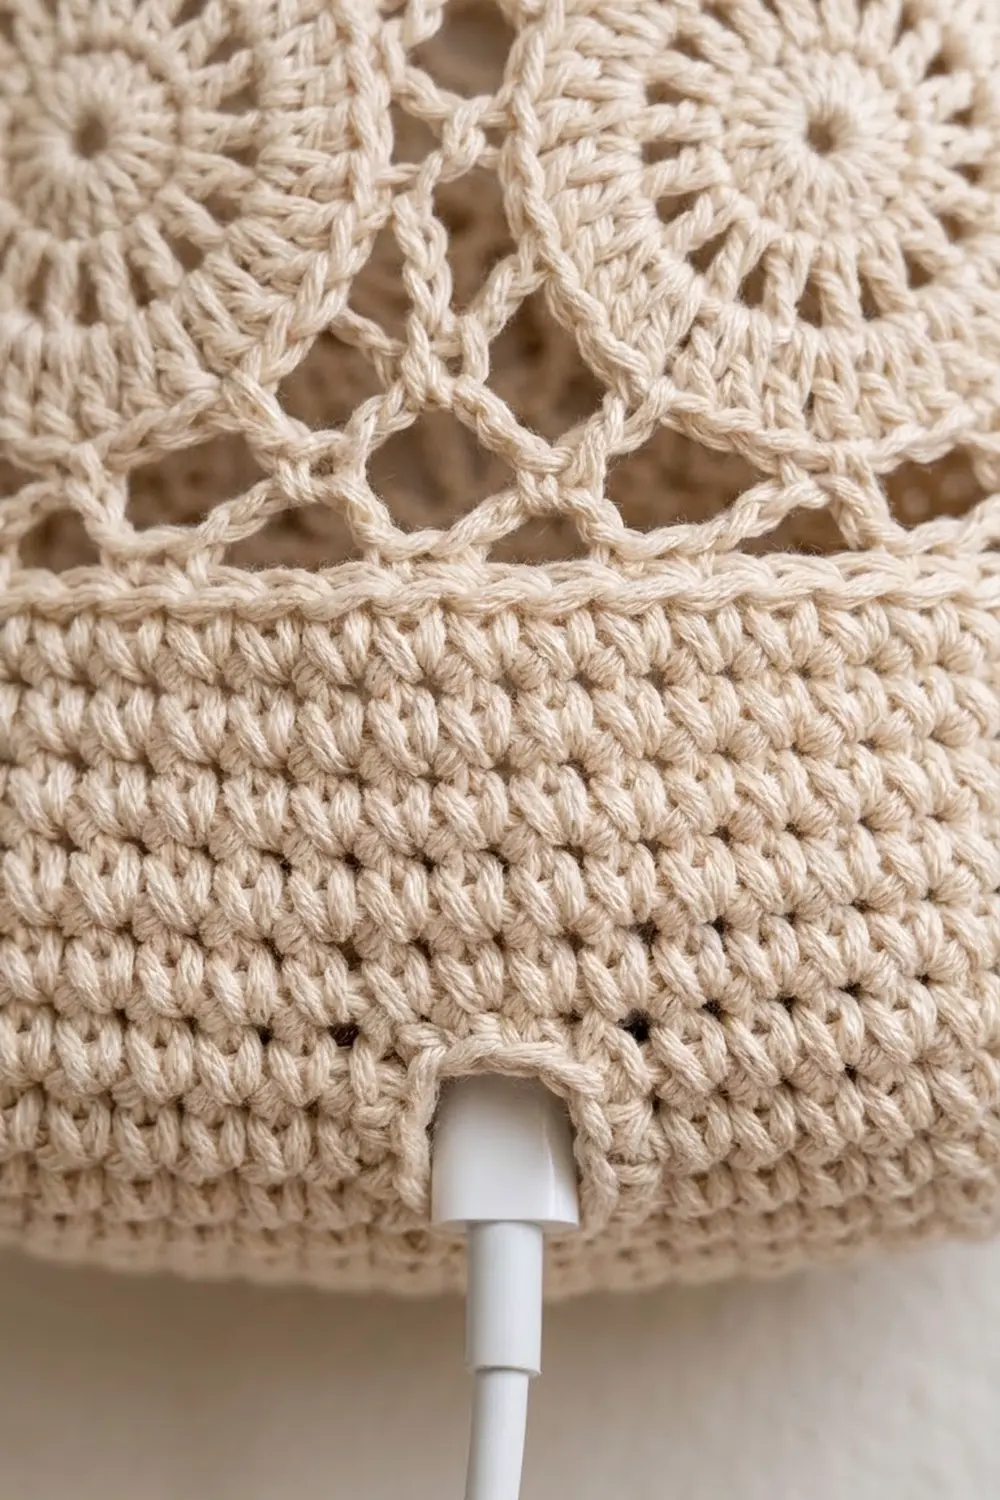
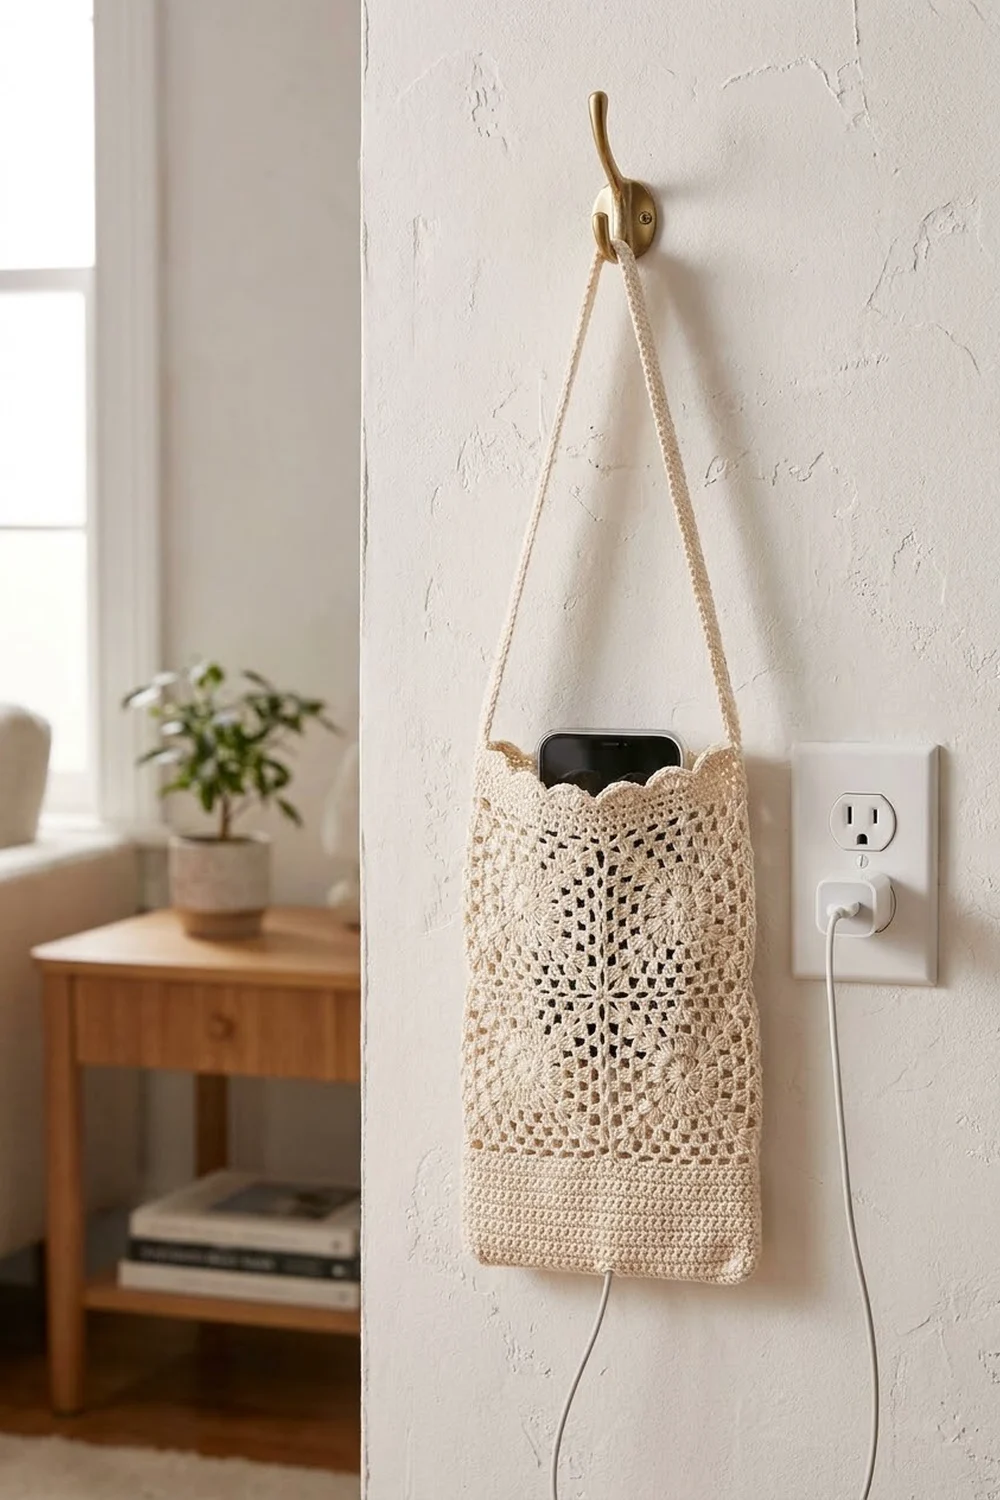
This little holder keeps your phone off the counter while it charges. It hangs from a wall hook next to the outlet, the phone drops in from the top, and the cable comes out through a gap in the base. It looks like vintage lace, but the construction is simple and it holds its shape well.
The design is worked in one color, a soft cream cotton. Eight wheel motifs, each with a solid center, radiating spokes and an open mesh frame, are joined into a tube two motifs high. A firm single-crochet band makes the base, a row of small scallops finishes the top, and a narrow strap forms the hanging loop.
The pattern uses US crochet terms. The finished holder measures 4 in (10.2 cm) wide when flat and 5.75 in (14.6 cm) tall, with an 8 in (20.3 cm) strap. It fits phones up to about 3.3 in (8.4 cm) wide in a slim case, and the top of the phone sits above the scallops so it is easy to grab.
Construction overview: make 8 motifs, joining them as you go into a ring of 4, two tiers high. Then work the base band into the bottom edge and close it with a cable gap, work the scalloped edging into the top edge, and sew on the strap.
Finished Size and Construction
- Finished size: 4 in (10.2 cm) wide flat × 5.75 in (14.6 cm) tall, plus strap
- Skill level: Easy intermediate
- Terminology: US crochet terms
- Yarn weight: Sport (2), cotton
- Hook: 3.25 mm (US D-3)
- Number of pieces: 8 motifs + 1 strap
- Layout: 4 motifs around × 2 tiers high, joined into a tube
- Motif size: 2 in (5.1 cm) square after blocking
- Size before edgings: 8 in (20.3 cm) around × 4 in (10.2 cm) tall (flat: 4 × 4 in / 10.2 × 10.2 cm)
- Base band depth: 1 in (2.5 cm)
- Top edging depth: 0.75 in (1.9 cm)
Materials
Use a smooth, firmly twisted cotton or mercerized cotton in sport weight. Cotton shows the stitch definition well, doesn’t stretch much under the weight of a phone, and won’t get fuzzy where the phone rubs against it. Don’t use acrylic or loosely plied yarn, because the lace will stretch.
- Cream / ecru: 40 g, about 125 m (137 yd). One 50 g ball (about 155 m / 170 yd) is plenty.
The quantity above includes about a 10% margin for your gauge swatch and weaving in ends.
Tools:
– 3.25 mm (US D-3) crochet hook
– Tapestry needle
– Scissors
– Stitch markers (4–6)
– Blocking mat and rust-proof pins
– Spray bottle
– A piece of cardboard or a folded towel about 4 × 6 in (10.2 × 15.2 cm) for final blocking
Abbreviations (US Terms)
- ch – chain
- sl st – slip stitch
- sc – single crochet
- hdc – half double crochet
- dc – double crochet
- tr – treble crochet
- sk – skip
- sp(s) – space(s)
- st(s) – stitch(es)
- rep – repeat
- Rnd – round
Special stitch – Join-as-you-go chain (JAYG): When a space on the side being joined calls for “ch 2”, work ch 1, sl st into the matching ch-2 sp of the neighboring motif, ch 1. In a corner, work tr, ch 1, sl st into the neighbor’s corner ch-2 sp, ch 1, tr. If another join already sits in that corner, sl st into that join’s sl st.
Gauge and Checkpoints
Make one complete motif and block it before you start the full set. This is your gauge swatch, and you can use it as Motif 1.
Motif checkpoints (measured flat, lightly pressed):
– After Rnd 1: 0.75 in (1.9 cm) across
– After Rnd 2: 1.25 in (3.2 cm) across
– After Rnd 3: 1.5 in (3.8 cm) across
– After Rnd 4: 2 in (5.1 cm) square, edge to edge
Band gauge: 11 sc = 2 in (5.1 cm), and 6 rnds of sc = 1 in (2.5 cm).
If your motif is too big (over 2.125 in / 5.4 cm), go down to a 3.0 mm hook. If it is too small (under 1.875 in / 4.8 cm), go up to a 3.5 mm hook. Just 1/8 in (0.3 cm) per motif adds up to 0.5 in (1.3 cm) around the tube, which is enough to make the holder loose or too tight.
Motif Pattern (Make 8)
Each motif has a solid wheel center, a spoke round, a solid rim and an open square frame.
Rnd 1: Make a magic ring. Ch 3 (counts as dc), 15 dc in ring, sl st to top of beg ch-3. Pull the ring tight. (16 dc)
Rnd 2 (spokes): Ch 4 (counts as dc + ch 1), dc in next dc, ch 1; rep from * 14 more times, sl st to 3rd ch of beg ch-4. (16 dc, 16 ch-1 sps)*
The single dc posts with ch-1 gaps between them make the spokes you see in each wheel.
Rnd 3 (rim): Sl st into first ch-1 sp, ch 1, 2 sc in same sp, 2 sc in each remaining ch-1 sp around, sl st to first sc. (32 sc)
This round closes the wheel into a firm ring.
Rnd 4 (square mesh frame): This round uses 8 rim stitches per side: 1 corner stitch plus 7 more.
Ch 4 (counts as tr), (ch 2, tr) in same st as join for the first corner. Ch 2, sk 1, hdc in next, ch 2, sk 1, sc in next, ch 2, sk 1, hdc in next, ch 2, sk 1.
*(Tr, ch 2, tr) in next st, ch 2, sk 1, hdc in next, ch 2, sk 1, sc in next, ch 2, sk 1, hdc in next, ch 2, sk 1; rep from * 2 more times, sl st to top of beg ch-4.
(8 tr, 8 hdc, 4 sc = 20 sts; 16 side ch-2 sps + 4 corner ch-2 sps)
Check: 8 rim sts per side × 4 sides = 32, which uses every Rnd 3 stitch. Along each side, between the two corner ch-2 sps, you have tr, sp, hdc, sp, sc, sp, hdc, sp, tr (5 sts and 4 sps). You will use this sequence for joining and for both edgings.
On joined sides, swap the chains for JAYG chains as described below. Fasten off and weave in the ends of each motif before starting the next one.
Make All Pieces
- Cream: 8 motifs, all identical
- Cream: 1 strap (instructions follow the edgings)
Layout grid (tube shown opened flat; columns A and D are joined to each other):
          A     B     C     D
Tier 2: [ M5 ][ M6 ][ M7 ][ M8 ]   ← top edge
Tier 1: [ M1 ][ M2 ][ M3 ][ M4 ]   ← bottom edge
        └ front face ┘└ back face ┘
The holder folds flat along the M4/M1 seam and the M2/M3 seam. M1, M2, M5 and M6 make the front, and M3, M4, M7 and M8 make the back.
Joining
Join the motifs as you work Rnd 4 of each new motif, using JAYG on every side that touches a finished motif. You won’t need to sew any seams.
Stitch-to-stitch logic: Each joined side connects at 6 points: corner sp, 4 side ch-2 sps, corner sp. Since every motif has the same sequence, the hdc lines up with hdc, the sc with sc, and the tr with tr, so the seam lies flat and forms an even lattice.
Order:
1. M1: complete, no joins.
2. M2: join 1 side to M1.
3. M3: join 1 side to M2.
4. M4: join 1 side to M3 and the opposite side to M1. This closes the ring. Before you join, check that the strip isn’t twisted: all right sides should face out.
5. M5: join its bottom side to the top of M1.
6. M6: join to the top of M2 and the side of M5.
7. M7: join to the top of M3 and the side of M6.
8. M8: join to the top of M4, the side of M7 and the side of M5 (3 sides).
Where four corners meet, sl st into the join that is already there so the corners stay neat.
Tension: Keep the JAYG sl sts relaxed, the same height as a normal chain. If you pull them tight, the seams will pucker and the tube will narrow.
Size checkpoint: The tube should measure 8 in (20.3 cm) around and 4 in (10.2 cm) tall. Flattened along the fold seams, it should be 4 × 4 in (10.2 × 10.2 cm).
Border: Base Band and Top Edging
Border gauge: 11 sc = 2 in (5.1 cm), which matches one motif side. 6 rnds = 1 in (2.5 cm).
Edge-pickup rule (used on both edges): Along each motif’s edge, work 1 sc in the corner sp, 1 sc in each of the 5 sts, 1 sc in each of the 4 side ch-2 sps, and 1 sc in the other corner sp. That gives 11 sc per motif side, and both corner sts are already included. Where two motifs meet, each motif’s corner sp gets its own sc, so you don’t add any extra stitches at the seams.
Base Band
With the tube upside down, join yarn in M1’s corner sp at the M4/M1 seam (the fold line).
Rnd 1: Ch 1, work the edge-pickup rule along the bottom of M1, M2, M3 and M4, sl st to first sc. (4 motifs × 11 = 44 sc)
Rnds 2–6: Ch 1, sc in each st around, sl st to first sc. (44 sc each round)
Checkpoint: The band is 1 in (2.5 cm) deep and the tube still measures 8 in (20.3 cm) around. Your round now ends at the fold line.
Closing the bottom with a cable gap: Flatten the tube so the M4/M1 and M2/M3 seams sit at the folds. You now have 22 stitch pairs (front and back stitches lined up). Working through both layers:
Ch 1, sc in next 9 pairs, ch 4, sk 4 pairs, sc in next 9 pairs. (18 sc + ch-4 gap; 9 + 4 + 9 = 22 pairs)
The gap is about 0.75 in (1.9 cm) wide, which is room for a USB-C or Lightning plug. Fasten off.
Why the math works: 44 sts ÷ 2 faces = 22 per face, and 22 = 2 motifs × 11. The gap sits exactly in the center, at the front seam between M1 and M2.
Top Edging
With the tube right side up, join yarn in M5’s corner sp at the M8/M5 seam (above the fold).
Rnd 1: Ch 1, work the edge-pickup rule along the top of M5, M6, M7 and M8, sl st to first sc. (4 × 11 = 44 sc)
Rnd 2 (conversion round): Ch 1, sc in next 5 sts, 2 sc in next st, sc in next 5 sts; rep from * 3 more times, sl st to first sc. (44 worked 1-per-stitch + 4 added = 48 sc; 12 per motif)*
The increase in each motif’s center stitch brings the count to a multiple of 4, so the scallops come out even.
Rnd 3 (scallops): Ch 1, sc in first st, sk 1, 5 dc in next st, sk 1, sc in next st; rep from * around, but on the last repeat sl st to the first sc instead of working a final sc. (12 scallops, 12 sc)*
Check: each repeat uses 4 sts. 48 ÷ 4 = 12 scallops, which is 6 on each face.
Checkpoint: Rnds 1–2 are about 3/8 in (1.0 cm) deep and the scallops add about 3/8 in (1.0 cm), for 0.75 in (1.9 cm) in total. Fasten off.
Strap
Foundation: Ch 46.
Row 1: Hdc in 3rd ch from hook and in each ch across. The skipped chains don’t count. (44 hdc)
Row 2: Ch 1, turn, sc in each st across. (44 sc)
Fasten off with a 10 in (25.4 cm) tail, and leave a matching tail at the start.
Checkpoint: 8 in (20.3 cm) long and about 0.5 in (1.3 cm) wide.
Attach: Tuck each strap end 0.5 in (1.3 cm) down inside the holder at one fold line, behind Rnds 1–2 of the top edging. Whipstitch it through the sc rounds and the top of the motif mesh, then weave in the ends. This leaves a 7 in (17.8 cm) loop above the opening.
Final Blocking
- Wet the holder with the spray bottle or a quick soak in cool water, then press out the water in a towel. Don’t wring it.
- Slide the 4 × 6 in (10.2 × 15.2 cm) cardboard (wrapped in plastic) or a folded towel inside so the holder is held at its finished width.
- Line up the fold seams with the edges of the form so the front and back faces stay centered.
- Pin the scallops into rounded points along the top edge.
- Open up each wheel’s spokes and mesh with your fingertips so the lattice looks even.
- Lay the strap flat beside the holder and pin it straight at 8 in (20.3 cm).
- Let it dry completely, then remove the form.
Final Quality-Control Checklist
- Holder measures 4 in (10.2 cm) flat across and 5.75 in (14.6 cm) tall.
- All 8 motifs are 2 in (5.1 cm) square and their seams line up in straight horizontal and vertical lines.
- None of the motifs is twisted, and every right side faces out.
- Base band has 44 sc per round and is 1 in (2.5 cm) deep.
- Cable gap is centered at the front and wide enough for your plug.
- Top edge has 12 even scallops, 6 per face.
- Strap ends are secure at both fold lines and the loop is 7 in (17.8 cm).
- All ends are woven in through solid stitches, not through the open mesh.
Troubleshooting
Wheel centers cup or ruffle: Rnd 1 is too loose or too tight around the ring. Pull the magic ring fully closed and keep the Rnd 2 ch-1s a consistent size.
Mesh frame looks uneven: Check that you skip exactly 1 st between each worked stitch in Rnd 4 (8 rim sts per side).
Seams pucker: Your JAYG sl sts are too tight. Work them loosely and keep the ch-1s on either side the same height as your regular chains.
Base band flares or pulls in: Recount Rnd 1 for 11 sc per motif. If the count is right, change your hook size for the band only.
Phone doesn’t fit: Measure your phone and case. If it is wider than 3.3 in (8.4 cm), work all pieces with a 3.5 mm hook to make slightly larger motifs.
Scallops are crowded at one spot: Rnd 2 didn’t reach exactly 48. Redo it, making sure you work one increase in each motif.
Care
Hand wash in cool water with a mild soap, press dry in a towel, and lay flat over the blocking form to dry. Don’t tumble dry, because heat and agitation can stretch the lace.
Final Notes
The measurements build on each other. Each motif finishes at 2 in (5.1 cm), with 11 stitches per side. Four motifs around give a tube 8 in (20.3 cm) around, and two tiers make it 4 in (10.2 cm) tall. The edgings start from 44 sc each. The base band adds 1 in (2.5 cm), and the top edging goes to 48 sc and adds 0.75 in (1.9 cm). That brings the holder to 4 in (10.2 cm) wide and 5.75 in (14.6 cm) tall, with an 8 in (20.3 cm) strap. As long as your first motif matches the gauge, the rest will measure correctly too.
Happy crocheting!