

This little ornament brings a quiet bit of holiday sparkle to your car, window, or tree. Two cream lace bells hang one above the other. A crocheted bead joins them and a crocheted ball clapper hangs below. Gold accent beads and a burgundy bow finish the top.
Each bell has a small solid dome, an open diamond mesh body, a band of fans, and a flared scalloped hem tipped with picots. The look is vintage and heirloom, the kind of lace you might find in a grandmother’s thread tin.
The pattern uses US crochet terms. After stiffening, each bell measures about 2.25 in (5.7 cm) tall and 3 in (7.6 cm) across the hem. The finished ornament is about 9.5 in (24.1 cm) long, including the hanging loop.
Construction is simple. Each bell is worked top down in joined rounds. The beads are crocheted over wooden cores, the bow is a single strip, and everything is strung together on one strong strand of thread.
Finished Size and Construction
- Finished ornament length: 9.5 in (24.1 cm), loop included
- Skill level: Intermediate (thread lace, small stitches)
- Terminology: US crochet terms
- Yarn weight: Size 10 crochet cotton (Lace / 0)
- Hook: 1.5 mm (US steel 8)
- Number of pieces: 6 (2 bells, 2 crocheted beads, 1 bow, 1 hanging cord)
- Layout: One vertical stack: loop, bow, top bell, link bead, bottom bell, clapper
- Piece size (bell): 2.25 in (5.7 cm) tall, 3 in (7.6 cm) across the hem
- Size before border (bell after Round 9): 1.75 in (4.4 cm) tall, 2.5 in (6.4 cm) across the opening
- Border depth (scalloped hem): 0.5 in (1.3 cm)
Materials
Choose a mercerized cotton thread in size 10. It holds starch well, shows lace stitches crisply, and resists fuzzing in a sunny car. Avoid acrylic thread, because it will not stiffen.
- Cream (main color): 20 g, about 110 m (120 yd), for the bells, beads, cord, and assembly strand
- Burgundy (bow): 3 g, about 17 m (18 yd)
These quantities include a comfortable margin for a test swatch and longer tails.
Tools and notions:
- 1.5 mm (US steel 8) crochet hook
- Two 12 mm round wooden beads (cores for the crocheted beads)
- Five 4 mm gold metal beads
- Tapestry needle and a fine beading needle
- Fabric stiffener or homemade starch
- Two bell-shaped blocking forms about 2.5 in (6.4 cm) across, such as small plastic cups or egg-shaped forms, wrapped in plastic
- Rust-proof pins and a foam board
- Stitch marker and scissors
Abbreviations (US Terms)
- ch – chain
- sl st – slip stitch
- sc – single crochet
- dc – double crochet
- sc2tog – single crochet 2 together
- sk – skip
- sp – space
- st(s) – stitch(es)
- MR – magic ring
- rnd – round
Special stitch – picot (p): Ch 3, sl st in the 3rd ch from the hook.
Shell: 7 dc worked into the same stitch.
Gauge and Checkpoints
Gauge: 9 dc = 1 in (2.5 cm) in size 10 thread with a 1.5 mm hook. For the bow strip, 10 sc = 1 in (2.5 cm).
Make one bell first and measure it before you start the second. Both bells must match, so write down any hook change.
Checkpoints for one bell:
- After Rnd 2: flat disk about 0.8 in (2.0 cm) across
- After Rnd 8: about 1.5 in (3.8 cm) tall from the top of the dome
- After Rnd 9: about 1.75 in (4.4 cm) tall, opening circumference about 8 in (20.3 cm)
- After Rnd 12 and blocking: 2.25 in (5.7 cm) tall, 3 in (7.6 cm) across the hem
If your bell is too big: Go down to a 1.25 mm hook, or tighten your chain loops. If it is too small: Go up to a 1.75 mm hook. Change the hook, not the stitch counts, so the scallop math stays correct.
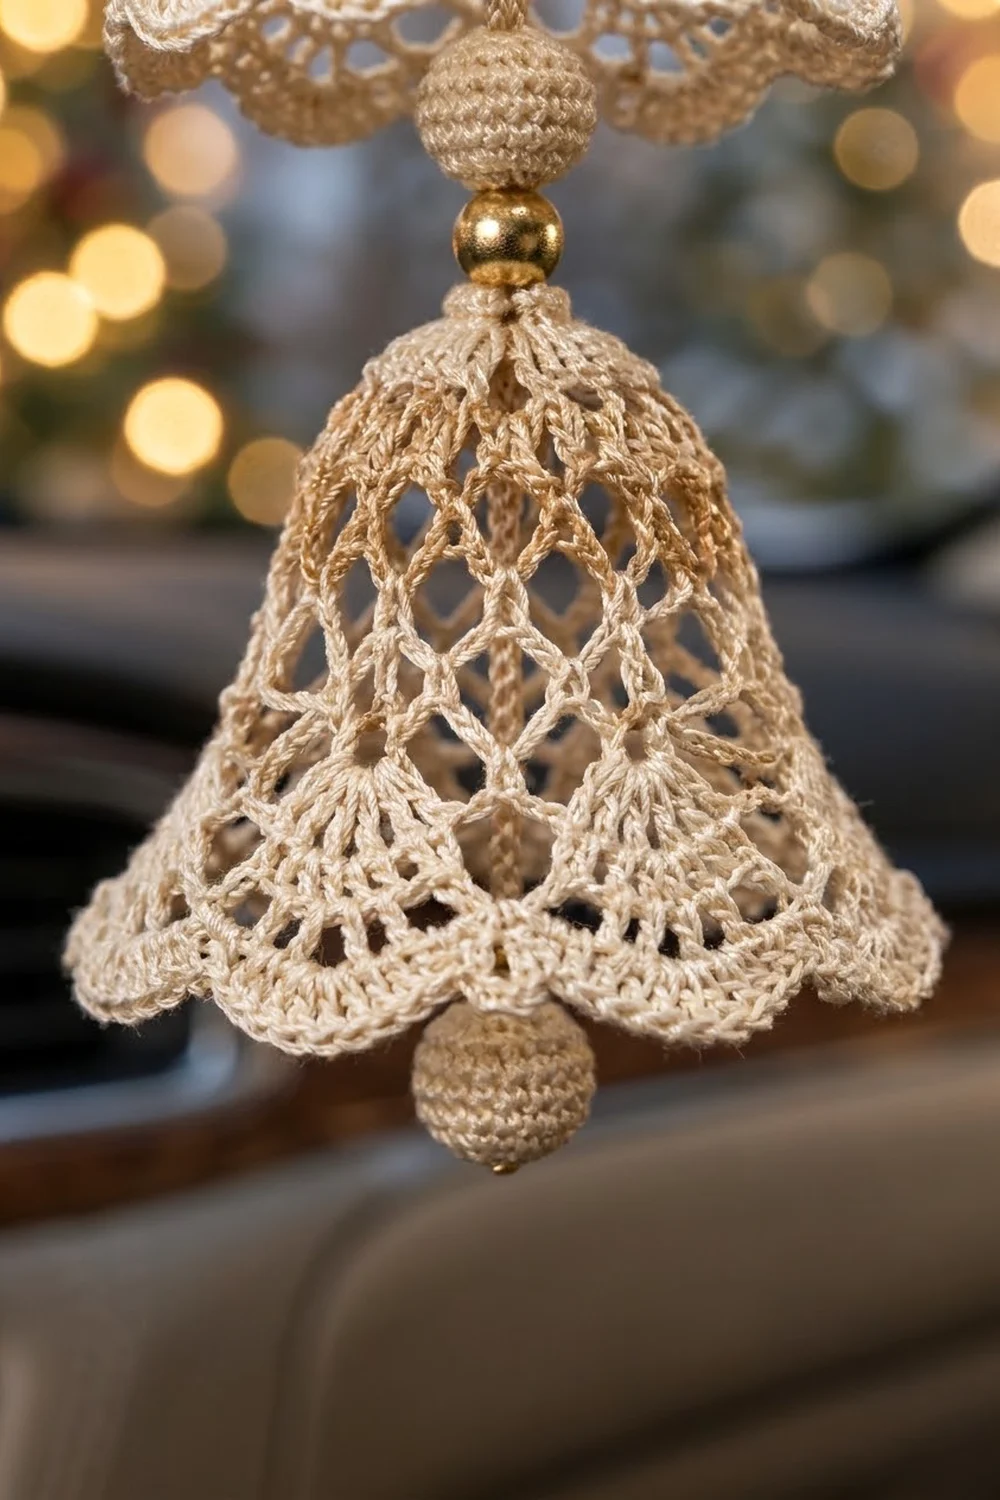
Bell (Make 2)
Use cream. Join every round with a sl st to the top of the first stitch. The ch 3 at the start of a dc round counts as the first dc.
Rnd 1: Ch 4, sl st to the first ch to form a ring. Ch 3, 11 dc in the ring. Join. (12 dc)
Rnd 2: Ch 3, dc in the same st, 2 dc in each st around. Join. (24 dc)
Rnd 3: Ch 3, dc in each st around. Join. (24 dc)
This round has no increases, so the disk starts to curl down into the dome of the bell.
Rnd 4 (mesh setup): Ch 1, sc in the first st, ch 3, sk next st, sc in next st; repeat from * 10 more times, ch 3, sk the last st, join to the first sc. (12 sc, 12 ch-3 loops)
Rnd 5: Sl st in the next 2 ch to reach the center of the first loop. Ch 1, sc in the same loop, ch 4, sc in the next loop; repeat from * 10 more times, ch 4, join to the first sc. (12 ch-4 loops)
Rnd 6: Sl st in the next 2 ch. Ch 1, sc in the same loop, ch 5, sc in the next loop; repeat from * 10 more times, ch 5, join. (12 ch-5 loops)
Rnd 7: Sl st in the next 3 ch. Ch 1, sc in the same loop, ch 5, sc in the next loop; repeat from * 10 more times, ch 5, join. (12 ch-5 loops)
Rnd 7 keeps the same loop length as Rnd 6. This forms the slightly narrower “waist” of the bell.
Rnd 8: Sl st in the next 3 ch. Ch 1, sc in the same loop, ch 6, sc in the next loop; repeat from * 10 more times, ch 6, join. (12 ch-6 loops)
Each sc sits in the middle of the loop below it, so Rnds 4–8 form the staggered diamond mesh.
Rnd 9 (fan round): Sl st into the first ch-6 loop. Ch 3, 5 dc in the same loop, 6 dc in each of the remaining 11 loops. Join. (12 loops × 6 dc = 72 dc)
Each group of 6 dc fans out from its loop, and the sc points of Rnd 8 sit between the fans. Check your size now. The bell should be about 1.75 in (4.4 cm) tall, with an opening about 2.5 in (6.4 cm) across.
Do not fasten off. Go straight on to the border.
Border: Scalloped Hem
Each bell’s hem is worked as three border rounds. The bell is round, so counts are given per fan section. There are 12 sections, one for each fan of Rnd 9.
Border gauge: 9 dc = 1 in (2.5 cm), the same as the body. The 84 dc of Rnd 10 span about 9.25 in (23.5 cm) of circumference, which creates the outward flare.
Rnd 10 (flare round): Ch 3, dc in each of the next 4 dc, 2 dc in the next dc (the last dc of the first fan), dc in each of the next 5 dc, 2 dc in the next dc; repeat from * 10 more times. Join.
(72 dc worked 1 per stitch + 12 extra dc = 84 dc; 7 dc per section)
Rnd 11 (shell round): Ch 1, sc in the next st, sk 2 sts, shell (7 dc) in the next st, sk 2 sts, sc in the next st; repeat from * 11 more times. Join to the first sc.
(Per section: 2 sc + 1 shell of 7 dc. Total: 24 sc, 12 shells, 84 dc)
Each repeat uses exactly 7 stitches: 1 + 2 + 1 + 2 + 1. The shell sits in the 4th stitch, which is the center of each 7-stitch section. The two sc that meet between shells line up with the sc points of the mesh.
Rnd 12 (picot round): Sl st in the first sc. Sc in each of the next 3 dc, (sc, p, sc) in the next dc, sc in each of the next 3 dc, sl st in each of the next 2 sc; repeat from * 11 more times. On the final repeat, sl st in the last sc only, then sl st into the first sl st. Fasten off and weave in the end.
(Per section: 8 sc, 1 picot, 2 sl st. Total: 96 sc, 12 picots, 24 sl st)
Why the math works: The 12 mesh loops make 12 fans of 6 dc. The flare round adds 1 dc per fan, giving 7 stitches per section. The shell repeat uses exactly 7 stitches, so 12 shells fit with no leftover stitches. Rnd 12 works one stitch into each of the 7 dc and 2 sc in a section. The picot is centered on the 4th dc, so every picot lands at the tip of a scallop.
At the top of each bell, leave a 6 in (15.2 cm) tail from the starting ring. You will use it for tacking during assembly.
Make All Pieces
Make the following before assembly:
- Cream: 2 bells, 2 crocheted beads, 1 hanging cord
- Burgundy: 1 bow
- Notions: 5 gold beads
Crocheted Bead (Make 2: one link bead, one clapper)
Use cream. Work in a continuous spiral and move your marker each round.
- Rnd 1: 6 sc in a MR. (6 sc)
- Rnd 2: 2 sc in each st around. (12 sc)
- Rnd 3: Sc in the next st, 2 sc in the next st; repeat around. (18 sc)
- Rnds 4–5: Sc in each st around. (18 sc)
- Insert a 12 mm wooden bead with its hole lined up with the magic ring.
- Rnd 6: Sc in the next st, sc2tog; repeat around. (12 sc)
- Rnd 7: Sc2tog around. (6 sc)
Fasten off and close the opening. Push a needle through the bead hole to keep the channel open. Each covered bead is about 0.5 in (1.3 cm) across.
Hanging Cord (Make 1)
Use cream. Ch 61. Sl st in the back bump of the 2nd ch from the hook and each ch across. (60 sl st) The cord is about 6 in (15.2 cm) long. Fold it in half to make a 3 in (7.6 cm) loop.
Bow (Make 1)
Use burgundy. Ch 61. Sc in the 2nd ch from the hook and each ch across. (60 sc) The strip is about 6 in (15.2 cm) long.
Fold the strip into two loops, each about 0.75 in (1.9 cm) long, and leave two tails about 0.75 in (1.9 cm) long. The bow should be 1.5 in (3.8 cm) wide. Wrap the center 6 times with a burgundy tail and secure it at the back.
Layout (top to bottom):
[ Hanging loop          3 in   / 7.6 cm ]
[ Gold bead                              ]
[ Bow, gold bead, gold bead              ]  0.75 in / 1.9 cm zone
[ Top bell              2.25 in / 5.7 cm ]
[ Gold bead, link bead, gold bead        ]  0.75 in / 1.9 cm zone
[ Bottom bell           2.25 in / 5.7 cm ]
[ Clapper bead           0.5 in / 1.3 cm below hem ]
Joining: Stringing the Ornament
All pieces are joined on one strong center strand. Nothing is sewn edge to edge.
- Cut 24 in (61.0 cm) of cream thread, double it, and thread it onto the beading needle.
- Pass the needle through the clapper bead, tie a firm knot below it, and dot the knot with glue or stiffener.
- Go up through the starting ring (Rnd 1) of the bottom bell. Pull until the clapper sits about 0.5 in (1.3 cm) below the hem.
- String 1 gold bead, the link bead, and 1 gold bead.
- Go up through the Rnd 1 ring of the top bell.
- String 2 gold beads, pass through the center wrap of the bow, then add the last gold bead.
- Lay both cord ends against the strand and tie the strand around them. Wrap several times, then sew through the cord to lock it.
Stitch-to-stitch logic: The strand passes through the center of each 12-dc ring. Use each bell’s 6 in (15.2 cm) tail to tack the strand to 2 opposite dc posts of Rnd 1, so the bells cannot slide or twist.
Tension: Keep the strand snug enough that the beads touch, but do not pull hard. Too much tension will flatten the domes.
Size checkpoint: Hang the ornament and measure from the top of the loop to the bottom of the clapper. It should measure 9.5 in (24.1 cm).
Final Blocking
- Wet the bells and soak them in stiffener for a few minutes.
- Gently squeeze out the excess. Do not wring.
- Slip each bell over a 2.5 in (6.4 cm) form wrapped in plastic.
- Open the mesh diamonds evenly with a needle tip.
- Flare the hem outward and pin each picot so the scallops measure 3 in (7.6 cm) across.
- Dab a little stiffener on the bow and shape the loops around a pencil.
- Let everything dry completely, usually overnight. Remove the forms, then assemble. If you assembled first, touch up the shaping now.
Final Quality-Control Checklist
- Both bells measure 2.25 in (5.7 cm) tall and 3 in (7.6 cm) across the hem
- Each bell has 12 mesh columns, 12 fans, 12 scallops, and 12 picots
- Every picot sits centered on a scallop tip
- The domes are smooth, with no flat or dented tops
- The beads are firm and centered on the strand
- The bow is level and the tails are equal
- The ornament hangs straight at 9.5 in (24.1 cm)
- All ends are woven in and trimmed
Troubleshooting
Bell is too wide and floppy: Your chain loops are loose. Go down a hook size, or chain more firmly.
Dome stays flat: Rnd 3 may have accidental increases. Recount it to 24 dc.
Scallops do not line up with fans: Rnd 10 must have exactly 84 dc. Check that there are 7 dc in each section.
Hem ruffles: Your tension changed in Rnds 10–11. Block firmly over the form, or rework Rnd 11 more tightly.
Bells twist on the strand: Add one more tack stitch through Rnd 1.
Crocheted bead looks gappy: Use a smaller hook for the beads only.
Care
Dust gently with a soft brush. If the ornament gets dirty, hand wash it in cool water, then re-stiffen and re-block it over the forms.
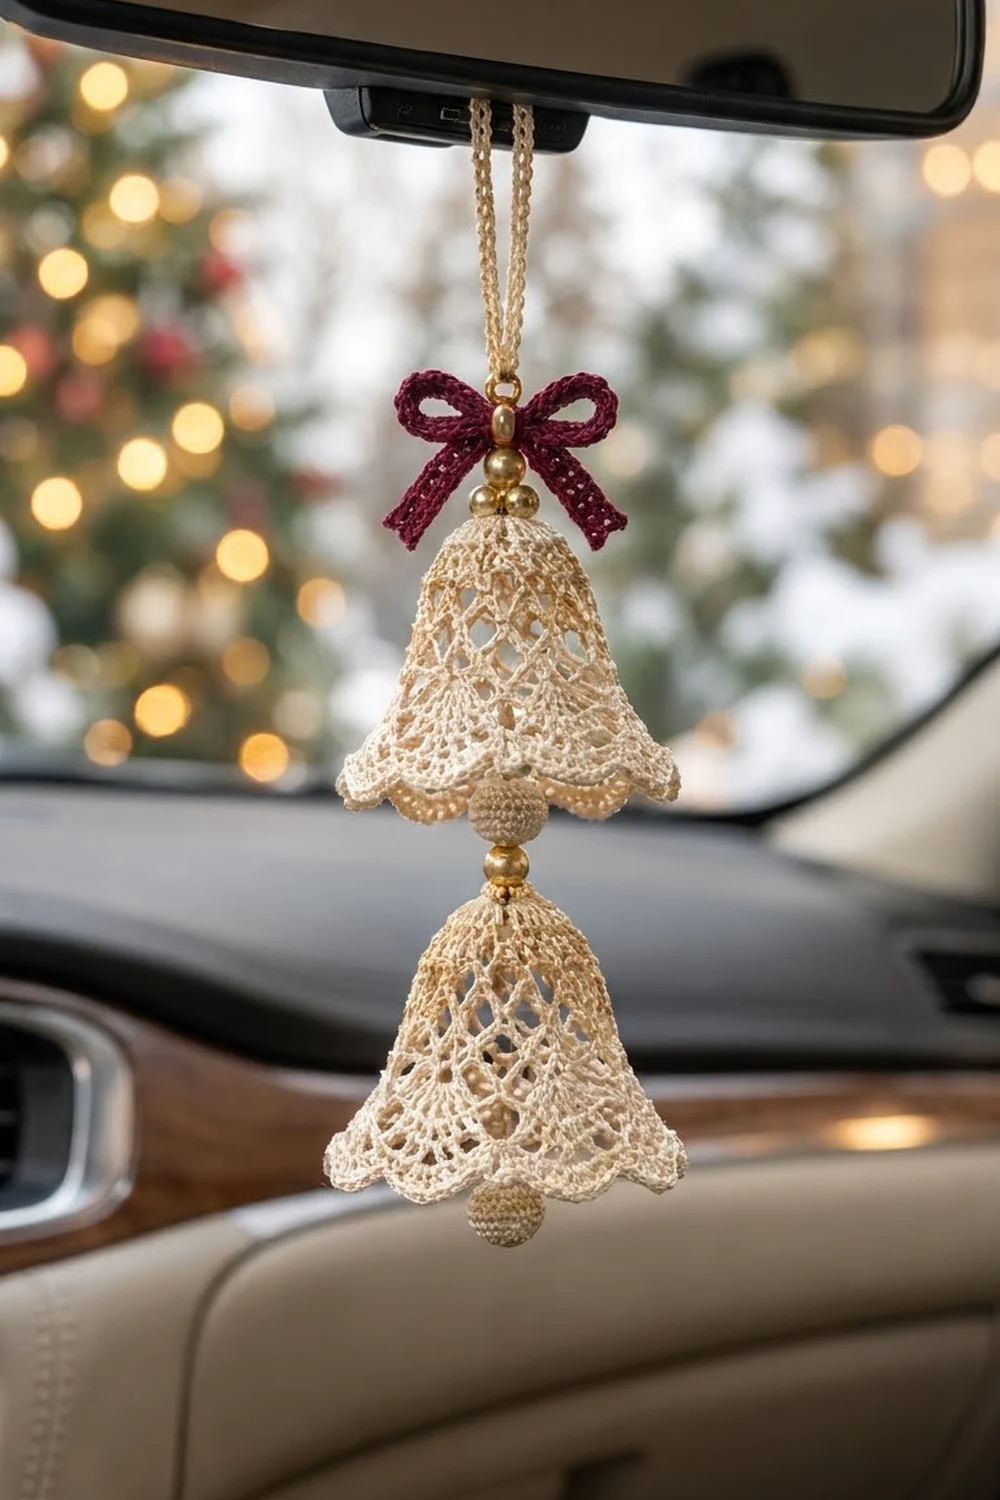
Final Notes
Here is the measurement chain. A gauge of 9 dc per 1 in (2.5 cm) gives a Rnd 9 opening of 2.5 in (6.4 cm) and a height of 1.75 in (4.4 cm). The 0.5 in (1.3 cm) border brings each bell to 2.25 in (5.7 cm) tall and 3 in (7.6 cm) across. Stacked with the beads, bow, and 3 in (7.6 cm) loop, the full ornament measures 9.5 in (24.1 cm).
Every count in this pattern comes in twelves, so if your counts are right, the scallops will line up.
Happy crocheting!