

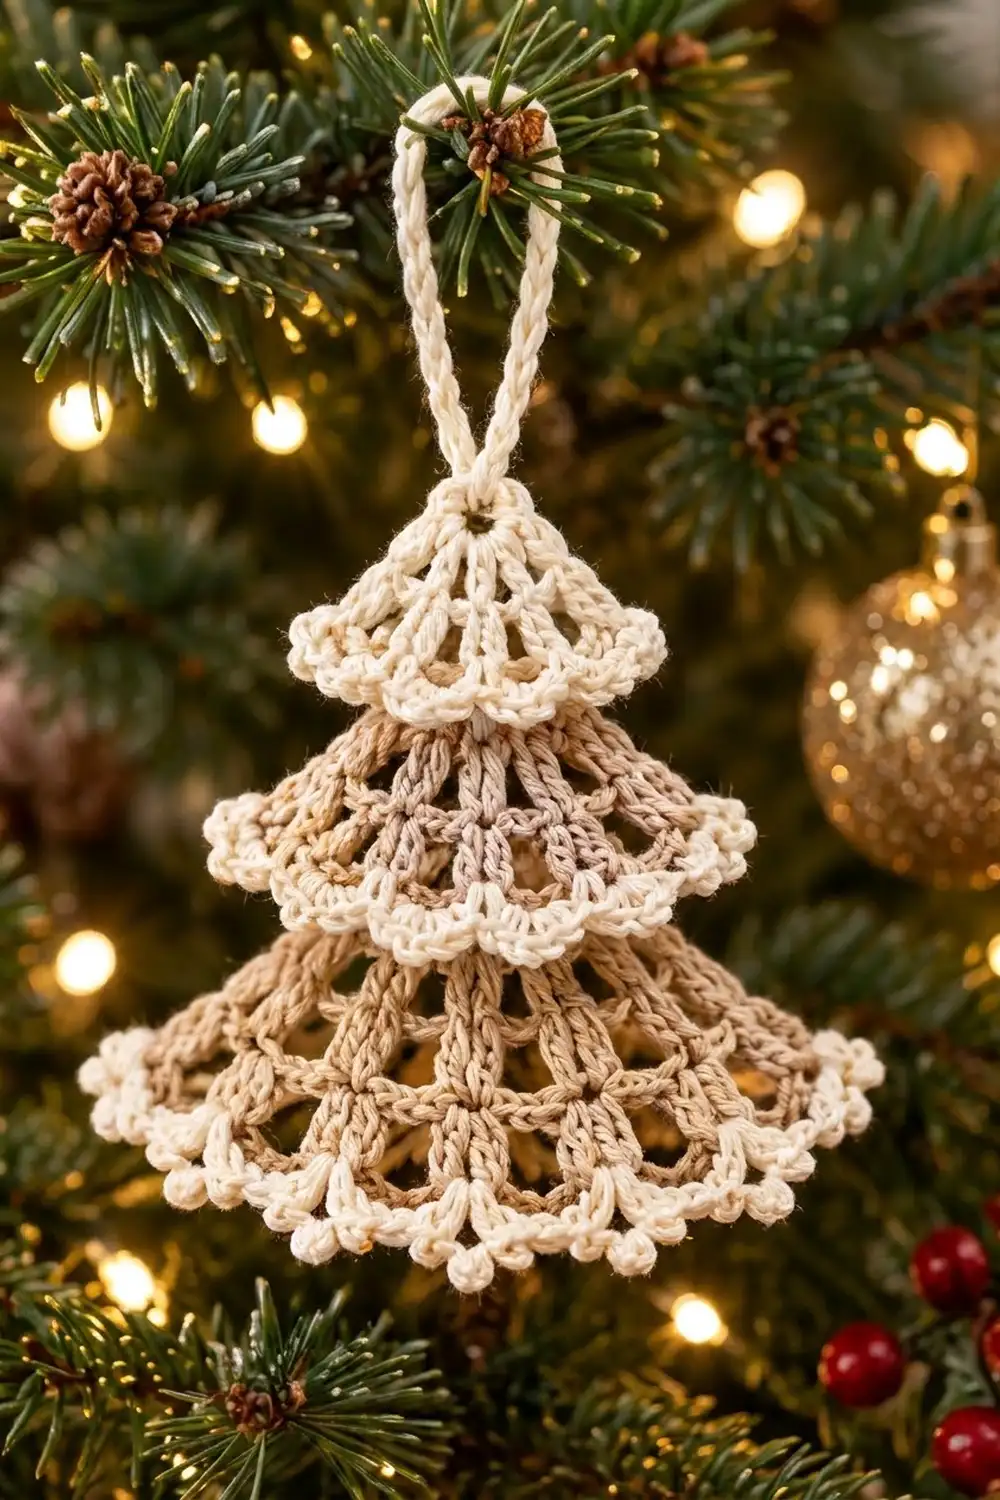
The Frosted Lace Fir is a small, airy tree ornament made from three lace fans stacked on a chain hanging loop. Each fan opens like a little skirt. Double-crochet spokes spread out from a single point, and a scalloped picot border finishes each curved edge.
The colors are warm and quiet. The top tier is solid cream. The middle and bottom tiers are light beige with cream picot edges, so each layer stands out against the one below it. The style looks like vintage doily lace, but in a sturdy DK cotton that holds its shape on a branch.
This pattern uses US crochet terms. The finished tree is about 3.5 in (8.9 cm) wide and 3.6 in (9.1 cm) tall, and the hanging loop adds 2 in (5.1 cm), for a total hanging height of 5.6 in (14.2 cm).
You work three fans flat in turned rows, each starting from a magic ring. Every fan gets a cream picot border along its curved edge. You then make one chain cord and sew the point of each fan to a set chain on that cord.
Finished Size and Construction
- Finished size: 3.5 in (8.9 cm) wide × 3.6 in (9.1 cm) tall, plus a 2 in (5.1 cm) loop
- Skill level: Easy to Intermediate
- Terminology: US crochet terms
- Yarn weight: DK / light (3) cotton
- Hook: 3.5 mm (E-4)
- Number of pieces: 3 lace tiers + 1 chain hanging cord
- Layout: vertical stack, with each tier’s point 0.8 in (2.0 cm) below the point of the tier above
- Piece sizes (finished, width × height):
- Small: 2.1 in × 1.2 in (5.3 cm × 3.0 cm)
- Medium: 2.8 in × 1.6 in (7.1 cm × 4.1 cm)
- Large: 3.5 in × 2.0 in (8.9 cm × 5.1 cm)
- Width before border:
- Small: 1.6 in (4.1 cm)
- Medium: 2.3 in (5.8 cm)
- Large: 2.9 in (7.4 cm)
- Border depth: 0.3 in (0.8 cm)
Materials
Use a smooth mercerized or combed DK cotton. Cotton gives crisp stitch definition and holds its shape well with light starch. Avoid fuzzy or very stretchy yarns, because the lace spaces will close up and the picots will droop.
- Cream: 8 g, about 18 m (small tier, all borders and the hanging cord)
- Light beige: 6 g, about 13 m (bodies of the medium and large tiers)
These quantities include a margin of about 30% for gauge swatches and tails. One 50 g ball of each color makes many ornaments.
Tools:
- 3.5 mm (E-4) crochet hook
- Tapestry needle
- Scissors
- Rustproof pins and a foam blocking board
- Spray starch or a light fabric stiffener
- Ruler or tape measure
- 2 stitch markers
Abbreviations (US Terms)
- ch – chain
- sl st – slip stitch
- sc – single crochet
- hdc – half double crochet
- dc – double crochet
- sp(s) – space(s)
- st(s) – stitch(es)
- MR – magic ring
- RS / WS – right side / wrong side
Special stitches
- V-st: (dc, ch 1, dc) in the same stitch.
- Picot: ch 3, then sl st in the 3rd ch from the hook. Count each picot as 1 unit.
Gauge and Checkpoints
Make the small tier first and use it as your test piece. Measure from the center of the ring, along the middle spoke, to the top of the row. Each fan should open to about one-third of a circle (120°) when laid flat.
- After Row 1: 0.5 in (1.3 cm) from the ring center
- After Row 2: 0.9 in (2.3 cm)
- After Row 3: 1.3 in (3.3 cm)
- After Row 4: 1.7 in (4.3 cm)
- The border adds 0.3 in (0.8 cm).
- Chain gauge: 5 ch = 1 in (2.5 cm)
If your fan is too big: go down to a 3.25 mm hook, or keep your chain spaces snug.
If your fan is too small: go up to a 3.75 mm hook, and make sure each dc is pulled up to its full height.
If the fan cups instead of lying flat, your chains are too tight. Loosen them before you change hook size.
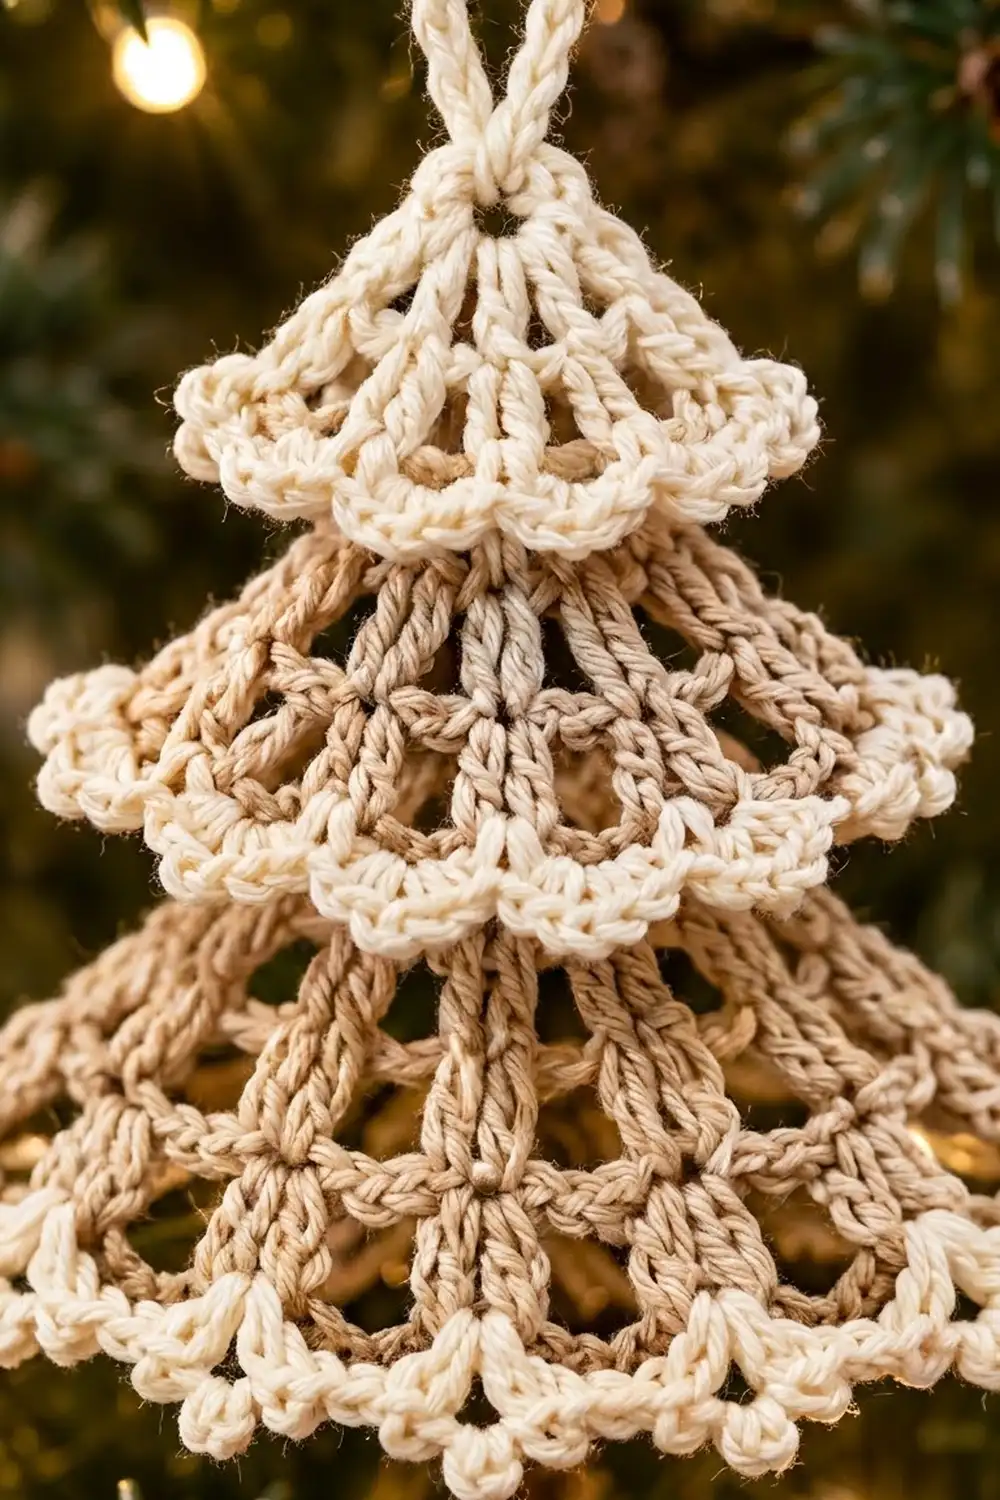
Tier Bodies
Work every tier in turned rows. The turning chain counts as a stitch throughout. All three tiers use the same opening rows; the larger tiers simply keep going.
Row 1 (all tiers)
Make a MR. Ch 3 (counts as dc), then work 4 dc in the ring. Pull the ring closed firmly. Turn. (5 dc)
Leave a 6 in (15.2 cm) starting tail; you will use it later to sew the tier to the cord.
Row 2 (all tiers)
Ch 4 (counts as dc + ch 1), skip the first dc, [dc in the next dc, ch 1] 3 times, then dc in the top of the turning ch. Turn.
(5 dc spokes + 4 ch-1 sps = 9 sts)
Row 3 (medium and large tiers)
Ch 5 (counts as dc + ch 2), skip the first dc and the ch-1 sp, [dc in the next dc, ch 2] 3 times, then dc in the 3rd ch of the turning ch. Turn.
(5 dc spokes + 4 ch-2 sps = 13 sts)
Row 4 (large tier only)
Ch 4 (counts as dc + ch 1), then dc in the first dc to complete the first V-st. Then [ch 1, skip the ch-2 sp, V-st in the next dc] 3 times. Finish with ch 1, skip the ch-2 sp, and work a V-st in the 3rd ch of the turning ch. Turn.
(5 V-sts + 4 ch-1 sps between them = 19 sts)
This row splits each spoke into a V, which gives the bottom tier its wider, frillier edge.
Rows per tier
- Small tier (cream): Rows 1–2. Do not fasten off; go straight into the small border.
- Medium tier (beige): Rows 1–3. Fasten off beige.
- Large tier (beige): Rows 1–4. Fasten off beige.
Make All Pieces
| Piece | Body color | Border color | Rows | Quantity |
|---|---|---|---|---|
| Small tier | Cream | Cream | 1–2 | 1 |
| Medium tier | Beige | Cream | 1–3 | 1 |
| Large tier | Beige | Cream | 1–4 | 1 |
| Hanging cord | Cream | — | — | 1 |
Finish the border on every tier (see the Border section) before you join the pieces. The joining only uses the tier points, so the borders are much easier to work while each tier is loose.
Hanging cord: With cream, ch 20 and sl st in the first ch to form the loop. Then ch 8 for the stem and fasten off. The loop hangs 2 in (5.1 cm) tall, and the stem is 1.6 in (4.1 cm) long.
Layout grid (front view):
        (  loop: 20 ch  )
               |
             [ S ]        <- point at loop join (ch 0)
            [  M  ]       <- point at stem ch 4
          [    L    ]     <- point at stem ch 8
Joining
Method: Sew each tier’s point (its magic ring) to the cord with that tier’s own starting tail.
Stitch-to-stitch logic: The stem has 8 ch. At 5 ch per inch, every 4 ch equals 0.8 in (2.0 cm), which is exactly the spacing between tier points.
- Put a stitch marker in stem ch 4 and another in stem ch 8. Count from the loop join outward.
- Small tier: thread its tail through the ring. Make 3 small stitches through the sl st join at the base of the loop, then secure the tail.
- Medium tier: lay it behind the small tier. Sew its ring to marked ch 4 the same way.
- Large tier: lay it behind the medium tier. Sew its ring to marked ch 8, which is the last chain of the stem.
- Weave all ends into the back of the spokes.
Tension advice: Pull the sewing stitches snug but not tight. If they are too tight, the ring puckers and the fan tilts. If they are too loose, the tier swings sideways when it hangs.
Size checkpoint: The stem runs behind the upper tiers, where it is hidden. Each tier covers the top of the one below it. The small tier overlaps the medium by 0.4 in (1.0 cm), and the medium overlaps the large by 0.8 in (2.0 cm). Measure from the small tier’s point to the bottom of the large tier’s border. It should be 0.8 + 0.8 + 2.0 = 3.6 in (9.1 cm).
Border
Border gauge: One border row adds 0.3 in (0.8 cm) of depth. Each scallop covers one chain space in the last body row. The sc stitches sit on top of the spokes to anchor the scallops. Work the border along the curved edge only; the straight sides stay plain.
Use whichever side of the fan you like best as the front. Picots look good from both sides.
Small tier border (continue with cream)
After Row 2, turn. Ch 1, then sc in the first dc. Then [(dc, picot, dc) in the next ch-1 sp, sc in the next dc] 4 times; the last sc goes in the 3rd ch of the turning ch. Fasten off.
Count: 5 sc + 4 scallops (2 dc + 1 picot each) = 5 + 12 = 17 units
Medium tier border
Turn the tier. Join cream with a sl st in the first dc, then ch 1 and sc in the same dc. Then [(hdc, dc, picot, dc, hdc) in the next ch-2 sp, sc in the next dc] 4 times. Fasten off.
Count: 5 sc + 4 shells (5 units each) = 5 + 20 = 25 units
Large tier border
Turn the tier. Join cream with a sl st in the first dc, ch 1, and sc in the same dc. Then work (hdc, dc, picot, dc, hdc) in the first V-st’s ch-1 sp, and sc in the next dc.
Next, repeat the following 4 times:
- (sc, picot, sc) in the ch-1 sp between V-sts
- sc in the next dc
- (hdc, dc, picot, dc, hdc) in the V-st’s ch-1 sp
- sc in the next dc
Fasten off.
Count: 10 sc on spokes + 5 shells (25 units) + 4 small scallops (12 units) = 47 units, with 9 picots
Why the math works
The starting count for each border is simply that tier’s last body row: 9, 13 and 19 sts. Every chain space gets exactly one scallop, and every dc gets exactly one sc, so nothing is added or skipped.
The curved edge gets longer with each extra row (the radius grows by 0.4 in, or 1.0 cm, per row). The scallops grow to match:
- small: 1-dc scallops in ch-1 sps
- medium: 5-unit shells in the wider ch-2 sps
- large: 9 scallops
That keeps every edge flat instead of ruffled or pulled tight.
Final Blocking
- Wet the finished ornament lightly, or spritz it until it is evenly damp.
- Pin the large tier out as a 120° fan, 3.5 in (8.9 cm) wide. Put one pin in each picot.
- Lift the upper tiers away and pin the medium tier to 2.8 in (7.1 cm) and the small tier to 2.1 in (5.3 cm).
- Pull the hanging loop straight up and pin it flat.
- Spray all three tiers with starch, front and back.
- Leave it to dry completely, which takes about 8 hours, before you unpin.
- Lay the tiers back over each other so each point sits centered on the cord.
Final Quality-Control Checklist
- Row counts are 5, 9, 13 and 19 sts, as written for each tier.
- The borders have 17, 25 and 47 units, with 4, 4 and 9 picots.
- Each fan lies flat and opens to about 120°.
- The tier points sit on the loop join, ch 4 and ch 8.
- The tree measures 3.5 in × 3.6 in (8.9 cm × 9.1 cm).
- The loop hangs 2 in (5.1 cm) tall.
- The stem is hidden behind the tiers.
- No ends show on the front.
Troubleshooting
- The fan ruffles: your chains are too loose, or you used extra turning chains. Recount the row against the stated total.
- The fan cups: your chains are too tight. Loosen your chain tension or use a larger hook for the chains only.
- There is a hole at the point: the magic ring was not closed. Pull the tail firmly and anchor it during joining.
- Picots flop: use more starch, and pin each picot to a sharp point while blocking.
- The tree hangs crooked: one point is off its marked chain. Re-sew it to the correct chain.
- Tiers twist on the tree: tack the center spoke of each tier to the stem with one extra stitch.
Care
Hand wash in cool water, press out the water in a towel, and lay flat to dry. Re-starch and re-block after washing to bring back the crisp lace.
Final Notes
The whole ornament depends on a short chain of measurements. Each row adds 0.4 in (1.0 cm) of radius: 0.5 in, then 0.9 in, 1.3 in and 1.7 in (1.3, 2.3, 3.3 and 4.3 cm). The 0.3 in (0.8 cm) border brings the tiers to 1.2, 1.6 and 2.0 in (3.0, 4.1 and 5.1 cm) tall. Stacking them at 4-chain steps, 0.8 in (2.0 cm) apart, gives a 3.6 in (9.1 cm) tree.
Check the small tier against these numbers first, and the other two tiers will fit as written. Make one, then make a forest for your tree.
Happy crocheting!