

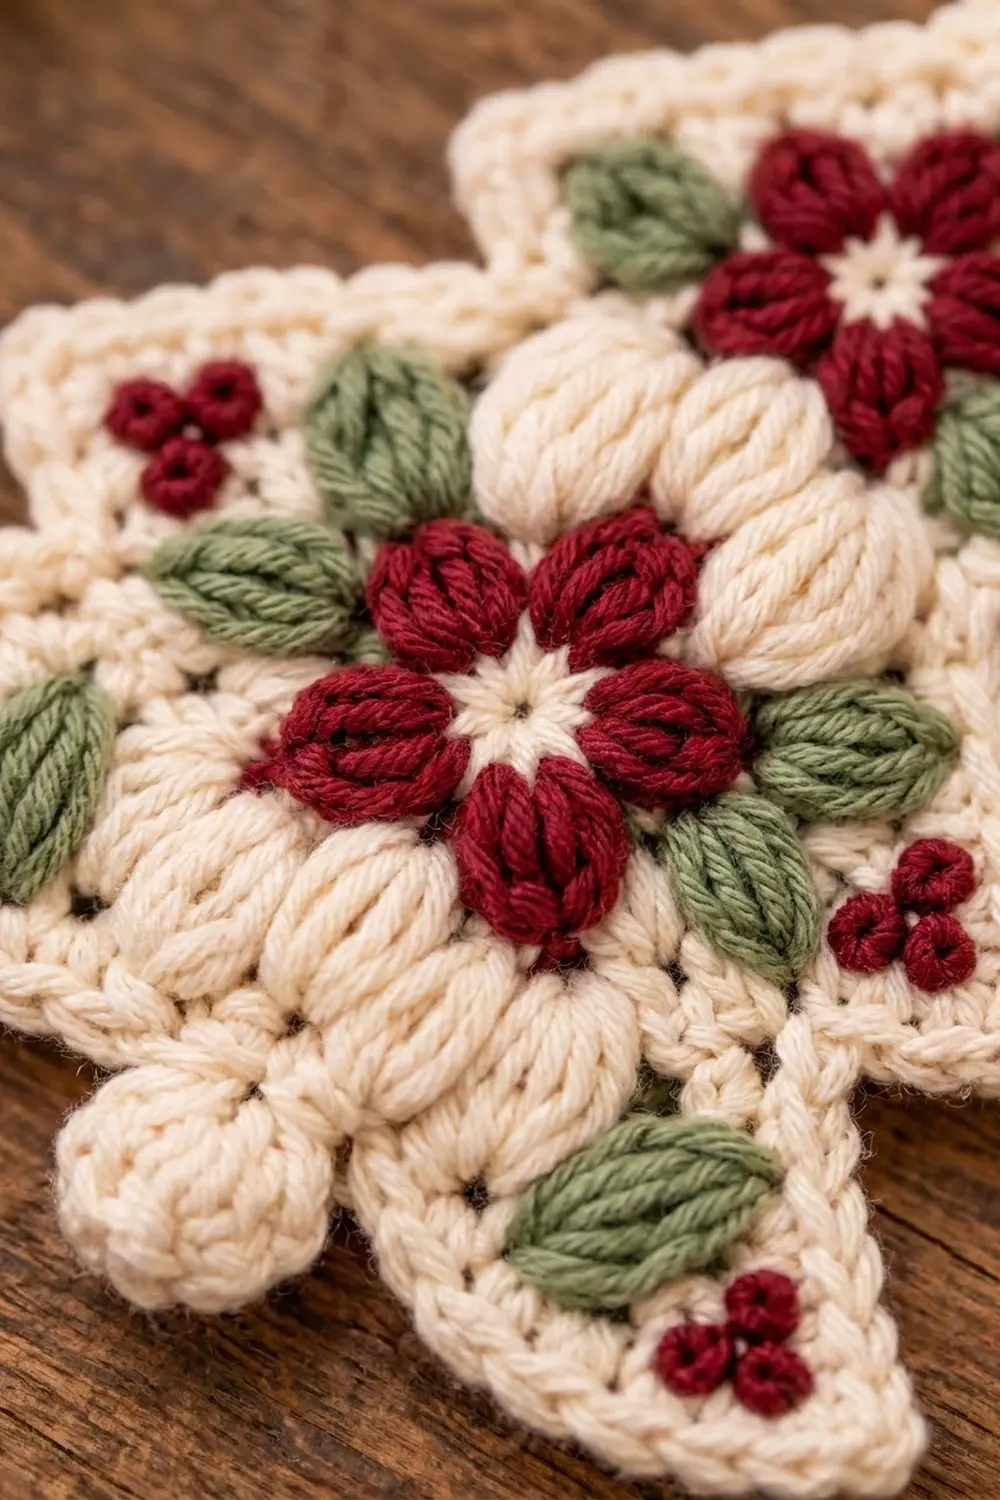
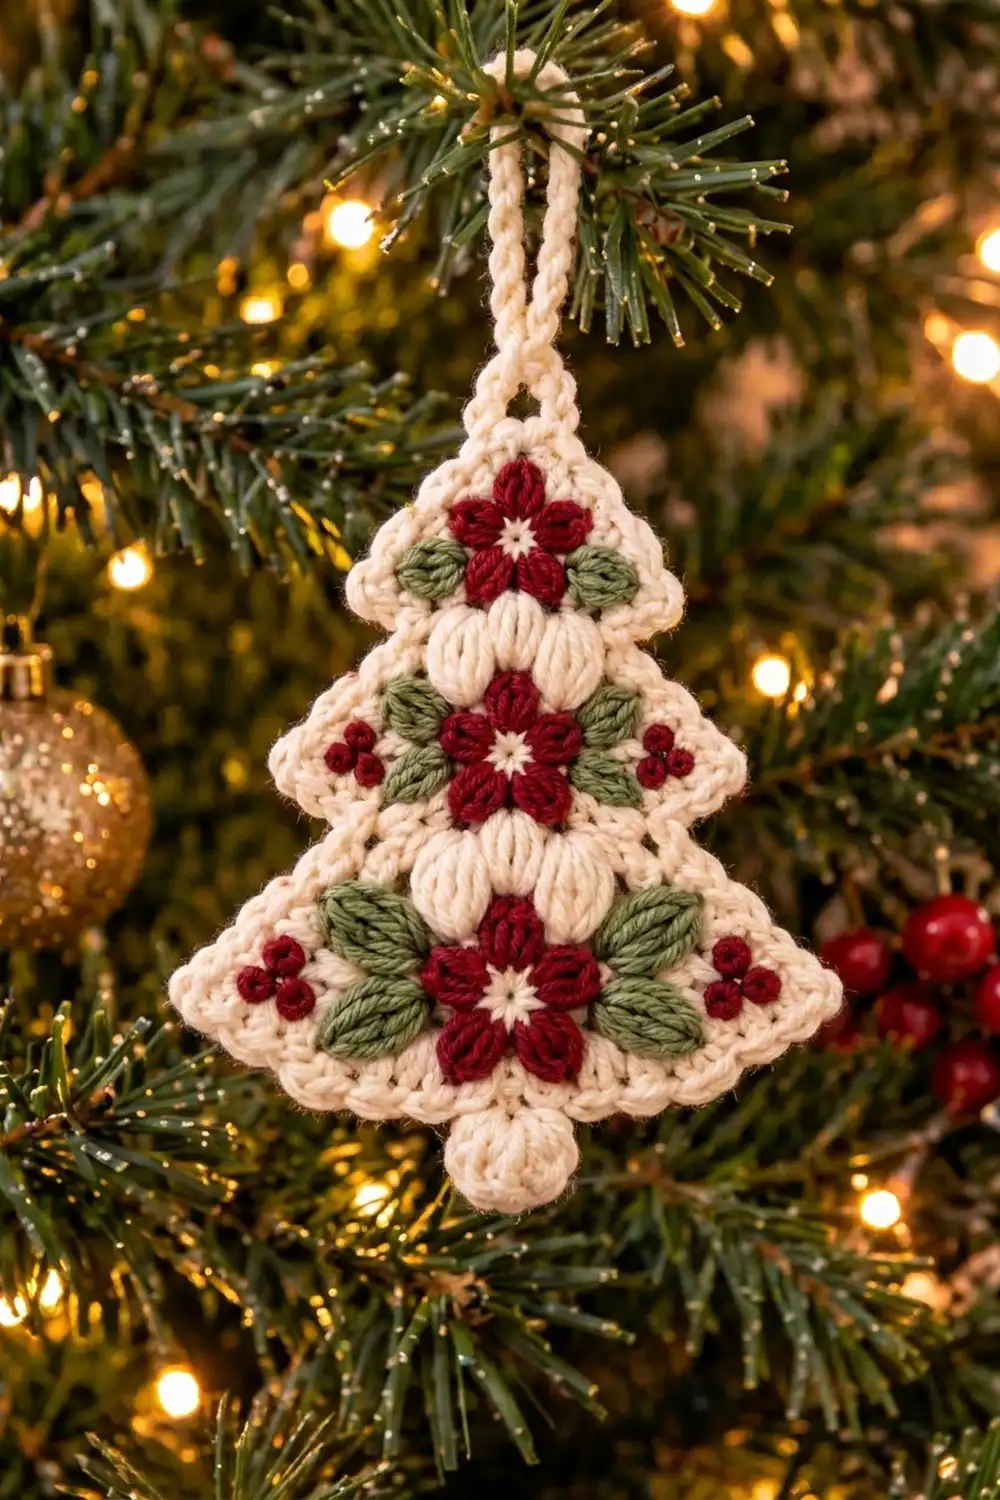
The Winter Blossom Tree is a flat Christmas tree ornament with three tiers and a cozy, cottage-style look. A cream base holds three deep burgundy puff flowers stacked down the center. Soft sage-green leaves sit on either side, and tiny burgundy berry clusters sit at the tips of the lower tiers.
Short rows of cream puff stitches sit between the flowers. A round cream bobble forms the trunk, and a beaded crab-stitch edge outlines the whole tree. The colors are classic and calm: cream, burgundy, and sage green.
This pattern uses US crochet terms. The tree with its border measures 4.3 in (10.9 cm) wide and 4.5 in (11.4 cm) tall. With the trunk it is 5.0 in (12.7 cm) tall, and the hanging loop adds 1.25 in (3.2 cm).
You work the tree body flat in single crochet rows from the top point down, with puff stitches in two of the rows. A two-round border goes around the whole body. Then you make the flowers, leaves, berry clusters, and trunk separately and sew them on.
Finished Size and Construction
- Finished size: 4.3 in (10.9 cm) wide x 4.5 in (11.4 cm) tall with border; 5.0 in (12.7 cm) tall with trunk; 6.25 in (15.9 cm) with hanging loop
- Skill level: Easy-intermediate
- Terminology: US
- Yarn weight: DK (light, #3), cotton or cotton blend
- Hook: 3.5 mm (E-4)
- Number of pieces: 1 finished ornament (one tree body plus sewn-on appliqués: 3 flowers, 8 leaves, 4 berry clusters, 1 trunk)
- Layout: Single tree with three stacked tiers and one flower per tier
- Body size before border: 3.8 in (9.7 cm) wide x 4.0 in (10.2 cm) tall
- Border depth: 0.25 in (0.6 cm) on every side
Materials
Choose a smooth cotton DK, either mercerized or matte. Cotton gives crisp puff stitches and holds its shape on a branch. Avoid fuzzy yarns, which hide the stitch texture.
- Cream: 10 g / 24 m (body, border, loop, flower centers, trunk)
- Burgundy: 5 g / 12 m (flowers, berry clusters)
- Sage green: 3 g / 7 m (leaves)
These amounts assume a DK cotton of about 120 m per 50 g. They include extra for testing your gauge and for tails.
Tools:
- 3.5 mm (E-4) crochet hook
- Tapestry needle
- Scissors
- 2 stitch markers
- Rustproof pins
- A few cream yarn scraps for stuffing the trunk
- Blocking mat and spray bottle
Abbreviations (US Terms)
- ch – chain
- sl st – slip stitch
- sc – single crochet
- hdc – half double crochet
- dc – double crochet
- sc2tog – single crochet 2 together
- MR – magic ring
- st(s) – stitch(es)
- sp – space
- RS / WS – right side / wrong side
- rev sc – reverse single crochet (crab stitch): work in the opposite direction to normal. Insert the hook in the next st behind you, pull up a loop, yo, and pull through both loops.
Puff stitch (puff): (Yo, insert hook in st, yo, pull up a loop) 3 times, yo, pull through all 7 loops on hook.
3-dc bobble: (Yo, insert hook in indicated place, yo, pull up a loop, yo, pull through 2 loops) 3 times, yo, pull through all 4 loops on hook.
Gauge and Checkpoints
Gauge: 20 sc and 24 rows = 4 in (10.2 cm) in sc rows. That is 5 sts and 6 rows per 1 in (2.5 cm).
Make one complete tree body before you make the appliqués. The body is small, so it works as your test piece.
Checkpoints:
- After Row 8: 11 sts = 2.2 in (5.6 cm) wide; about 1.33 in (3.4 cm) tall
- After Row 16: 15 sts = 3.0 in (7.6 cm) wide; about 2.67 in (6.8 cm) tall
- After Row 24: 19 sts = 3.8 in (9.7 cm) wide; 4.0 in (10.2 cm) tall
- After the border: 4.3 in (10.9 cm) x 4.5 in (11.4 cm)
- Each flower: about 1.0 in (2.5 cm) across
If the body comes out too big, switch to a 3.25 mm hook. If it’s too small, switch to a 3.75 mm hook. Get the width right first; the height usually follows.
Tree Body
Use cream. Odd rows are RS rows. You work the tree from the top point down. Each tier gains 1 st at each end on every even row. At the start of each new tier, slip stitches and unworked stitches move the edge inward, so the tier above overhangs the one below.
Tier 1 (Top)
Row 1 (RS): Ch 2, 3 sc in 2nd ch from hook, turn. (3 sts)
Row 2 (WS): Ch 1, 2 sc in first st, sc in next st, 2 sc in last st, turn. (5 sts)
Row 3: Ch 1, sc in each st across, turn. (5 sts)
Row 4: Ch 1, 2 sc in first st, sc in each st to last st, 2 sc in last st, turn. (7 sts)
Row 5: Ch 1, sc across, turn. (7 sts)
Row 6: Repeat Row 4. (9 sts)
Row 7: Ch 1, sc across, turn. (9 sts)
Row 8: Repeat Row 4. (11 sts)
Checkpoint: 2.2 in (5.6 cm) wide.
Tier 2 (Middle)
Row 9 (RS, puff row): Don’t ch. Sl st in first 3 sts, ch 1, sc in same st as last sl st and in next st, puff in each of next 3 sts, sc in next 2 sts, leave last 2 sts unworked, turn. (7 sts: 4 sc + 3 puffs)
The three puffs sit in the center and pop out on the RS. The 2 sts left free at each end of Row 8 form the Tier 1 overhang.
Row 10: Ch 1, 2 sc in first st, sc in each st (including the top of each puff) to last st, 2 sc in last st, turn. (9 sts)
Row 11: Ch 1, sc across, turn. (9 sts)
Row 12: Repeat Row 10. (11 sts)
Row 13: Ch 1, sc across, turn. (11 sts)
Row 14: Repeat Row 10. (13 sts)
Row 15: Ch 1, sc across, turn. (13 sts)
Row 16: Repeat Row 10. (15 sts)
Checkpoint: 3.0 in (7.6 cm) wide.
Tier 3 (Bottom)
Row 17 (RS, puff row): Don’t ch. Sl st in first 3 sts, ch 1, sc in same st as last sl st and in next 3 sts, puff in each of next 3 sts, sc in next 4 sts, leave last 2 sts unworked, turn. (11 sts: 8 sc + 3 puffs)
Row 18: Repeat Row 10. (13 sts)
Row 19: Ch 1, sc across, turn. (13 sts)
Row 20: Repeat Row 10. (15 sts)
Row 21: Ch 1, sc across, turn. (15 sts)
Row 22: Repeat Row 10. (17 sts)
Row 23: Ch 1, sc across, turn. (17 sts)
Row 24: Repeat Row 10. (19 sts) Don’t fasten off.
Checkpoint: 3.8 in (9.7 cm) wide x 4.0 in (10.2 cm) tall.
Border
Border gauge: Work 1 sc per row-end on the slanted edges. Every 2 rows, the edge rises 0.33 in (0.8 cm) and steps out 0.2 in (0.5 cm). That makes each slanted section about 0.39 in (1.0 cm) long, which is almost exactly the 0.4 in (1.0 cm) that 2 sc cover at gauge. As a result, the edge lies flat without rippling or cupping.
Round 1 (RS): Turn so the RS faces you. Ch 1. Work along the bottom edge (the top of Row 24): 3 sc in first st, sc in next 17 sts, 3 sc in last st. (Bottom edge: 23 sc)
Continue up the first side:
- Sc in the end of each of Rows 23–17. (7 sc)
- Along the free underside of the Tier 2 overhang: sc in the next st, 3 sc in the outer tip st. (4 sc)
- Sc in the end of each of Rows 15–9. (7 sc)
- Along the Tier 1 overhang: sc in the next st, 3 sc in the outer tip st. (4 sc)
- Sc in the end of each of Rows 7–1. (7 sc)
Side total: 29 sc.
Apex: 3 sc in the foundation ch at the top point. (3 sc) Place a marker in the center sc of these 3.
Work down the second side as a mirror image:
- Sc in the end of each of Rows 1–7. (7 sc)
- 3 sc in the Tier 1 tip st, sc in the next overhang st. (4 sc)
- Sc in the end of each of Rows 9–15. (7 sc)
- 3 sc in the Tier 2 tip st, sc in the next overhang st. (4 sc)
- Sc in the end of each of Rows 17–23. (7 sc)
Side total: 29 sc. Sl st to first sc. (Total: 23 + 29 + 3 + 29 = 84 sts)
Don’t add stitches at the inner corners where a tier meets the overhang above it. These inward-facing corners need no extra fullness. Each 3-sc corner belongs to one edge and is counted only once.
Round 2: Ch 1, rev sc in each st around. (84 sts) Sl st to first st. This makes the beaded, rope-like edge.
Hanging loop: Sl st along the edge to the marked apex st. Ch 14, sl st in the same apex st. Work 20 sc into the ch-14 loop, then sl st in the apex st. Fasten off and weave in. The loop hangs about 1.25 in (3.2 cm) above the apex.
Flowers (Make 3)
Rnd 1: With cream, MR, ch 1, 6 sc in ring, sl st to first sc. Fasten off cream. (6 sts)
Rnd 2: Join burgundy in any sc. Ch 1, (puff, ch 1) in each sc around, sl st to top of first puff. (6 puffs + 6 ch-1 sps = 12 sts) Fasten off, leaving a 10 in (25.4 cm) tail for sewing.
Each flower is about 1.0 in (2.5 cm) across, with six rounded petals around a cream center.
Leaves (Make 4 Small, 4 Large)
Use sage green.
Small leaf: Ch 5. Sc in 2nd ch from hook, hdc in next 2 ch, then work (sc, ch 2, sc) in last ch to form the tip. Now work along the other side of the chain: hdc in next 2 ch, sc in next ch, sl st in the turning ch. Fasten off with an 8 in (20.3 cm) tail. The leaf is about 0.7 in (1.8 cm) long.
Large leaf: Ch 6. Sc in 2nd ch from hook, hdc in next ch, dc in next ch, hdc in next ch, (sc, ch 2, sc) in last ch. Now work along the other side of the chain: hdc in next ch, dc in next ch, hdc in next ch, sc in next ch, sl st in the turning ch. Fasten off with an 8 in (20.3 cm) tail. The leaf is about 0.9 in (2.3 cm) long.
Berry Clusters (Make 4)
With burgundy, ch 4, sl st in first ch to form a ring. (Ch 2, 3-dc bobble in ring, ch 2, sl st in ring) 3 times. Fasten off with an 8 in (20.3 cm) tail.
Each cluster has 3 round berries in a small triangle, about 0.5 in (1.3 cm) across.
Trunk (Make 1)
Use cream.
Rnd 1: MR, 6 sc in ring. (6 sts)
Rnd 2: 2 sc in each st around. (12 sts)
Rnd 3: Sc in each st around. (12 sts)
Rnd 4: Sc2tog 6 times. (6 sts)
Stuff lightly with cream scraps. Fasten off, thread the tail through the front loops of the last 6 sts, and pull closed. Keep the tail long for sewing. The ball is about 0.6 in (1.5 cm) across.
Assembly
Lay the body RS up. Pin each piece before sewing. Sew with matching yarn, working through back loops or edges so your stitches stay hidden.
- Flower 1: Center it over Rows 2–7 of Tier 1, just above the Row 9 puffs.
- Flower 2: Center it over Rows 10–16 of Tier 2, below the Row 9 puffs.
- Flower 3: Center it over Rows 18–24 of Tier 3, below the Row 17 puffs.
- Small leaves: Place one on each side of Flower 1 and Flower 2. Angle the tips up and out, and tuck the bases slightly under the petals.
- Large leaves: Place two on each side of Flower 3, one angled up and one angled down. Tuck the bases under the petals.
- Berry clusters: Place one just inside each outer tip of Tier 2 and one just inside each outer tip of Tier 3.
- Trunk: Sew it to the center of the bottom edge so about 0.5 in (1.3 cm) of the ball hangs below the border.
Final Blocking
- Weave in all tails on the WS.
- Pin the ornament RS up on a blocking mat at 4.3 in (10.9 cm) x 4.5 in (11.4 cm).
- Pin each tier tip to a sharp point and keep the inner corners crisp.
- Mist lightly with water. Don’t press the puffs, flowers, or trunk flat.
- Let it dry completely, about 2–4 hours, before you unpin it.
Final Quality-Control Checklist
- Body before border is 3.8 in (9.7 cm) x 4.0 in (10.2 cm)
- Border Rounds 1 and 2 each have 84 sts
- Round 1 has 29 sc on each side, 23 sc on the bottom, and 3 sc at the apex
- Both puff rows show 3 centered puffs on the RS
- Each tier overhangs by 2 sts on each side
- All 3 flowers have 6 petals and sit on the center line
- The 8 leaves and 4 berry clusters are placed symmetrically
- The hanging loop is centered and firmly attached
- Finished size is 4.3 in (10.9 cm) x 4.5 in (11.4 cm), plus trunk and loop
Troubleshooting
Border edges ripple: Your border tension is loose. Use a 3.25 mm hook for Round 1 only.
Edges pull in or cup: Check that you worked 3 sc into each tip and corner st. Work the row-ends more loosely.
Puffs sink to the WS: Make sure you worked the puffs on RS rows (Rows 9 and 17). Pull each puff’s loops up to the same height.
Tiers look lopsided: Recount Rows 9 and 17. Each side must have exactly 2 unworked sts.
Flower petals look flat: Pull up taller loops before closing each puff, and keep the ch-1 between petals snug.
Trunk droops: Sew it to the border in two places, not just one.
Care
Hand wash in cool water with mild soap and lay flat to dry. Reshape the tiers and puffs while the ornament is damp.
Final Notes
Here’s how the measurements build on each other. At 5 sts and 6 rows per inch, the body comes out 3.8 in (9.7 cm) x 4.0 in (10.2 cm). The 0.25 in (0.6 cm) border brings it to 4.3 in (10.9 cm) x 4.5 in (11.4 cm). The trunk adds 0.5 in (1.3 cm), and the loop adds 1.25 in (3.2 cm). Check your gauge at Rows 8, 16, and 24, and every later number will work out.
Make one for your tree, then a few more for gifts and package toppers.
Happy crocheting!