

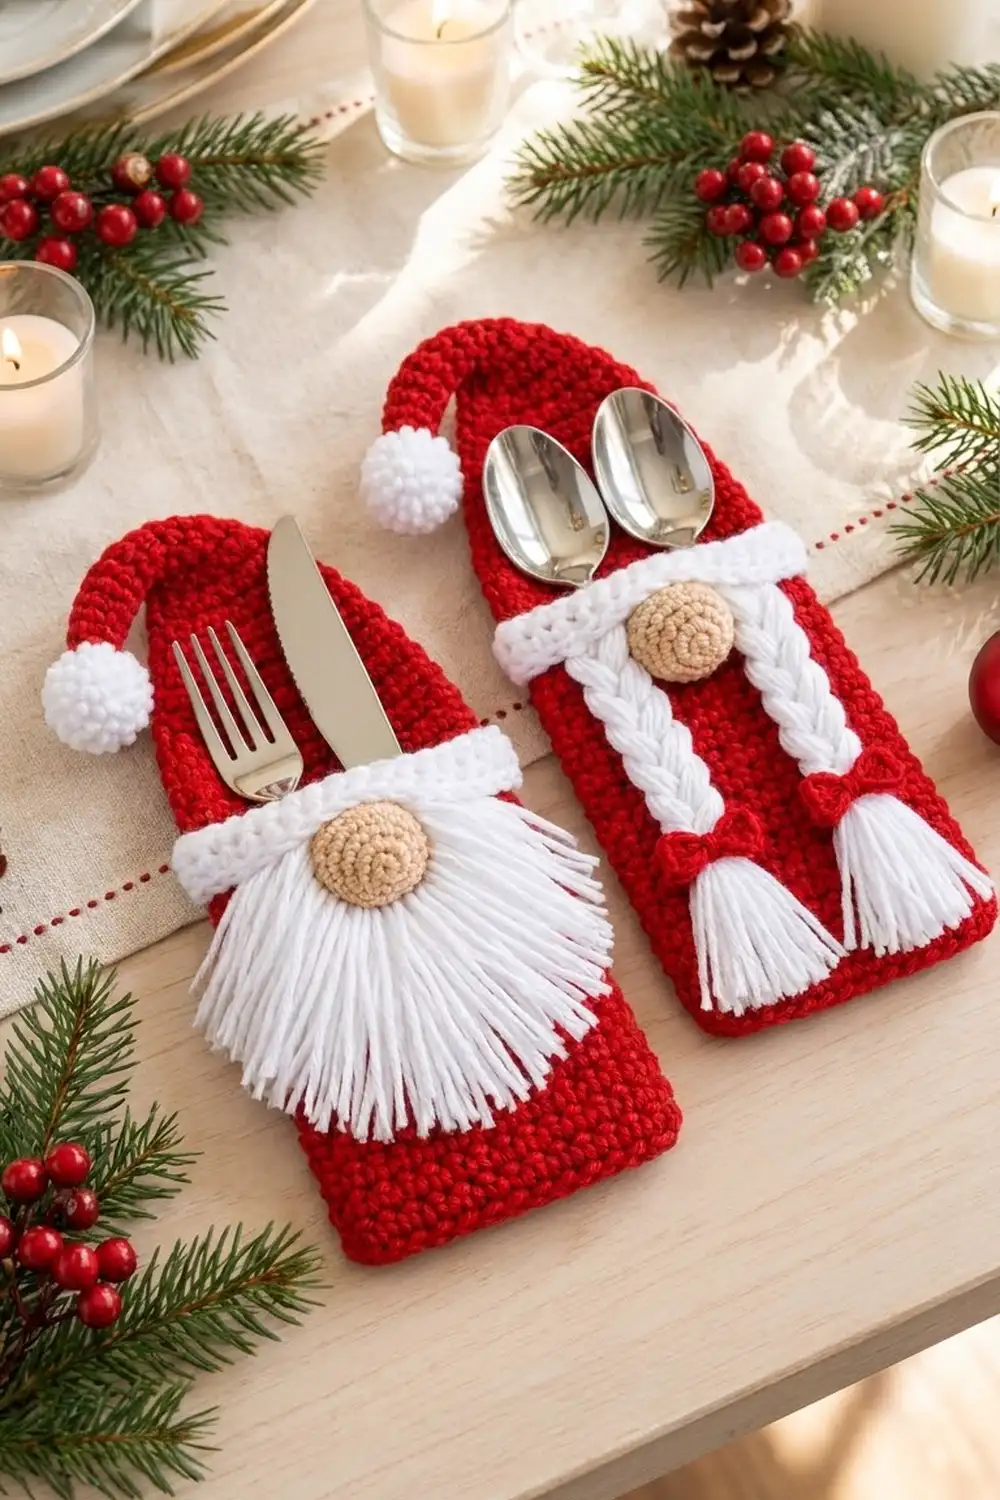
These little gnome cutlery holders make any holiday table look festive. Each one is a flat red pocket topped with a tall rounded gnome hat. A floppy hat tip bends to the side and ends in a white popcorn pompom. A crisp white brim and a round tan nose finish the face.
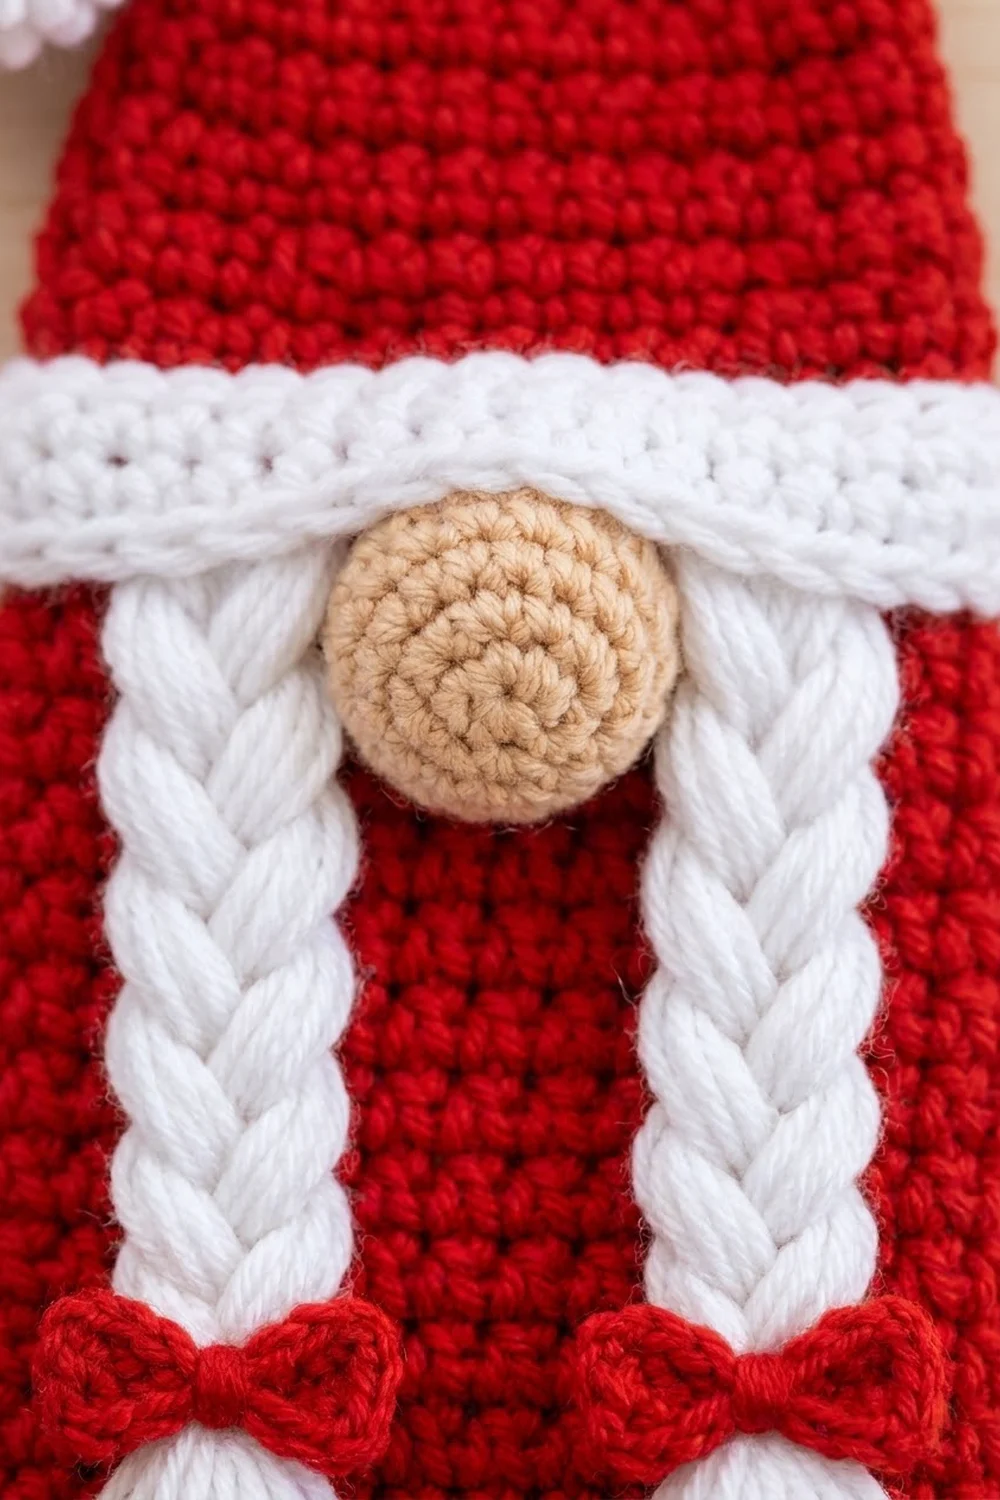
The set has two different holders. Mr. Gnome wears a full white fringe beard trimmed into a soft U shape. Mrs. Gnome has two white braids that end in fringe tassels, each tied with a small red bow. Slip a fork and knife into one and two spoons into the other.
This pattern uses US crochet terms. Each finished holder measures 4 in (10.2 cm) wide and 8.5 in (21.6 cm) tall, not counting the curled hat tip.
Construction is simple. You work a back panel and a front pocket in rows of single crochet. One border round joins the pocket to the back and edges the whole holder. Then you add the brim, nose, hat tip, pompom and the beard or braids.
Finished Size and Construction
- Finished size (each holder): 4 in x 8.5 in (10.2 cm x 21.6 cm)
- Skill level: Easy / advanced beginner
- Terminology: US
- Yarn weight: Worsted (#4)
- Hook: 4.5 mm (US 7)
- Number of holders: 2 separate holders (not joined to each other)
- Layout: Back panel with a shorter front pocket on the bottom
- Back panel before border: 3.5 in x 8 in (8.9 cm x 20.3 cm)
- Front pocket before border: 3.5 in x 4 in (8.9 cm x 10.2 cm)
- Border depth: 0.25 in (0.6 cm) on every edge
Materials
Use a smooth acrylic or cotton-blend worsted yarn. Firm stitches keep the holder flat, and a smooth yarn makes neat fringe.
- Red: 120 g / about 216 m (both holders)
- White: 30 g / about 54 m (brims, pompoms, beard, braids)
- Light tan: 10 g / about 18 m (noses)
All quantities include a margin of about 20%.
Tools:
– 4.5 mm (US 7) crochet hook
– Tapestry needle
– Small amount of fiberfill
– Stitch markers
– Sharp scissors
– A 7 in (17.8 cm) and a 14 in (35.6 cm) piece of cardboard for cutting fringe
– Rustproof pins
Abbreviations (US Terms)
- ch: chain
- sl st: slip stitch
- sc: single crochet
- sc2tog: single crochet 2 together
- inc: 2 sc in the same stitch
- dc: double crochet
- MR: magic ring
- st(s): stitch(es)
- RS / WS: right side / wrong side
- FO: fasten off
Popcorn (pc): Work 4 dc in the same stitch. Drop the loop from your hook. Insert the hook from front to back into the top of the first dc, pick up the dropped loop and pull it through. The popcorn pops toward you.
Gauge and Checkpoints
Gauge: 16 sc x 18 rows = 4 in (10.2 cm) in sc worked in rows. That works out to 4 sts and 4.5 rows per inch.
Make one complete back panel first and measure it before you go on.
Checkpoints:
– Back panel after Row 27: 3.5 in x 6 in (8.9 cm x 15.2 cm)
– Back panel after Row 36: 3.5 in x 8 in (8.9 cm x 20.3 cm)
– Front pocket after Row 18: 3.5 in x 4 in (8.9 cm x 10.2 cm)
– Brim: 4 in x about 0.9 in (10.2 cm x 2.3 cm)
– Nose: about 1.25 in (3.2 cm) across
– Bordered holder: 4 in x 8.5 in (10.2 cm x 21.6 cm)
If your panel is too big, change to a 4 mm hook. If it is too small, change to a 5 mm hook. Height matters most, because the pocket and back panel must line up row for row. Both pieces use the same row gauge, so they will match if you use the same hook for both.
Back Panel (make 2, red)
Ch 15.
Row 1: Sc in 2nd ch from hook and in each ch across. Ch 1, turn. (14 sc)
Rows 2–27: Sc in each st across. Ch 1, turn. (14 sc)
Checkpoint: 3.5 in x 6 in (8.9 cm x 15.2 cm).
Hat dome shaping:
Row 28: Sc across. (14 sc)
Row 29: Sc2tog, sc in next 10 sts, sc2tog. (12 sc)
Row 30: Sc across. (12 sc)
Row 31: Sc2tog, sc in next 8 sts, sc2tog. (10 sc)
Row 32: Sc across. (10 sc)
Row 33: Sc2tog, sc in next 6 sts, sc2tog. (8 sc)
Row 34: Sc2tog, sc in next 4 sts, sc2tog. (6 sc)
Row 35: Sc2tog, sc in next 2 sts, sc2tog. (4 sc)
Row 36: Sc across. (4 sc) FO.
Checkpoint: 8 in (20.3 cm) tall. The decreases come faster near the top, which rounds the dome.
Front Pocket (make 2, red)
Ch 15.
Row 1: Sc in 2nd ch from hook and in each ch across. Ch 1, turn. (14 sc)
Rows 2–18: Sc in each st across. Ch 1, turn. (14 sc)
FO. Checkpoint: 3.5 in x 4 in (8.9 cm x 10.2 cm).
Brim (make 2, white)
Ch 17.
Row 1: Sc in 2nd ch from hook and in each ch across. Ch 1, turn. (16 sc)
Rows 2–4: Sc across. Ch 1, turn. (16 sc)
FO, leaving a 16 in (40.6 cm) tail for sewing. Checkpoint: 4 in x about 0.9 in (10.2 cm x 2.3 cm).
Nose (make 2, tan)
Rnd 1: 6 sc in MR. (6)
Rnd 2: Inc in each st. (12)
Rnd 3: (Sc, inc) 6 times. (18)
Rnd 4: Sc in each st. (18)
Rnd 4 cups the circle slightly. Sl st to the next st and FO, leaving a long tail. Tuck in a pinch of fiberfill when you sew the nose on.
Hat Tip (make 2, red)
Work in a continuous spiral.
Rnd 1: 4 sc in MR. (4)
Rnd 2: (Sc, inc) twice. (6)
Rnd 3: Sc around. (6)
Rnd 4: (2 sc, inc) twice. (8)
Rnds 5–6: Sc around. (8)
Rnd 7: (3 sc, inc) twice. (10)
Rnds 8–9: Sc around. (10)
FO with a long tail. The tube is about 2 in (5.1 cm) long and about 1.25 in (3.2 cm) wide when flattened.
Popcorn Pompom (make 2, white)
Rnd 1: 6 sc in MR. (6)
Rnd 2: Inc in each st. (12)
Rnd 3: (Sc, pc) 6 times. (12)
Rnd 4: (Pc, sc) 6 times. (12)
Rnd 5: Sc2tog 6 times. (6)
Stuff firmly. Close the hole and FO. The pompom is about 1 in (2.5 cm) across, and the staggered popcorns give it the knobbly texture.
Bows (make 2, red, Mrs. only)
Ch 5.
Row 1: Sc in 2nd ch from hook and across. Ch 1, turn. (4 sc)
Row 2: Sc across. (4 sc)
FO with a 10 in (25.4 cm) tail. Wrap the tail tightly around the center 5 times to pinch the bow. Each bow is about 0.75 in (1.9 cm) wide.
Make All Pieces
For each holder, make:
- Red: 1 back panel, 1 front pocket, 1 hat tip (plus 2 bows for Mrs.)
- White: 1 brim, 1 pompom
- Tan: 1 nose
Totals for the set: 2 back panels, 2 pockets, 2 hat tips, 2 bows, 2 brims, 2 pompoms and 2 noses.
Set them out side by side like this:
[ Mr. Gnome ]   [ Mrs. Gnome ]
  hat + tip       hat + tip
  brim + nose     brim + nose
  beard           2 braids + bows
Joining the Pocket to the Back Panel
Place the back panel RS up. Lay the pocket on top, RS up, with the foundation edges together.
The pieces line up stitch for stitch:
- The 14 pocket foundation sts match the 14 back panel foundation sts.
- The 18 pocket row ends on each side match back panel Rows 1–18.
Pin at each corner and at Row 9 on both sides.
The border round below joins the two layers. Work every stitch in the overlap through both layers. Leave the pocket’s top edge (Row 18) open to hold the cutlery.
Keep your tension even and don’t pull the double-layer stitches tighter than the single-layer ones. If you do, the sides will pucker where the pocket ends.
Checkpoint before the border: 3.5 in (8.9 cm) wide, with the pocket covering the bottom 4 in (10.2 cm).
Border (Joining Round, red)
Border gauge: Work 1 sc in each row end (4.5 per inch) and 1 sc in each stitch along the bottom and top edges.
Hold the RS of the pocket toward you. Join red in the first foundation st at the bottom right corner.
Rnd 1:
– Bottom (through both layers): 3 sc in first st, sc in next 12 sts, 3 sc in last st. (18 sc: 12 plus two corner groups of 3)
– First side: 1 sc in each row end of Rows 1–36. (36 sc) Rows 1–18 go through both layers; Rows 19–36 go through the back panel only.
– Top of dome: 2 sc in first st, sc in next 2 sts, 2 sc in last st. (6 sc)
– Second side: 1 sc in each row end of Rows 36–1. (36 sc) Again, Rows 18–1 go through both layers.
Sl st to the first sc and FO. The round total is 96 sc (18 + 36 + 6 + 36).
Why the math works:
– One sc per sc row end matches the row gauge, so the sides stay flat.
– The 3-sc corner groups turn the square bottom corners.
– The 2-sc increases at the top round off the narrow dome.
– One round of sc adds 0.25 in (0.6 cm) to each edge. That gives 3.5 + 0.5 = 4 in (10.2 cm) wide and 8 + 0.5 = 8.5 in (21.6 cm) tall.
Finishing the Face and Hat
- Brim: Center the brim across the pocket front so that its top edge lines up with the pocket opening and it covers pocket Rows 15–18. Sew all four edges through the pocket only, not the back panel, so the opening stays free.
- Hat tip: Flatten the open end of the tube. Sew it over the top 0.5 in (1.3 cm) of the dome. Bend the tip to the left and tack it in place.
- Pompom: Sew it securely to the end of the hat tip.
- Nose: Center the nose so its upper half overlaps the lower edge of the brim. Add a little fiberfill and sew it around the edge.
Mr. Gnome beard:
– Wrap white yarn around the 7 in (17.8 cm) cardboard and cut to get 88 strands.
– Use 2 strands per latch-hook knot, working through the pocket front only:
– Row 14: 14 knots
– Row 12: center 12 sts
– Row 10: center 10 sts
– Row 8: center 8 sts
– That is 44 knots in total. Brush the strands down and trim them into a rounded U, with the lowest point 0.75 in (1.9 cm) above the bottom edge.
Mrs. Gnome braids:
– Cut 12 strands using the 14 in (35.6 cm) cardboard.
– For each braid, fold 6 strands through st 4 (and through st 11 for the second braid) of pocket Row 14, pulling them through as one knot. This gives 12 ends per braid.
– Divide the ends into 3 groups of 4. Braid for 2 in (5.1 cm) and tie off tightly with red yarn.
– Trim the tassel to 1 in (2.5 cm).
– Sew a bow over each tie. Tack each braid at its midpoint with white yarn.
Final Blocking
- Lightly spray the holder with water. Avoid soaking the fringe.
- Pin it flat to 4 in x 8.5 in (10.2 cm x 21.6 cm) on a blocking mat.
- Straighten the sides so they are parallel and even out the curve of the dome.
- Keep the pocket opening flat. Don’t stretch it.
- Comb the beard or tassels straight and let everything dry completely.
- Unpin it and trim any stray fringe.
Final Quality-Control Checklist
- Each holder measures 4 in x 8.5 in (10.2 cm x 21.6 cm).
- The border round has 96 sc, with no gaps where the pocket ends.
- The pocket opening is free and a fork slides in easily.
- The brim is sewn through the pocket front only.
- The nose overlaps the brim and is centered.
- The hat tip bends to the same side on both holders.
- The pompoms are sewn on firmly.
- The beard is evenly trimmed, and the braids are even in length with secure bows.
- All ends are woven in.
Troubleshooting
- The pocket doesn’t line up with the back: Check that both pieces have 18 rows in the overlap. Rip back or add one row.
- The sides ripple: You worked more than 1 sc per row end. Redo the border round.
- The sides pull in: Your tension tightened through the double layer. Rework more loosely.
- The dome looks pointed: Make sure Row 36 has 4 sts and you worked 2 sc in each top corner.
- The brim closed the pocket: Unpick it and sew it through the front layer only.
- The beard is thin: Add knots in Row 13.
Care
Hand wash in cool water, press out the moisture in a towel and dry flat. Comb the fringe gently once it is dry.
Final Notes
The measurements build in a simple chain. The 14-st panel is 3.5 in (8.9 cm) wide. The 36-row back panel is 8 in (20.3 cm) tall, and the 18-row pocket is 4 in (10.2 cm) deep. One border round adds 0.25 in (0.6 cm) on every edge, for a finished holder of 4 in x 8.5 in (10.2 cm x 21.6 cm). The 16-st brim also measures 4 in (10.2 cm), so it matches the bordered width exactly. If your gauge is right on the first back panel, everything else will fit. Set one at every place and enjoy your gnome-filled table.
Happy crocheting!