

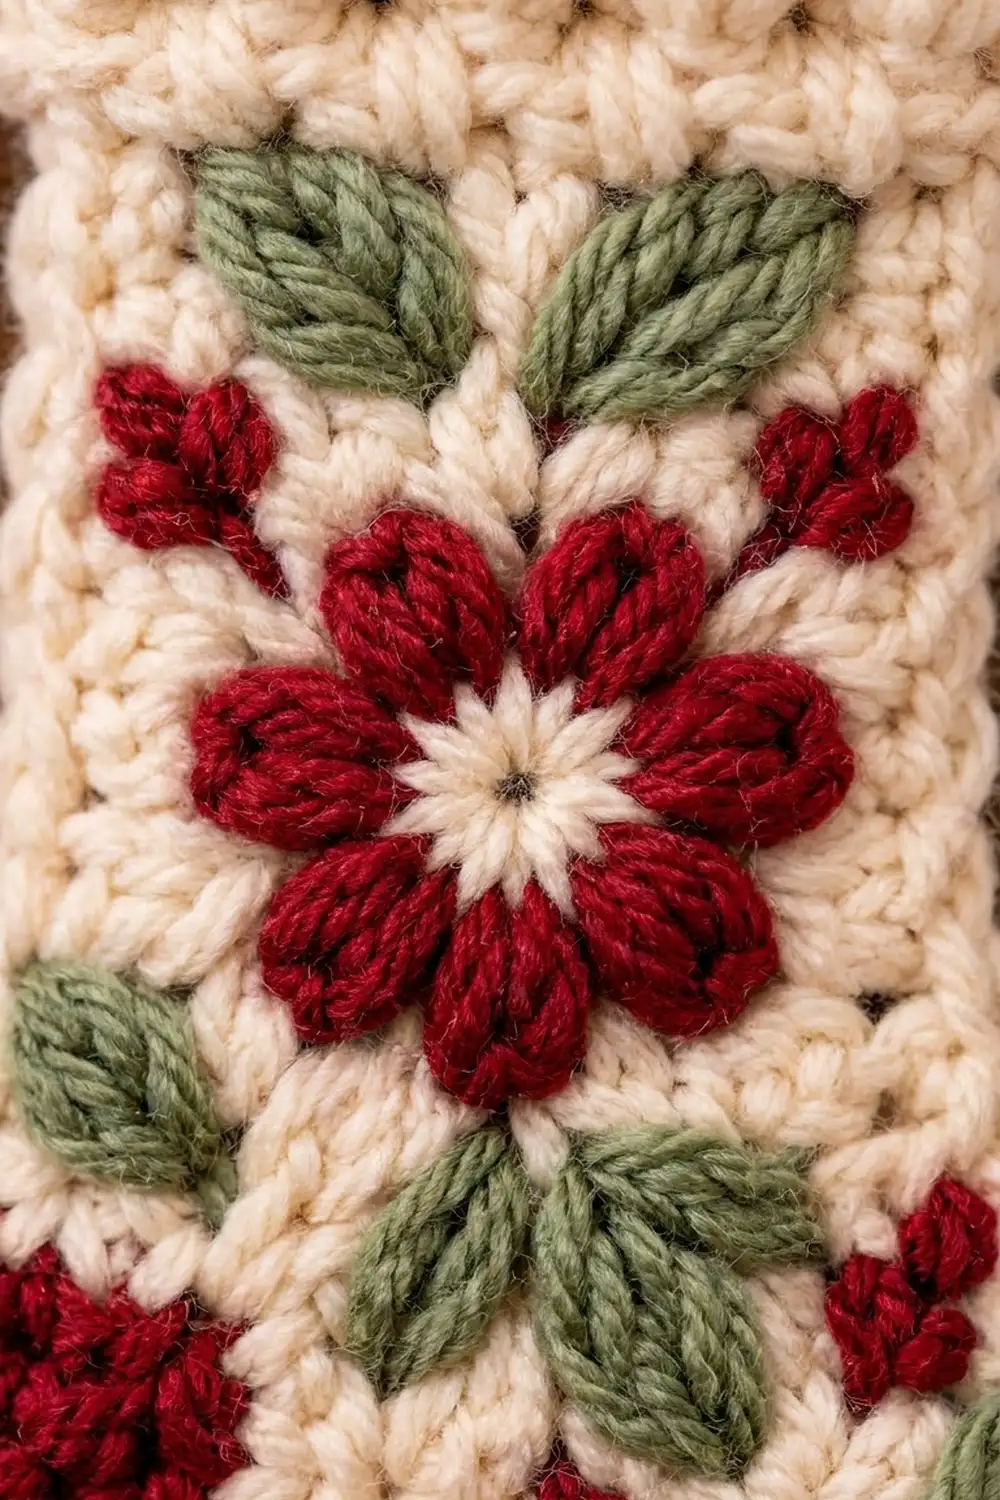
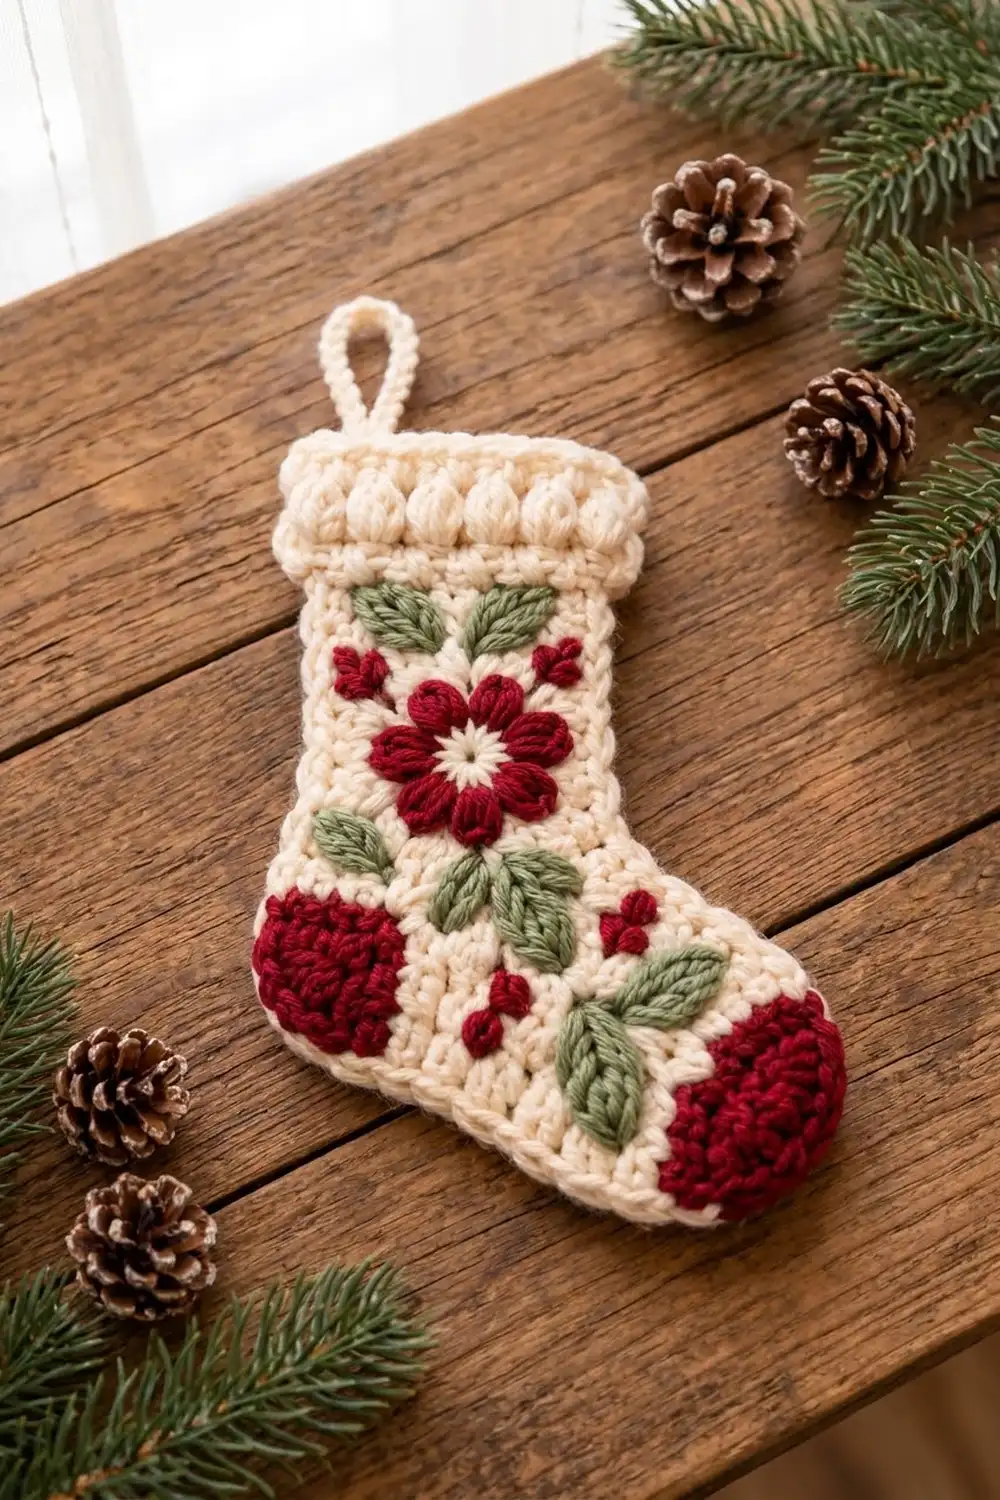
The Holly Bloom Stocking is a small, flat Christmas ornament with a cozy, old-fashioned look. A soft cream stocking has a raised puff-stitch cuff at the top, deep-red heel and toe patches, and a red eight-petal flower surrounded by sage-green leaves and tiny red berries.
The palette uses three colors: cream, deep red and sage green. The style is cottage-Christmas, a little like embroidered folk textiles, with a clear cream outline holding everything together.
This pattern uses US crochet terms. The finished ornament measures about 4.2 in (10.7 cm) wide across the foot and 5.6 in (14.2 cm) tall, not counting the hanging loop.
You work the body flat in single crochet rows, shaping the foot and heel with increases and decreases. The puff-stitch cuff is worked straight onto the top of the leg. One round of single crochet outlines the whole shape. Then you sew on the heel, toe, flower and leaves, embroider the berries, and add the loop.
Finished Size and Construction
- Finished size: 4.2 in (10.7 cm) wide x 5.6 in (14.2 cm) tall, plus a 1.5 in (3.8 cm) loop
- Skill level: Advanced beginner
- Terminology: US crochet terms
- Yarn weight: Worsted (#4)
- Hook: 4.0 mm (G-6)
- Number of pieces: 1 ornament (one stocking body plus small sewn-on appliqués)
- Layout: Single stocking, toe pointing right when the right side faces you
- Piece size before border: 3.8 in (9.7 cm) wide x 5.2 in (13.2 cm) tall
- Leg width before border: 2.2 in (5.6 cm)
- Border depth: 0.2 in (0.5 cm), one round of sc
Materials
Yarn: Use a smooth worsted-weight acrylic or cotton blend so the stitches show clearly. Fuzzy yarns blur the puff stitches and the petal shapes.
- Cream: 12 g / 23 m (body, cuff, border, flower center, loop)
- Deep red: 5 g / 10 m (heel, toe, flower petals, berries)
- Sage green: 4 g / 8 m (leaves)
These quantities include a margin for a gauge swatch and weaving in ends.
Tools:
– 4.0 mm (G-6) crochet hook
– Tapestry needle
– 4 locking stitch markers
– Scissors
– Measuring tape or ruler
– Pins for placing appliqués
– Spray bottle and a foam blocking mat
Abbreviations (US Terms)
- ch – chain
- sl st – slip stitch
- sc – single crochet
- hdc – half double crochet
- dc – double crochet
- sc2tog – single crochet 2 together
- st(s) – stitch(es)
- RS / WS – right side / wrong side
- MR – magic ring
Special stitch – Puff stitch (puff): Yarn over, insert the hook in the stitch, yarn over and pull up a loop to the height of an hdc. Repeat 2 more times in the same stitch (7 loops on hook). Yarn over and pull through all 7 loops. Work puffs on WS rows so they pop out on the RS.
Gauge and Checkpoints
Gauge: 9 sc and 10 rows = 2 in (5.1 cm), which equals 18 sc and 20 rows = 4 in (10.2 cm).
You don’t need a separate swatch. Work the body through Row 7 and measure there; the foot is your test piece.
- After Row 7: foot measures 3.8 in (9.7 cm) wide and 1.4 in (3.6 cm) tall.
- After Row 20: body measures 4.0 in (10.2 cm) tall, and the leg is 2.2 in (5.6 cm) wide.
- After Row 25: body measures 5.2 in (13.2 cm) tall, and the cuff is 2.7 in (6.9 cm) wide.
- After the border: 4.2 in (10.7 cm) wide x 5.6 in (14.2 cm) tall.
If your foot is too wide (over 4.0 in / 10.2 cm), go down to a 3.75 mm hook. If it’s too narrow (under 3.6 in / 9.1 cm), go up to a 4.5 mm hook. Change the hook, not the stitch counts. All the shaping depends on these exact counts.
Stocking Body
With cream, work in rows. Ch 1 at the start of each row does not count as a stitch.
Direction: Row 1 is a RS row worked from the toe end toward the heel end. That puts the toe on the right when the RS faces you. Odd rows run toe to heel, and even rows run heel to toe.
Foot
Row 1 (RS): Ch 14. Sc in 2nd ch from hook and in each ch across. Turn. (13 sc)
Row 2 (WS): Ch 1, 2 sc in first st, sc in next 11 sts, 2 sc in last st. Turn. (15 sc)
Row 3: Ch 1, 2 sc in first st, sc in next 13 sts, 2 sc in last st. Turn. (17 sc)
Rows 4–7: Ch 1, sc in each st across. Turn. (17 sc each row)
Checkpoint: 3.8 in (9.7 cm) wide x 1.4 in (3.6 cm) tall. The bottom corners should be gently rounded.
Heel and Instep Shaping
Row 8 (WS, heel to toe): Ch 1, sc2tog, sc in next 13 sts, sc2tog. Turn. (15 sts)
Row 9 (RS, toe to heel): Ch 1, sc2tog, sc in next 13 sts. Turn. (14 sts)
Row 10 (WS, heel to toe): Ch 1, sc in next 10 sts, sc2tog. Turn, leaving the last 2 sts unworked. (11 sts)
Place a marker in the first of those 2 unworked sts. They form the top of the toe, and you’ll work into them during the border.
Row 11 (RS, toe to heel): Ch 1, sc2tog, sc in next 9 sts. Turn. (10 sts)
The foot now steps down to the toe on the right, and the heel edge curves in slightly on the left.
Leg
Rows 12–20: Ch 1, sc in each st across. Turn. (10 sc each row)
Checkpoint: body is 4.0 in (10.2 cm) tall, and the leg is 2.2 in (5.6 cm) wide.
Puff-Stitch Cuff
Row 21 (RS): Ch 1, 2 sc in first st, sc in next 8 sts, 2 sc in last st. Turn. (12 sc)
The cuff is now one stitch wider than the leg on each side, so it overhangs slightly, just like the photo.
Row 22 (WS, puff row): Ch 1, sc in first st, puff in next st, sc in next st; repeat from * 4 more times, sc in last st. Turn. (12 sts: 5 puffs + 7 sc)
Row 23 (RS): Ch 1, sc in each st across, working the top of each puff as one st. Turn. (12 sc)
Row 24 (WS, puff row): Ch 1, sc in first 2 sts, puff in next st, sc in next st; repeat from * 3 more times, sc in last 2 sts. Turn. (12 sts: 4 puffs + 8 sc)
The Row 24 puffs fall on sts 3, 5, 7 and 9, between the Row 22 puffs on sts 2, 4, 6, 8 and 10. That staggers the two rows of bobbles.
Row 25 (RS): Ch 1, sc in each st across. Do not fasten off. (12 sc)
Checkpoint: body is 5.2 in (13.2 cm) tall, and the cuff is 2.7 in (6.9 cm) wide.
Border
Border gauge: 1 sc per stitch along the top and bottom, and 1 sc per row end along the sides. A sc row is 0.2 in (0.5 cm) tall, slightly shorter than a sc is wide, so 1 sc per row end sits flat without ruffling. The border adds 0.2 in (0.5 cm) to each edge.
Border Round (RS): Continue with cream from the end of Row 25. Ch 1, turn the work so the RS faces you, and go around counterclockwise:
- Top edge: 3 sc in the first st (top-right corner), sc in next 10 sts, 3 sc in last st (top-left corner). (16 sc)
- Heel side (left edge): Working down, 1 sc in each row end of Rows 24 to 1. (24 sc)
- Sole (bottom edge): Working in the free loops of the foundation chain, 2 sc in first loop, sc in next 11 loops, 2 sc in last loop. (15 sc)
- Toe side, lower: Working up, 1 sc in each row end of Rows 1 to 9. (9 sc)
- Toe top: Sc in each of the 2 marked unworked sts of Row 9. (2 sc)
- Front leg edge: 1 sc in each row end of Rows 10 to 24. (15 sc)
Join with a sl st to the first sc. (81 sc total)
Why the math works: 16 + 24 + 15 + 9 + 2 + 15 = 81.
- The top uses all 12 sts of Row 25, plus 2 extra sts in each corner: 12 + 4 = 16.
- The sole uses all 13 foundation loops, plus 1 extra st at each end: 13 + 2 = 15.
- The sides use one sc per row. Row 25 isn’t counted on the sides because its end stitches are the top corners.
Fasten off and weave in the ends.
Hanging Loop
Count the 16 top-edge border sc and find the 8th and 9th (the center two). Join cream with a sl st in the 8th sc. Ch 16, then sl st in the 9th sc. Fasten off and weave the ends into the cuff. The loop hangs about 1.5 in (3.8 cm).
Heel and Toe Patches
Both patches are red half circles worked in rows from a magic ring. Ch 1 does not count as a stitch.
Heel Patch (smaller)
Row 1: With red, MR, ch 1, 5 sc in ring, pull the ring closed. Turn. (5 sc)
Row 2: Ch 1, 2 sc in each st. Turn. (10 sc)
Row 3: Ch 1, sc in next st, 2 sc in next st; repeat 4 more times. (15 sc)
Fasten off and leave a 12 in (30.5 cm) tail. The patch measures about 1.3 in (3.3 cm) across the straight edge.
Toe Patch (larger)
Work Rows 1–3 as for the heel, then:
Row 4: Ch 1, sc in next 2 sts, 2 sc in next st; repeat 4 more times. (20 sc)
Fasten off and leave a 12 in (30.5 cm) tail. The patch measures about 1.7 in (4.3 cm) across the straight edge.
Placing the Patches
Pin the toe patch so its curve fits into the rounded toe, right against the inside edge of the border round. Its straight edge runs roughly vertically, facing the heel.
Pin the heel patch into the bottom-left corner with its curve following the heel and its straight edge angled up toward the center of the foot.
Whipstitch around each curve through the back loops of the patch. Work small running stitches along each straight edge. The cream border should stay fully visible as an outline.
Flower
Rnd 1: With cream, MR, ch 1, 8 sc in ring. Join with a sl st to the first sc. Fasten off cream. (8 sc)
Rnd 2: Join red in any st. Ch 1, 2 sc in each st around. Join. (16 sc)
Rnd 3: (Hdc, dc, dc, hdc) in next st, sl st in next st; repeat 7 more times. Join to the first hdc. (40 sts: 8 petals of 4 sts each + 8 sl sts)
Fasten off and leave a 12 in (30.5 cm) tail. The flower measures about 1.4 in (3.6 cm) across.
Optional: with cream, sew 8 short straight stitches from the center out onto each petal to make the small light rays seen in the photo.
Leaves (make 7)
With green, ch 6.
Side 1: Starting in 2nd ch from hook: sc, hdc, dc, hdc, sc. (5 sts)
Tip: Ch 1.
Side 2: Rotate and work in the free loops of the same chain: sc, hdc, dc, hdc, sc. Sl st into the first sc of Side 1. (10 sts + ch-1 tip)
Fasten off and leave an 8 in (20.3 cm) tail. Each leaf is about 0.9 in (2.3 cm) long, with the chain spine forming a center vein.
Assembly
Place the flower centered on the leg, with its top about 0.5 in (1.3 cm) below the cuff. Arrange the leaves:
- 2 leaves in a V above the flower, tips pointing up and out
- 1 leaf on each side below the flower, tips angled down and out
- 1 leaf below the flower, centered on the foot, pointing down
- 2 leaves near the toe patch, fanning toward the toe
Pin everything first and check from about 6 in (15.2 cm) away. Then sew each leaf down along its center spine, and tack down the tips. Sew the flower around Rnd 2 so the petals stay raised.
Berries
With red, embroider French knots, wrapping the yarn 3 times around the needle for each one. Work 10 knots in small clusters:
- 2 knots beside each upper leaf (4 total)
- 3 knots below the flower, between the lower leaves
- 3 knots on the foot, between the heel patch and the center leaf
Weave all ends into the back of the body.
Final Blocking
- Lay the ornament RS up on the blocking mat.
- Mist it lightly until it’s damp, not soaked.
- Shape it to 4.2 in (10.7 cm) wide across the foot and 5.6 in (14.2 cm) tall.
- Pin the straight leg edges parallel, about 2.6 in (6.6 cm) apart including the border.
- Use your fingers to round the heel and toe curves smoothly.
- Don’t pin or press the puff stitches or petals. Lift them gently so they stay raised.
- Let it dry completely before you unpin it.
Final Quality-Control Checklist
- Foot measures 4.2 in (10.7 cm) wide, and total height is 5.6 in (14.2 cm).
- The border round has 81 sc and lies flat with no ruffles.
- The cuff shows 5 puffs in the upper row and 4 in the lower, staggered.
- The cream outline is visible around both red patches.
- The flower has 8 even petals and a cream center.
- All 7 leaves and 10 berries are secure.
- The loop is centered and firmly anchored.
- No yarn ends show on the front.
Troubleshooting
The foot slants or looks lopsided: Check the direction of Rows 8–11. The heel-side decrease in Row 9 is skipped on purpose.
The cuff flares too much: Pull each puff’s loops to hdc height only. Taller puffs push the edges outward.
The puffs appear on the back: Work puffs only on WS rows (Rows 22 and 24).
The border ruffles along the sides: You may have doubled up in some row ends. Work exactly 1 sc per row end.
The border pulls in at the toe step: Make sure you worked into both marked unworked sts.
The petals cup upward: Block the flower flat before sewing it on, or loosen Rnd 3 a little.
Patches cover the outline: Unpin and move them inward 0.1 in (0.3 cm).
Care
Spot clean with cool water and mild soap, then lay flat to dry. Store the ornament flat in tissue paper so the puffs and petals keep their shape.
Final Notes
The whole ornament follows one measurement chain:
- The 3.8 in (9.7 cm) foot at Row 7 confirms your gauge.
- That leads to a 4.0 in (10.2 cm) body at Row 20.
- The cuff brings it to 5.2 in (13.2 cm) at Row 25.
- The 81-stitch border brings it to 4.2 x 5.6 in (10.7 x 14.2 cm).
- The heel, toe, flower, leaves and berries are added last, inside the cream outline.
If you check at each stage, your stocking will hang straight and match the photo.
Happy crocheting!