

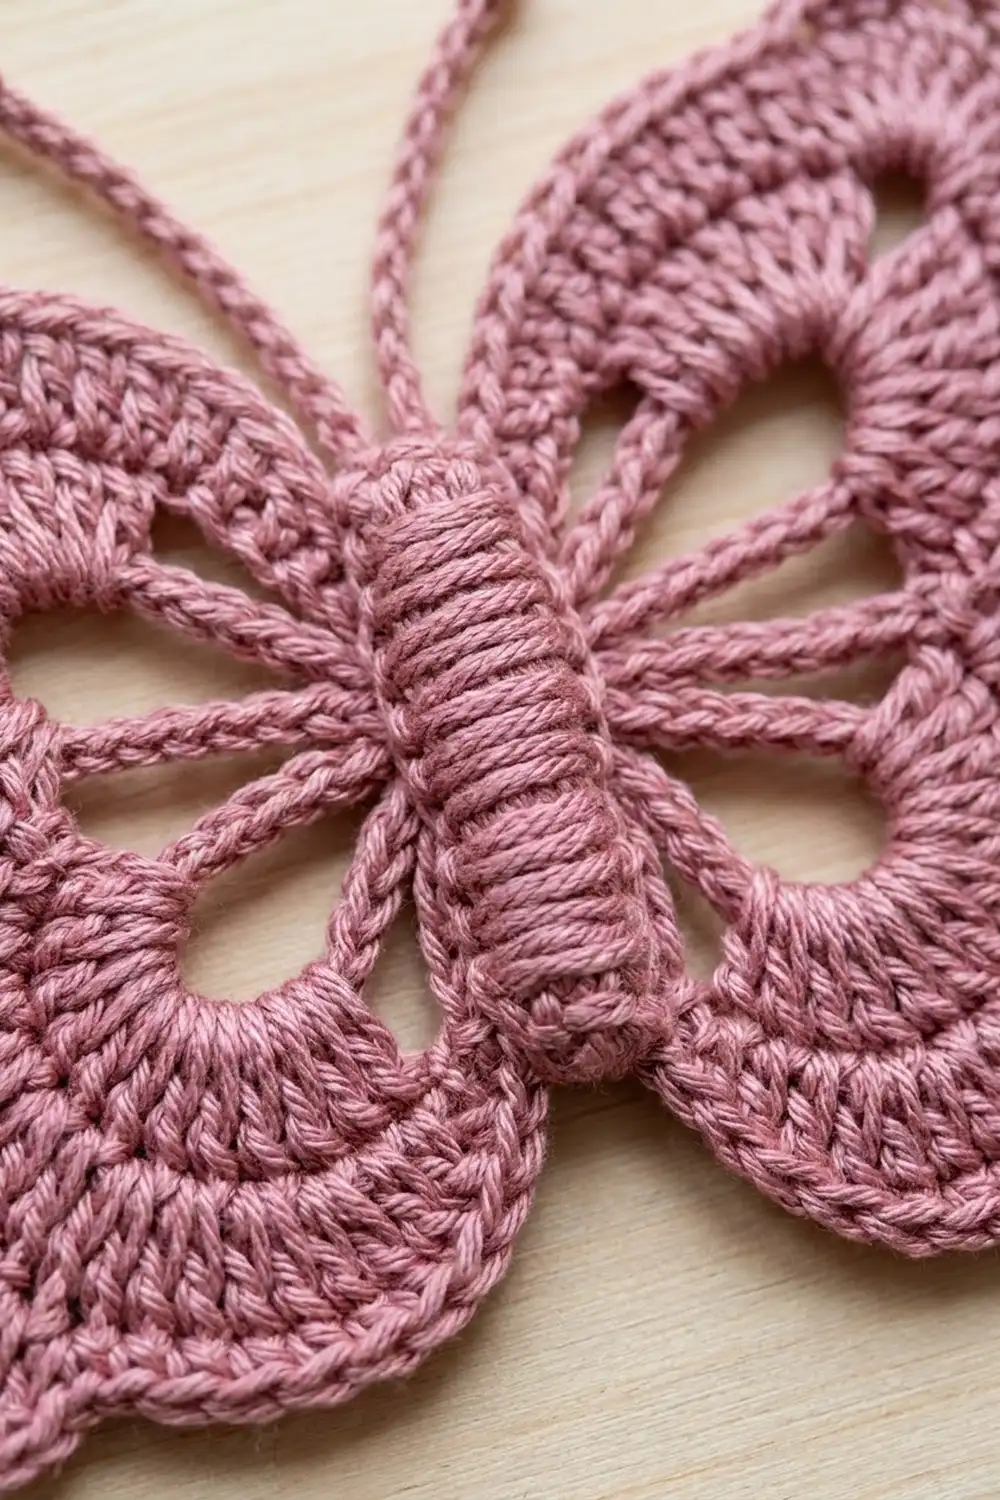
This butterfly is a small, airy appliqué in one soft dusty rose. Each of its four wings is an open chain loop with a solid band of fanned stitches along the outer curve, so every wing reads as a lacy window framed by crisp texture. A raised, ridged body runs down the center, and two chain-cord antennae end in tiny knotted tips.
The style is light and romantic. Use it as an appliqué on a bag, card, or cushion, or hang it on a thin thread as an ornament. Mercerized cotton thread gives the stitches a clear, slightly glossy finish that shows off the fan shaping.
The pattern uses US crochet terms. The finished butterfly measures about 4½ in (11.4 cm) wide and 3¾ in (9.5 cm) tall across the wings. Measured from the lower wing tip to the antenna tip, it is about 4¼ in (10.8 cm) tall.
You start with a small center ring. For each wing, you chain a loop and work three short rows back and forth before moving on to the next loop. The body is a separate little tube that you sew over the ring, and then you add the antennae. The result is one finished motif.
Finished Size and Construction
- Finished size: 4½ in (11.4 cm) wide x 3¾ in (9.5 cm) tall across the wings; 4¼ in (10.8 cm) tall including antennae
- Skill level: Easy-intermediate
- Terminology: US crochet terms
- Yarn weight: Size 3 mercerized cotton crochet thread (or a light fingering cotton)
- Hook: 2.0 mm
- Number of pieces: 1 finished motif (a wing unit plus a body sewn on during assembly)
- Layout: 4 wings around a center ring: upper right, lower right, lower left, upper left
- Piece size: upper wing about 2⅛ in (5.4 cm) from ring to tip; lower wing about 1⅝ in (4.1 cm)
- Size before border: about 4¼ in (10.8 cm) wide x 3½ in (8.9 cm) tall
- Border depth: 1 row of sc edging, about ⅛ in (0.3 cm)
Materials
Choose a smooth, tightly plied mercerized cotton. Fuzzy or loosely spun yarn blurs the open windows and the ridged body. A medium dusty rose with a little warmth matches this look, but any solid color works.
- Dusty rose: 12 g, about 30 m (33 yd)
This amount includes a generous margin for swatching and weaving in ends. One butterfly uses about half of it.
Tools:
- 2.0 mm crochet hook
- Tapestry needle that fits your thread
- Small scissors
- Rustproof pins and a foam blocking mat
- Spray bottle with water; optional light spray starch
- A pinch of fiberfill or thread scraps for the body
- Optional: fine matching thread for hanging
Abbreviations (US Terms)
- ch – chain
- sl st – slip stitch
- sc – single crochet
- hdc – half double crochet
- dc – double crochet
- sc2tog – single crochet 2 together
- BLO – back loop only
- MR – magic ring
- st(s) – stitch(es)
Special stitch – Knob (3-dc cluster): [Yarn over, insert hook in indicated st, pull up a loop, yarn over and pull through 2 loops] 3 times in the same st, then yarn over and pull through all 4 loops on hook.
Gauge and Checkpoints
Gauge: 8 sc = 1 in (2.5 cm); 9 ch = 1 in (2.5 cm); 1 row of dc is about ¼ in (0.6 cm) tall.
Test one piece first. Make the center ring and one lower wing, then measure before you continue.
Checkpoints:
- Center ring after 12 sc: about ½ in (1.3 cm) across
- Lower wing chain loop, laid flat as a teardrop: about 1 in (2.5 cm) from ring to tip
- Lower wing after Row A: 1¼ in (3.2 cm); after Row B: 1½ in (3.8 cm); after Row C: 1⅝ in (4.1 cm)
- Upper wing chain loop: about 1⅜ in (3.5 cm); after Row A: 1¾ in (4.4 cm); after Row B: 2 in (5.1 cm); after Row C: 2⅛ in (5.4 cm)
- Body: about 1⅝ in (4.1 cm) long and ½ in (1.3 cm) wide when flattened
If your sample is too big, switch to a 1.75 mm hook. If it is too small, switch to a 2.25 mm hook. If only the chain loop is off, change your chain tension and keep the same hook. A tight loop puckers the wing and closes up the window.
Center Ring
Ch 6, sl st in first ch to form a ring.
Rnd 1: Ch 1, 12 sc into the ring, sl st in first sc to join. (12 sts)
Count the sc as 1 to 12 around the ring. Each wing is anchored over 3 sc:
- sc 1–3: upper right wing
- sc 4–6: lower right wing
- sc 7–9: lower left wing
- sc 10–12: upper left wing
The body will cover the gaps at sc 12/1 (head end) and sc 6/7 (tail end).
Do not fasten off. All four wings are worked continuously from this ring.
Upper Right Wing
Your hook is at sc 1.
Loop: Ch 28, sl st in sc 3. (28 ch loop)
Keep the chain untwisted. This loop becomes the inner outline of the wing window.
Row A (base row, worked into the loop chains): Ch 1, sc in first 3 ch, hdc in next 3 ch, [dc in next ch, 2 dc in next ch] 8 times, hdc in next 3 ch, sc in last 3 ch, sl st in sc 1 of ring. (36 sts: 3 sc + 3 hdc + 24 dc + 3 hdc + 3 sc)
Check: 3 + 3 + 16 + 3 + 3 = 28 chains used. The 8 increases flare the outer curve so the wing lies flat.
Row B (fan band): Turn. Sl st in first 3 sc, sc in next 3 hdc, [dc in next 2 dc, 2 dc in next dc] 8 times, sc in next 3 hdc, sl st in last 3 sc, sl st in sc 3 of ring. (44 sts: 3 sl st + 3 sc + 32 dc + 3 sc + 3 sl st)
Check: 3 + 3 + 24 + 3 + 3 = 36 sts used, which matches Row A. The sl sts and sc keep the edge slim near the body, and the dc build the wide outer band.
Now work Row C (the upper right edging) from the Border section, then continue with the next wing.
Lower Right Wing
Travel: Sl st in BLO of sc 2 and sc 3, then sl st in sc 4.
Loop: Ch 20, sl st in sc 6. (20 ch loop)
Row A: Ch 1, sc in first 3 ch, hdc in next 2 ch, [dc in next ch, 2 dc in next ch] 5 times, hdc in next 2 ch, sc in last 3 ch, sl st in sc 4 of ring. (25 sts: 3 sc + 2 hdc + 15 dc + 2 hdc + 3 sc)
Check: 3 + 2 + 10 + 2 + 3 = 20 chains used.
Row B: Turn. Sl st in first 3 sc, sc in next 2 hdc, [dc in next 2 dc, 2 dc in next dc] 5 times, sc in next 2 hdc, sl st in last 3 sc, sl st in sc 6 of ring. (30 sts: 3 sl st + 2 sc + 20 dc + 2 sc + 3 sl st)
Check: 3 + 2 + 15 + 2 + 3 = 25 sts used.
Work Row C (lower wing edging) from the Border section.
Lower Left Wing
Travel: Sl st in BLO of sc 5 and sc 6, then sl st in sc 7.
Loop: Ch 20, sl st in sc 9.
Work Rows A and B as for the lower right wing. End Row A with a sl st in sc 7 and Row B with a sl st in sc 9. (Row A: 25 sts; Row B: 30 sts)
Work Row C (lower wing edging).
Upper Left Wing
Travel: Sl st in BLO of sc 8 and sc 9, then sl st in sc 10.
Loop: Ch 28, sl st in sc 12.
Work Rows A and B as for the upper right wing. End Row A with a sl st in sc 10 and Row B with a sl st in sc 12. (Row A: 36 sts; Row B: 44 sts)
Work Row C (upper left edging), then fasten off and leave a 6 in (15.2 cm) tail.
Where each upper wing meets the lower wing next to it, the two chain edges lie side by side. Together they form the chain bar that separates the upper and lower windows.
Body
Work the body in a spiral. Do not join rounds; mark the first st of each round.
Rnd 1: 6 sc in MR. (6)
Rnd 2: [Sc in next st, 2 sc in next st] 3 times. (9)
Rnd 3: Sc in each st around. (9)
Rnd 4: [Sc in next st, sc2tog] 3 times. (6) This makes the small neck.
Rnd 5: [Sc in next st, 2 sc in next st] 3 times. (9)
Rnds 6–12: Working in BLO, sc in each st around. (9 per round) The unused front loops form the horizontal ridges that make the body look segmented.
Lightly stuff the head and upper body.
Rnd 13: [Sc in next st, sc2tog] 3 times. (6)
Rnd 14: Sc in each st around. (6)
Rnd 15: Sc2tog 3 times. (3)
Fasten off and leave a 12 in (30.5 cm) tail. Close the tip and flatten the body slightly.
Antennae
Join the thread with a sl st at the top of the head, just right of center.
Right antenna: Ch 15, work a Knob in 2nd ch from hook, sl st in each of next 13 ch, sl st in the head. (1 Knob + 13 sl st)
Check: 1 skipped ch + 1 Knob ch + 13 sl st = 15 ch.
Sl st into the next st to the left on the head.
Left antenna: Repeat the right antenna. Fasten off.
Each antenna is about 1½ in (3.8 cm) long, including the knob.
Assembly: Attaching the Body
Lay the wing unit right side up. Place the body over the center ring with the head at the sc 12/1 gap and the tail at the sc 6/7 gap. The head should sit about ⅜ in (1.0 cm) below the top line of the upper wings, and the tail should extend about ½ in (1.3 cm) below the ring.
Use the long tail to whipstitch the underside of the body to the ring and to the inner sl sts of each wing. Keep the stitches small and hide them under the ridges. Angle the antennae up and out in a gentle V.
Border (Row C Edging)
Border gauge: 8 sc = 1 in (2.5 cm). Work Row C into Row B of each wing as you go. It adds about ⅛ in (0.3 cm) to the outer edge.
Upper right wing, Row C: Turn. Sl st in first 3 sl sts, sc in next 3 sc, sc in next 21 dc, 3 sc in next dc (wing tip), sc in next 10 dc, sc in next 3 sc, sl st in last 3 sl sts, sl st in sc 1 of ring. (46 sts: 3 sl st + 3 sc + 21 sc + 3 sc + 10 sc + 3 sc + 3 sl st)
Upper left wing, Row C: Turn. Sl st in first 3 sl sts, sc in next 3 sc, sc in next 10 dc, 3 sc in next dc (wing tip), sc in next 21 dc, sc in next 3 sc, sl st in last 3 sl sts, sl st in sc 10 of ring. (46 sts)
The tip comes in the opposite order on the left wing. That way both tips sit 10 dc from the head end, and the two wings mirror each other.
Each lower wing, Row C: Turn. Sl st in first 3 sl sts, sc in next 2 sc, sc in next 4 dc, 2 sc in next dc, sc in next 9 dc, 2 sc in next dc, sc in next 5 dc, sc in next 2 sc, sl st in last 3 sl sts, sl st in that wing’s first anchor sc (sc 4 or sc 7). (32 sts: 3 sl st + 2 sc + 4 sc + 2 sc + 9 sc + 2 sc + 5 sc + 2 sc + 3 sl st)
Why the math works: Row C has 1 stitch in each existing stitch, plus a few extras.
- Upper wing: 44 worked 1-per-stitch + 2 extra at the tip = 46.
- Lower wing: 30 worked 1-per-stitch + 2 extra (one at each increase) = 32.
Rows A and B already hold the main fan increases (8 per row on the upper wings, 5 per row on the lower wings). The edging only needs a few extras to round the curve without ruffling. The 3-sc tip gives each upper wing its slightly pointed outer corner.
Final Blocking
- Weave in all ends along the back of the stitches, never across the open windows.
- Mist the butterfly until it is damp but not dripping.
- Lay it right side up on the blocking mat.
- Pin the body straight first. Then pin the upper wing tips so the full width is 4½ in (11.4 cm).
- Pin the lower wing curves so the wing height is 3¾ in (9.5 cm).
- Open each window with your fingers and pin the chain loop into a smooth teardrop.
- Shape the antennae into a V and pin the knobs.
- For a crisp ornament, add a light mist of spray starch.
- Let it dry completely, at least 6 hours, before you remove the pins.
Final Quality-Control Checklist
- Center ring has 12 sc, with 3 sc under each wing.
- Upper wings: 28 ch loop, Row A 36 sts, Row B 44 sts, Row C 46 sts.
- Lower wings: 20 ch loop, Row A 25 sts, Row B 30 sts, Row C 32 sts.
- Both upper wing tips point up and out, mirrored.
- All four windows are open and evenly shaped.
- Body has 15 rounds, with ridges on Rnds 6–12.
- Each antenna has 13 sl sts and a knob.
- Finished size is about 4½ in (11.4 cm) x 3¾ in (9.5 cm).
Troubleshooting
Wing cups or curls inward: Increases are missing. Recount. Row B should have 44 sts on an upper wing and 30 on a lower wing.
Wing ruffles: The dc rows are too loose, or the edging has extra increases. Use a hook one size smaller for Rows A and B.
Window is too small: The chain loop is too tight. Chain it again more loosely, or use a hook one size larger for the chain only.
Upper tips point the wrong way: The tip is in the wrong place. On the right wing, work 21 sc before the tip. On the left wing, work 10.
Body looks lumpy: It has too much stuffing. Take some out, or use thread scraps only.
Antennae flop: Work the sl sts more tightly, or stiffen the antennae with starch.
Care
Hand wash in cool water with mild soap. Roll in a towel to press out the water, then dry flat and re-block or re-starch as needed.

Final Notes
Here is the full measurement chain:
- A 12-sc ring about ½ in (1.3 cm) across
- Chain loops of 28 (upper) and 20 (lower)
- Upper wings growing from 36 to 44 to 46 sts
- Lower wings growing from 25 to 30 to 32 sts
- A ⅛ in (0.3 cm) edging that brings the motif to 4½ in (11.4 cm) x 3¾ in (9.5 cm)
If your first lower wing matches its checkpoints, the rest of the butterfly will fall into place.
To hang the butterfly, pass fine thread through the top of the body between the antennae and tie a loop. Several hung at different heights make a soft, floating display.
Happy crocheting!