

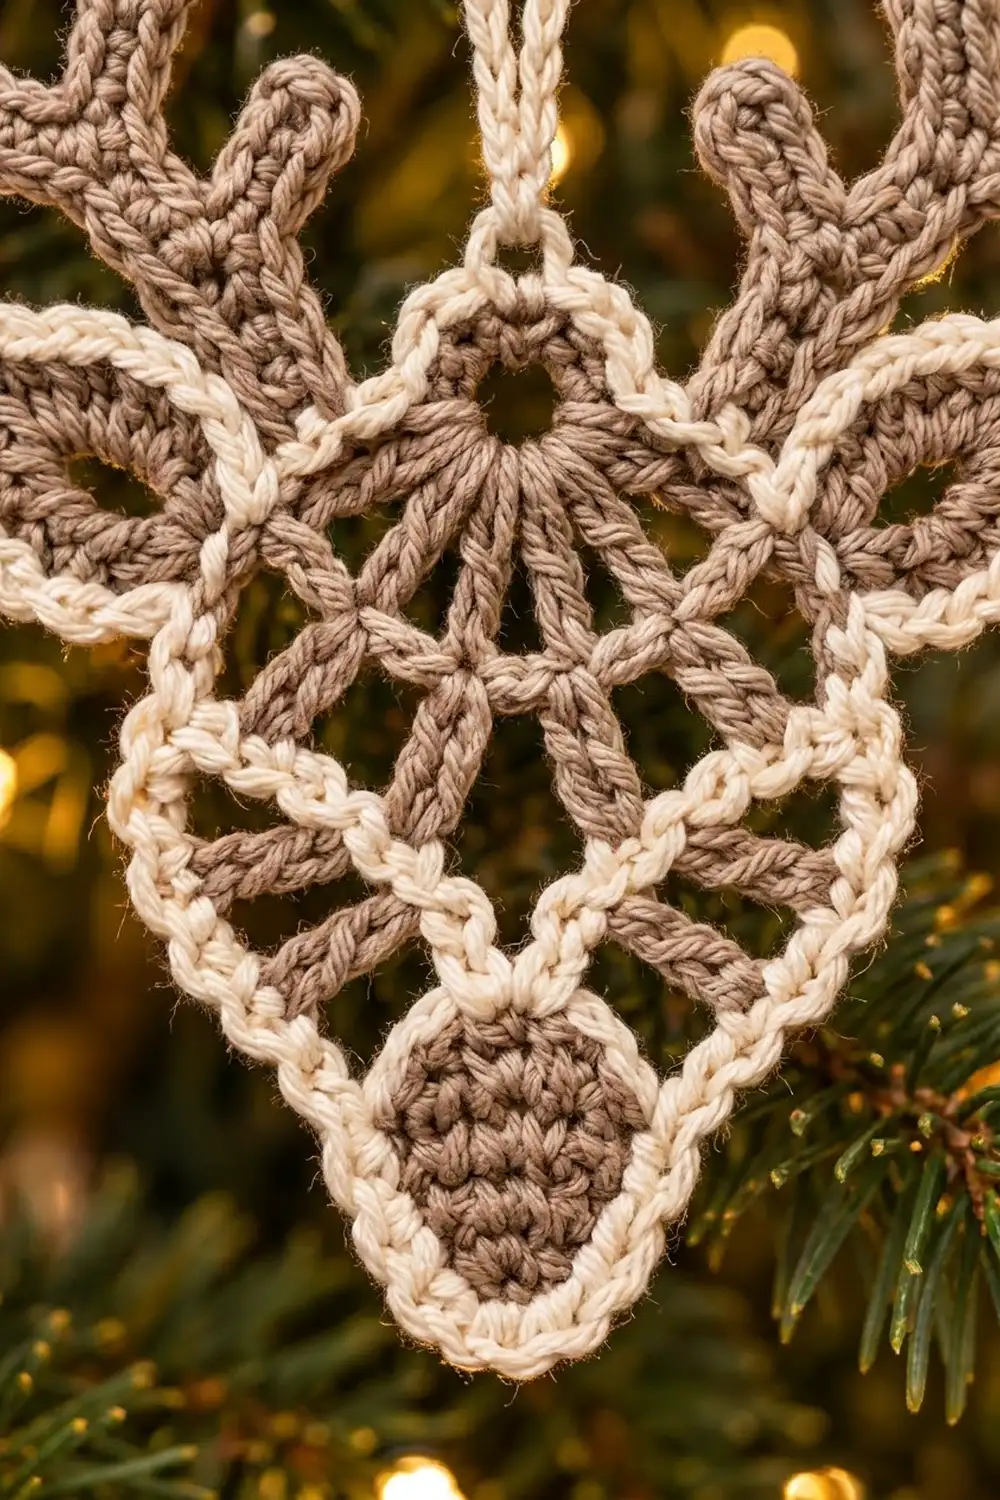
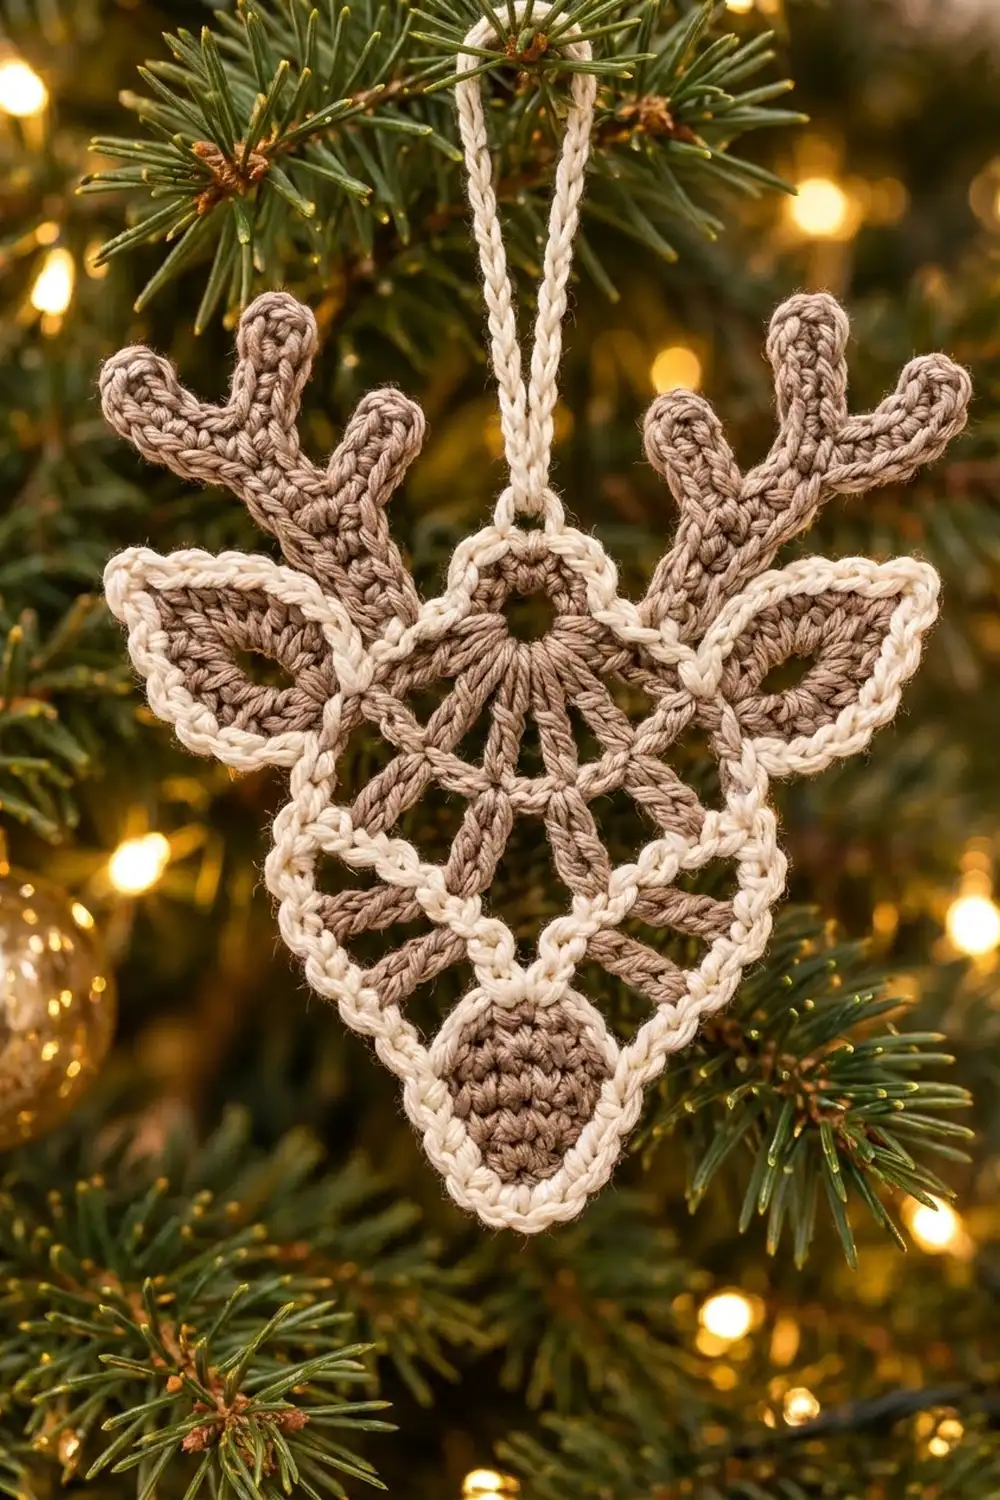
This little reindeer head is one lacy ornament made to hang on a tree branch. The face is a shield-shaped lace motif. Spokes radiate out from a small open ring near the top, and a solid oval nose sits at the bottom point. Leaf-shaped ears stick out from the upper sides, and two branched antlers rise from the top.
The palette is just two soft neutrals: warm taupe for the lace, ears, nose and antlers, and creamy ivory for the corded border, the ear edging and the hanging loop. It’s quiet and rustic, and it looks good against green branches and warm lights.
This pattern uses US crochet terms. The finished ornament measures about 4.5 in (11.4 cm) wide from ear tip to ear tip and 5 in (12.7 cm) tall from the nose to the antler tips, not counting the loop. The bordered head on its own is 3.5 in (8.9 cm) tall and 3.25 in (8.3 cm) wide.
You’ll crochet the head in the round from the center ring, shaping it into a point with stitches of increasing height. Then you make a small nose, two ears and two antlers. The ears are joined while you work the cream border. The nose and antlers are sewn on at the end, followed by blocking.
Finished Size and Construction
- Finished size: 4.5 in (11.4 cm) wide x 5 in (12.7 cm) tall, plus a 2 in (5.1 cm) loop
- Skill level: Intermediate
- Terminology: US crochet terms
- Yarn weight: Sport-weight (2) cotton
- Hook: 2.75 mm (US C-2)
- Number of pieces: 1 ornament, assembled from a head motif, 1 nose, 2 ears and 2 antlers
- Layout: Single motif, no grid
- Head size (bordered): 3.5 in (8.9 cm) tall x 3.25 in (8.3 cm) wide
- Head size before border: 3 in (7.6 cm) tall x 2.75 in (7.0 cm) wide
- Border depth: 0.25 in (0.6 cm) on every edge
Materials
Use a smooth, mercerized sport-weight cotton. Cotton holds the open spokes crisply, keeps the border corded and firm, and takes starch well. Fuzzy or very stretchy yarns blur the lace and make the antlers droop.
- Taupe (MC): 10 g, about 30 m (head, nose, ears, antlers)
- Cream (CC): 5 g, about 15 m (border, ear edging, hanging loop)
Both quantities include a margin for a test motif and for weaving in ends. One ornament uses about 6 g of taupe and 3 g of cream.
Tools:
- 2.75 mm (US C-2) crochet hook
- Tapestry needle
- 4 locking stitch markers
- Scissors
- Blocking board or foam mat and rustproof pins
- Spray starch (optional, recommended)
Abbreviations (US Terms)
- ch – chain
- sl st – slip stitch
- sc – single crochet
- hdc – half double crochet
- dc – double crochet
- tr – treble crochet
- dtr – double treble crochet
- rev sc – reverse single crochet (crab stitch)
- sp – space
- st(s) – stitch(es)
- rnd – round
- MC / CC – main color (taupe) / contrast color (cream)
Double treble (dtr): Yarn over 3 times, insert hook in st, yarn over and pull up a loop (5 loops on hook). [Yarn over, pull through 2 loops] 4 times.
Reverse single crochet (rev sc): Work from left to right (right-handed). Insert the hook into the next sc to the right, yarn over, pull up a loop, yarn over, pull through both loops. This gives the corded edge.
Gauge and Checkpoints
Gauge: 24 sc and 26 rows = 4 in (10.2 cm) in sc, which is 6 sc per 1 in (2.5 cm).
For a lace motif, the checkpoints below matter more than the swatch. Make one complete head and measure it before you make the ears and antlers.
- After Rnd 1: 1 in (2.5 cm) across
- After Rnd 2: 2 in (5.1 cm) across
- After Rnd 3: 3 in (7.6 cm) tall x 2.75 in (7.0 cm) wide, measured lightly flattened
- After the border: 3.5 in (8.9 cm) tall x 3.25 in (8.3 cm) wide
Too big? Go down to a 2.5 mm hook and check that your dtr loops are pulled snug. Too small? Go up to a 3.0 mm hook. If you change hooks, use the new hook for every component so the ears and antlers stay in proportion with the head.
Head
Make 1 with MC.
Rnd 1: Ch 6 and sl st in the first ch to form a ring. Ch 3 (counts as dc), work 15 dc in the ring, then sl st to the top of the ch-3. (16 dc)
The ring stays open. It becomes the small hole near the top of the face.
Rnd 2: Ch 5 (counts as dc + ch 2). Dc in next dc, ch 2; repeat from * 14 more times. Sl st to the 3rd ch of the beginning ch-5. (16 dc, 16 ch-2 sps)*
These 16 dc are the spokes. Number them clockwise from 1 to 16, starting at the joining stitch. Spoke 1 is top center and spoke 9 is bottom center. Put a marker in spoke 1 and another in spoke 9.
Rnd 3 (shaping): Ch 1. Each st in this round is worked into the top of a spoke, and the stitch heights increase toward the bottom point.
- Sc in spoke 1, ch 3, sc in spoke 2, ch 3, sc in spoke 3, ch 3.
- Hdc in spoke 4, ch 3, dc in spoke 5, ch 4.
- Tr in spoke 6, ch 4, tr in spoke 7, ch 5.
- Dtr in spoke 8, ch 5.
- (Dtr, ch 3, dtr) in spoke 9 for the bottom point, ch 5.
- Dtr in spoke 10, ch 5, tr in spoke 11, ch 4, tr in spoke 12, ch 4.
- Dc in spoke 13, ch 3, hdc in spoke 14, ch 3.
- Sc in spoke 15, ch 3, sc in spoke 16, ch 3. Sl st to the first sc.
(17 sts: 5 sc, 2 hdc, 2 dc, 4 tr, 4 dtr. 17 ch-sps: eight ch-3 sps between spokes, four ch-4 sps, four ch-5 sps, plus one ch-3 point sp.)
The two halves mirror each other, so the motif comes out as a shield. It’s shallow around the ring and long and pointed below. Fasten off MC and weave in the ends.
Checkpoint: The head should measure 3 in (7.6 cm) tall x 2.75 in (7.0 cm) wide.
Nose
Make 1 with MC.
Rnd 1: Ch 5. Sc in the 2nd ch from the hook and in the next 2 ch, then work 3 sc in the last ch. Rotate and work along the opposite side of the chain: sc in the next 2 ch, then 2 sc in the last ch (the same ch that holds the first sc). Sl st to the first sc. (10 sc)
Rnd 2: Ch 1. 2 sc in the first st, sc in the next 2 sts, 2 sc in each of the next 3 sts, sc in the next 2 sts, 2 sc in each of the last 2 sts. Sl st to the first sc. (16 sc)
The nose is a solid oval, 1 in (2.5 cm) long x 0.75 in (1.9 cm) wide. Fasten off and leave an 8 in (20.3 cm) tail for sewing.
Ears
Make 2.
Rnd 1 (MC): Ch 8. Sc in the 2nd ch from the hook, hdc in the next ch, dc in the next 3 ch, hdc in the next ch. In the last ch work (sc, ch 2, sc) for the tip. Rotate to the opposite side of the chain: hdc in the next ch, dc in the next 3 ch, hdc in the next ch, sc in the last ch (the same ch as the first sc). Sl st to the first sc. (14 sts + 1 ch-2 tip)
Fasten off MC.
Rnd 2 (CC): Join CC in the first sc at the base. Ch 1. Sc in each st to the tip, (sc, ch 2, sc) in the ch-2 tip, then sc in each st to the end. Sl st to the first sc. (16 sc + 1 ch-2 tip)
Each ear is an almond-shaped leaf with a pointed tip and a taupe center outlined in cream. It measures 1.5 in (3.8 cm) long x 0.75 in (1.9 cm) wide. Fasten off and weave in the ends.
Antlers
Make 2 with MC.
Ch 10. The slip-knot end is the base and the hook end is the tip.
Beam, first side: Sc in the 2nd ch from the hook and in each of the next 8 ch. (9 sc)
Base: Work 2 more sc in the same last ch, which rounds the base.
Beam, second side, with tines: Work along the opposite side of the foundation chain. Sc in the next 2 ch.
- Tine A: Ch 5. Sc in the 2nd ch from the hook and in the next 3 ch. (4 sc)
Sc in the next 3 ch on the beam, then work Tine B the same way as Tine A. Sc in the next 2 ch.
Tip: Work 2 sc in the ch that holds the first sc, then sl st to the first sc.
(Beam: 9 + 2 + 2 + 3 + 2 + 2 = 20 sc. Tines: 4 sc each. Total: 28 sc.)
The beam is 1.5 in (3.8 cm) long. Each tine is about 0.75 in (1.9 cm). With the beam tip, that gives three points per antler. Fasten off and leave an 8 in (20.3 cm) tail for sewing.
Border
The border is 2 rounds of CC, worked around the head. The ears are joined during Rnd 1.
Border gauge: 6 sc per 1 in (2.5 cm) along a straight edge. After Rnd 3 the head’s outline measures about 10.5 in (26.7 cm). At that gauge it needs 63 sc, which is exactly what Rnd 1 gives. Into each space you work one sc fewer than its chain count, because chain spaces stretch wider than solid stitches.
Rnd 1 (sc + ear join): Join CC in spoke 1 (top center). Ch 1, sc in the same st.
Right side:
- Work 2 sc in each of the next four ch-3 sps, with 1 sc in each spoke between them (spokes 2–5).
- Work 3 sc in each of the next two ch-4 sps, with 1 sc in spokes 6 and 7.
- Work 4 sc in each of the next two ch-5 sps, with 1 sc in spoke 8.
- Sc in the first dtr of spoke 9.
Point: Work (sc, ch 2, sc) in the ch-3 point sp.
Left side: Sc in the second dtr of spoke 9, then work the right side in reverse. Use 4 sc per ch-5 sp, 3 sc per ch-4 sp and 2 sc per ch-3 sp, with 1 sc in each of spokes 10–16. Sl st to the first sc. (63 sc + 1 ch-2 point)
Count per side:
- Spaces: 4 x 2 + 2 x 3 + 2 x 4 = 22 sc
- Spokes 2–8: 7 sc
- One dtr of spoke 9: 1 sc
- One point sc: 1 sc
- Side total: 31 sc
Two sides (31 + 31 = 62) plus the top-center sc makes 63.
Ear join: The 3 sc for each ear are part of the 63 above, so the ears add no stitches. On the right side, hold an ear behind the head with its base overlapping by 0.25 in (0.6 cm) and its tip pointing up and out. Work the 2 sc in the space between spokes 4 and 5 and the sc in spoke 5 through both layers, catching the ear’s base sc and the stitch on either side of it. Join the left ear the same way, mirrored: sc in spoke 13 and the 2 sc in the space between spokes 13 and 14.
Rnd 2 (corded edge): Ch 1. Rev sc in each sc around, and work 2 rev sc in the ch-2 point. Sl st to the first st. (65 rev sc)
That’s 31 per side, 1 at top center and 2 at the point. Do not fasten off.
Hanging loop: With the hook at the top-center st, ch 31 and sl st in the same st. Then sl st in each ch around the loop to make a firm cord. (31 sl st) Fasten off. The loop hangs about 2 in (5.1 cm) above the head.
Checkpoint: The bordered head should measure 3.5 in (8.9 cm) x 3.25 in (8.3 cm). The 0.25 in (0.6 cm) border on each edge adds 0.5 in (1.3 cm) to each dimension.
Assembly
- Nose: Center the nose over spoke 9, with its lower edge just touching the inner edge of Border Rnd 1. Whipstitch all the way around through the back loops of the nose’s Rnd 2.
- Antlers: Place each antler behind the top edge with its base overlapping 0.25 in (0.6 cm). Center the right antler over spokes 2–3 and the left antler over spokes 15–16, angled slightly outward, with the tines facing outward. Sew through the back of Border Rnd 1 only, so the stitches don’t show on the front.
- Weave in all the ends along the back of the border.
Final Blocking
- Wet the ornament in cool water and gently press out the excess in a towel.
- Pin the head to 3.5 in (8.9 cm) x 3.25 in (8.3 cm). Pin the bottom point first, then top center.
- Open each spoke space evenly with pins, and keep the center ring round.
- Pin each ear tip out so the ornament is 4.5 in (11.4 cm) across.
- Straighten each antler and tine. Check the total height of 5 in (12.7 cm).
- Spray-starch lightly and let dry flat for 24 hours before unpinning.
Final Quality-Control Checklist
- Rnd 2 has 16 evenly spaced spokes.
- Rnd 3 is mirrored: the same stitch heights and chain lengths on both sides.
- Border Rnd 1 has 63 sc + ch-2 point, and Rnd 2 has 65 rev sc.
- The ears sit at the same height and angle.
- The nose is centered and the antlers are symmetrical.
- The ornament measures 4.5 in (11.4 cm) x 5 in (12.7 cm).
- The loop is centered and firmly anchored.
- No ends show on the front.
Troubleshooting
- Head cups: Border Rnd 1 is too tight or short of stitches. Recount to 63 and relax your tension.
- Border ruffles: You put too many sc in the chain spaces. Use one sc fewer than the chain count.
- Point is blunt: Check that both dtr are in spoke 9 with a ch-3 between them, and that the border has its ch-2 at the point.
- Lopsided head: Compare your Rnd 3 against the mirrored list. A swapped tr and dc is a common slip.
- Ears flop forward: Sew a few stitches behind the ear base, and starch.
- Antlers curl: Block them damp and pinned straight. Use a smaller hook next time.
- Ring closes up: Pull the ch-6 ring snug, but don’t cinch it.
Care
Hand wash in cool water, reshape, and dry flat. Re-starch as needed, and store the ornament flat in tissue paper between seasons.
Final Notes
The measurement chain is short. The ring is 1 in (2.5 cm) after Rnd 1 and 2 in (5.1 cm) after Rnd 2. After Rnd 3 the head is 3 in (7.6 cm) x 2.75 in (7.0 cm). The 0.25 in (0.6 cm) border brings it to 3.5 in (8.9 cm) x 3.25 in (8.3 cm). The ears and antlers take the finished ornament to 4.5 in (11.4 cm) x 5 in (12.7 cm). If each checkpoint matches, the whole reindeer comes out right.
Happy crocheting!