

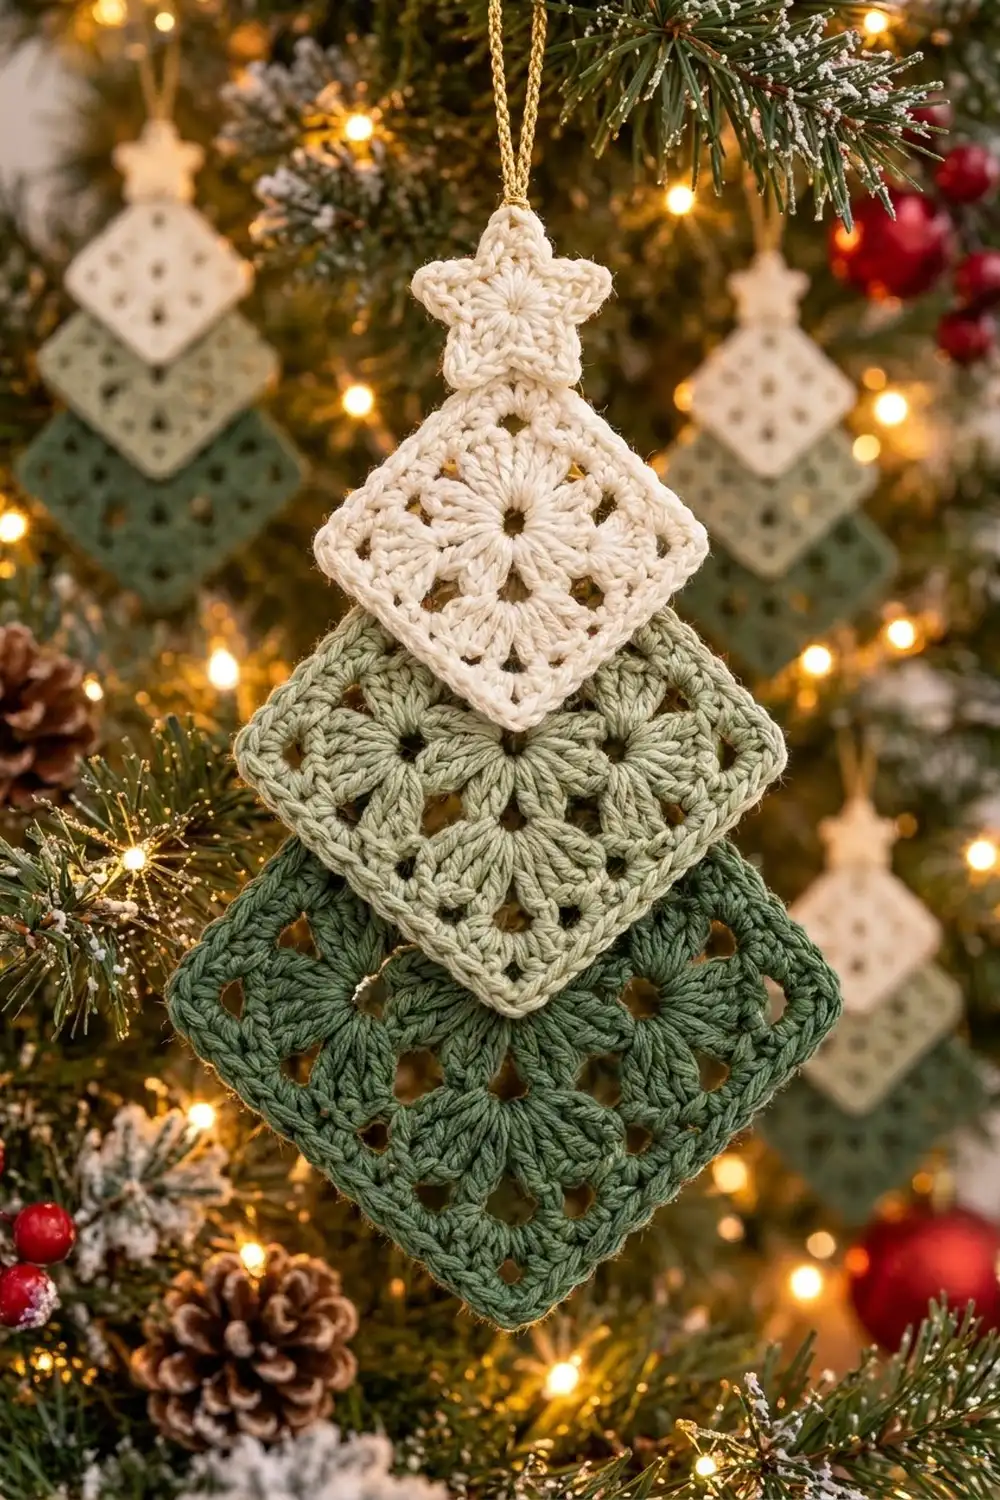
The Evergreen Trio is a layered Christmas tree ornament made from three small granny squares. Each square is turned on point and they are stacked from smallest to largest. A cream diamond sits on top, a soft sage diamond in the middle and a deep forest-green diamond forms the base. A tiny cream star sits on top of the tree, and a gold cord makes the hanging loop.
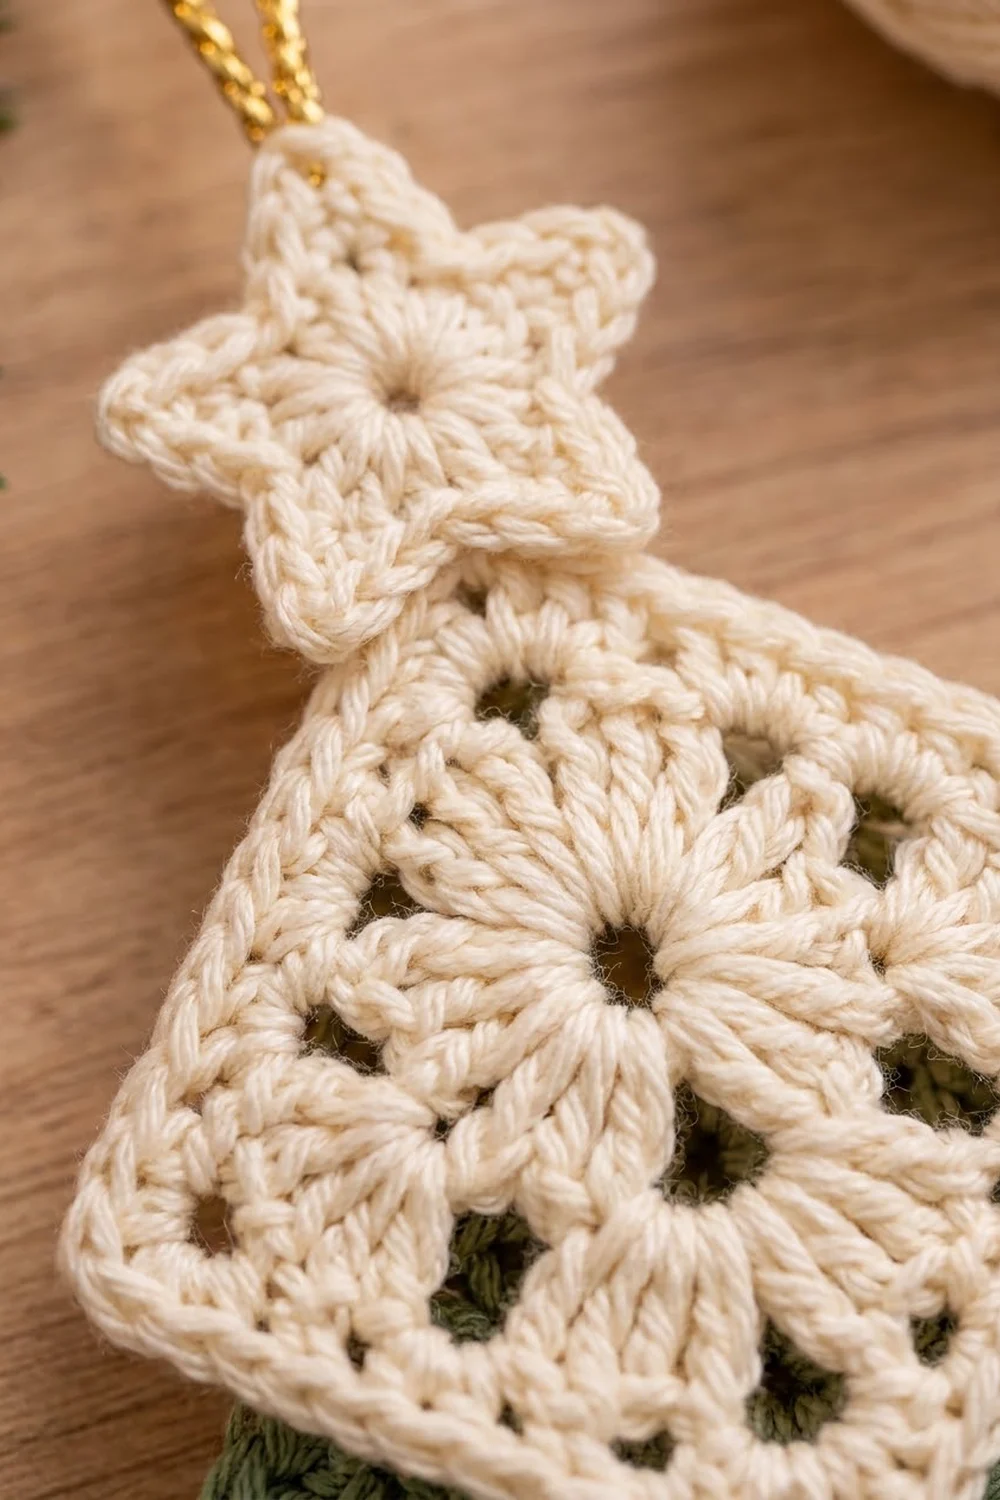
Every square starts with the same lacy center: a flower of eight clusters with open spaces between them. It is framed by classic granny groups and a neat single crochet edge. The only difference between the three squares is the number of granny rounds, so you learn one motif and simply make it bigger.
This pattern uses US crochet terms. The finished ornament is about 9.7 in (24.6 cm) tall from the star tip to the bottom corner and 4.6 in (11.7 cm) wide, not counting the hanging loop.
Construction is simple. Crochet three squares and one star, and edge each square. Then overlap the diamonds and sew them together from the back. Finish by adding the star and the cord.
Finished Size and Construction
- Finished size: 9.7 in (24.6 cm) tall x 4.6 in (11.7 cm) wide
- Skill level: Easy / advanced beginner
- Terminology: US crochet terms
- Yarn weight: Sport weight (#2 fine) cotton or cotton blend
- Hook: 3.0 mm
- Number of pieces: 4 (three squares and one star)
- Layout: Three diamonds stacked vertically, each lower diamond tucked behind the one above it, with the star on top
- Piece sizes (edged): Square A 2.25 in (5.7 cm), Square B 2.75 in (7.0 cm), Square C 3.25 in (8.3 cm) per side
- Size before border: Square A 2 in (5.1 cm), Square B 2.5 in (6.4 cm), Square C 3 in (7.6 cm) per side
- Border depth: one round of sc, which adds about 0.25 in (0.6 cm) to each side measurement
- Star: 1.25 in (3.2 cm) tall
Materials
Choose a smooth cotton in sport weight, either mercerized or matte. Cotton makes crisp clusters and holds the diamond shape well on a tree. Acrylic also works, but it may need firmer blocking.
- Cream: 8 g, about 24 m (Square A and star)
- Sage green: 7 g, about 21 m (Square B)
- Forest green: 10 g, about 30 m (Square C)
- Gold metallic cord: 8 in (20.3 cm) for the hanging loop
These amounts assume a yarn of about 150 m per 50 g. They include a margin for your gauge swatch and sewing tails.
Tools:
- 3.0 mm crochet hook
- Tapestry needle
- Scissors
- Stitch markers
- Rust-proof pins and a blocking mat
- Ruler or tape measure
- Spray bottle with water
Abbreviations (US Terms)
- ch – chain
- sl st – slip stitch
- sc – single crochet
- hdc – half double crochet
- dc – double crochet
- sp – space
- st(s) – stitch(es)
- MR – magic ring
Special stitches:
- Beginning cluster (beg-cl): Ch 2. Then yarn over, insert hook in the same st, pull up a loop, yarn over, pull through 2 loops 2 times. Yarn over and pull through all 3 loops on the hook.
- 3-dc cluster (cl): Yarn over, insert hook in st, pull up a loop, yarn over, pull through 2 loops 3 times in the same st. Yarn over and pull through all 4 loops on the hook.
Gauge and Checkpoints
Gauge matters here because the three squares must step up in size evenly. Make Square A first and use it as your swatch.
Checkpoint 1: After Round 3, the square measures 2 in (5.1 cm) per side.
Checkpoint 2: After the edging, Square A measures 2.25 in (5.7 cm) per side and about 3.2 in (8.1 cm) corner to corner.
Edging gauge: about 7 sc = 1 in (2.5 cm), measured along the middle of a side.
If your square is too big, go down 0.25 mm in hook size. If it is too small, go up 0.25 mm. Loose or stringy clusters mean your hook is too big. If the square cups or curls, your hook is too small. Get the swatch right before you make the green squares.
Square Pattern (All Squares)
All three squares begin with Rounds 1–3. Keep the right side facing you throughout and do not turn.
Round 1: MR, ch 3 (counts as dc), 15 dc in ring, sl st to top of beginning ch-3. Pull the ring closed. (16 dc)
Round 2: Beg-cl in same st as join, ch 3, skip next dc, cl in next dc, ch 3, skip next dc; repeat from * 6 more times, sl st to top of beg-cl. (8 clusters, 8 ch-3 sps)
This round makes the eight-petal flower, with a small open hole between each pair of petals.
Round 3 (squaring round): Sl st into next ch-3 sp. Ch 3 (counts as dc), (2 dc, ch 2, 3 dc) in same sp for the first corner, ch 1, 3 dc in next ch-3 sp, ch 1, (3 dc, ch 2, 3 dc) in next ch-3 sp, ch 1, 3 dc in next ch-3 sp, ch 1; repeat from * 2 more times, sl st to top of beginning ch-3.
Count: 36 dc, 8 ch-1 sps and 4 corner ch-2 sps. Between the corner ch-2 sps, each side has 3 dc, ch 1, 3 dc, ch 1, 3 dc = 11 sts. Total: 4 x 11 = 44 sts plus 4 corner sps.
Checkpoint: 2 in (5.1 cm) per side.
Square A (Cream)
After Round 3, go straight to the Edging (see the Border section). Do not fasten off.
Square B (Sage Green)
Work Rounds 1–3, then:
Round 4 (granny round): Sl st in next 2 dc and into the corner ch-2 sp. Ch 3 (counts as dc), (2 dc, ch 2, 3 dc) in same sp, ch 1, 3 dc in next ch-1 sp 2 times, ch 1, (3 dc, ch 2, 3 dc) in next corner sp, ch 1, 3 dc in next ch-1 sp 2 times, ch 1; repeat from ** to ** 2 more times, sl st to top of beginning ch-3.
Count: 48 dc, 12 ch-1 sps and 4 corner ch-2 sps. Each side has 4 groups of 3 dc and 3 ch-1 sps = 15 sts. Total: 4 x 15 = 60 sts plus 4 corner sps.
Checkpoint: 2.5 in (6.4 cm) per side.
Continue to the Edging.
Square C (Forest Green)
Work Rounds 1–4 as for Square B, then:
Round 5 (granny round): Sl st in next 2 dc and into the corner ch-2 sp. Ch 3 (counts as dc), (2 dc, ch 2, 3 dc) in same sp, ch 1, 3 dc in next ch-1 sp 3 times, ch 1, (3 dc, ch 2, 3 dc) in next corner sp, ch 1, 3 dc in next ch-1 sp 3 times, ch 1; repeat from ** to ** 2 more times, sl st to top of beginning ch-3.
Count: 60 dc, 16 ch-1 sps and 4 corner ch-2 sps. Each side has 5 groups of 3 dc and 4 ch-1 sps = 19 sts. Total: 4 x 19 = 76 sts plus 4 corner sps.
Checkpoint: 3 in (7.6 cm) per side.
Continue to the Edging.
Star (Cream)
Round 1: MR, ch 2 (does not count as a st), 10 hdc in ring, sl st to first hdc. Pull the ring closed. (10 hdc)
Round 2 (points): Ch 4, sc in 2nd ch from hook, hdc in next ch, dc in next ch, skip next hdc of Round 1, sl st in next hdc; repeat from * 4 more times. Work the final sl st into the joining st. (5 points)
Each point uses 2 hdc of Round 1, so 5 x 2 = 10 hdc are used exactly. Fasten off and leave a 10 in (25.4 cm) tail for sewing.
Checkpoint: 1.25 in (3.2 cm) from the top point to the line between the two lower points.
Make All Pieces
Make one of each piece:
- Cream: Square A (Rounds 1–3 + edging) and 1 star
- Sage green: Square B (Rounds 1–4 + edging)
- Forest green: Square C (Rounds 1–5 + edging)
Layout (front view, top to bottom, all centered on one vertical line):
Row 1:  [ Star – cream ]
Row 2:  [ Square A – cream, on point ]
Row 3:  [ Square B – sage, on point, behind A ]
Row 4:  [ Square C – forest green, on point, behind B ]
Each lower diamond’s top corner is hidden behind the diamond above it. Its side corners stick out wider and form the tree’s stepped “branches.”
Joining
The squares are sewn rather than crocheted together because they overlap instead of meeting edge to edge.
Placement: Lay Square B face up. Place Square A on top and center it on the same vertical line. Slide A down until B’s top corner sits 1.5 in (3.8 cm) above A’s bottom corner, then pin.
Why this works: Both diamonds have sides at the same 45-degree angle, so the overlap makes a neat small diamond. A’s lower edges cross B’s upper edges 0.75 in (1.9 cm) above A’s bottom corner. On each of A’s two lower edges, that works out to about 1 in (2.5 cm) of edging, or roughly 7 sc.
Stitch-to-stitch sewing: Thread cream yarn onto a tapestry needle. Start 7 sc to the left of A’s bottom corner sc. Whipstitch through the back loop of each edging sc of A and into the fabric of B directly behind it. Work 1 stitch per sc: 7 sc, the corner sc, then 7 sc on the other side, for 15 stitches in total. Don’t let the needle come through to the front of B.
Tack the hidden corner: Turn the piece over. With sage yarn, tack B’s top corner sc to the back of A with 2 small stitches so it cannot flip forward.
Join Square C behind Square B the same way. Use sage yarn for the 15 whipstitches and forest green to tack C’s top corner.
Tension: Pull each stitch just snug. Sewing that is too tight puckers the overlap, and sewing that is too loose lets the lower diamond droop.
Star: Place the star so its two lower points overlap A’s top corner by 0.25 in (0.6 cm). Using the star tail, sew the star to the edging around A’s corner from the back.
Hanging loop: Fold the gold cord in half. Thread both ends through the star’s top point from front to back and knot them together. The loop stands about 3.5 in (8.9 cm) high.
Size checkpoint: The stacked squares measure 3.2 + 3.9 + 4.6 − 1.5 − 1.5 = 8.7 in (22.1 cm). The star adds 1.25 − 0.25 = 1 in (2.5 cm), for a total of 9.7 in (24.6 cm). The width equals Square C’s diagonal, 4.6 in (11.7 cm).
Border
Each square gets its own single crochet edging before joining. The ornament is an overlapping stack, so there is no separate border around the whole tree.
Border gauge: about 7 sc = 1 in (2.5 cm) along a side.
Edging round (all squares): Do not fasten off after the last pattern round. Ch 1, sc in same st as join and in each dc and each ch-1 sp around, working 3 sc in each corner ch-2 sp. Sl st to first sc. Fasten off and weave in ends.
In each corner group of 3 sc, the middle sc is the corner stitch.
Square A: The 11 side sts become 13 sc between corner stitches (1 + 11 + 1). Total: 4 x 13 + 4 corner sc = 56 sc. Each side has 15 sc counted corner to corner, including both corner sts. Size: 2.25 in (5.7 cm).
Square B: The 15 side sts become 17 sc between corners. Total: 4 x 17 + 4 = 72 sc. Each side has 19 sc including corners. Size: 2.75 in (7.0 cm).
Square C: The 19 side sts become 21 sc between corners. Total: 4 x 21 + 4 = 88 sc. Each side has 23 sc including corners. Size: 3.25 in (8.3 cm).
Why the math works: The edging count is (sc worked 1-per-existing-stitch) + (3 sc in each of the 4 corner sps). That gives 44 + 12 = 56, 60 + 12 = 72 and 76 + 12 = 88. Each granny round adds exactly 4 sts per side (one 3-dc group and one ch-1). As a result, every square edges cleanly with no skipped or squeezed stitches, and each size is 4 sc per side larger than the one before.
Final Blocking
- Block each square before joining to get the sharpest corners.
- Pin Square A to the mat at its four corners so each side measures 2.25 in (5.7 cm).
- Pin the middle of each side so the edges run straight.
- Pin Square B to 2.75 in (7.0 cm) and Square C to 3.25 in (8.3 cm) per side.
- Pin the star, opening out each point.
- Mist everything until damp but not soaked.
- Let everything dry completely, for at least 4 hours.
- After joining, lay the ornament flat, mist the overlaps lightly and pin the outer corners again to keep the stack straight.
Final Quality-Control Checklist
- Each square has 8 even petals with open holes between them.
- Edging counts: A 56 sc, B 72 sc, C 88 sc.
- Square sizes: 2.25 in (5.7 cm), 2.75 in (7.0 cm) and 3.25 in (8.3 cm).
- All three diamonds sit on one straight vertical line.
- Each overlap measures 1.5 in (3.8 cm).
- No sewing stitches show on the front of B or C.
- The star points are even and the star sits upright.
- Total height is 9.7 in (24.6 cm).
- All ends are woven in securely.
Troubleshooting
Square ruffles: Your hook is too large, or the ch-3 sps in Round 2 are too long. Try a smaller hook.
Square cups: Your tension is tight. Go up 0.25 mm or loosen your clusters.
Corners look rounded: Check that you worked 3 sc, not 2, in each corner. Then block firmly with a pin at each tip.
Tree leans to one side: The diamonds are not centered. Unpick the sewing and line the corners up on one vertical line.
Lower diamond flops forward: Add 1–2 more tacking stitches at its hidden top corner.
Star points curl: Pin and block again, or work the ch-4 a little looser.
Care
Hand wash in cool water with mild soap, roll in a towel and dry flat. Store flat in tissue paper so the points stay crisp.
Final Notes
Here is how the measurements build up. Rounds 1–3 give a 2 in (5.1 cm) square. Each granny round adds 0.5 in (1.3 cm), and the edging adds 0.25 in (0.6 cm). That gives squares of 2.25 in (5.7 cm), 2.75 in (7.0 cm) and 3.25 in (8.3 cm). Overlap them by 1.5 in (3.8 cm) each and add the star for a tree 9.7 in (24.6 cm) tall.
Make a few in different greens, or swap the cream for white or soft gold. One motif in three sizes makes one cheerful little tree.
Happy crocheting!