

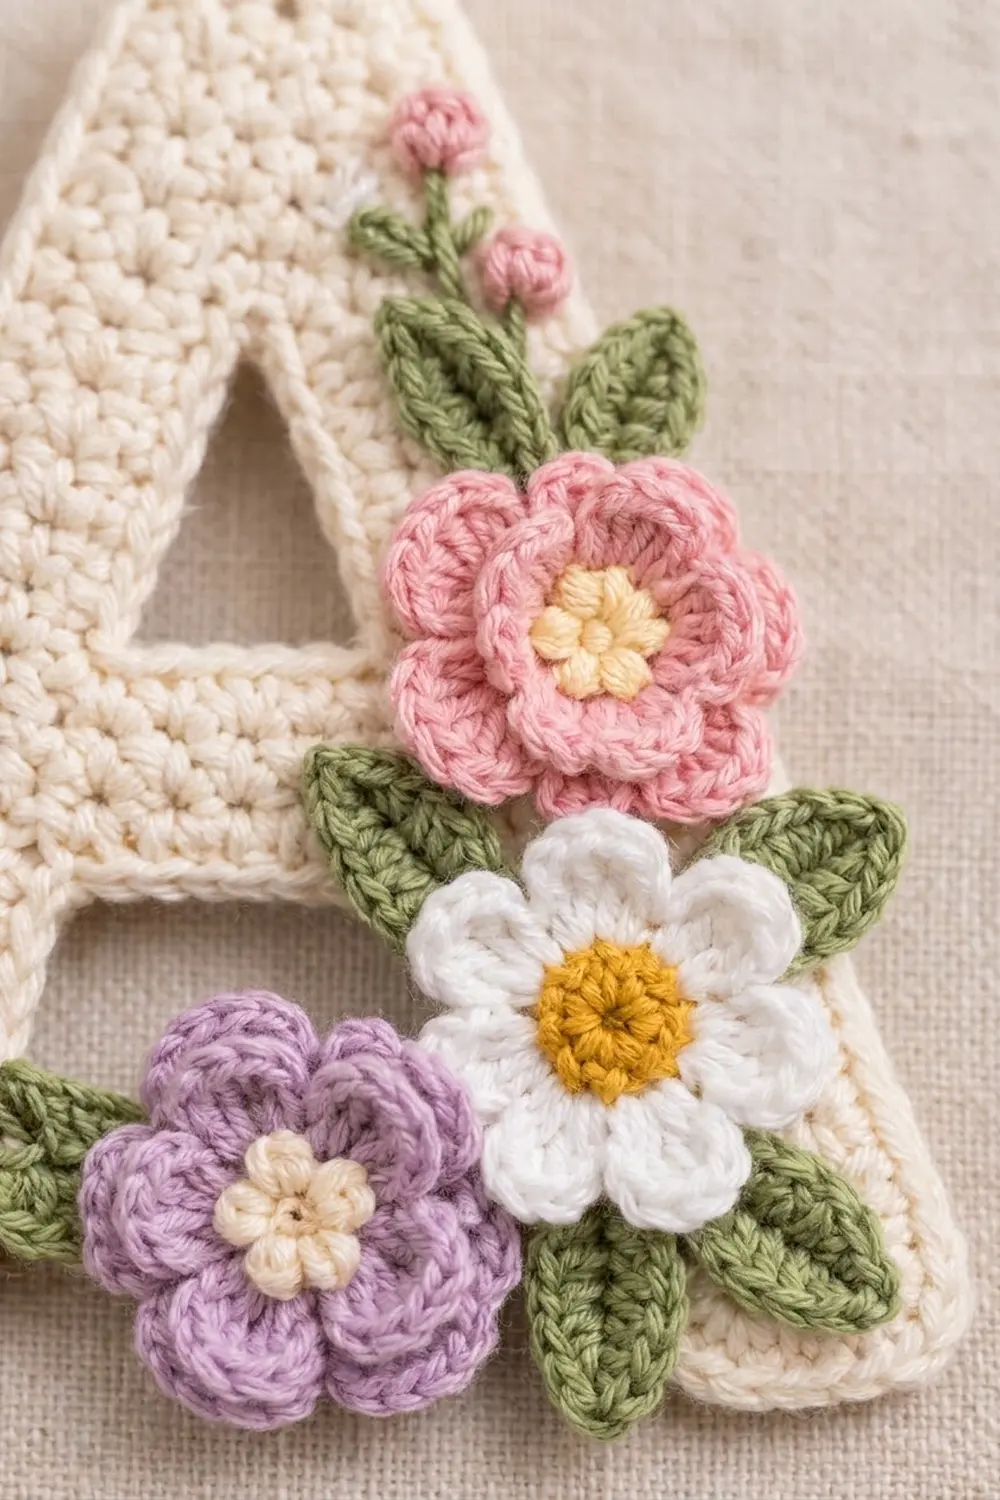
This little letter A keychain is a sweet way to carry an initial on a bag, a set of keys, or a zipper pull. The letter is worked in firm cream single crochet with a crisp, raised outline. A tiny bouquet of pink, white, and lilac flowers, sage-green leaves, and dusty-pink buds sits on top.
The style is soft cottage-garden, with a neutral base, pastel flowers, and bright gold hardware. Everything uses one fine cotton yarn, so the flowers stay in proportion to the letter.
The pattern uses US crochet terms. The finished keychain is about 3 1/8 in (7.9 cm) wide and 3 1/2 in (8.9 cm) tall, not counting the hardware.
The piece is worked flat. You crochet the two legs separately from the feet up, join them with a chained crossbar, leave a small triangular opening, and taper to the top. One sc round and one slip-stitch round outline the letter. The flowers, leaves, and buds are made separately and sewn on.
Finished Size and Construction
- Finished size: about 3 1/8 in (7.9 cm) wide x 3 1/2 in (8.9 cm) tall, plus hardware
- Skill level: Intermediate (row shaping, appliqué, light embroidery)
- Terminology: US crochet terms
- Yarn weight: Fine (#2) sport-weight cotton
- Hook: 2.5 mm
- Number of pieces: 1 letter piece, plus sewn-on appliqués (3 flowers, 8 leaves, 4 buds)
- Layout: single piece, no joining
- Size before border: about 2 7/8 in (7.3 cm) wide x 3 1/4 in (8.3 cm) tall
- Border depth: about 1/8 in (0.3 cm) on every edge
- Piece size after border: 3 1/8 in (7.9 cm) x 3 1/2 in (8.9 cm)
Materials
Use a smooth, mercerized sport-weight cotton (about 160 m per 50 g). Cotton shows stitches clearly, holds the letter’s shape, and resists fuzzing on an item that gets handled every day.
- Cream (letter and lilac flower center): 8 g, about 26 m
- Pink (layered flower and buds): 3 g, about 10 m
- White (daisy petals): 2 g, about 6 m
- Lilac (lilac flower petals): 2 g, about 6 m
- Sage green (leaves and stems): 3 g, about 10 m
- Golden yellow (daisy center): 1 g, about 3 m
- Pale yellow (pink flower center): 1 g, about 3 m
These amounts include a margin for swatching and sewing tails.
Tools
- 2.5 mm crochet hook
- Tapestry needle
- 4 locking stitch markers
- Gold split key ring, 1 in (2.5 cm)
- Gold chain, about 1 in (2.5 cm) long
- 2 gold jump rings and 2 pairs of flat-nose pliers
- Blocking board, rust-proof pins, spray bottle
- Scissors and a ruler
Abbreviations (US Terms)
- ch – chain
- sc – single crochet
- hdc – half double crochet
- dc – double crochet
- sl st – slip stitch
- st(s) – stitch(es)
- sp – space
- sk – skip
- MR – magic ring
- sc2tog – single crochet 2 together: (insert hook in next st, yarn over, pull up a loop) twice, yarn over, pull through all 3 loops
- Shift row (special technique) – keeps the same stitch count but moves a strip 1 st inward: sc2tog over the 2 sts at the outer edge, 2 sc in the st at the inner edge, and sc in every other st
The turning ch 1 never counts as a stitch.
Gauge and Checkpoints
Gauge: 6 sc and 7 rows = 1 in (2.5 cm) in sc worked flat. A 2 in (5.1 cm) swatch is 12 sc x 14 rows.
The first leg is your test piece. Work it, measure it, and adjust your hook before going further.
Checkpoints
- After Row 8 of a leg: 5 sts, about 0.8 in (2.0 cm) wide and 1 1/8 in (2.9 cm) tall.
- After Row 10: 13 sts across the crossbar, about 2 1/8 in (5.4 cm).
- After Row 15: about 2 1/8 in (5.4 cm) tall, with 9 sts (1 1/2 in / 3.8 cm) across the top row.
- After Row 23: about 2 7/8 in (7.3 cm) wide at the feet and 3 1/4 in (8.3 cm) tall.
Too big? Go down to a 2.25 mm hook. Too small? Go up to a 2.75 mm hook. Firm fabric matters most: you should not be able to see light through the stitches.
Pattern: The Letter A
Left Leg
With cream, ch 6.
Row 1: Sc in 2nd ch from hook and in each ch across. Place a marker in the first sc made; that edge is the outer edge. (5 sc)
Rows 2–3: Ch 1, turn, sc in each st across. (5 sc)
Row 4 (shift row): Ch 1, turn, work a shift row toward the inner edge. (5 sts)
Rows 5–6: Ch 1, turn, sc in each st across. (5 sc)
Row 7 (shift row): Ch 1, turn, work a shift row as in Row 4. (5 sts)
Row 8: Ch 1, turn, sc in each st across. (5 sc) The yarn now sits at the outer edge. Do not fasten off; put the live loop on a marker.
Right Leg
With cream, ch 6.
Row 1: Sc in 2nd ch from hook and in each ch across. Place a marker in the last sc made; that edge is the outer edge. (5 sc)
Rows 2–8: Work as for the left leg, shifting toward the inner edge on Rows 4 and 7. (5 sts) Fasten off.
Each leg has moved 2 sts inward, so the gap between the legs narrows from 7 sts at the feet to 3 sts.
Crossbar
Row 9 (joining row): Put the left leg loop back on your hook. Ch 1, turn, sc in each of the 5 left leg sts, ch 3, then sc in each of the 5 sts of Row 8 of the right leg, starting at its inner edge. (10 sc + 3 ch = 13 sts)
Row 10: Ch 1, turn, sc in each sc and each ch across. (13 sc)
Row 11: Ch 1, turn, sc2tog, sc in next 9 sts, sc2tog. (11 sts)
Triangular Opening
Row 12: Ch 1, turn, sc in next 4 sts, ch 3, sk next 3 sts, sc in last 4 sts. (8 sc + 3 ch = 11 sts)
Row 13: Ch 1, turn, sc in next 4 sts, ch 3, sk ch-3 sp, sc in last 4 sts. (8 sc + 3 ch = 11 sts)
Row 14: Ch 1, turn, sc2tog, sc in next st, 2 sc in next st, ch 1, sk ch-3 sp, 2 sc in next st, sc in next st, sc2tog. (4 sts + 1 ch + 4 sts = 9 sts)
Both sides shift 1 st inward, so the opening narrows from 3 sts to 1 st and forms the triangle.
Row 15 (conversion row): Ch 1, turn, sc in next 4 sts, sc in ch-1 sp, sc in last 4 sts. (8 sc worked 1-per-st + 1 sc in the ch-1 sp = 9 sc)
Top of the Letter
Rows 16–17: Ch 1, turn, sc in each st across. (9 sc)
Row 18: Ch 1, turn, sc2tog, sc in next 5 sts, sc2tog. (7 sts)
Rows 19–20: Ch 1, turn, sc in each st across. (7 sc)
Row 21: Ch 1, turn, sc2tog, sc in next 3 sts, sc2tog. (5 sts)
Row 22: Ch 1, turn, sc in each st across. (5 sc)
Row 23: Ch 1, turn, sc2tog, sc in next st, sc2tog. (3 sts) Do not fasten off.
The outer edges move 1 st inward on Rows 4, 7, 11, 14, 18, 21, and 23, which is every 3 to 4 rows. That gives the A its even slant.
Appliqués
Leave 8 in (20.3 cm) tails for sewing.
Pink Layered Flower (make 1)
Rnd 1: With pale yellow, MR, 5 sc in ring, pull closed, sl st to first sc. Fasten off. (5 sc)
Rnd 2: Join pink in any sc, (sc, ch 2) in each st around, sl st to first sc. (5 sc + 5 ch-2 sps)
Rnd 3: (Sc, hdc, dc, hdc, sc) in each ch-2 sp around, sl st to first sc. (5 small petals, 25 sts)
Rnd 4: Working behind the petals, *ch 3, sc around the post of the next Rnd 2 sc; rep from * around. (5 ch-3 loops)
Rnd 5: (Sc, hdc, 3 dc, hdc, sc) in each ch-3 loop around, sl st to first sc. (5 large petals, 35 sts) Fasten off.
The flower is about 1 1/4 in (3.2 cm) across, with the small petals sitting in front of the large ones.
White Daisy (make 1)
Rnd 1: With golden yellow, MR, 10 sc in ring, pull closed, sl st to first sc. Fasten off. (10 sc)
Rnd 2: Join white in any sc, *sl st in next st, (hdc, 3 dc, hdc) in next st; rep from * around, sl st to the joining st. (5 petals, 30 sts) Fasten off.
The daisy is about 1 in (2.5 cm) across.
Lilac Flower (make 1)
Rnd 1: With cream, MR, 5 sc in ring, pull closed, sl st to first sc. Fasten off. (5 sc)
Rnd 2: Join lilac in any sc, (sc, ch 3) in each st around, sl st to first sc. (5 sc + 5 ch-3 sps)
Rnd 3: (Sc, hdc, 3 dc, hdc, sc) in each ch-3 sp around, sl st to first sc. (5 petals, 35 sts) Fasten off.
The lilac flower is about 1 1/8 in (2.9 cm) across.
Large Leaf (make 5)
With sage green, ch 6. Sc in 2nd ch from hook, then hdc, dc, hdc, sc in the remaining chs. Ch 1, rotate, and work sc, hdc, dc, hdc, sc along the other side of the chain; sl st to the tip. (10 sts) Each leaf is about 5/8 in (1.6 cm) long, and the chain spine forms the center vein.
Small Leaf (make 3)
With sage green, ch 4. Sc in 2nd ch from hook, hdc, sc, ch 1, rotate, then work sc, hdc, sc along the other side; sl st to the tip. (6 sts) Each is about 3/8 in (1.0 cm) long.
Bud (make 4)
With pink, MR, 6 sc in ring, pull tightly closed, sl st to first sc. Fasten off. Thread the tail through the front loops of all 6 sts and pull it into a ball about 1/4 in (0.6 cm) across. (6 sc)
Border
Border gauge: about 6 1/2 sc per 1 in (2.5 cm) along the edges. Edge stitches sit slightly closer together than body stitches, which keeps the outline flat.
With the Row 23 loop still on your hook, ch 1 and rotate the piece to work down the nearest outer edge.
Rnd 1 (sc outline):
- First outer edge: 1 sc in each row end from Row 23 down to Row 1. (23 sc)
- First foot: working into the foundation ch, 3 sc in the first st (outer corner), sc in next 3 sts, 3 sc in the last st (inner corner). (9 sc)
- Notch: 1 sc in each row end of Rows 1–7 of this leg (7 sc); sc2tog over the Row 8 row end and the first crossbar ch (1 st); sc in the middle ch (1 sc); sc2tog over the third ch and the Row 8 row end of the other leg (1 st); 1 sc in each row end of Rows 7–1 (7 sc). (17 sts)
- Second foot: 3 sc in the first st (inner corner), sc in next 3 sts, 3 sc in the last st (outer corner). (9 sc)
- Second outer edge: 1 sc in each row end from Row 1 up to Row 23. (23 sc)
- Top: 3 sc in the first st of Row 23, sc in next st, 3 sc in the last st. (7 sc)
Sl st to the first sc. Total: 23 + 9 + 17 + 9 + 23 + 7 = 88 sts.
Rnd 2 (raised outline): Ch 1, loosely sl st through the back loop of each sc around. (88 sl sts) Fasten off.
Triangle outline: Join cream at a bottom corner of the opening. Loosely sl st in the 3 skipped sts of Row 11 (3), the row ends of Rows 12–13 (2), the ch-1 at the tip (1), and the row ends of Rows 13–12 on the other side (2). (8 sl sts) Fasten off. Slip stitches give a neat rim without closing the opening.
Why the math works: Each slanted outer edge is about 3 1/2 in (8.9 cm) long, and 23 sc at 6 1/2 sc per inch fill it without ruffling or pulling. Each foot has 5 sts, and the two 3-sc corners add 4 more (5 + 4 = 9) so the border turns each corner cleanly. The sc2tog inside corners keep the notch crisp. The 3-sc corners on the narrow Row 23 round the top into a soft dome. Rnd 1 adds 1/8 in (0.3 cm) on every edge, so the width goes from 2 7/8 in (7.3 cm) to 3 1/8 in (7.9 cm) and the height from 3 1/4 in (8.3 cm) to 3 1/2 in (8.9 cm).
Final Blocking
- Weave in all the tails on the letter. Mist it lightly until damp, not soaked.
- Pin it face up at each foot corner, each top corner, and each side of the notch.
- Use the board grid to check that both legs slant evenly and the letter measures 3 1/8 in (7.9 cm) x 3 1/2 in (8.9 cm).
- Open the triangle and notch with a fingertip so they keep their shape.
- Mist and pin the flowers and leaves separately, with the petals opened flat. Let everything dry completely.
- Place the pink flower on the right leg, with its center about 2 in (5.1 cm) above the bottom edge. Place the daisy below it, center about 1 1/4 in (3.2 cm) up, over the right end of the crossbar. Place the lilac flower to the lower left of the daisy, center about 3/4 in (1.9 cm) up, slightly overlapping it.
- Tuck the large leaves behind the flower edges: two by the pink flower, two by the daisy, and one below the lilac flower.
- With sage green, embroider four short stems in stem stitch: two climbing the right leg above the pink flower and two on the lower left leg. Put a small leaf beside three of the stems and a bud at the end of each stem.
- Sew on the leaves first, then the lilac flower, the daisy, and the pink flower. Catch only the back of the stitches so nothing shows on the reverse.
- Open a jump ring, pass it through two Rnd 1 stitches at the top center, add the chain, and close it. Join the chain to the split ring with the second jump ring.
Final Quality-Control Checklist
- The letter measures 3 1/8 in (7.9 cm) x 3 1/2 in (8.9 cm).
- Both legs slant evenly and the feet sit level.
- The notch and triangle are open with clean edges.
- Rnd 1 has 88 sts and lies flat.
- Each flower has 5 even petals, and the pink flower shows both layers.
- No sewing stitches or tails show on the back.
- Both jump rings are fully closed.
Troubleshooting
- Legs slant unevenly: Both shift rows must move toward the inner edge. Keep the inner edge marked.
- Crossbar puckers: The ch-3 is too tight. Chain more loosely.
- Triangle closes up: Keep the slip stitches around it loose, or skip that outline.
- Border ruffles: Go down a hook size for Rnd 1 only.
- Border pulls the edges inward: Go up a hook size for Rnd 1.
- Petals curl: Block them flat and let them dry fully before sewing.
- Letter feels floppy: Remake it with a smaller hook for firmer fabric.
Care
Spot clean with cool water and mild soap, press out the water in a towel, and dry flat. Do not machine wash, because the hardware and small appliqués can snag.

Final Notes
Here is how the measurements build. A gauge of 6 sc and 7 rows per inch gives 0.8 in (2.0 cm) legs, a 2 1/8 in (5.4 cm) crossbar after Row 10, and a 2 7/8 in (7.3 cm) x 3 1/4 in (8.3 cm) letter after Row 23. The 88-stitch border adds 1/8 in (0.3 cm) all around, for a finished keychain of 3 1/8 in (7.9 cm) x 3 1/2 in (8.9 cm). Check each stage and the bouquet will land right where it belongs.
Happy crocheting!