

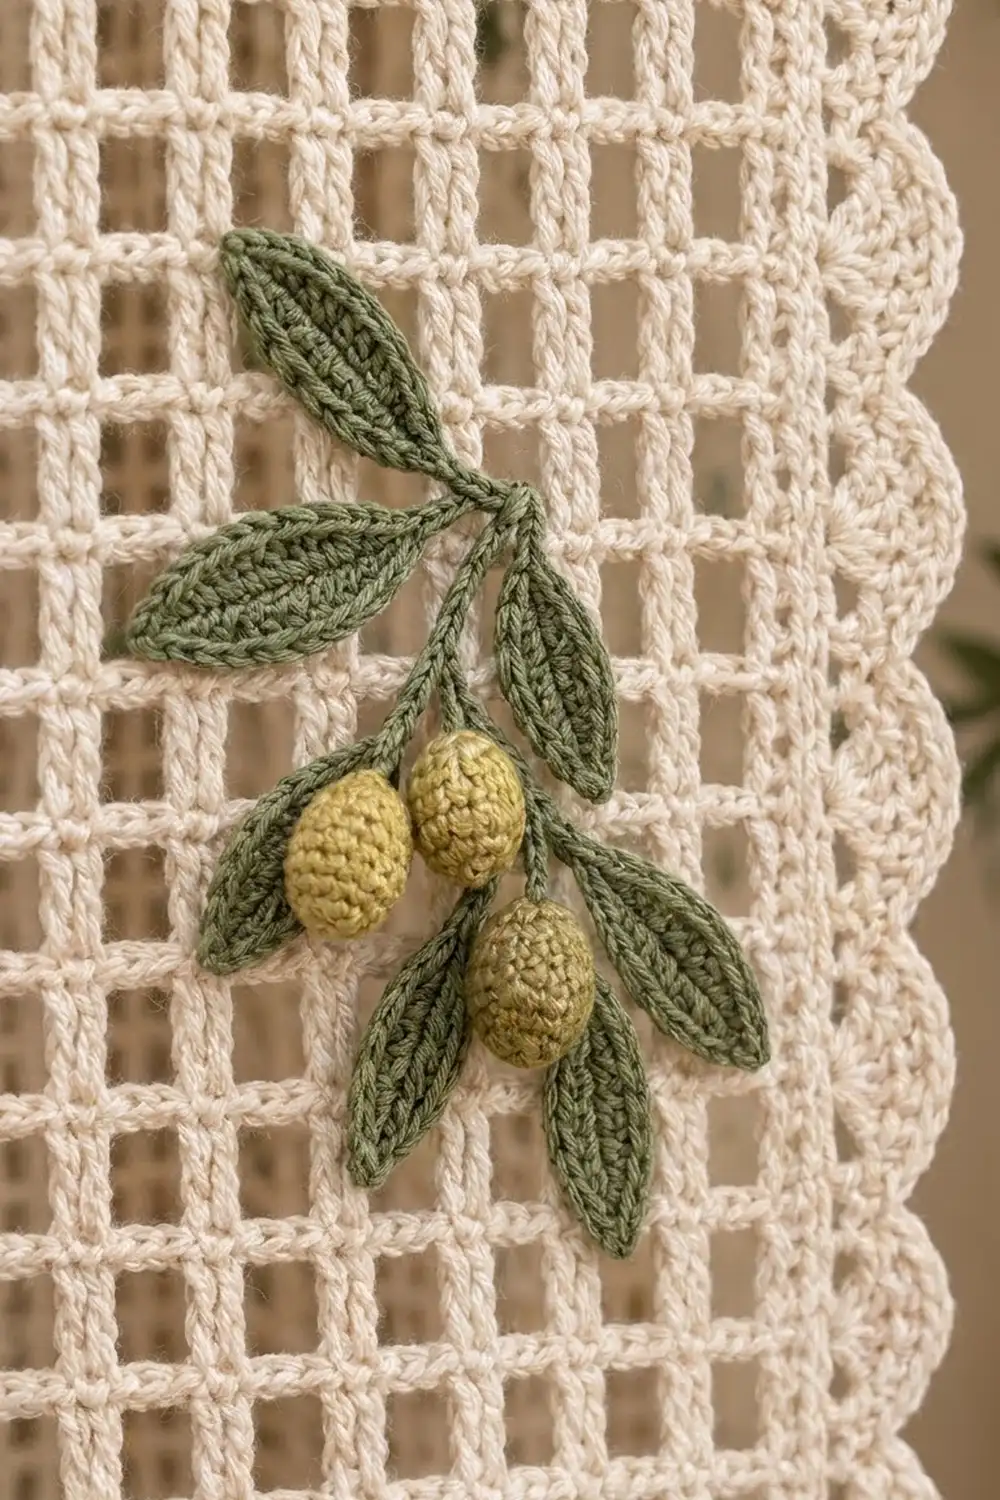
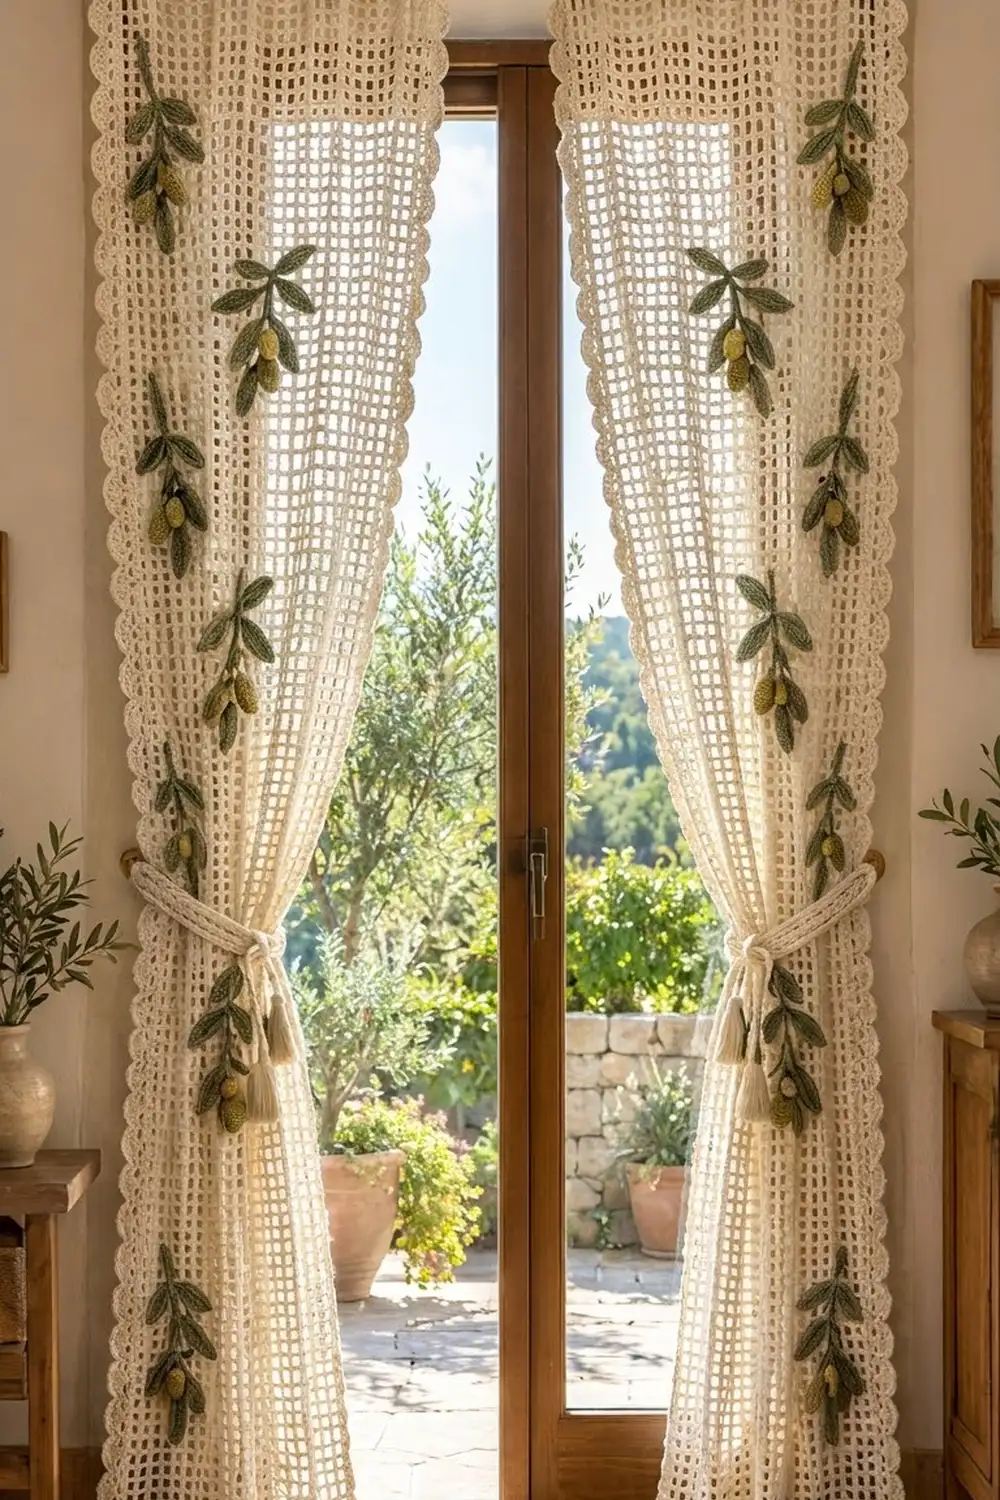
These airy curtain panels bring a sunny Mediterranean feel to any doorway or window. Each panel is a grid of cream filet mesh, edged with deep rounded scallops on three sides. Sage-green olive branches with plump little olives climb down the fabric.
The palette is quiet on purpose: cream for the mesh and border, sage green for the leaves and stems, and a soft yellow-olive for the fruit. Light passes through the open squares, so the branches look as if they are growing against the window.
This pattern uses US crochet terms. One finished panel measures 28 in (71.1 cm) wide by 79.25 in (201.3 cm) long, not counting the tabs. With the tab loops it is 82.25 in (208.9 cm) tall. The photo shows two identical panels hung as a pair, so the yarn amounts below are for two panels.
Construction is simple. You work the mesh flat in rows, add two solid header rows, crochet the tabs straight off the header, and then work a three-row scalloped border down one side, across the bottom and up the other side. Last, you make the appliqués and sew them on.
Finished Size and Construction
- Finished panel size: 28 in × 79.25 in (71.1 cm × 201.3 cm) before tabs
- Skill level: Intermediate
- Terminology: US
- Yarn weight: Worsted (#4) cotton
- Hook: 5.0 mm (H-8)
- Number of pieces: 2 panels, worked separately and never joined. Each panel gets 7 sewn-on olive branches.
- Layout: One rectangle per panel, 34 meshes wide × 104 rows tall
- Size before border: 25.5 in × 78 in (64.8 cm × 198.1 cm)
- Border depth: 1.25 in (3.2 cm) on the sides and bottom
- Tabs: 4 per panel, each 2.5 in (6.4 cm) wide, forming 3 in (7.6 cm) loops
Materials
Choose a smooth mercerized or combed worsted cotton with clear stitch definition. Cotton blocks crisply and hangs straight, which mesh curtains need. The amounts below assume about 190 m per 100 g.
- Cream (mesh, border, tabs, tiebacks): 1,700 g (about 3,230 m)
- Sage green (leaves and stems): 100 g (about 190 m)
- Yellow-olive (olives): 50 g (about 95 m)
Tools:
– 5.0 mm (H-8) crochet hook
– Tapestry needle
– A small amount of polyester fiberfill
– Stitch markers
– Rust-proof pins and a large blocking surface
– Measuring tape
All quantities include a margin of about 10% for the gauge swatch and tension differences.
Abbreviations (US Terms)
- ch – chain
- sl st – slip stitch
- sc – single crochet
- hdc – half double crochet
- dc – double crochet
- sc2tog – single crochet 2 together
- sk – skip
- sp – space
- st(s) – stitch(es)
- RS / WS – right side / wrong side
Special stitch: Mesh. One mesh is (ch 2, dc in next dc). It is 3 sts wide: the 2 chains plus the dc that closes the square.
Special stitch: Scallop. (Sk 3 sc, 9 dc in next sc, sk 3 sc, sc in next sc). Each scallop uses 8 base stitches.
Gauge and Checkpoints
Gauge: 4 meshes and 4 rows = 3 in (7.6 cm) in filet mesh after blocking. That makes each mesh 0.75 in (1.9 cm) square, and it equals 4 sts per inch along the edges.
Test swatch first. Ch 29 (3 × 8 + 5). Dc in the 8th ch from the hook, then ch 2, sk 2 ch, dc in next ch across, for 8 meshes. Work 7 more mesh rows. Block the swatch. It should measure 6 in × 6 in (15.2 cm × 15.2 cm).
- Swatch too big: go down a hook size, or keep your chains snug.
- Swatch too small: go up a hook size, or pull up the dc loops slightly taller.
Across 34 meshes and 104 rows, a 1/8 in difference per mesh adds up to 4.25 in (10.8 cm) in width and 13 in (33 cm) in length, so the swatch matters.
Measurement checkpoints (lightly stretched flat):
– After Row 8: width 25.5 in (64.8 cm)
– After Row 24: length 18 in (45.7 cm)
– After Row 52: length 39 in (99.1 cm)
– After Row 102: length 76.5 in (194.3 cm)
– After Row 104: length 78 in (198.1 cm)
Panel Body (Make 2)
With cream, ch 107. That is 3 × 34 meshes + 5.
Row 1 (RS): Dc in the 8th ch from the hook. The 7 skipped chains count as the first dc plus ch 2. Ch 2, sk 2 ch, dc in next ch; repeat from * across. Turn.
Count: 35 dc and 34 ch-2 sps (34 meshes; 103 sts if you count each ch-2 as 2).
Row 2: Ch 5 (counts as dc + ch 2). Sk the first ch-2 sp, dc in the next dc. Ch 2, dc in next dc; repeat from * across. Work the last dc in the 3rd ch of the skipped chains at the start of Row 1. Turn.
Count: 34 meshes.
Rows 3–102: Ch 5 (counts as dc + ch 2), dc in the next dc. Ch 2, dc in next dc; repeat from * across. Work the last dc in the 3rd ch of the turning ch-5. Turn.
Count: 34 meshes in every row.
Keep every dc stacked directly on the dc below so the squares stay true.
Header Row 103: Ch 3 (counts as dc). 2 dc in next ch-2 sp, dc in next dc; repeat from * across. Work the last dc in the 3rd ch of the turning ch-5. Turn.
Count: 103 dc (1 + 34 × 3).
Header Row 104: Ch 3 (counts as dc). Dc in each st across, working the last dc in the top of the turning ch-3. Do not fasten off.
Count: 103 dc.
The body now measures 25.5 in × 78 in (64.8 cm × 198.1 cm).
Tabs
Each panel has 4 tabs, 10 sts wide, placed with 3 equal gaps of 21 sts. Check: 4 × 10 + 3 × 21 = 103.
Tab 1: Continue from Header Row 104. Ch 1, turn, and sc in each of the first 10 sts (10 sc).
Tab rows 2–24: Ch 1, turn, sc in each sc across (10 sc). Fasten off and leave a 12 in (30.5 cm) tail.
Tabs 2–4: Skip 21 sts after the previous tab. Join cream in the next st, then ch 1 and work 10 sc. Repeat tab rows 2–24 as for Tab 1. The last tab finishes flush with the final st of the header.
Each tab is about 6 in (15.2 cm) long. Fold it to the WS and whipstitch the last row to the base of Header Row 103. This forms a loop about 3 in (7.6 cm) tall.
Make All Pieces and Placement
Quantities for the pair: 2 panel bodies (cream), 14 branches, 70 leaves (sage), 14 stems (sage) and 28 olives (yellow-olive).
Leaf (make 70, sage): Ch 10.
– Side 1: Starting in the 2nd ch from the hook, work sl st, sc, hdc, dc in each of the next 3 ch, hdc, sc. Then work 3 sc in the last ch.
– Side 2: Working into the other side of the foundation chain, work sc, hdc, dc in each of the next 3 ch, hdc, sc.
– Tip: Ch 2, sl st in the 2nd ch from the hook to make a pointed tip. Sl st in the first ch.
– Count: 18 sts plus the tip.
– Vein: Surface sl st along the foundation chain.
Each leaf is about 2.25 in × 0.9 in (5.7 cm × 2.3 cm).
Olive (make 28, yellow-olive):
– Rnd 1: 6 sc in a magic ring (6).
– Rnd 2: 2 sc in each st (12).
– Rnds 3–5: Sc in each st (12).
– Stuff lightly.
– Rnd 6: Sc2tog 6 times (6).
– Close the hole and leave a tail.
Each olive is about 0.9 in × 0.75 in (2.3 cm × 1.9 cm).
Stem (make 14, sage): Ch 25. Sl st in the 2nd ch from the hook and in each ch back down the chain (24 sl sts). The stem is about 6.25 in (15.9 cm) long.
Assembling a branch: Sew 5 leaves along a stem, alternating sides and angling the leaves toward the tip, with 1 leaf at the very tip. Below the second leaf, sew 2 olives hanging on short ch-4 stalks. Each branch is about 7 in (17.8 cm) tall.
Placement grid for Panel 1. Rows are counted from the bottom (Row 1) and meshes from the right edge (1–34):
Rows 92–100 | meshes 4–12   | Branch A
Rows 80–88  | meshes 20–28  | Branch B
Rows 66–74  | meshes 6–14   | Branch C
Rows 52–60  | meshes 20–28  | Branch D
Rows 38–46  | meshes 4–12   | Branch E
Rows 24–32  | meshes 22–30  | Branch F
Rows 8–16   | meshes 6–14   | Branch G
For Panel 2, mirror the grid by counting meshes from the left edge. Pin each branch flat without stretching the mesh. Sew it down with matching yarn, catching the dc posts behind it every 0.5 in (1.3 cm). Sew the appliqués after blocking (see Final Blocking).
Border
Border gauge: 4 sc per inch. A mesh row is 0.75 in tall, so 3 sc per row-end matches it exactly. Along the bottom, each dc takes 1 sc and each ch-2 sp takes 2 sc, which also gives 3 sc per 0.75 in mesh. The border lies flat without ruffling or cupping.
The border is worked in rows, starting at the top corner of one long side and ending at the top corner of the other. The top edge has no border.
Border Row 1 (RS): Join cream at the top corner of the right-hand side.
1. Ch 1. Work 3 sc in each row-end down the side: 104 × 3 = 312 sc.
2. In the base of the corner dc, work 2 sc. The first is the corner sc.
3. Along the bottom, work 1 sc in the base of each remaining dc and 2 sc in each ch-2 sp. This makes 103 sc across the bottom, including the sc already worked in step 2. In the base of the final dc, work 1 extra sc as the second corner sc.
4. Work 3 sc in each row-end up the other side: 312 sc. Turn.
Total: 312 + 1 + 103 + 1 + 312 = 729 sc.
Why the math works: Each scallop uses 8 sts, with 1 shared anchor sc at the start, so every edge needs (8 × scallops) + 1 sts.
– Each side, counting its corner sc, has 313 sts: 8 × 39 + 1, so 39 scallops.
– The bottom, counting both corner sc, has 105 sts: 8 × 13 + 1, so 13 scallops.
– The corner sc are shared between edges, so the whole row is 313 + 105 + 313 − 2 = 729 = 8 × 91 + 1.
This makes 91 scallops in all, with an anchor sc landing exactly on each corner. This is why the panel is 34 meshes wide.
Border Row 2: Ch 1. Sc in the first sc. Sk 3 sc, 9 dc in next sc, sk 3 sc, sc in next sc; repeat from * 91 times. Turn.
Count: 91 scallops; 819 dc + 92 sc = 911 sts.
Border Row 3: Ch 1, sl st in the first sc. Sc in each of the next 4 dc, 3 sc in the next (center) dc, sc in each of the next 4 dc, sl st in the next sc; repeat from * 91 times.
Count: 1,001 sc + 92 sl sts.
Fasten off and weave in the ends. Each scallop is 2 in (5.1 cm) wide and 1.25 in (3.2 cm) deep, which brings the panel to 28 in × 79.25 in (71.1 cm × 201.3 cm).
Optional tieback (make 2):
1. Chain three 30 in (76.2 cm) cream cords.
2. Braid them together.
3. Wrap a 4 in (10.2 cm) tassel of 30 strands, and attach it to the end of the braid.
Final Blocking
- Soak the panel in cool water with a little wool wash for 15 minutes.
- Press the water out gently in a towel. Do not wring.
- Lay the panel flat on blocking mats or a clean sheet on the floor.
- Pin the body to 25.5 in × 78 in (64.8 cm × 198.1 cm), pinning every 6 in (15.2 cm) along the edges.
- Run a long ruler along the mesh columns and straighten any squares that lean.
- Pin the tip of each scallop so the border opens out evenly.
- Let the panel dry completely, then unpin.
- Sew the appliqués onto the dry panel, then steam them lightly from the WS so they sit flat.
Final Quality-Control Checklist
- Every mesh row has 34 meshes.
- The header has 103 dc.
- The 4 tabs are evenly spaced and folded to the same length.
- Border Row 1 has 729 sc, and each corner has a corner sc.
- There are 91 complete scallops: 39 on each side and 13 across the bottom.
- The panel measures 28 in × 79.25 in (71.1 cm × 201.3 cm).
- Each panel has 7 branches, placed as mirror images on the two panels.
- All ends are woven into dc posts, not across the open squares.
Troubleshooting
- The panel narrows or widens: Count meshes every 10 rows. Missing a dc beside the turning chain is the most common cause.
- The squares look tall and narrow: Your dc are too tall for your chains. Loosen the ch-2 slightly.
- The side border ripples: You worked more than 3 sc per row-end. Rework at exactly 3.
- The scallops come out uneven at a corner: Recount Border Row 1. Each side needs 313 sts and the bottom 105, counting the corner sc.
- The appliqués pucker the mesh: Sew them more loosely and only catch the dc posts.
- The tabs twist: Fold each tab straight and whipstitch it across its full width.
Care
Hand wash cold or machine wash on a gentle cycle in a laundry bag. Then reshape the panel and dry it flat to keep the mesh square and the scallops crisp.
Final Notes
The measurement chain is easy to follow:
– 4 meshes = 3 in (7.6 cm)
– 34 meshes × 104 rows = 25.5 in × 78 in (64.8 cm × 198.1 cm)
– 3 sc per row-end gives 729 border sts, which divide into 91 scallops
– A 1.25 in (3.2 cm) border brings each panel to 28 in × 79.25 in (71.1 cm × 201.3 cm)
Check your gauge at the start, count at each checkpoint, and both panels will hang straight and match. Happy crocheting!