

This little house-shaped cutlery holder brings a cozy cottage look to a holiday table. A warm oatmeal-beige back panel rises into a pointed roof edged with chunky cream bobbles, like fresh snow on the eaves. A shallow front pocket holds a fork and spoon upright, with the handles showing below the roof.
The front pocket has two cream four-pane windows, an arched burgundy door with a cream knob, and two small flower sprigs embroidered in burgundy and green. The style is soft, rustic, and textured.
This pattern uses US crochet terms. The finished holder measures about 4.5 in (11.4 cm) wide at the walls, about 5 in (12.7 cm) across the snowy eaves, and about 9 in (22.9 cm) tall at the roof peak.
Construction is simple. You crochet a house-shaped back panel in single crochet rows, a square front pocket, and a small arched door. The door and embroidery go on the pocket first. Next, one round of single crochet joins the pocket to the back and edges the whole house. Two cream rows finish the roof.
Finished Size and Construction
- Finished size: 4.5 in (11.4 cm) wide x 9 in (22.9 cm) tall, including roof trim
- Skill level: Easy to intermediate
- Terminology: US crochet terms
- Yarn weight: Worsted (#4)
- Hook: 4.5 mm (US 7)
- Number of pieces: 3 crocheted pieces (back panel, front pocket, door), joined into 1 holder
- Layout: Pocket laid over the lower part of the back panel, with bottom and side edges lined up
- Back panel size before border: 4 in (10.2 cm) wide x 8 in (20.3 cm) tall
- Pocket size before border: 4 in (10.2 cm) wide x 4 in (10.2 cm) tall
- Size after border: 4.5 in (11.4 cm) x 8.5 in (21.6 cm)
- Border depth: about 0.25 in (0.6 cm) per side; the roof trim adds about 0.5 in (1.3 cm)
Materials
Choose a smooth worsted-weight yarn in cotton, a cotton blend, or acrylic. Cotton holds its shape well and washes easily after a dinner party. Avoid fuzzy yarn for the cream trim, because the bobbles look best with clear definition.
- Oatmeal beige (main color): 20 g / 40 m
- Cream: 6 g / 12 m (roof trim, windows, door knob)
- Burgundy: 3 g / 6 m (door, flowers)
- Green: 2 g / 4 m (stems and leaves)
Quantities are for one holder and include a small safety margin.
Tools:
- 4.5 mm (US 7) crochet hook
- Tapestry needle
- Scissors
- Stitch markers (2–3)
- Locking clips or pins
- Ruler or tape measure
- Blocking mat and pins
Abbreviations (US Terms)
- ch – chain
- sc – single crochet
- sc2tog – single crochet 2 together
- sl st – slip stitch
- st(s) – stitch(es)
- BLO – back loop only
- RS / WS – right side / wrong side
Special stitch – Bobble (bob): Yarn over, insert hook in st, yarn over, pull up a loop, yarn over, pull through 2 loops (2 loops on hook). Repeat 4 more times in the same st (6 loops on hook). Yarn over and pull through all 6 loops. Push the bobble toward the side facing away from you.
Gauge and Checkpoints
Gauge: 16 sc x 18 rows = 4 in (10.2 cm) in sc rows, unblocked.
That works out to 4 sc per inch and 4.5 rows per inch. Make the front pocket first, because it doubles as a gauge swatch. It should measure 4 in (10.2 cm) square after Row 18.
Checkpoints:
- Pocket after Row 18: 4 in x 4 in (10.2 cm x 10.2 cm)
- Back panel after Row 28: 4 in (10.2 cm) wide x 6.2 in (15.7 cm) tall
- Back panel after Row 36: 8 in (20.3 cm) tall at the peak
- Door after Row 9: 1.5 in (3.8 cm) wide x 2 in (5.1 cm) tall
- Joined and bordered: 4.5 in x 8.5 in (11.4 cm x 21.6 cm)
If your pocket is too big, switch to a 4 mm hook. If it is too small, switch to a 5 mm hook. Don’t change the stitch counts: the door, windows, and border are all placed using 16 sts and 18 rows.
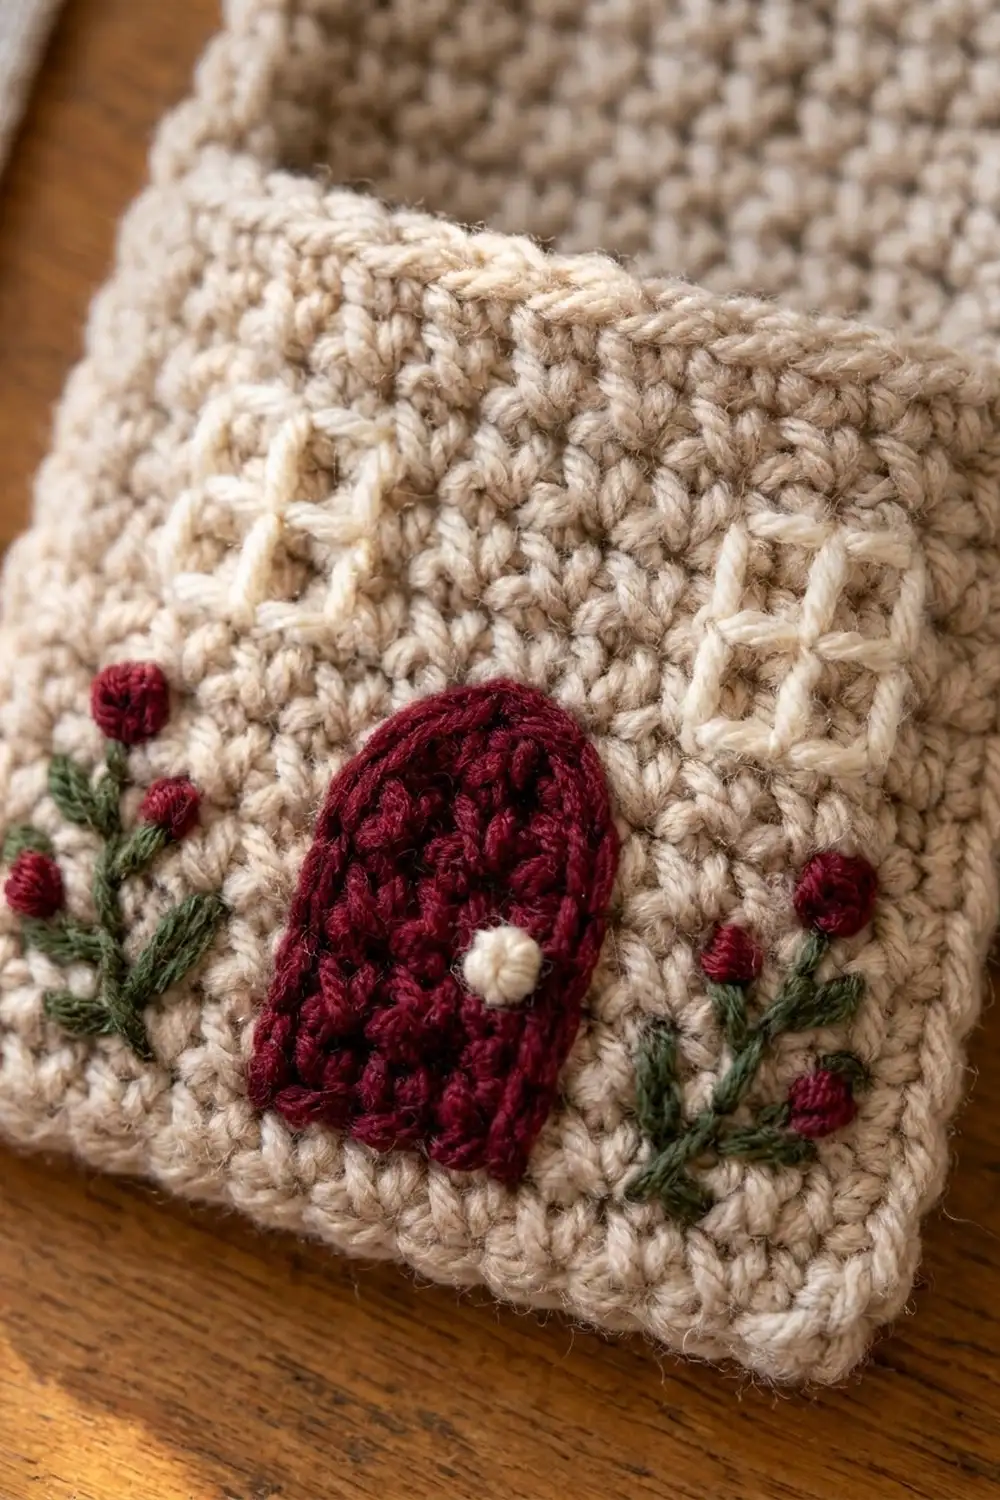
Front Pocket (Beige)
Ch 17.
Row 1: Sc in 2nd ch from hook and in each ch across. (16 sts)
Rows 2–17: Ch 1, turn, sc in each st across. (16 sts)
Row 18: Ch 1, turn, sc in BLO of each st across. (16 sts)
The unworked front loops make a neat ridge along the top of the pocket. The side facing you while you work Row 18 is the pocket’s RS. Fasten off and weave in ends.
Back Panel (Beige)
Ch 17.
Row 1: Sc in 2nd ch from hook and in each ch across. (16 sts)
Rows 2–28: Ch 1, turn, sc in each st across. (16 sts)
Checkpoint: 4 in (10.2 cm) wide x 6.2 in (15.7 cm) tall.
Roof shaping:
Row 29: Ch 1, turn, sc2tog, sc in next 10 sts, sc2tog. (12 sts)
Wait—use the counts below exactly:
Row 29: Ch 1, turn, sc2tog, sc in next 12 sts, sc2tog. (14 sts)
Row 30: Ch 1, turn, sc2tog, sc in next 10 sts, sc2tog. (12 sts)
Row 31: Ch 1, turn, sc2tog, sc in next 8 sts, sc2tog. (10 sts)
Row 32: Ch 1, turn, sc2tog, sc in next 6 sts, sc2tog. (8 sts)
Row 33: Ch 1, turn, sc2tog, sc in next 4 sts, sc2tog. (6 sts)
Row 34: Ch 1, turn, sc2tog, sc in next 2 sts, sc2tog. (4 sts)
Row 35: Ch 1, turn, sc2tog twice. (2 sts)
Row 36: Ch 1, turn, sc2tog. (1 st)
Each roof row loses 1 st at each end, so the slopes rise at about 45 degrees. The roof is 8 rows, or about 1.8 in (4.6 cm) tall. Fasten off and weave in ends.
Door (Burgundy)
Ch 7.
Row 1: Sc in 2nd ch from hook and in each ch across. (6 sts)
Rows 2–7: Ch 1, turn, sc in each st across. (6 sts)
Row 8: Ch 1, turn, sc2tog, sc in next 2 sts, sc2tog. (4 sts)
Row 9: Ch 1, turn, sc2tog twice. (2 sts)
The last two rows round the top into an arch. Fasten off, leaving a 12 in (30.5 cm) tail for sewing.
Make All Pieces
For one holder, make:
- Beige: 1 back panel, 1 front pocket
- Burgundy: 1 door
- Cream, burgundy, green: roof trim and embroidery, worked directly on the pieces
Pocket front layout (16 sts x 18 rows, Row 1 at the bottom):
Rows 15-18:  . . . . . . . . . . . . . . . .
Rows 12-14:  . . W W W . . . . . . W W W . .
Row 11:      . . . . . . . . . . . . . . . .
Rows 2-10:   . . F . . D D D D D D . . F . .
Row 1:       . . . . . . . . . . . . . . . .
W = cream window, D = door, F = flower sprig.
Door: Center the door over sts 6–11. Its bottom edge sits on Row 2 and its arch reaches Row 10, leaving 5 sts free on each side. Whipstitch around the edge with the burgundy tail. For the knob, make a cream French knot (wrap 3 times) on the right side of the door, about halfway up.
Windows: With cream, backstitch a square over sts 3–5 and Rows 12–14, about 0.75 in (1.9 cm) across. Add one vertical and one horizontal straight stitch through the center to make 4 panes. Repeat over sts 12–14.
Flowers: With green, make a straight-stitch stem on st 3, from Row 2 to Row 6, about 1 in (2.5 cm) long. Add 2–3 small lazy-daisy leaves along the stem. With burgundy, add 3 French knots at the top of the stem and on its upper sides. Repeat on st 14 as a mirror image.
Finish all embroidery before joining so you don’t stitch through the back panel.
Joining
The first border round joins the pocket to the back. You work through both layers at once.
Lay the back panel flat, RS up. Place the pocket on top, RS up, so its bottom (foundation) edge and side edges line up with the back’s. Pocket Row 18 lines up with back Row 18, because both pieces have the same row gauge. Clip the layers at the bottom corners and at the pocket’s top corners.
Stitch-to-stitch logic: Each pocket foundation st sits over one back foundation st (16 over 16). Each pocket row-end sits over one back row-end (18 over 18). Insert the hook through the pocket first, then the back, and work 1 sc through both.
Tension: Keep the joining sc slightly relaxed. If you pull tight, the pocket will cup and the sides will pucker. A pocket that bows outward means your joining stitches are too tight.
Size checkpoint: After joining, the bottom edge should measure 4.5 in (11.4 cm) including the border. The pocket should lie flat with a small, even opening at the top.
Border
Border gauge: Work 1 sc in each st along the bottom and 1 sc in each row-end along the sides and roof slopes. Single crochet row-ends compress slightly, so this spacing lies flat.
Round 1 (beige, joins pocket): With RS facing and the pocket on top, join beige at the bottom right corner through both layers.
- Bottom: 3 sc in the first st, sc in next 14 sts, 3 sc in the last st. (20 sts, including both corner groups)
- Left side: Sc in each of the 28 row-ends of Rows 1–28. Work Rows 1–18 through both layers and Rows 19–28 through the back only. (28 sts)
- Left roof slope: Sc in each row-end of Rows 29–35. (7 sts)
- Peak: 3 sc in the single st of Row 36. (3 sts)
- Right roof slope: Sc in each row-end of Rows 35–29. (7 sts)
- Right side: Sc in each of the 28 row-ends of Rows 28–1, working Rows 18–1 through both layers. (28 sts)
Join with sl st to the first sc. Total: 93 sts (20 + 28 + 7 + 3 + 7 + 28). Fasten off.
Why the math works: The bottom has 16 foundation sts. The first and last sts each take 3 sc, which adds 2 extra sts at each corner: 16 + 2 + 2 = 20. Each side matches the 28 body rows exactly. Each slope matches the 7 decrease rows below the peak, and Row 36 is the peak itself. The pocket has the same 16 sts and 18 rows as the back, so it adds no stitches to the count.
Roof Row 1 (cream): With RS facing, join cream in the right-side border sc at Row 28. Sc in that st. Sc in each of the next 7 slope sts and in the first peak sc. Work 3 sc in the center peak sc. Sc in the last peak sc, in the 7 left slope sts, and in the left-side border sc at Row 28. (21 sts: 19 worked once + 2 extra at the peak)
Roof Row 2 (cream bobble snow): Ch 1, turn. Sc in first st, (bob in next st, sc in next st) 4 times, bob in next st, 3 sc in the center st, bob in next st, (sc in next st, bob in next st) 4 times, sc in last st. (23 sts: 21 worked once + 2 extra at the peak; 10 bobbles)
The bobbles sit on the RS as a chunky, scalloped snow line. Their bulk makes the trim hang about 0.25 in (0.6 cm) past the walls on each side, so the eaves are about 5 in (12.7 cm) wide. Fasten off and weave in ends.
Final Blocking
- Lightly mist the holder with water, or soak it briefly and roll it in a towel.
- Lay it flat, RS up, on a blocking mat.
- Pin the bottom edge straight at 4.5 in (11.4 cm).
- Pin the sides straight, with the height at 8.5 in (21.6 cm) to the beige peak.
- Pin the roof slopes into straight lines meeting at a sharp point.
- Don’t pin through or flatten the bobbles. Shape them gently with your fingers.
- Slip a piece of card into the pocket so the layers don’t stick together.
- Let it dry completely before removing the pins.
Final Quality-Control Checklist
- Back panel has 16 sts and 36 rows, ending in a single peak st.
- Pocket has 16 sts and 18 rows, with a ridge along the top.
- Door is 6 sts wide with a rounded arch and a cream knob.
- Windows are matching squares on sts 3–5 and 12–14.
- Flower sprigs mirror each other on either side of the door.
- Border Round 1 has 93 sts, with no gaps at the pocket’s top corners.
- Roof trim has 10 bobbles, 5 on each slope, with a pointed peak.
- Finished holder measures 4.5 in x 9 in (11.4 cm x 22.9 cm) including trim.
- All ends are woven in on the WS.
Troubleshooting
Roof looks lopsided: Check that every roof row has a sc2tog at both ends and that the counts match.
Sides ripple: You worked more than 1 sc per row-end. Rework with exactly 28 per side.
Sides pull in: You skipped row-ends. Count them and rework.
Pocket gapes at the top corners: Work the Row 18 row-end firmly through both layers. Add a small beige tack stitch if needed.
Bobbles appear on the wrong side: As you work Row 2, push each bobble toward the side facing away from you.
Door puckers the pocket: Whipstitch more loosely, catching only the outer loops of the door.
Fork falls over: Check that the pocket top sits 4 in (10.2 cm) above the bottom edge. A shorter pocket won’t support the handles.
Care
Hand wash in cool water with mild soap, press out the water in a towel, and dry flat. Reshape the roof point and bobbles while damp.

Final Notes
The measurement chain keeps this holder accurate. A gauge of 16 sc x 18 rows = 4 in (10.2 cm) gives a 4 in (10.2 cm) square pocket and a 4 in x 8 in (10.2 cm x 20.3 cm) back panel. The pocket matches the back stitch for stitch and row for row, so one 93-st border round joins them and brings the holder to 4.5 in x 8.5 in (11.4 cm x 21.6 cm). Two cream roof rows finish it at about 9 in (22.9 cm) tall.
Check the pocket first, and everything else will follow. Make one for each place setting and enjoy a snowy little village on your table.
Happy crocheting!