

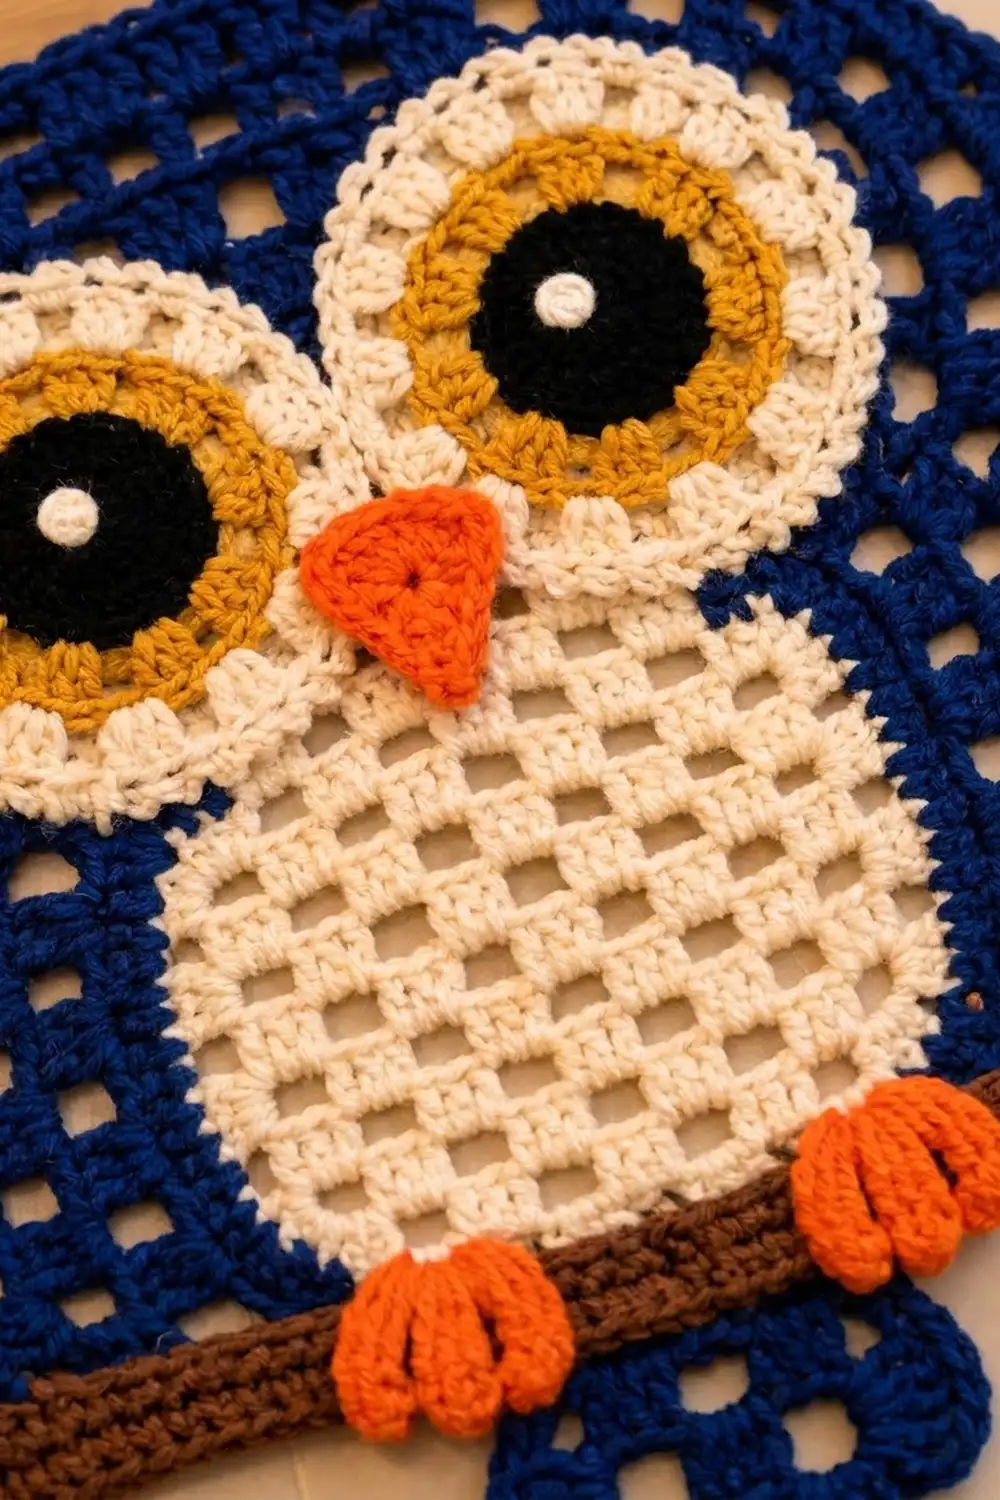
The Midnight Perch Owl Bath Rug is a cheerful owl worked in open navy mesh. A cream mesh belly, big layered eyes, an orange beak and two orange feet sit on top, and the owl perches on a brown branch. Two pointed ears rise from the top corners, and a small stepped tail drops below the branch.
The colors are navy, cream, golden mustard, black, chocolate brown and orange. The open mesh keeps the rug light and graphic, and a scalloped shell border softens the outline.
This pattern uses US crochet terms. The finished rug measures 23 in (58.4 cm) wide x 25 in (63.5 cm) tall from ear tip to tail tip, including the border.
You work the body flat in filet mesh rows, add the ears and tail as short stepped sections, and finish with a two-round border. Then you make the belly, eyes, beak, branch and feet separately and sew them on in layers.
Finished Size and Construction
- Finished size: 23 in (58.4 cm) x 25 in (63.5 cm)
- Skill level: Intermediate
- Terminology: US crochet terms
- Yarn weight: Bulky (#5)
- Hook: 6.5 mm (US K-10.5)
- Number of pieces: 1 body plus 7 appliqués (belly, 2 eyes, beak, branch, 2 feet)
- Layout: single rug; no motifs are joined
- Body size before border: 20 in (50.8 cm) x 22 in (55.9 cm)
- Border depth: 1.5 in (3.8 cm) on every edge
Materials
Use a smooth bulky cotton, cotton blend or sturdy acrylic. Cotton holds its shape and washes well. The amounts below assume about 120 m per 100 g.
- Navy (body, border): 220 g / 264 m
- Cream (belly, eye rings, highlights): 60 g / 72 m
- Golden mustard (eye rings): 20 g / 24 m
- Black (pupils): 20 g / 24 m
- Brown (branch): 20 g / 24 m
- Orange (beak, feet): 15 g / 18 m
All amounts include a margin of about 15 percent for swatching and tension differences.
Tools:
– 6.5 mm hook
– Tapestry needle
– Stitch markers
– Rust-proof pins
– Measuring tape
– Scissors
– Blocking mats or a towel
– Optional: non-slip rug grip mat
Abbreviations (US Terms)
- ch: chain
- sl st: slip stitch
- sc: single crochet
- hdc: half double crochet
- dc: double crochet
- sc2tog: single crochet 2 together
- sk: skip
- sp: space
- st(s): stitch(es)
- MR: magic ring
- BLO: back loop only
- RS: right side
Special stitches:
- Mesh: a ch-2 space plus the dc that closes it. Each mesh is 3 sts wide.
- Decrease at row start: sl st in the next 2 ch and the next dc (3 sl sts). Ch 5 (counts as dc + ch 2), then dc in the next dc or in the top of the turning ch.
- Decrease at row end: work across until 1 mesh remains, then stop.
- Picot: ch 3, sl st in the 3rd ch from the hook.
- 3-dc cluster: in the same place, (yo, insert hook, pull up a loop, yo, pull through 2 loops) 3 times. Yo and pull through all 4 loops.
Gauge and Checkpoints
Gauge:
– 4 meshes and 4 rows = 4 in (10.2 cm) square, so 1 mesh = 1 in (2.5 cm) wide and 1 row = 1 in (2.5 cm) tall.
– 3 sc = 1 in (2.5 cm).
Swatch first: ch 17 and work 4 rows of mesh. Block the swatch and measure it.
– Larger than 4 in (10.2 cm): go down half a hook size.
– Smaller than 4 in (10.2 cm): go up half a hook size.
Meshes must be square, because the ear, tail and border counts depend on it.
Checkpoints:
– After Row 4: 20 in (50.8 cm) x 4 in (10.2 cm)
– After Row 16: 20 in (50.8 cm) x 16 in (40.6 cm)
– After the ears: 19 in (48.3 cm) tall
– After the tail: 22 in (55.9 cm) tall
– After Border Round 1: 21 in (53.3 cm) x 23 in (58.4 cm)
– After Border Round 2: 23 in (58.4 cm) x 25 in (63.5 cm)
Body
With navy, ch 65.
Row 1 (RS): Dc in the 8th ch from the hook. Ch 2, sk 2 ch, dc in the next ch. Repeat from * 18 more times. Turn. (20 meshes: 21 dc + 20 ch-2 sps = 61 sts)
Row 2: Ch 5 (counts as dc + ch 2), dc in the next dc. Ch 2, dc in the next dc. Repeat from * across, working the last dc in the 3rd ch of the turning ch. Turn. (20 meshes, 61 sts)
Rows 3-16: Repeat Row 2. Do not fasten off. (20 meshes, 61 sts)
First Ear
Row 17: Ch 5, dc in the next dc, (ch 2, dc in the next dc) 2 times. Turn and leave the rest of the row unworked. (3 meshes)
Row 18: Decrease at row start. Ch 2, dc in the 3rd ch of the turning ch. Turn. (2 meshes)
Row 19: Ch 5, dc in the next dc. Fasten off. (1 mesh)
The outer edge stays straight while the inner edge steps in, which forms the point of the ear.
Second Ear
Count 4 dc posts in from the other end of Row 16. The turning ch counts as the first post. Join navy in the 4th post.
Row 17: Ch 5, dc in the next dc, ch 2, dc in the next dc, ch 2, dc in the 3rd ch of the turning ch. Turn. (3 meshes)
Row 18: Ch 5, dc in the next dc, ch 2, dc in the next dc. Leave the inner mesh unworked. Turn. (2 meshes)
Row 19: Decrease at row start, working the dc in the top of the turning ch. Fasten off. (1 mesh)
Fourteen meshes of Row 16 stay open between the ears. They form the flat top of the head.
Tail
Turn the body upside down so you can work into the free loops of the foundation ch. Find the dc at the start of mesh 8 and join navy in the free loop at its base.
Tail Row 1: Ch 5, sk 2 ch, dc in the ch at the base of the next dc. Ch 2, sk 2 ch, dc in the ch at the base of the next dc. Repeat from * 4 more times. Turn. (6 meshes)
Tail Row 2: Decrease at row start, then work across and decrease at row end. Turn. (4 meshes)
Tail Row 3: Repeat Tail Row 2. Fasten off. (2 meshes)
Seven foundation meshes stay open on each side of the tail.
Belly
With cream, ch 29.
Row 1: Dc in the 8th ch from the hook. Ch 2, sk 2 ch, dc in the next ch. Repeat from * 6 more times. Turn. (8 meshes: 9 dc + 8 ch-2 sps = 25 sts)
Rows 2-7: Repeat Body Row 2. (8 meshes)
Row 8: Decrease at both ends. Turn. (6 meshes)
Row 9: Repeat Row 8. Do not fasten off. (4 meshes)
The belly now measures 8 in (20.3 cm) x 9 in (22.9 cm).
Edging: Ch 1. Sc around the whole belly:
– 3 sc in each mesh along the top and bottom
– 3 sc in each row end, including the stepped edges
– 2 extra sc at each of the 2 bottom corners
Join with a sl st. The counts are:
– Top: 12 sc
– Each side: 33 sc
– Bottom: 24 sc
– Corner extras: 4 sc
– Total: 12 + 33 + 33 + 24 + 4 = 106 sc
Leave a long tail. The belly now measures 9 in (22.9 cm) x 10 in (25.4 cm).
Eyes (Make 2)
Round 1: With black, MR. Ch 3 (counts as dc), 11 dc in the ring. Join. (12 dc; 1.5 in / 3.8 cm across)
Round 2: Ch 3, dc in the same st, then 2 dc in each st around. Join. (24 dc; 3 in / 7.6 cm across) Fasten off.
Round 3: Join gold. Ch 3, dc in the same st, dc in the next st. 2 dc in the next st, dc in the next st. Repeat from * around. Join. (36 dc; 4.5 in / 11.4 cm across) Fasten off.
Round 4: Join cream. Ch 3, dc in the next st, 2 dc in the next st. Dc in the next 2 sts, 2 dc in the next st. Repeat from * around. Join. (48 dc; 6 in / 15.2 cm across)
Round 5 (trim): Ch 1. Sc in the next 3 sts, picot. Repeat from * around. Join. (48 sc, 1 in each st, + 16 picots; 6.5 in / 16.5 cm across) Leave a long tail.
Highlight: With cream, work a double French knot on each pupil, slightly up and to the side of center. Put it on the same side on both eyes.
Beak
With orange, ch 7.
Row 1: Sc in the 2nd ch from the hook and in each ch across. Turn. (6 sc)
Row 2: Ch 1, sc2tog, sc in the next 2 sts, sc2tog. Turn. (4 sc)
Row 3: Ch 1, sc2tog twice. Turn. (2 sc)
Row 4: Ch 1, sc2tog. Fasten off. (1 sc)
The beak is 2 in (5.1 cm) wide x 1.5 in (3.8 cm) tall.
Branch
With brown, ch 65.
Row 1: Hdc in the 3rd ch from the hook and in each ch across. Turn. (63 hdc)
Row 2: Ch 1, sc in the BLO of each st across. Fasten off. (63 sc)
Working in the back loops leaves a ridge that looks like bark. The branch measures 21 in (53.3 cm) x 1 in (2.5 cm).
Feet (Make 2)
With orange, MR. Ch 3, 3-dc cluster in the ring, ch 3, sl st in the ring. Repeat from * 2 more times. Pull the ring tight. (3 toes; 2 in / 5.1 cm wide)
Border
Border gauge: 3 sc = 1 in (2.5 cm). Each mesh edge and each row end is 1 in (2.5 cm) long, so each gets 3 sc.
Round 1: With RS facing, join navy at the bottom-left body corner. Ch 1. Sc around with 3 sc per mesh and 3 sc per row end. Work 2 extra sc at each of these 6 points:
– both bottom body corners
– the outer top corner of each ear
– both bottom corners of the tail
Join. The counts are:
– Each outer side (16 body rows + 3 ear rows): 57 sc
– Each ear tip: 3 sc
– Each inner ear edge (3 row ends + 2 open meshes): 15 sc
– Top of head (14 meshes): 42 sc
– Each bottom section beside the tail (7 meshes): 21 sc
– Each stepped side of the tail: 15 sc
– Tail bottom: 6 sc
– Corner extras: 12 sc
Total: 57 + 57 + 3 + 3 + 15 + 15 + 42 + 21 + 21 + 15 + 15 + 6 = 270, and 270 + 12 = 282 sc. Round 1 adds 0.5 in (1.3 cm) per edge.
Round 2 (shells): Sl st in the first sc. Sk 2 sts, 5 dc in the next st, sk 2 sts, sl st in the next st. Repeat from * around, ending with the last sl st in the first sl st. (47 shells: 235 dc + 47 sl sts = 282 sts) Round 2 adds 1 in (2.5 cm) per edge. Fasten off.
Why the math works:
– Each shell repeat uses 6 sts, and 282 ÷ 6 = 47, so the shells close evenly.
– 3 sc per inch keeps the edges flat.
– The 12 corner extras let the points turn without cupping.
If your Round 1 count is off, add or remove sc along the outer sides until you have 282.
Appliqué Placement
Lay the rug flat, RS up. Measure every height from the foundation edge of the body. Pin each piece before you sew it.
- Belly: Center it, with the bottom edge 2 in (5.1 cm) up. The top reaches 12 in (30.5 cm). Whipstitch around the edging.
- Branch: Center it from 2 in (5.1 cm) to 3 in (7.6 cm) up, so it covers the bottom of the belly. Each end extends 0.5 in (1.3 cm) onto the border.
- Eyes: Place them so they touch at the center. Their bottoms sit 9 in (22.9 cm) up, overlapping the top of the belly, and their tops sit 0.5 in (1.3 cm) below the top of Row 16. Sew just inside the picots.
- Beak: Place it point down where the eyes meet, with the top edge 11.5 in (29.2 cm) up.
- Feet: Center each foot 3 in (7.6 cm) from the center line, with the toes over the branch.
Final Blocking
- Soak the rug in cool water and press it in a towel. Don’t wring it.
- Lay it flat, RS up.
- Pin it to 23 in (58.4 cm) x 25 in (63.5 cm).
- Straighten the rows and square the meshes.
- Pin each shell into a scallop and each ear into a point.
- Shape the eyes into circles and straighten the branch.
- Let it dry completely before unpinning.
Final Quality-Control Checklist
- Body has 20 meshes x 16 rows
- Ears step 3, 2, 1 meshes; tail steps 6, 4, 2 meshes
- Border has 282 sc and 47 shells
- Eyes are 6.5 in (16.5 cm) with 16 picots each
- Highlights are on matching sides
- Appliqués lie flat and all ends are secure
Troubleshooting
- Tall, narrow meshes: snug up your dc or go down a hook size.
- Ragged ear steps: keep the decrease sl sts loose.
- Ruffled border: recount Round 1 section by section.
- Cupped border: check the corner extras, or work Round 2 with a larger hook.
- Bowl-shaped eyes: loosen your tension on Round 4.
- Puckered appliqués: sew more loosely and catch only the mesh bars.
Care
Machine wash cold on a gentle cycle and dry flat. Use a non-slip mat on smooth floors.

Final Notes
The measurements build like this:
– 1 mesh = 1 in (2.5 cm), so the body is 20 in (50.8 cm) wide.
– 16 rows, plus 3 in (7.6 cm) of ears and 3 in (7.6 cm) of tail, make 22 in (55.9 cm).
– The 282 sc border round and the 47 shells add 1.5 in (3.8 cm) per edge, for 23 in (58.4 cm) x 25 in (63.5 cm).
Check each stage and your owl will lie flat and even.
Happy crocheting!