

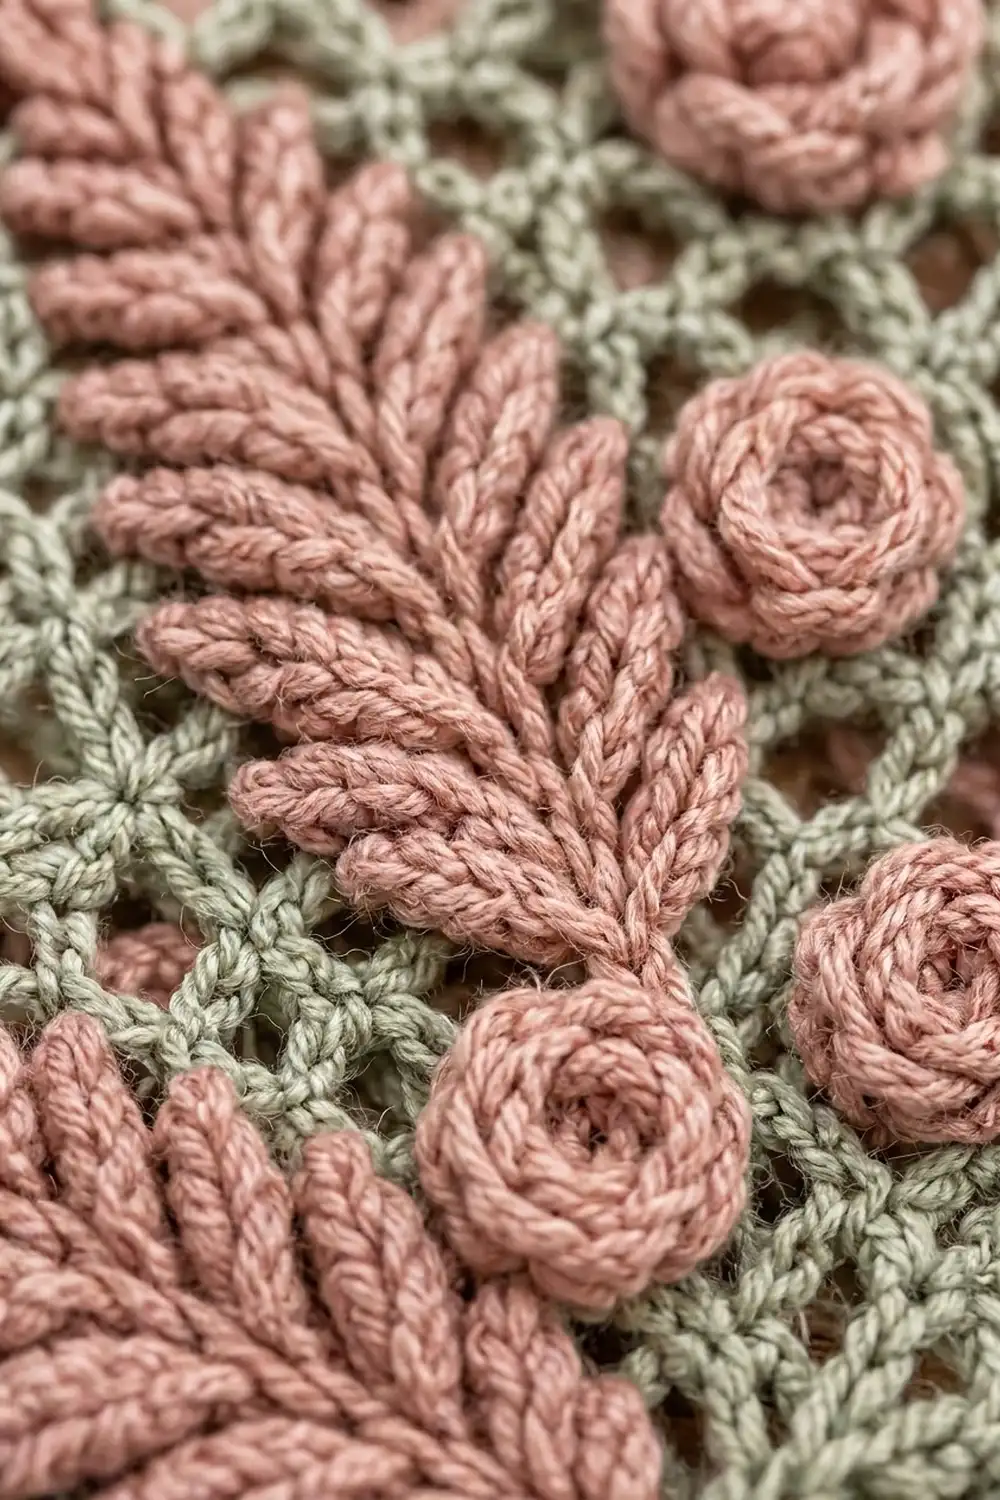
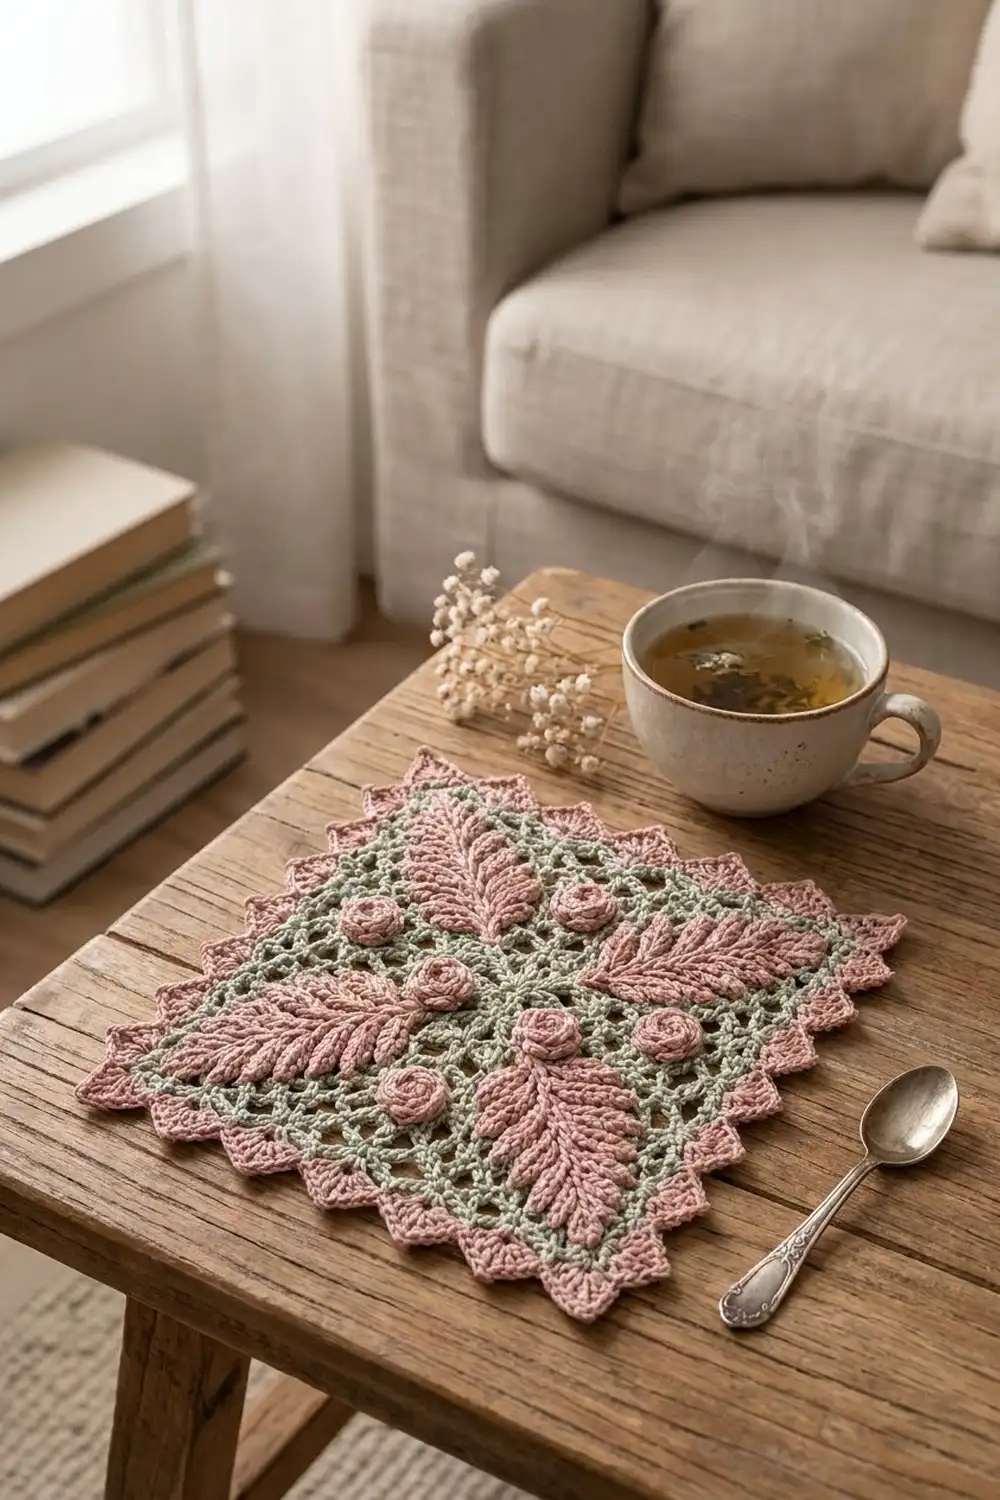
The Rose Fern Lattice Square is a single textured square: a light sage-green chain-loop mesh topped with raised dusty-rose appliqués. Four feathered fern leaves run along the diagonals toward the corners, five small rolled roses sit in a cross, and a dusty-rose sawtooth border frames the edge.
The look is soft and vintage, close to Irish-lace style but much simpler. Only two colors are used. The open sage mesh lets the solid rose leaves and roses stand out in relief.
This pattern uses US crochet terms. The finished square measures 8 in x 8 in (20.3 cm x 20.3 cm) after blocking. On its own it works as a doily, coaster mat, or display piece.
Construction is simple. You work the sage mesh in the round from the center, finish it with one solid single crochet round, then add a two-round rose border. You crochet the leaves and roses separately and sew them on.
Finished Size and Construction
- Finished size: 8 in x 8 in (20.3 cm x 20.3 cm)
- Skill level: Intermediate
- Terminology: US crochet terms
- Yarn weight: Sport (CYC 2), mercerized or matte cotton
- Hook: 3.0 mm
- Number of pieces: 1 square, plus 9 sewn-on appliqués (4 leaves, 5 roses)
- Layout: Single square; leaves on the diagonals, roses in a cross
- Mesh square size before border: 6.5 in x 6.5 in (16.5 cm x 16.5 cm)
- Border depth: 0.75 in (1.9 cm) on each side
- Leaf size: 3 in long x 2.25 in wide (7.6 cm x 5.7 cm)
- Rose size: about 1 in (2.5 cm) across
Materials
Use a smooth cotton or cotton blend in sport weight, about 155 m per 50 g. Cotton holds the leaf ridges and rose spirals crisply and blocks flat. Avoid fuzzy yarns, because they blur the mesh.
- Color A, light sage green: 25 g (78 m / 85 yd), for the mesh
- Color B, dusty rose: 35 g (109 m / 119 yd), for the leaves, roses, and border
Both quantities include a margin of about 20% for swatching and sewing tails.
Tools:
- 3.0 mm crochet hook
- Tapestry needle
- 6 locking stitch markers
- Scissors
- Rustproof pins and a blocking mat
- Spray bottle with clean water
- Measuring tape or ruler
Abbreviations (US Terms)
- ch – chain
- sl st – slip stitch
- sc – single crochet
- hdc – half double crochet
- dc – double crochet
- sk – skip
- st(s) – stitch(es)
- sp – space
- rep – repeat
Special stitch – Frond: ch the number given, sc in 2nd ch from hook, then work the listed stitches in the remaining chains, ending with a sl st in the same spine chain where the frond started. Each frond is one leaflet of the fern.
Special stitch – Tooth: sc in next st, ch 4, sc in 2nd ch from hook, hdc in next ch, dc in next ch, sk next 2 sts. One tooth uses 3 border stitches.
Gauge and Checkpoints
Gauge matters more than usual here, because the border stitch count depends on the mesh size. Make the mesh through Round 5 and measure before you go further.
- Mesh gauge: Rounds 1–5 = 2.5 in (6.4 cm) square, measured edge to edge (not corner to corner), lightly pressed flat.
- Solid gauge: 20 sc = 3.25 in (8.3 cm) in Color A.
Checkpoints:
- After Round 5: 2.5 in (6.4 cm) square
- After Round 9: 4.5 in (11.4 cm) square
- After Round 13: 6.25 in (15.9 cm) square
- After Round 14: 6.5 in (16.5 cm) square
- After the border: 8 in (20.3 cm) square
If your square is too big, go down to a 2.75 mm hook, or chain more tightly on the ch-5 loops. If it is too small, go up to a 3.25 mm hook. Don’t add or remove rounds, because the border math depends on 12 side loops per side in Round 13.
Mesh Square (Color A)
In every round, a side loop is any ch-5 loop between two corners and a corner loop is the single ch-5 loop at each corner. Place a marker in each corner loop and move it up every round.
Round 1: Make a magic ring, ch 1, 8 sc in ring, sl st to first sc. Pull the ring closed. (8 sc)
Round 2: Ch 1, sc in first sc, ch 5, sc in next sc, ch 5 rep 7 times, sl st to first sc. (8 ch-5 loops) Mark loops 2, 4, 6, and 8 as corner loops. Loops 1, 3, 5, and 7 are side loops, 1 per side.
Round 3: Sl st in first 2 ch of the next loop, ch 1, sc in same loop (side loop). Ch 5, (sc, ch 5, sc) in corner loop, ch 5, sc in next side loop rep 3 more times, but on the last rep skip the final sc and sl st to first sc instead. (12 ch-5 loops: 4 corner loops + 8 side loops, 2 per side)
The new corner loop is the ch-5 worked between the 2 sc of the corner group. Move your markers there.
Rounds 4–13: Sl st in first 2 ch of the next loop, ch 1, sc in same loop. Work ch 5, sc in next side loop to the corner, then ch 5, (sc, ch 5, sc) in corner loop. Continue around in the same way and sl st to first sc. Each round adds 1 side loop per side and 4 loops in total.
Loop counts after each round:
- Round 4: 16 loops (3 side loops per side)
- Round 5: 20 loops (4 per side)
- Round 6: 24 loops (5 per side)
- Round 7: 28 loops (6 per side)
- Round 8: 32 loops (7 per side)
- Round 9: 36 loops (8 per side)
- Round 10: 40 loops (9 per side)
- Round 11: 44 loops (10 per side)
- Round 12: 48 loops (11 per side)
- Round 13: 52 loops (4 corner loops + 48 side loops, 12 per side)
Rule of thumb: Round n has 4 x n loops, with n – 1 side loops per side.
Round 14 (conversion round): Sl st in first 2 ch of the next side loop, ch 1. Work 3 sc in each side loop and (2 sc, ch 2, 2 sc) in each corner loop. Sl st to first sc. Fasten off.
Count for each side: (12 side loops x 3 sc) + (2 sc + 2 sc from the corner loops at each end) = 40 sc. Total: 160 sc + 4 corner ch-2 sps.
Check: the square should measure 6.5 in (16.5 cm). Since 40 sc at 20 sc = 3.25 in (8.3 cm) works out to 6.5 in (16.5 cm), the conversion round also confirms your solid gauge.
Fern Leaves (Color B, make 4)
Each leaf is a spine chain with fronds on both sides and one at the tip. Working the fronds close together gives the raised, feathered look.
Frond sizes:
- Short frond: ch 5, sc in 2nd ch from hook, hdc in next 3 ch, sl st in spine ch (4 sts)
- Long frond: ch 7, sc in 2nd ch from hook, hdc in next 2 ch, dc in next 3 ch, sl st in spine ch (6 sts)
- Medium frond: ch 6, sc in 2nd ch from hook, hdc in next 2 ch, dc in next 2 ch, sl st in spine ch (5 sts)
Side 1 (tip to base): Ch 21. Sl st in 2nd ch from hook. This is the tip. Make 1 short frond as the tip frond. Then sl st in next 2 spine ch, make a frond 8 times, in this order: 2 short, 4 long, 2 medium. You end at spine ch 18 (counted from the hook end). Sl st in the last 3 ch to make the stem.
Side 1 count: 9 fronds (1 tip + 8 side). Frond stitches: (3 short x 4) + (4 long x 6) + (2 medium x 5) = 46 sts.
Side 2 (base to tip): Ch 1. Rotate and work into the bottom loops of the foundation chain. Sl st in the first 3 bottom loops (stem). Sl st in next ch and make a medium frond. Then sl st in next 2 ch, make a frond 7 times, in this order: 1 medium, 4 long, 2 short. Sl st in the last 2 bottom loops and join with a sl st to the tip sl st. Fasten off and leave a 12 in (30.5 cm) tail.
Side 2 count: 8 fronds. Frond stitches: (2 medium x 5) + (4 long x 6) + (2 short x 4) = 42 sts. Leaf total: 17 fronds.
Fronds on opposite sides now meet at the same spine chains. Press each frond toward the tip so the leaflets point the same way. The leaf should measure 3 in x 2.25 in (7.6 cm x 5.7 cm).
Optional ridge: With a Color B tail, surface sl st up the center spine to make it look raised.
Rolled Roses (Color B, make 5)
Row 1: Ch 15. Work 2 hdc in 3rd ch from hook and 2 hdc in each remaining ch across. (13 ch worked x 2 = 26 hdc) The strip will curl into a ruffle by itself. Fasten off and leave a 10 in (25.4 cm) tail.
Shaping: Starting from the end opposite the tail, roll the strip tightly into a spiral, keeping the base flat. Thread the tail onto the needle and stitch through all layers of the base 3–4 times to secure it. Each rose should be about 1 in (2.5 cm) across.
Appliqué Placement
Lay the mesh square flat, right side up.
- Leaves: Place 1 leaf on each diagonal, with the stem about 0.75 in (1.9 cm) from the center and the tip pointing into the corner. The tip should end about 1 in (2.5 cm) inside the corner of the mesh.
- Center rose: Place 1 rose over the center so it covers all 4 stems.
- Edge roses: Place 1 rose on each straight axis, halfway between two leaves, about 2.5 in (6.4 cm) from the center.
- Pin everything first and check that it is symmetrical. Then use the Color B tails to whipstitch around each leaf’s spine and outer fronds, and through each rose base. Catch only the mesh chains so no stitches show on the back.
The leaves and roses sit on top of the mesh as a raised layer. The mesh stays open between them.
Border (Color B)
Border gauge: same as solid gauge, 20 sc = 3.25 in (8.3 cm). Each tooth covers 3 sts, about 0.5 in (1.3 cm).
Border Round 1: Join Color B in any corner ch-2 sp. Ch 1, (sc, ch 2, sc) in the same sp. Sc in each of the next 40 sc, (sc, ch 2, sc) in corner sp rep 3 times, then sc in each of the last 40 sc and sl st to first sc.
Count for each side: 40 sc worked 1 per existing stitch + 2 corner sc = 42 sc. Total: 168 sc + 4 corner ch-2 sps.
Border Round 2 (teeth): Sl st into the corner ch-2 sp. Ch 1, (sc, ch 3, sc) in the same sp to make a corner picot. Make 14 teeth across the side, then (sc, ch 3, sc) in the corner ch-2 sp rep 3 times. Make 14 teeth across the last side and sl st to first sc. Fasten off.
Count for each side: 14 teeth. Total: 56 teeth + 4 corner picots.
Why the math works: Each tooth starts with sc in 1 st and then skips 2, so it uses exactly 3 sts. 14 teeth x 3 sts = 42 sts, which matches the 42 sc on each side from Border Round 1. The last tooth on each side skips the final 2 sc and lands right at the corner sp, so there is no leftover stitch and no gap.
Round 1 adds about 0.25 in (0.6 cm) and the teeth add about 0.5 in (1.3 cm), for a 0.75 in (1.9 cm) border. 6.5 in + 0.75 in + 0.75 in = 8 in (20.3 cm).
Final Blocking
- Weave in all ends along the back of the appliqués or inside the border sc.
- Soak the square in cool water for 10 minutes, then gently squeeze it out. Don’t wring.
- Roll it in a towel and press to remove extra water.
- Lay it face up on the blocking mat and pin the 4 corners to an 8 in (20.3 cm) square.
- Pin the tip of each tooth so the points are sharp and evenly spaced.
- Open the mesh loops with your fingers so they sit evenly.
- Shape each fern frond so it angles toward the leaf tip, and press each rose into a dome.
- Let it dry fully, for 12–24 hours, before unpinning.
Final Quality-Control Checklist
- Square measures 8 in x 8 in (20.3 cm x 20.3 cm) on all four sides
- Mesh is 6.5 in (16.5 cm) inside the border
- Round 13 had 12 side loops on every side
- Round 14 has 40 sc on each side
- Border Round 1 has 42 sc on each side
- 14 teeth on each side, 56 in total, plus 4 corner picots
- 4 leaves with 17 fronds each, all tips pointing into the corners
- 5 roses: 1 in the center and 4 on the axes
- No sewing visible from the front, and all ends secured
Troubleshooting
- Mesh cups into a bowl: Your ch-5 loops are too tight. Loosen your chains or go up a hook size.
- Mesh ruffles: The loops are too loose. Tighten your chains or go down a hook size.
- Wrong stitch count on one side in Round 14: Count the side loops in Round 13. A missed or extra loop changes the side count by 3 sc. Rip back to fix it.
- Teeth don’t end at the corner: Recount Border Round 1. Each side must have exactly 42 sc.
- Leaf twists: You worked Side 2 into the wrong loops. Use only the bottom loops of the foundation chain.
- Rose falls open: Roll it tighter and add more stitches through the base.
- Border flares: Work Border Round 1 with a hook one size smaller.
Care
Hand wash in cool water with a mild detergent and dry flat, reshaping the teeth and leaves while damp. Don’t tumble dry, because heat crushes the raised appliqués.
Final Notes
The measurement chain is short: Round 5 at 2.5 in (6.4 cm), Round 9 at 4.5 in (11.4 cm), Round 13 at 6.25 in (15.9 cm), and Round 14 at 6.5 in (16.5 cm) with 40 sc per side. The border adds 2 corner sc for 42 sts per side and 14 three-stitch teeth, bringing the square to 8 in (20.3 cm). If each checkpoint is correct, the border will fit exactly.
Take your time with the fronds and the placement, because they are what give this square its sculpted look.
Happy crocheting!