

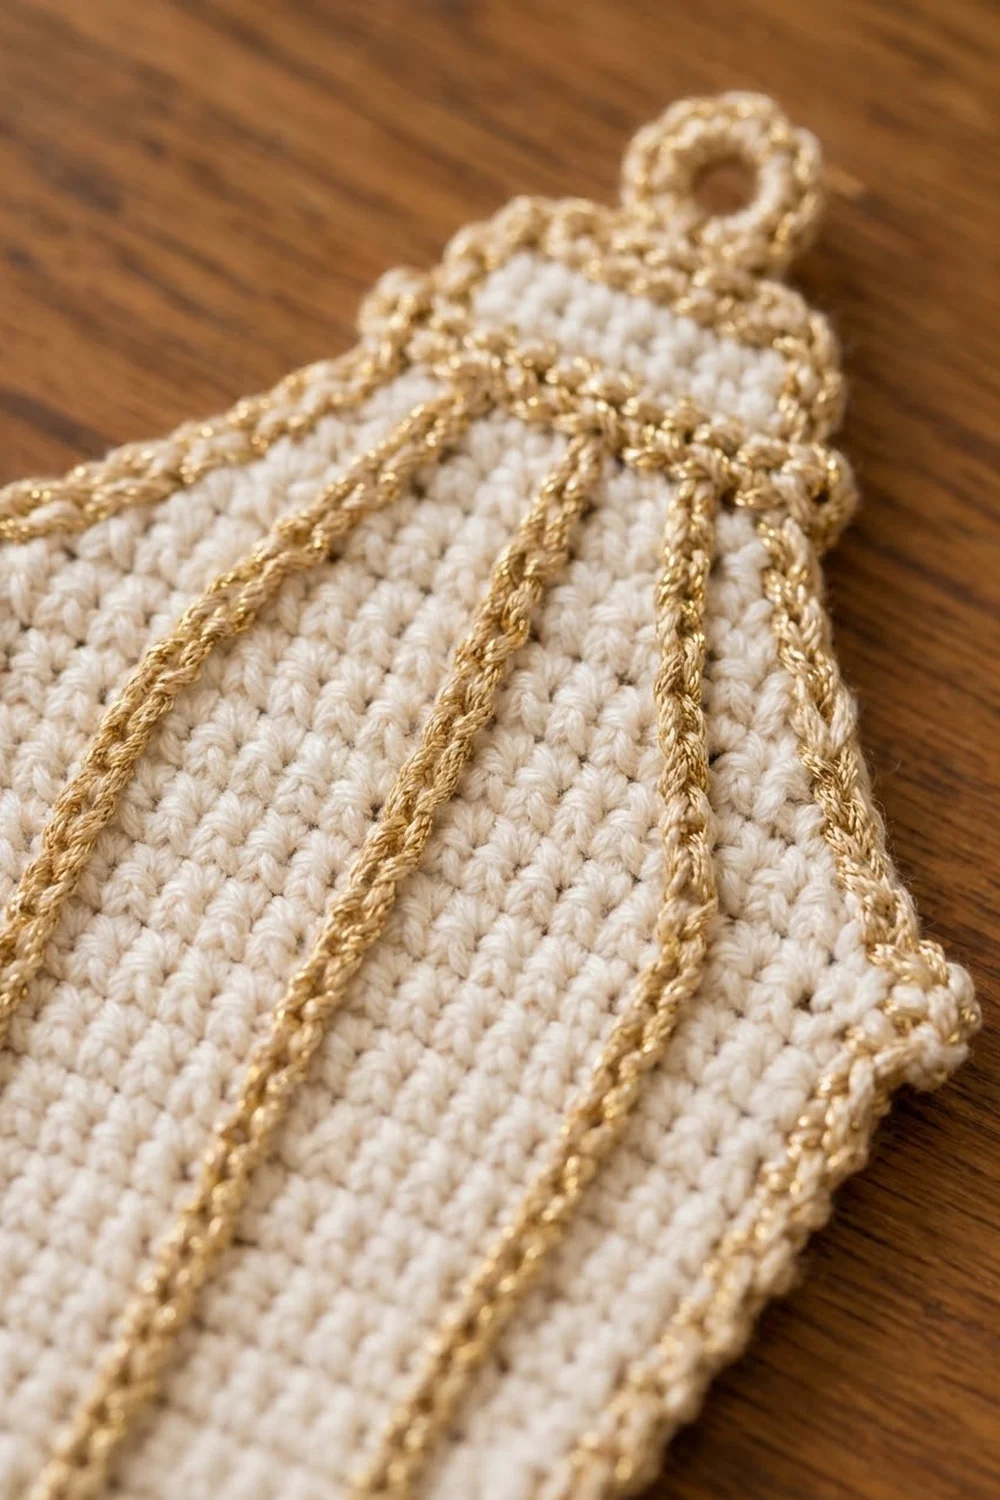
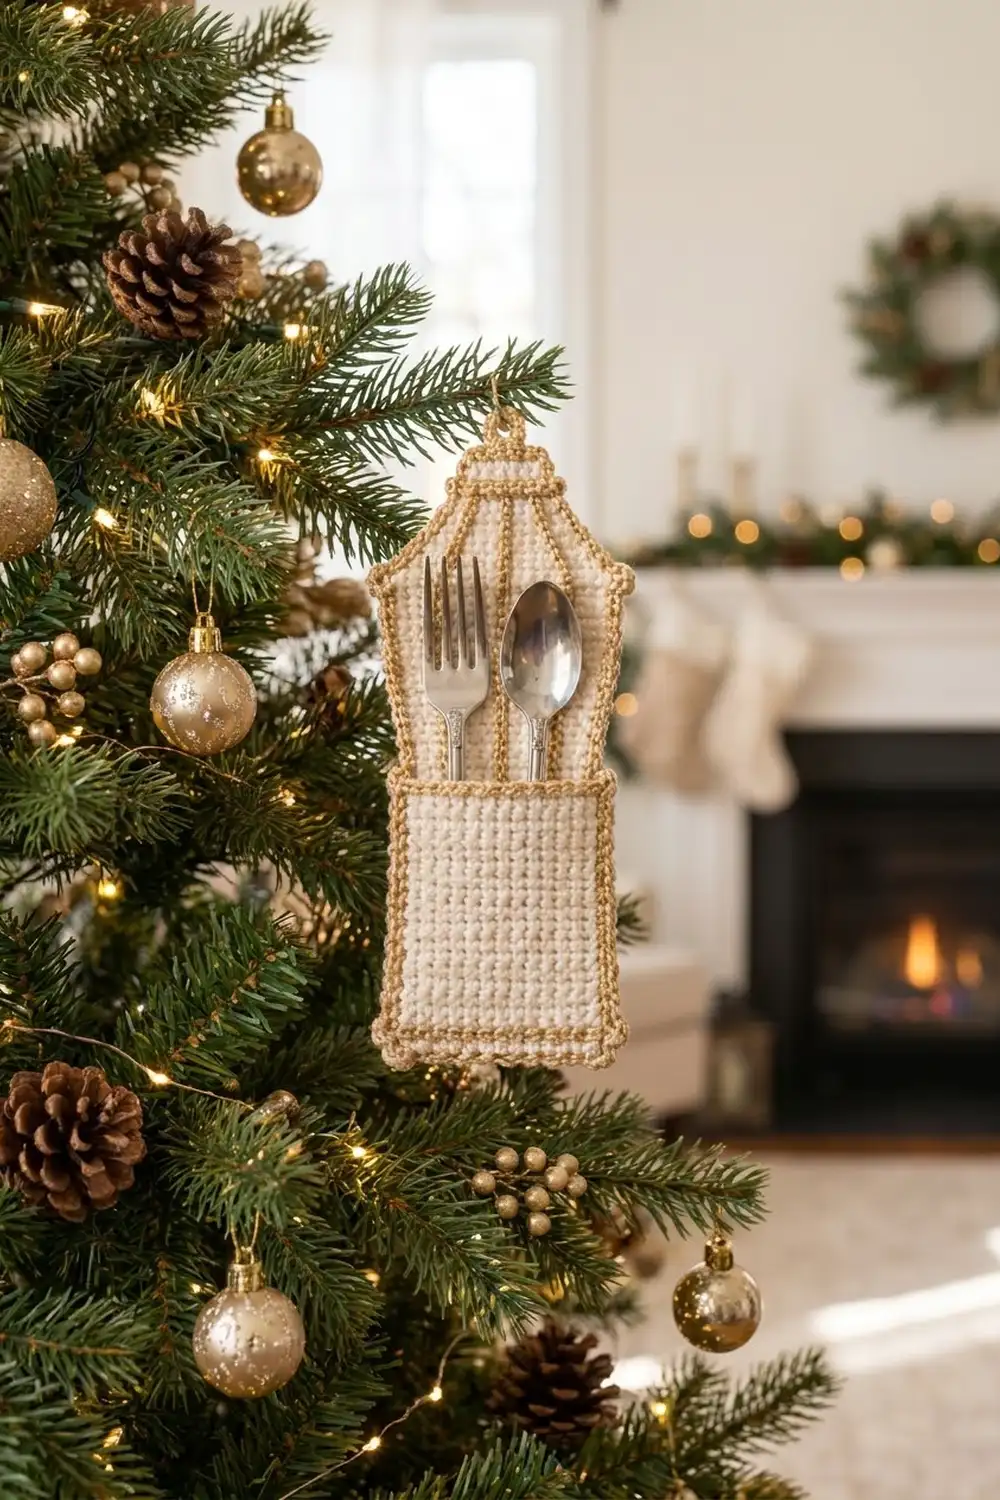
This cutlery holder is shaped like a little holiday lantern. It has a straight body, small flared shoulders, a sloped roof, a short square cap, and a round hanging ring at the top. A flat front pocket holds a fork and spoon, and each place setting gets a soft, warm glow when the candles are lit.
The fabric is creamy ivory single crochet. Everything else is gold: four thin lines run up the lantern panes, one line sits under the cap, and a rope-like crab stitch edge goes around both the back panel and the pocket. The look is classic and elegant. It suits a Christmas table, a winter wedding, or any dinner where you want the cutlery to look like part of the decorations.
The pattern uses US crochet terms. The finished holder is 4.0 in (10.2 cm) wide across the body, 4.4 in (11.2 cm) wide at the shoulders, and 8.4 in (21.3 cm) tall without the ring, or about 9.0 in (22.9 cm) with it. A standard dessert fork and spoon fit with their handles showing above the pocket.
You make two pieces in rows of single crochet: a shaped back panel and a rectangular pocket. Gold surface slip stitch lines go on next, then a two-round gold border on each piece. Last, you sew the pocket onto the lower back panel along its sides and bottom. Every stage has a measurement checkpoint, so you can catch any size drift early.
Finished Size and Construction
- Finished size: 4.0 in (10.2 cm) wide body, 4.4 in (11.2 cm) at the shoulders, 8.4 in (21.3 cm) tall; about 9.0 in (22.9 cm) including the ring
- Skill level: Easy-intermediate
- Terminology: US
- Yarn weight: DK (#3), cotton or cotton blend
- Hook: 3.5 mm (E-4)
- Number of pieces: 2 (back panel and pocket), joined into one holder
- Layout: pocket centered over the lower back panel, with bottom edges aligned
- Back panel before border: 3.6 in (9.1 cm) wide x 8.0 in (20.3 cm) tall
- Pocket before border: 3.2 in (8.1 cm) wide x 4.0 in (10.2 cm) tall
- Pocket after border: 3.6 in (9.1 cm) x 4.4 in (11.2 cm)
- Border depth: about 0.2 in (0.5 cm) per side (2 rounds)
Materials
Pick a smooth mercerized cotton or a cotton blend in DK weight. Cotton shows stitches clearly, holds the lantern shape, and washes well after a dinner. For the gold, use a soft metallic-blend DK or a matte gold cotton. Stiff metallic thread is hard to work crab stitch with and can scratch the cream fabric.
- Color A (cream/ivory): 20 g, about 44 m
- Color B (gold): 10 g, about 22 m
These amounts are for one holder, and they include a margin for your gauge swatch, the sewing tail, and weaving in ends. For a set of eight, multiply by eight.
Tools
- 3.5 mm (E-4) crochet hook
- Tapestry needle
- Scissors
- Stitch markers (4)
- Ruler or tape measure
- Blocking mat and rustproof pins
Abbreviations (US Terms)
- ch – chain
- sc – single crochet
- sc2tog – single crochet 2 together
- sl st – slip stitch
- st(s) – stitch(es)
- rev sc – reverse single crochet (crab stitch)
- RS / WS – right side / wrong side
Special stitches
- Surface slip stitch: Hold Color B at the back of the work. Insert the hook from front to back through the center of a stitch, yarn over at the back, and pull a loop to the front. Insert the hook into the next stitch along the line, pull up a loop, and draw it through the loop on the hook. Repeat, making 1 surface sl st per row.
- Reverse sc (crab stitch): Work from left to right (for right-handed crocheters). Insert the hook into the next st to the right, pull up a loop, yarn over, and draw through both loops. This makes a twisted, rope-like edge.
Gauge and Checkpoints
Gauge: 20 sc and 24 rows = 4 in (10.2 cm) in sc with Color A. That’s 5 sts and 6 rows per inch (2.5 cm).
Make the pocket first. It’s a plain rectangle, so it works as your gauge test. Measure it flat, without stretching, before you add the border.
Checkpoints
- Pocket after Row 24: 3.2 in (8.1 cm) x 4.0 in (10.2 cm)
- Back panel after Row 36: 3.6 in (9.1 cm) x 6.0 in (15.2 cm)
- Back panel after Row 38: 4.0 in (10.2 cm) wide, about 6.3 in (16.0 cm) tall
- Back panel after Row 44: 1.6 in (4.1 cm) wide at the top, about 7.3 in (18.5 cm) tall
- Back panel after Row 48: 8.0 in (20.3 cm) tall
- After the border: 4.0 in (10.2 cm) body width, 8.4 in (21.3 cm) height
If your pieces are too big, try a 3.25 mm hook. If they’re too small, try a 3.75 mm hook. Height matters more than width here. The pocket has to cover the lower body, and the fork tines need to sit below the roof.
With Color A, ch 17.
Row 1 (RS): Sc in 2nd ch from hook and in each ch across, turn. (16 sts)
Rows 2–24: Ch 1, sc in each st across, turn. (16 sts)
Fasten off Color A. The pocket should measure 3.2 in (8.1 cm) x 4.0 in (10.2 cm).
Pocket border
Round 1: With the RS facing, join Color B in the top right corner st. Ch 1. Work 3 sc in the corner st, sc in the next 14 sts, and 3 sc in the last st (top: 20 sts). Down the side, work 1 sc in each row end (24 sts). Along the bottom, work 3 sc in the first foundation ch, sc in the next 14 ch, and 3 sc in the last ch (bottom: 20 sts). Up the other side, work 1 sc in each row end (24 sts). Join with a sl st to the first sc. (88 sts)
The corner 3-sc groups are counted in the top and bottom totals. The side totals are row-end stitches only: 20 + 24 + 20 + 24 = 88.
Round 2: Ch 1. Rev sc in each st around. Join with a sl st. (88 sts)
Fasten off and leave a 24 in (61.0 cm) tail of Color B for sewing.
Back Panel
With Color A, ch 19.
Row 1 (RS): Sc in 2nd ch from hook and in each ch across, turn. (18 sts)
Rows 2–36: Ch 1, sc in each st across, turn. (18 sts)
Checkpoint: 3.6 in (9.1 cm) x 6.0 in (15.2 cm).
Shoulders
Row 37: Ch 1, 2 sc in the first st, sc in the next 16 sts, 2 sc in the last st, turn. (20 sts)
Row 38: Ch 1, sc in each st across, turn. (20 sts)
The increase sticks out 1 st (0.2 in / 0.5 cm) on each side. That’s the small shoulder flare of the lantern.
Roof
Row 39: Ch 1, sc2tog, sc in the next 16 sts, sc2tog, turn. (18 sts)
Row 40: Ch 1, sc2tog, sc in the next 14 sts, sc2tog, turn. (16 sts)
Row 41: Ch 1, sc2tog, sc in the next 12 sts, sc2tog, turn. (14 sts)
Row 42: Ch 1, sc2tog, sc in the next 10 sts, sc2tog, turn. (12 sts)
Row 43: Ch 1, sc2tog, sc in the next 8 sts, sc2tog, turn. (10 sts)
Row 44: Ch 1, sc2tog, sc in the next 6 sts, sc2tog, turn. (8 sts)
Each row loses 1 st at each end. The roof narrows 2.4 in (6.1 cm) over 1.0 in (2.5 cm) of height.
Cap
Rows 45–47: Ch 1, sc in each st across, turn. (8 sts)
Row 48: Ch 1, sc2tog, sc in the next 4 sts, sc2tog. (6 sts)
Fasten off. Checkpoint: 8.0 in (20.3 cm) tall. Row 48 rounds the top of the cap slightly so the ring sits neatly.
Gold Surface Lines
Number the stitch columns 1–20 from right to left, using Row 38 as the reference. The Row 37 increase added one column at each edge, so the body columns 4, 8, 11, and 15 of 18 are now columns 5, 9, 12, and 16. Mark the four starting columns at Row 21 with stitch markers.
With the RS facing and Color B, work four vertical lines of surface sl st. Make 1 sl st per row.
- Inner lines (columns 9 and 12): Start at Row 21 and go straight up to Row 44. (24 sl sts each)
- Outer lines (columns 5 and 16): Start at Row 21 and go straight up through Row 38. On Rows 39, 40, and 41, step one column toward the center on each row, ending in columns 8 and 13. Go straight up Rows 42–44. (24 sl sts each)
The lines start at Row 21 so their ends hide under the pocket. In Row 44, the lines sit in the 2nd, 3rd, 6th, and 7th sts of the 8. The panes come together in two pairs under the cap.
Cap line: Work 8 surface sl sts across the top of Row 44, one in each st, to separate the roof from the cap.
Pull every line to the WS and weave in the ends there. The lines should lie flat. If the fabric puckers, loosen your tension or go up one hook size for the surface work.
Make All Pieces
For one holder, make:
- 1 pocket (Color A body, Color B border)
- 1 back panel (Color A body, Color B lines and border)
Layout (front view):
      [ ring ]
      [ cap  ]
     /  roof  \
    [ shoulder ]
    [  panes   ]
    [ POCKET   ]
    [ POCKET   ]
Back Panel Border
The border uses the same gauge as the body: 5 sc per inch along stitch edges and 1 sc per row end.
Round 1: With the RS facing, join Color B in the first foundation ch at the bottom right corner. Ch 1.
- Bottom: 3 sc in the first ch, sc in the next 16 ch, 3 sc in the last ch. (22 sts)
- Left side: 1 sc in each row end from Row 1 to Row 48. Work 2 sc in the row end of Row 37 for the shoulder point, and 2 sc in the row ends of Rows 40 and 43 to ease the slope. (48 + 3 = 51 sts)
- Top: 3 sc in the first st of Row 48, sc in the next 2 sts, ch 8 for the ring, sc in the next 2 sts, 3 sc in the last st. (10 sts plus the ch-8 loop)
- Right side: Same as the left side. (51 sts)
Join with a sl st to the first sc. (134 sts plus the ch-8 loop)
The corner 3-sc groups are counted in the bottom and top totals. The sides count only row-end stitches: 22 + 51 + 10 + 51 = 134.
Round 2: Ch 1. Rev sc in each st around. When you reach the ch-8 loop, work 12 rev sc into the loop. Join with a sl st. (134 + 12 = 146 sts)
Fasten off and weave in the ends.
Why the math works: The 22 bottom sts sit across 18 foundation chains, and the 2 extra sts at each corner let the edge turn 90 degrees without cupping. The extra row-end stitches at Row 37 make the shoulder point. The extras at Rows 40 and 43 cover the roof slope, which is about 0.26 in (0.7 cm) per row instead of a flat 0.2 in (0.5 cm), so the edge lies flat. The two rounds add about 0.2 in (0.5 cm) per side, so a 3.6 in (9.1 cm) body becomes 4.0 in (10.2 cm), and a 4.0 in (10.2 cm) shoulder becomes 4.4 in (11.2 cm).
Joining
Method: Whipstitch with the Color B tail you left on the pocket.
- Lay the back panel RS up. Put the pocket on top, RS up, with its bottom edge on Row 1 of the back. The pocket’s finished 3.6 in (9.1 cm) width exactly covers the 18 cream body sts inside the back border.
- Pin the bottom corners first, then the top corners. The pocket top should land around Row 27 of the back, about 4.4 in (11.2 cm) up.
- Sew from the WS side of the pocket’s Round 1 sc (under the crab stitch) through the cream back fabric. Make one whipstitch per pocket stitch.
- Stitch-to-stitch logic: Each of the 24 side row-end sts meets one back row, Rows 2–25. Along the bottom, each of the 20 sts meets one back stitch or one corner. Leave the 20 top sts open.
- Keep the tension snug but relaxed. If the stitches are too tight, the pocket will ripple. If they’re too loose, cutlery can slip behind the pocket.
Size checkpoint: The holder still measures 4.0 in (10.2 cm) across the body, and the pocket opening lies flat.
Final Blocking
- Mist the holder lightly, or soak it in cool water and press it in a towel.
- Pin it RS up on a blocking mat: 4.0 in (10.2 cm) body width, 4.4 in (11.2 cm) across the shoulders, and 8.4 in (21.3 cm) tall.
- Pin the roof slopes straight and the cap square.
- Pin the ring into a round shape.
- Let it dry completely, then unpin.
Final Quality-Control Checklist
- [ ] Back panel: 18 / 20 / 8 / 6 sts at Rows 36, 38, 44, and 48
- [ ] Pocket: 16 sts x 24 rows
- [ ] Four gold lines lie flat and come together in pairs under the cap
- [ ] Back border: Round 1 has 134 sts, Round 2 has 146 sts
- [ ] Pocket border: 88 sts in both rounds
- [ ] Pocket is sewn on three sides and the top is open
- [ ] All ends are woven in on the WS
Troubleshooting
- Edges ripple: Too many border sts. Leave out the extra row-end sc at Rows 40 and 43. Round 1 becomes 130 sts and Round 2 becomes 142.
- Corners cup: Make sure each corner has 3 sc.
- Lines pucker the fabric: Redo them with looser surface sl sts.
- Pocket gaps: Add a whipstitch at each pocket corner.
- Ring is floppy: Work 14 rev sc into the loop instead of 12, and adjust the final count to 148.
- Roof leans: Re-block with the slopes pinned evenly.
- Cutlery too long: Add 6 rows to the body (Rows 1–36 become Rows 1–42). The panel grows 1.0 in (2.5 cm), and each side border gains 6 sts.
Care
Hand wash in cool water, press out the water in a towel, and dry flat. Don’t wring it, so the crab stitch edge keeps its shape.
Final Notes
Here’s the measurement chain: 20 sts and 24 rows = 4 in (10.2 cm). The 16-st pocket is 3.2 in (8.1 cm), or 3.6 in (9.1 cm) with its border. The 18-st body is 3.6 in (9.1 cm), and the border brings it to 4.0 in (10.2 cm). The 48-row panel is 8.0 in (20.3 cm), and the border brings it to 8.4 in (21.3 cm). If each checkpoint matches, your lantern will hold a fork and spoon neatly at every place setting.
Happy crocheting!