

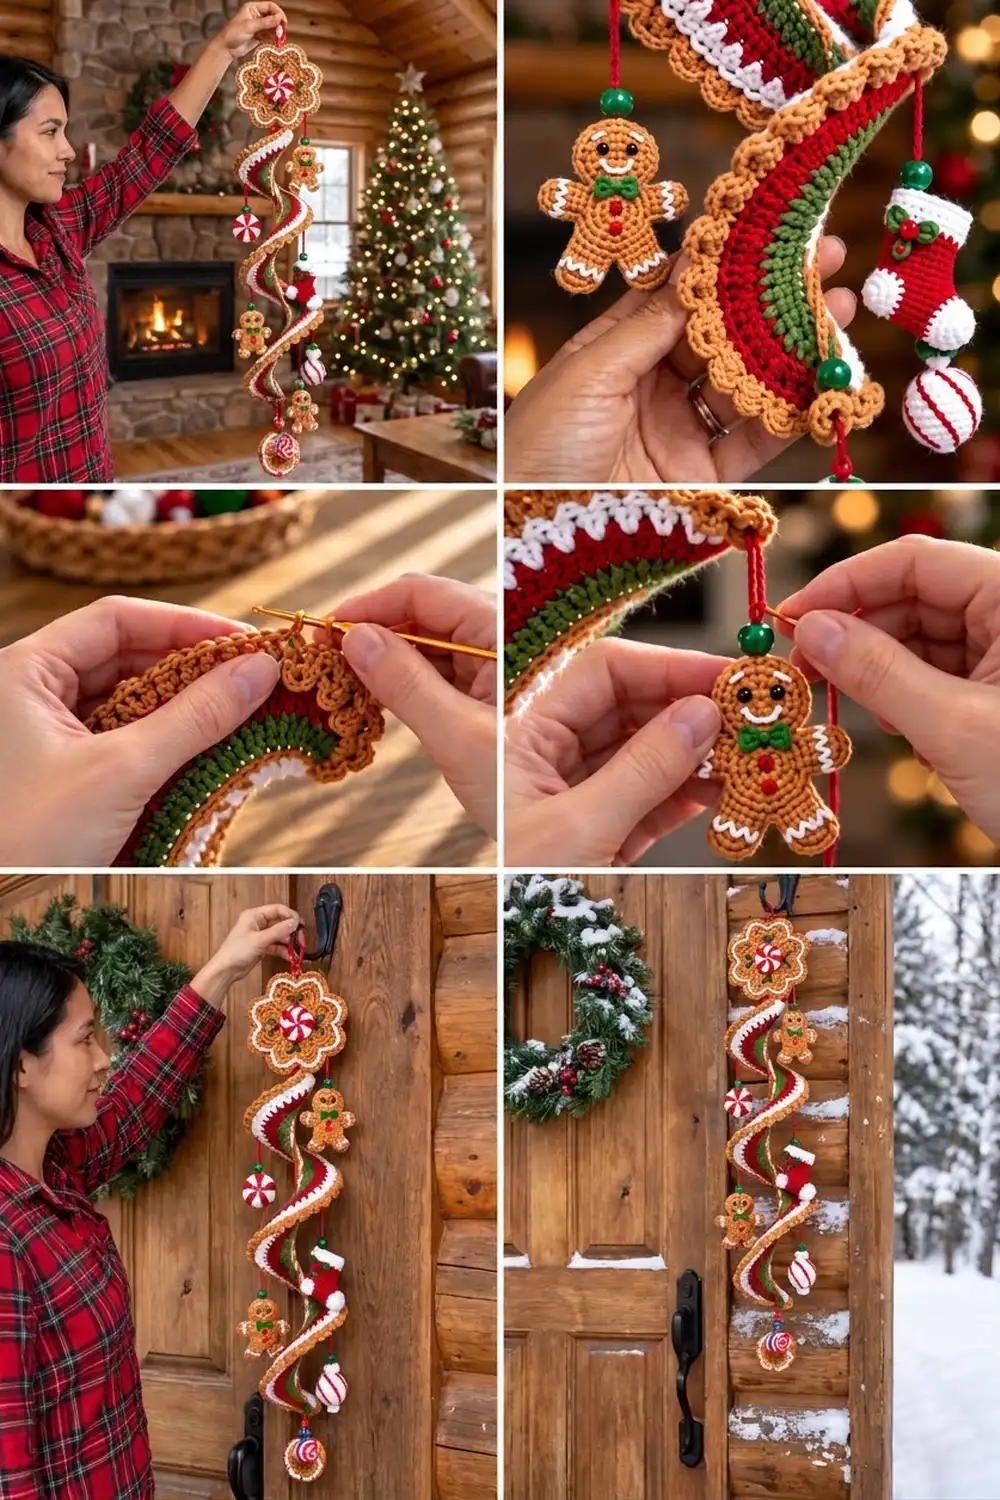
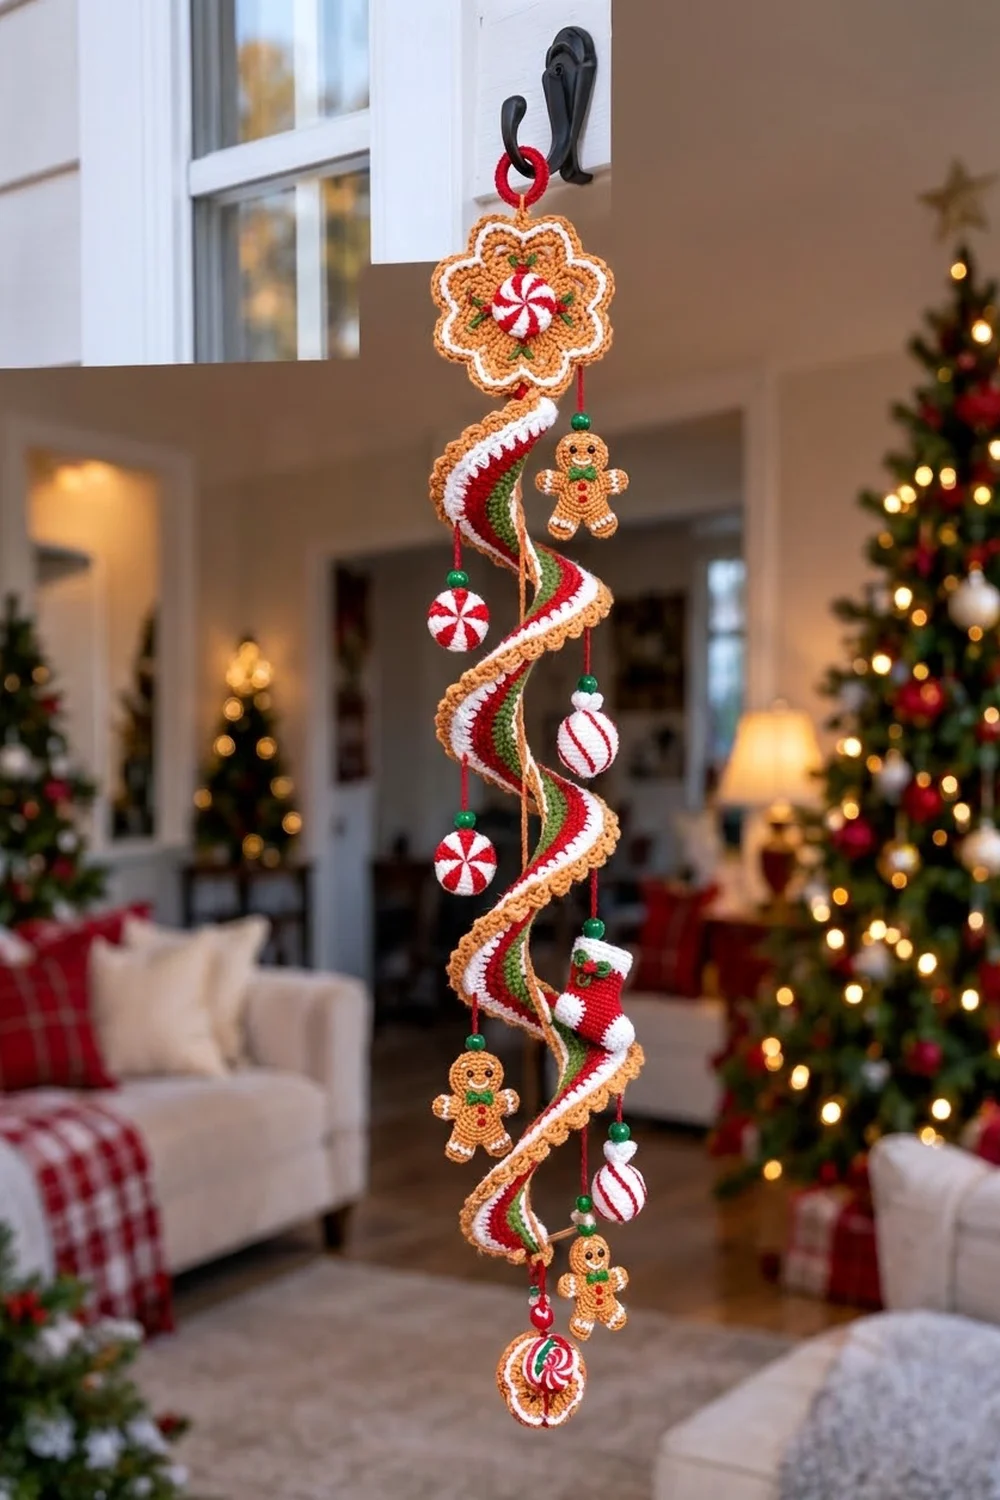
The Gingerbread Lane Spiral Hanging is a cheerful holiday decoration that moves gently in the air. A peppermint flower medallion sits at the top, and a striped band twists down below it in a corkscrew. Small gingerbread men, a stocking and peppermint balls hang from the curls on red cords with green beads.
The colors are classic bakery-Christmas: cookie tan, candy-cane red, crisp white and holly green, with black for the gingerbread faces. Hang it on a front door, a window latch, a mantel hook or a tree branch.
This pattern uses US crochet terms. The finished hanging is about 23 in (58.4 cm) long. The top medallion is 3.5 in (8.9 cm) across, and the striped band is about 1.6 in (4.1 cm) wide.
You make each part separately: two medallions, one flat striped band, and the charms. The band curls by itself because its outer edge has many more stitches than its inner edge. You then shape it around a tube, stiffen it with starch, and join everything with red cords and green beads.
Finished Size and Construction
- Finished length: about 23 in (58.4 cm), hanging
- Skill level: Intermediate
- Terminology: US
- Yarn weight: DK (#3)
- Hook: 3.5 mm (E-4); 2.75 mm (C-2) for the peppermint balls
- Number of pieces: 10 components (1 top medallion, 1 spiral band, 3 gingerbread men, 1 stocking, 3 peppermint balls, 1 bottom medallion)
- Layout: one vertical hanging, with charms spaced along the inner edge of the spiral
- Piece sizes: top medallion 3.5 in (8.9 cm); gingerbread man 3 in (7.6 cm); stocking 2.25 in (5.7 cm); ball 1.2 in (3.0 cm); bottom medallion 2 in (5.1 cm)
- Band width before border: about 1 in (2.5 cm)
- Border depth: inner edge 0.2 in (0.5 cm); outer scallops 0.4 in (1.0 cm)
Materials
Use a smooth cotton or cotton-blend DK yarn. Cotton holds the spiral shape well after starching and shows the stitches clearly. Fuzzy acrylic will make the curls soft and limp.
- Tan: 25 g, about 60 m
- Red: 20 g, about 48 m
- White: 15 g, about 36 m
- Green: 10 g, about 24 m
- Black: 2 g, about 5 m
Tools:
- 3.5 mm and 2.75 mm hooks
- Tapestry needle and stitch markers
- Fiberfill, for the stocking and peppermint balls
- Eight 10 mm green wooden beads
- One 1 in (2.5 cm) plastic ring, for hanging
- Spray starch or fabric stiffener
- A 1.5 in (3.8 cm) cardboard tube or dowel, plastic wrap, and rust-proof pins
The yarn amounts already include about a 25% margin.
Abbreviations (US Terms)
- ch: chain
- sl st: slip stitch
- sc: single crochet
- hdc: half double crochet
- dc: double crochet
- sc2tog: single crochet 2 together
- MR: magic ring
- st(s): stitch(es)
- rep: repeat
Special stitches
- Foundation single crochet (fsc): Insert the hook into the base chain of the last stitch, yarn over and pull up a loop, yarn over and pull through 1 loop (this makes the new base chain), then yarn over and pull through 2 loops.
- Tapestry color change: Carry the unused color along the top of the stitches and work over it. Change color on the last yarn over of the stitch before the new color starts.
Gauge and Checkpoints
Gauge with the 3.5 mm hook: 20 sc and 22 sc rows = 4 in (10.2 cm). That works out to 5 sts per inch.
Make the spiral band’s foundation first, because it works as your gauge swatch. Then check these measurements as you go:
- Spiral Row 1: 87 sc should measure 17.4 in (44.2 cm).
- Spiral Row 5: 145 sts along the outer edge should measure about 29 in (73.7 cm) when laid in a curve.
- Top medallion after Round 3: 1.25 in (3.2 cm) across.
- Top medallion after Round 6: 2.25 in (5.7 cm) across.
- Top medallion after Round 8: 3.5 in (8.9 cm) across.
- Gingerbread man: 3 in (7.6 cm) tall and 3 in (7.6 cm) wide across the arms.
If your pieces come out too big, go down 0.25 mm in hook size. If they come out too small, go up 0.25 mm. Don’t change the stitch counts, because the spiral’s curl depends on the ratio between the inner and outer edges.
Top Medallion
Front
Round 1 (white): Work 8 sc in a MR, then sl st to the first sc. (8)
Round 2 (red and white): Ch 1. Work 2 sc in each st around, alternating colors on each st: 2 red, then 2 white, and so on. Sl st to the first sc. (16 sts, in 8 wedges of 2)
Round 3: Ch 1. Sc in the next st, then 2 sc in the next st. Rep from * around, using the same color as the wedge below each time. (24 sts, in 8 wedges of 3)
Fasten off the red. The peppermint center is now 1.25 in (3.2 cm) across.
Round 4 (tan): Sc in the next 2 sts, then 2 sc in the next st. Rep from * 8 times. (32)
Round 5 (green): Sc in the next 3 sts, then 2 sc in the next st. Rep from * 8 times. (40)
Round 6 (white): Sc in the next 4 sts, then 2 sc in the next st. Rep from * 8 times. (48)
Fasten off.
Back
Work Rounds 1–6 in tan only, with the same increases. (48)
Joining Rounds
Place the back behind the front, wrong sides together. Work Round 7 through both layers at once.
Round 7 (tan, petals): Ch 1 and sc in the first st. Skip 2 sts, work 7 dc in the next st, skip 2 sts, then sc in the next st. Rep from * 7 more times. On the last rep, sl st into the first sc instead of working the final sc.
That makes 8 petals of 7 dc + 1 sc each, for 64 sts. Each petal uses 6 sts of Round 6, and 6 × 8 = 48.
Round 8 (tan): Ch 1. Sc in each st around, but work 2 sc in the 4th dc of each petal. (72 sts: 9 per petal × 8)
The white Round 6 now shows as a thin wavy line just inside the tan scallops.
Spiral Band
With white and the 3.5 mm hook, ch 88.
Row 1 (white): Sc in the 2nd ch from the hook and in each ch across. (87)
Row 2 (red): Ch 1 (does not count as a stitch), turn. Hdc in each st across. (87)
Row 3 (green): Ch 1, turn. Sc in the next 2 sts, then 2 sc in the next st. Rep from * 29 times. (116)
Row 4 (red): Ch 1, turn. Hdc in the next 3 sts, then 2 hdc in the next st. Rep from * 29 times. (145)
Row 5 (white): Ch 1, turn. Sc in each st across. (145)
Fasten off. The outer edge has 145 sts against 87 on the inner edge, a ratio of about 1.67. That difference makes the band curl.
Gingerbread Men (Make 3)
Use tan and the 3.5 mm hook throughout.
First leg: Ch 4. Sc in the 2nd ch from the hook and in the next 2 ch. (3) For Rows 2–4: ch 1, turn, and sc in each st. (3) Fasten off.
Second leg: Work the same as the first leg, but don’t fasten off.
Row 5: Ch 1, turn. Sc 3 across the second leg, ch 1, then sc 3 across the first leg. (7: 6 sc + 1 ch)
Rows 6–7: Ch 1, turn. Sc in each st and in the ch. (7)
Row 8 (arms): Ch 5. Sc in the 2nd ch from the hook and in the next 3 ch (4 sts). Sc 7 across the body (11 so far), then work 4 fsc. (15)
Row 9: Ch 1, turn. Sc 15.
Row 10: Turn and sl st in the first 4 sts (these don’t count). Ch 1, sc 7 across the body, and leave the last 4 sts unworked. (7)
Row 11: Ch 1, turn. Sc2tog, sc 3, sc2tog. (5)
Row 12: Ch 1, turn. Work 2 sc in the first st, sc 3, then 2 sc in the last st. (7)
Row 13: Ch 1, turn. Work 2 sc in the first st, sc 5, then 2 sc in the last st. (9)
Rows 14–15: Ch 1, turn. Sc 9.
Row 16: Ch 1, turn. Sc2tog, sc 5, sc2tog. (7)
Row 17: Ch 1, turn. Sc2tog, sc 3, sc2tog. (5)
Fasten off.
Finishing:
- With white, backstitch a zigzag across the end of each arm and each leg.
- With black, make two French knots for the eyes, and backstitch a smile.
- Wrap green yarn in a figure-eight 6 times at the neck, then cinch the center to make a bow.
- Add 2 red French knots down the body for buttons.
Stocking (Make 1)
Panel A (red): Ch 7, then sc in the 2nd ch from the hook and in each ch across. (6)
- Rows 2–6: Ch 1, turn, and sc 6.
- Row 7: Ch 4. Sc in the 2nd ch from the hook and in the next 2 ch, then sc 6. (9)
- Rows 8–9: Ch 1, turn, and sc 9.
- Row 10: Ch 1, turn. Sc2tog, sc 5, sc2tog. (7)
Fasten off.
Panel B: Work the same as Panel A, except Row 7 is: ch 1, turn, sc 6, then 3 fsc. (9) This puts the toe on the opposite end, so it lines up when you place the panels back to back.
Join: Place the panels wrong sides together. With red, sc through both layers around the sides and foot: 1 sc per row end, 1 sc per st, and 3 sc at each corner. Leave the top open, then stuff lightly.
Cuff (white):
- Round 1: Sc 12 around the opening (6 per panel).
- Rounds 2–3: Sc 12.
Toe puff (white): Work 6 sc in a MR, then 2 sc in each st around. (12) Sew it to the toe.
Holly leaf (green): Ch 5. Sl st in the 2nd ch from the hook, then sc, hdc and sc in the next 3 ch. Sew the leaf to the cuff and add 2 red French knots for berries.
Peppermint Balls (Make 3)
Use the 2.75 mm hook. Work in a continuous spiral and use the tapestry color change.
- Round 1 (white): 6 sc in a MR. (6)
- Round 2: Work 2 sc in each st, changing color every 2 sts: white, then red. (12 sts, 6 stripes)
- Round 3: Sc 1, then 2 sc in the next st. Rep around, changing color every 3 sts. (18 sts, 6 stripes)
- Rounds 4–6: Sc 18, keeping the stripes 3 sts wide. The stripes lean a little into a swirl.
- Round 7: Sc 1, sc2tog. Rep around. (12) Stuff the ball firmly.
- Round 8: Sc2tog 6 times. (6)
Close the opening and fasten off. Each ball is about 1.2 in (3.0 cm) across.
Bottom Medallion
- Front: Work Rounds 1–3 of the top medallion. (24)
- Back: Work Rounds 1–3 in tan. (24)
Round 4 (tan, through both layers): Ch 1 and sc in the first st. Skip 1 st, work 5 dc in the next st, skip 1 st, then sc in the next st. Rep from * 5 more times. On the last rep, sl st into the first sc instead of working the final sc.
That makes 6 shells, for 36 sts (6 per shell). The repeats use 1 + (4 × 6) − 1 = 24 sts of Round 3. The finished medallion is 2 in (5.1 cm) across.
Make All Pieces
| Piece | Qty | Colors |
|---|---|---|
| Top medallion | 1 (front + back) | white, red, tan, green |
| Spiral band | 1 | white, red, green, tan |
| Gingerbread men | 3 | tan, white, black, green, red |
| Stocking | 1 | red, white, green |
| Peppermint balls | 3 | red, white |
| Bottom medallion | 1 (front + back) | red, white, tan |
Layout grid (top to bottom). The numbers are inner-edge stitch positions on the spiral band.
            [ red ring ]
         [ TOP MEDALLION ]
              |  spiral starts
 st 12  ->  gingerbread man 1
 st 24  ->  peppermint ball 1
 st 36  ->  stocking
 st 48  ->  gingerbread man 2
 st 60  ->  peppermint ball 2
 st 72  ->  gingerbread man 3
 st 87  ->  peppermint ball 3
              |
        [ BOTTOM MEDALLION ]
Joining
Hanging ring: With red, work sc closely around the plastic ring until it is covered (about 22 sc). Then ch 6 and sew the chain to the back of the top petal of the medallion.
Medallion to spiral: Sew the starting end of the spiral (Row 1 end) to the back of the bottom petal of the medallion, overlapping by 0.5 in (1.3 cm). Use tan and whipstitch through both layers.
Charm drops: Thread one green bead onto red yarn and attach the yarn with a sl st to the inner edge stitch shown in the layout grid. Chain the drop length, slide the bead down, ch 3, and sew the end to the top of the charm.
| Charm | Drop chain |
|---|---|
| Gingerbread men | ch 8, about 1.5 in (3.8 cm) |
| Peppermint balls | ch 10, about 2 in (5.1 cm) |
| Stocking | ch 13, about 2.5 in (6.4 cm) |
Bottom end: At st 87, chain a 2 in (5.1 cm) drop to peppermint ball 3. Then add a bead and ch 6, and attach the bottom medallion.
Keep your chain tension even so the drops of the same type hang at matching lengths.
Checkpoint: When you hold it up after joining, the hanging should measure about 23 in (58.4 cm).
Border
Border gauge: a 5-dc shell plus its sc covers 4 base sts, or about 0.8 in (2.0 cm), and stands 0.4 in (1.0 cm) tall. Work the edgings on the spiral band before you join it to anything.
Inner edge (tan): Join tan at the starting end of the foundation chain. Ch 1 and sc in each of the 87 foundation loops. (87 sc)
Outer edge (tan): Join tan in the first st of Row 5. Ch 1 and sc in the first st. Skip 1 st, work 5 dc in the next st, skip 1 st, then sc in the next st. Rep from * 36 times. (36 shells and 37 sc = 217 sts)
Short ends (tan): Work 7 sc across each end: 1 sc in each sc row end and 2 sc in each hdc row end, so 3 + 4 = 7.
Why the math works:
- The outer scallops need a multiple of 4 plus 1. Row 5 has 145 sts, and 1 + (4 × 36) = 145, so the scallops end exactly at the last stitch.
- The inner edge is 1 sc per foundation loop, so it adds no extra stitches. The band keeps its 87:145 curl ratio.
Final Blocking
- Wet all the pieces, then roll them in a towel to remove excess water.
- Pin the medallions and gingerbread men flat. Open each petal and shell into an even curve.
- Wrap the cardboard tube in plastic wrap.
- Wind the spiral band around the tube, with the inner edge against it, for about 3 to 3.5 turns. Leave 3.5 in (8.9 cm) between turns, and pin the ends.
- Spray all the pieces generously with starch.
- Let everything dry completely, for at least 24 hours.
- Slide the spiral off the tube. It should spring back to about 14 in (35.6 cm) long.
Final Quality-Control Checklist
- The peppermint centers show 8 even wedges.
- The top medallion has 8 matching petals and measures 3.5 in (8.9 cm).
- The outer edge of the spiral has 36 shells, ending cleanly at both ends.
- The spiral hangs straight without flattening out.
- All three gingerbread men match in size and face placement.
- The drops of the same type are the same length, and each bead sits snug.
- All tails are woven in and trimmed.
Troubleshooting
- The spiral won’t curl: You probably missed increases. Check that Row 3 has 116 sts and Row 4 has 145 sts.
- The spiral flattens over time: Re-starch it on the tube, or thread craft wire through the inner edge.
- The medallion cups: Your tension is too tight on the increases. Go up a hook size for Rounds 4–6.
- The medallion ruffles: Your tension is too loose. Go down a hook size.
- The ball stripes are uneven: Keep the carried yarn snug and change color on the last yarn over.
- The hanging tilts: Move the stocking’s drop point 2 sts to rebalance it.
Care
Dust gently, or spot-clean with cool water and re-starch. Store it flat and loosely coiled, away from heat.
Final Notes
The measurement chain is simple:
- Gauge: 5 sts per inch.
- Spiral band: 87 inner sts = 17.4 in (44.2 cm), and 145 outer sts give the curl.
- Top medallion: 48 sts after Round 6, 72 sts after Round 8, and 3.5 in (8.9 cm) across.
- Blocking: the band wraps around a 1.5 in (3.8 cm) tube and dries into a 14 in (35.6 cm) spiral.
- Finished hanging: with the charms added, about 23 in (58.4 cm) long.
Check each measurement in order and the finished hanging will come out right. Happy crocheting!