

This little charm hangs two lacy leaves from your rearview mirror. Each leaf has a solid center spine, slim ribs that fan out to the edge, and a smooth single crochet outline, so it looks like a pressed leaf skeleton.
The palette is olive green and natural cream, with three small crocheted beads in the same two colors. It’s a calm, botanical look that suits a car, a window latch or a bag handle.
The pattern uses US crochet terms. Each leaf measures 4 in (10.2 cm) long by 1.75 in (4.4 cm) wide. The whole charm hangs about 11.5 in (29.2 cm) from the top of the loop to the tip of the cream leaf.
Construction is simple. You crochet each leaf in rounds around a foundation chain, add slip-stitch ribs, chain an outline from rib tip to rib tip, then cover it with single crochet. A slip-stitch cord comes off the base of each leaf. You then make three stuffed beads and a two-color hanging loop and tie everything together.
Finished Size and Construction
- Finished leaf size: 4 in × 1.75 in (10.2 cm × 4.4 cm)
- Total hanging length: 11.5 in (29.2 cm)
- Skill level: Intermediate
- Terminology: US
- Yarn weight: Size 3 crochet thread (fine, fingering-like)
- Hook: 2.0 mm steel hook
- Number of pieces: 6 (2 leaves with cords, 3 beads, 1 hanging loop)
- Layout: two leaves hanging side by side at different heights from one loop
- Leaf size before border: 3.75 in × 1.5 in (9.5 cm × 3.8 cm)
- Border depth: 0.125 in (0.3 cm) on every edge
- Bead size: 0.5 in (1.3 cm) across
Materials
Choose a mercerized cotton crochet thread in size 3. Mercerized cotton holds crisp edges, blocks well and won’t fade quickly in a sunny car. Avoid fuzzy or very stretchy fibers, because the ribs need to stay sharp.
- Olive green: 10 g, about 28 m (green leaf, Bead A, half of the loop)
- Natural cream: 10 g, about 28 m (cream leaf, Beads B and C, half of the loop)
These amounts include a generous margin for a gauge swatch and tie strands.
Tools:
– 2.0 mm steel crochet hook
– Tapestry needle with an eye small enough for thread
– Small scissors
– A pinch of fiberfill or thread scraps for the beads
– Rustproof pins and a foam blocking mat
– Spray bottle with water
– Ruler or tape measure
Abbreviations (US Terms)
- ch – chain
- sl st – slip stitch
- sc – single crochet
- sc2tog – single crochet 2 together
- MR – magic ring
- st(s) – stitch(es)
- rnd – round
Special stitch – Rib(N): Sl st in the next st, ch N, sl st in 2nd ch from hook and in each remaining ch back toward the spine (N − 1 sl st), then sl st again in the same spine st. The ch you skipped at the far end is the rib tip.
Tip Spoke: In the center tip st: sl st, ch 4, sl st in 2nd ch from hook and in the next 2 ch (3 sl st), then sl st again in the same st.
Gauge and Checkpoints
Gauge: 8 sc = 1 in (2.5 cm), so 16 sc = 2 in (5.1 cm). Slip stitches worked back along a chain: 9 sl st = 1 in (2.5 cm).
Make one leaf completely before starting the second. A leaf is small enough to serve as your gauge swatch.
Checkpoints:
– After Rnd 1, the spine measures 3.5 in (8.9 cm) long and 0.25 in (0.6 cm) wide.
– After Rnd 2, the leaf with ribs measures 3.75 in × 1.5 in (9.5 cm × 3.8 cm) when the ribs are laid flat.
– After Rnd 4, the leaf measures 4 in × 1.75 in (10.2 cm × 4.4 cm).
– Each bead measures 0.5 in (1.3 cm) across.
Too big? Go down to a 1.75 mm hook. Too small? Go up to a 2.25 mm hook. If only the ribs are off, keep your hook and adjust how tightly you work the slip stitches. Ribs that are too loose make a floppy leaf, and ribs that are too tight make it cup.
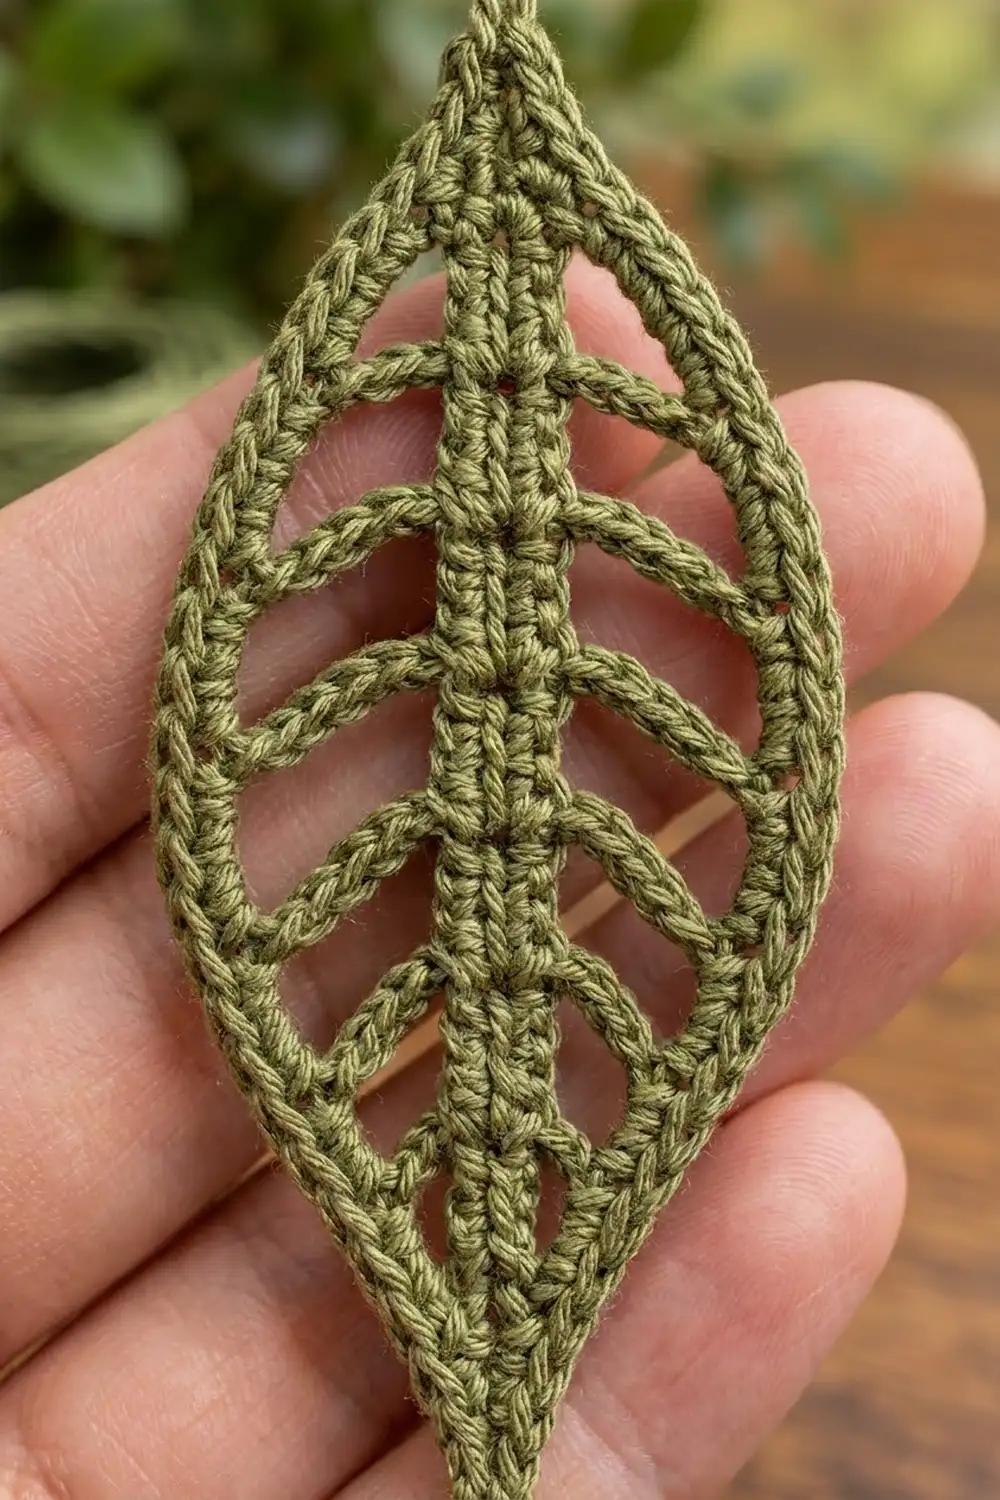
Leaf (Make 2: 1 Olive Green, 1 Cream)
Both leaves use the same stitches. Only the cord length is different.
Rnd 1 – Spine
Ch 29.
Sc in 2nd ch from hook, sc in next 26 ch, 3 sc in last ch (this is the tip). Rotate so you can work along the opposite side of the foundation chain. Sc in the free loop of the next 26 ch, then 2 sc in the last ch (the same ch that holds the first sc). Join with a sl st to the first sc.
Count: 58 sc (3 base sts + 26 side A sts + 3 tip sts + 26 side B sts).
There are 3 sc in the first ch, which form a rounded base, and 3 sc in the last ch, which form the tip. The foundation chain is hidden in the middle, which gives you a raised spine.
Rnd 2 – Ribs
Don’t chain. Sl st in the first st (base).
Side A (base to tip): Sl st in next 2 sts. Then work the following 8 times, using these rib lengths in order: 3, 5, 6, 7, 7, 6, 5, 3:
Rib(N) in next st, sl st in next 2 sts.
That covers 2 + (8 × 3) = 26 sts.
Tip: Sl st in the first tip st, work the Tip Spoke in the center tip st, then sl st in the third tip st.
Side B (tip to base): Sl st in next 2 sts. Then work the following 8 times, using rib lengths 3, 5, 6, 7, 7, 6, 5, 3:
Rib(N) in next st, sl st in next 2 sts.
That’s another 26 sts.
Base: Sl st in the last 2 sts.
Count: 58 spine sts worked (1 + 26 + 3 + 26 + 2), with 16 ribs and 1 tip spoke.
Ribs are placed every 3 spine sts, about 0.375 in (1.0 cm) apart. The longest ribs are in the middle, so the leaf is widest at its center.
Border (Outline)
The outline is the leaf’s border. Rnd 3 chains between the rib tips to make the outer frame, and Rnd 4 covers that frame with single crochet.
Border gauge: 8 sc = 1 in (2.5 cm) along the edge.
Rnd 3 – Outline Chain
Starting from the base, ch 3 and sl st in the tip of the first side A rib. Work (ch 3, sl st in the tip of the next rib) 7 times. Ch 3, then sl st in the end of the Tip Spoke.
Ch 3 and sl st in the tip of the first side B rib. Work (ch 3, sl st in the tip of the next rib) 7 times. Ch 3, then sl st in the base st where this round began.
Count: 72 sts, made of 54 ch and 18 sl st:
– Each side has 3 + (7 × 3) + 3 = 27 ch and 8 rib-tip sl sts.
– Plus 1 tip sl st and 1 base sl st.
Keep your chains relaxed. Don’t stretch the ribs while you work, or the leaf will pucker.
Rnd 4 – Outline Single Crochet (Trim Round)
Ch 1 (doesn’t count as a stitch). Sc in the same base st. Along side A, sc in each ch and in each rib-tip sl st (35 sc). Work 3 sc in the tip sl st. Along side B, sc in each ch and in each rib-tip sl st (35 sc). Join with a sl st to the first sc.
Count: 72 sts worked 1-per-st + 2 extra sts at the tip = 74 sc.
Per-side counts:
– Base: 1 sc
– Side A: 27 ch + 8 rib tips = 35 sc
– Tip: 3 sc
– Side B: 35 sc
– Total: 1 + 35 + 3 + 35 = 74 sc
Why the math works: 35 sc at 8 sc per inch is 4.375 in (11.1 cm) per side. That’s about the length of a curved edge running from base to tip on a pointed oval 4 in (10.2 cm) long and 1.75 in (4.4 cm) wide. The outer edge needs more stitches than the 26-st spine side, and the 3-ch gaps provide them. Because each gap at the edge is wider than the 3-st spacing at the spine, the ribs fan outward and the outline lies flat without ruffling. The 3 sc at the tip keep the point sharp. The single sc at the base keeps the base narrow where the cord attaches.
Checkpoint: The leaf should now be 4 in × 1.75 in (10.2 cm × 4.4 cm).
Cord
Don’t fasten off.
Green leaf: Ch 10. Sl st in 2nd ch from hook and in each ch back to the leaf (9 sl st). Sl st in the base sc. Fasten off and weave in the end.
Cord length: 1 in (2.5 cm).
Cream leaf: Ch 19. Sl st in 2nd ch from hook and in each ch back to the leaf (18 sl st). Sl st in the base sc. Fasten off and weave in the end.
Cord length: 2 in (5.1 cm).
Beads (Make 3: 1 Olive Green = Bead A, 2 Cream = Beads B and C)
Leave a 6 in (15.2 cm) starting tail.
- Rnd 1: 6 sc in MR. Pull the ring closed. (6 sc)
- Rnd 2: 2 sc in each st around. (12 sc)
- Rnd 3: Sc in each st around. (12 sc)
- Rnd 4: Sc in each st around. (12 sc)
Stuff lightly with a pinch of fiberfill or thread scraps.
- Rnd 5: Sc2tog 6 times. (6 sc)
Fasten off, leaving an 8 in (20.3 cm) tail. Thread the tail through the front loops of the last 6 sts and pull them closed.
Checkpoint: Each bead should be 0.5 in (1.3 cm) across. It should be firm but not hard, so a needle can pass straight through its center.
Hanging Loop (Make 1)
Hold one strand of olive green and one strand of cream together. Leave 8 in (20.3 cm) tails.
Ch 44, then sl st in the first ch to form a ring. Fasten off, leaving 8 in (20.3 cm) tails.
Loop gauge with both strands held together: 11 ch = 2 in (5.1 cm), so 44 ch = 8 in (20.3 cm) around. The loop hangs 4 in (10.2 cm) deep when doubled over a mirror stem.
Make All Pieces
| Piece | Color | Quantity |
|---|---|---|
| Leaf with 1 in (2.5 cm) cord | Olive green | 1 |
| Leaf with 2 in (5.1 cm) cord | Cream | 1 |
| Bead A | Olive green | 1 |
| Beads B and C | Cream | 2 |
| Hanging loop | Green + cream held together | 1 |
Layout (top to bottom):
        [ HANGING LOOP  44 ch, green + cream ]
                         |
                  ( BEAD A - green )
                    /            \
     green cord 1 in (2.5 cm)   ( BEAD B - cream )
                  |                     |
           [ GREEN LEAF ]     cream cord 2 in (5.1 cm)
           4 in x 1.75 in               |
                                ( BEAD C - cream )
                                        |
                                 [ CREAM LEAF ]
                                 4 in x 1.75 in
Joining (Assembly)
- Bead C. Thread Bead C’s tail onto the needle. Pass it through the center of the bead, then stitch through the base sc of the cream leaf and the bottom of the cord twice, so the bead sits over the base of the leaf. Knot the tail and bury it inside the bead.
- Tie strands. Cut one 12 in (30.5 cm) strand in each color. Draw the green strand through the top ch of the green cord and the cream strand through the top ch of the cream cord. Fold each strand in half so you have two tails per cord.
- Bead B. Thread both cream tie tails through the center of Bead B and slide the bead down until it rests on top of the cream cord.
- Bead A. Thread both cream tie tails, both green tie tails and all four loop tails through the center of Bead A. Push Bead A up until it sits right against the base of the loop.
- Secure. Pull the tails snug. The green cord should come straight out from under Bead A, and Bead B should sit directly below Bead A. Tie a square knot above Bead A using two tails at a time, around the base of the loop. Then thread each tail back down into Bead A and trim it close.
Tension advice: Snug the knots without crushing the beads. If a bead creases, the knot is too tight.
Size checkpoint:
– Top of loop to green leaf tip: 4 + 0.5 + 1 + 4 = 9.5 in (24.1 cm)
– Top of loop to cream leaf tip: 4 + 0.5 + 0.5 + 2 + 0.5 + 4 = 11.5 in (29.2 cm)
– The cream leaf hangs 2 in (5.1 cm) lower than the green leaf.
Final Blocking
- Before final assembly, soak both leaves in cool water for 5 minutes. Then press them gently in a towel.
- Lay each leaf on the mat. Pin the base and the tip so the leaf measures 4 in (10.2 cm) long.
- Pin the widest point to 1.75 in (4.4 cm).
- Run a pin through each open space and nudge each rib so it angles slightly toward the tip. Space the ribs evenly.
- Check that the spine is perfectly straight from base to tip.
- Mist the leaf and let it dry completely, which takes 6 to 12 hours.
- For extra stiffness in the heat of a car, dab on a light coat of diluted fabric stiffener before it dries.
- Don’t block the beads. Just roll them between your palms to round them out.
Final Quality-Control Checklist
- [ ] Each leaf has 58 spine sts, 16 ribs, a Tip Spoke and 74 outline sc.
- [ ] Each side of the outline has exactly 35 sc.
- [ ] Each leaf measures 4 in × 1.75 in (10.2 cm × 4.4 cm).
- [ ] The ribs are mirror images across the spine (3, 5, 6, 7, 7, 6, 5, 3).
- [ ] The cords measure 1 in (2.5 cm) for green and 2 in (5.1 cm) for cream.
- [ ] All three beads are 0.5 in (1.3 cm) across and closed tightly.
- [ ] The loop is 8 in (20.3 cm) around.
- [ ] The cream leaf tip hangs 2 in (5.1 cm) below the green leaf tip.
- [ ] All ends are buried inside the beads or woven into the spine.
Troubleshooting
The leaf cups or curls. Your Rnd 3 chains are too tight. Rework the round with looser chains, or block it harder with more pins.
The outline ruffles. Your chains are too loose, or you added extra sc. Count again for 35 per side.
The ribs are uneven lengths. Count the chains in each Rib(N) again. Pull out the sl sts and rework any rib that doesn’t match its partner on the opposite side.
The spine twists. Your foundation chain twisted during Rnd 1. Keep the chain flat and work all of side A before you rotate.
The tip is blunt. Make sure you worked 3 sc into the Tip Spoke’s sl st in Rnd 4.
Stuffing shows through a bead. Use stuffing in a matching color or thread scraps, or go down a hook size for the beads.
The loop is too short for your mirror. Add ch in multiples of 2. Every 11 ch adds 2 in (5.1 cm) around.
Care
Hand wash in cool water with mild soap. Press out the water in a towel, then re-pin the leaves to 4 in × 1.75 in (10.2 cm × 4.4 cm) and let them dry flat.

Final Notes
Here’s the measurement chain:
- The gauge is 8 sc per 1 in (2.5 cm).
- That gives a 3.5 in (8.9 cm) spine and a ribbed leaf of 3.75 in × 1.5 in (9.5 cm × 3.8 cm).
- The 35-sc outline on each side adds 0.125 in (0.3 cm) all around, which brings the leaf to 4 in × 1.75 in (10.2 cm × 4.4 cm).
- The cords, 0.5 in (1.3 cm) beads and 8 in (20.3 cm) loop set the green tip at 9.5 in (24.1 cm) and the cream tip at 11.5 in (29.2 cm).
If you check each stage as you go, the finished charm will hang straight and balanced.
Happy crocheting!