

This ornament has two lace holly leaves in deep teal, three metallic gold berries and a slim two-tone hanging loop. It hangs from a rearview mirror, a tree branch or a window latch, and the gold picot points catch the light.
The leaves are open mesh worked around a solid gold vein, and each one is finished with a gold edging that gives it the holly outline. The look is light, crisp and a little vintage, like old thread lace in festive colors.
This pattern uses US crochet terms. The finished ornament measures about 8 in (20.3 cm) tall including the loop and 3.5 in (8.9 cm) wide. Each leaf is 4.5 in (11.4 cm) long and 2 in (5.1 cm) wide after blocking.
You make six small pieces: two leaves, three berries and one cord. Each leaf starts as a gold single crochet vein. Three teal mesh rounds go around it, then one gold edging round adds the points. After blocking, you sew the pieces into one cluster.
Finished Size and Construction
- Finished ornament: 8 in (20.3 cm) tall × 3.5 in (8.9 cm) wide
- Skill level: Intermediate (thread work, graded stitch heights)
- Terminology: US
- Yarn weight: Lace (0), size 10 crochet thread
- Hook: 1.5 mm steel hook (US steel 8)
- Number of pieces: 6 (2 leaves, 3 berries, 1 cord)
- Layout: cord loop on top, then the berries in a triangle (1 over 2), then two leaves hanging in a V, overlapped
- Leaf size: 4.5 in (11.4 cm) × 2 in (5.1 cm)
- Leaf size before edging: 4.25 in (10.8 cm) × 1.75 in (4.4 cm)
- Edging depth: 0.125 in (0.3 cm) in the valleys, 0.25 in (0.6 cm) at the points
- Berry size: 0.5 in (1.3 cm) across
- Loop length: 3 in (7.6 cm)
Materials
Use a firm, mercerized size 10 cotton thread for the teal so the mesh holds its shape after blocking. For the gold, use a size 10 metallic crochet thread, or a cotton-and-metallic blend of the same thickness. A very slippery metallic may need slightly tighter tension.
- Deep Teal (Color A): 6 g, about 34 m
- Metallic Gold (Color B): 6 g, about 30 m
These amounts include a margin of about 30% for swatching and weaving in ends.
Tools:
– 1.5 mm (US steel 8) steel crochet hook
– Fine tapestry needle or sharp embroidery needle
– Small scissors
– Rustproof pins and a foam blocking board
– Spray bottle, and liquid starch or diluted fabric stiffener
– A small amount of gold thread scraps or polyester fiberfill, for stuffing the berries
– Stitch marker
Abbreviations (US Terms)
- ch – chain
- sl st – slip stitch
- sc – single crochet
- hdc – half double crochet
- dc – double crochet
- sc2tog – single crochet 2 together
- sk – skip
- sp(s) – space(s)
- st(s) – stitch(es)
- MR – magic ring
Special stitch – Picot: Ch 3, then sl st in the 3rd ch from the hook (the first chain you made). This makes a tiny round knob that sticks out from the edge.
Gauge and Checkpoints
Make one complete leaf first and check it before making the second. Thread gauge changes a lot from one hook to another and one hand to another, and the leaf is the gauge swatch.
Base gauge: 41 sc on the vein = 4 in (10.2 cm).
Checkpoints for one leaf (lay it flat and measure without stretching):
– After the vein: 4 in (10.2 cm) long
– After Round 1: 4.25 in (10.8 cm) long × 0.75 in (1.9 cm) wide
– After Round 2: 4.25 in (10.8 cm) × 1.25 in (3.2 cm)
– After Round 3: 4.25 in (10.8 cm) × 1.75 in (4.4 cm)
– After Round 4 and blocking: 4.5 in (11.4 cm) × 2 in (5.1 cm)
If your vein is longer than 4.25 in (10.8 cm), change to a 1.25 mm hook. If it is shorter than 3.75 in (9.5 cm), change to a 1.75 mm hook. Change hooks rather than the stitch counts, because the edging only works out if each side has 20 spaces.
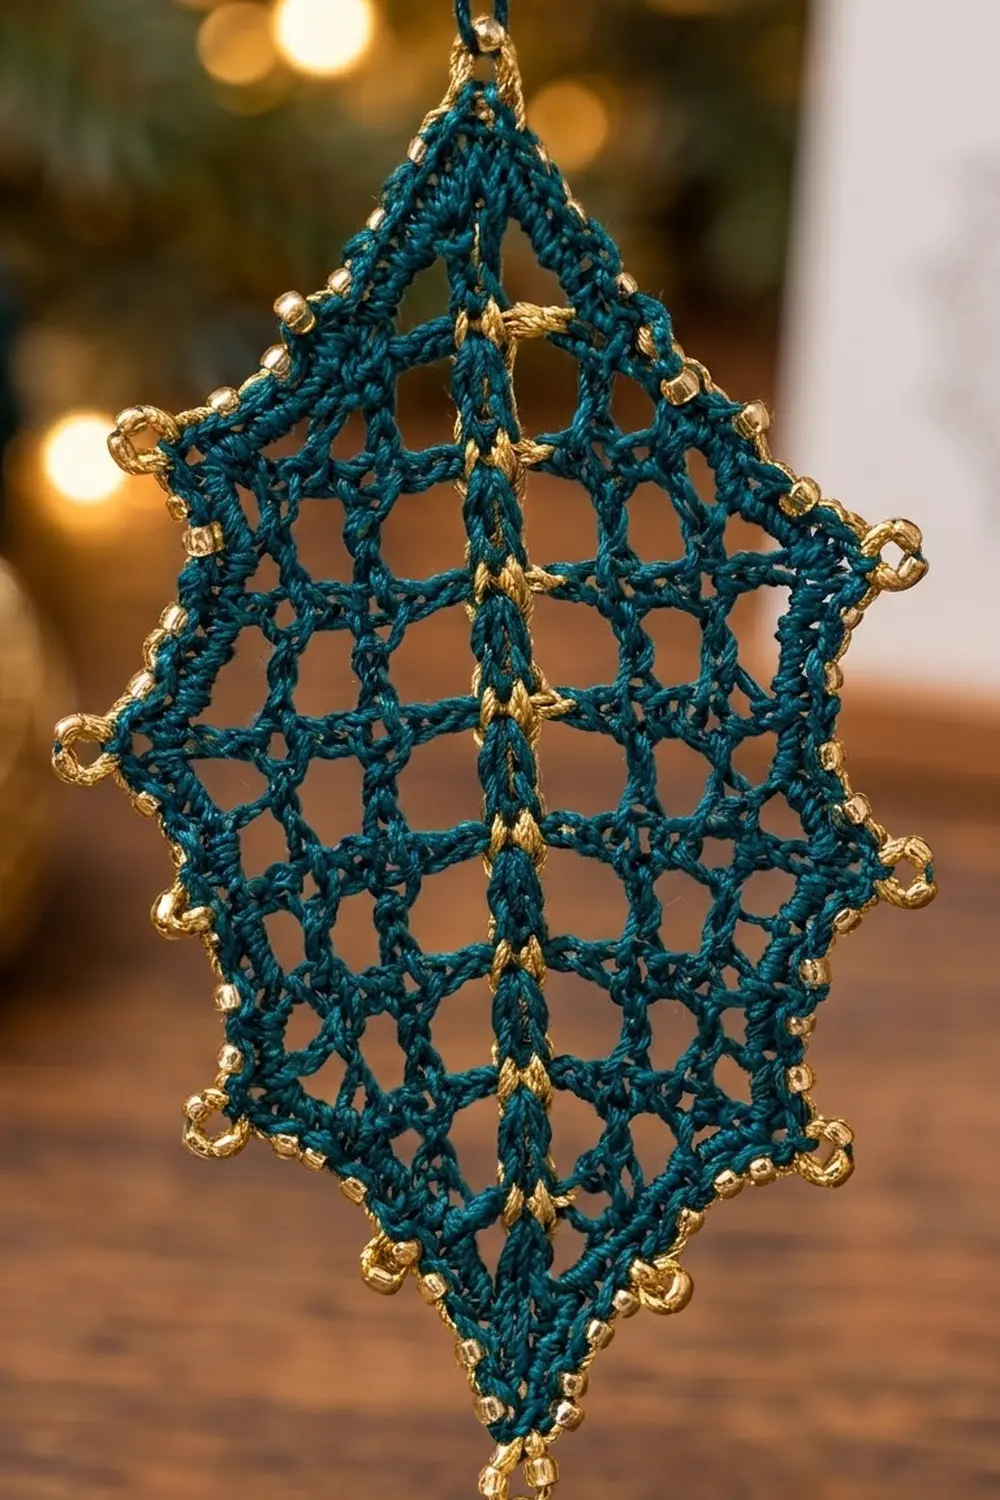
Leaf (Make 2)
Vein
With Color B, ch 42.
Row 1: Sc in the 2nd ch from the hook and in each ch across. Fasten off. (41 sc)
The first sc you worked is the tip end. The last sc is the stem end. For the rounds below, number the sc tops 1 to 41 starting from the stem end. The free loops of the foundation chain on the other side line up with them, also numbered 1 to 41 from the stem end.
Round 1 (teal, first mesh)
Join Color A with a sl st in sc #1 (stem end). Ch 1, sc in the same st.
Side A (along the sc tops):
– [Ch 2, sk 1 st, hdc in next st] 2 times.
– [Ch 2, sk 1 st, dc in next st] 14 times.
– [Ch 2, sk 1 st, hdc in next st] 2 times.
– [Ch 2, sk 1 st, sc in next st] 2 times. Your last sc lands in sc #41.
Tip: Ch 3, turn the work so the foundation chain is on top, and sc in free loop #41.
Side B (along the free loops):
– [Ch 2, sk 1 loop, sc in next loop] 2 times.
– [Ch 2, sk 1 loop, hdc in next loop] 2 times.
– [Ch 2, sk 1 loop, dc in next loop] 14 times.
– [Ch 2, sk 1 loop, hdc in next loop] 2 times. Your last hdc lands in loop #1.
Stem: Ch 2, sl st in the first sc.
Count: 42 posts and 42 spaces. That is 20 ch-2 sps on Side A, 1 ch-3 tip sp, 20 ch-2 sps on Side B and 1 ch-2 stem sp.
The stitches get taller toward the middle (sc, hdc, dc, hdc, sc), so the leaf is narrow at both ends and wide in the center.
Round 2 (teal, offset mesh)
Sl st in the first ch-2 sp of Side A. Ch 1, sc in the same sp.
Side A:
– [Ch 2, hdc in next sp] 2 times.
– [Ch 2, dc in next sp] 14 times.
– [Ch 2, hdc in next sp] 2 times.
– Ch 2, sc in next sp (the 20th Side A sp).
Tip: Ch 2, then work (sc, ch 3, sc) in the tip ch-3 sp.
Side B:
– Ch 2, sc in the first Side B sp.
– [Ch 2, hdc in next sp] 2 times.
– [Ch 2, dc in next sp] 14 times.
– [Ch 2, hdc in next sp] 2 times.
– Ch 2, sc in the last Side B sp.
Stem: Ch 2, sl st in the first sc.
Count: 42 posts (20 + 2 at the tip + 20) and 42 spaces. Each side still has 20 spaces. On Side A they are the 19 spaces between its posts plus the ch-2 leading into the tip. On Side B they are the ch-2 leaving the tip plus the 19 spaces between its posts. The tip ch-3 and the stem ch-2 make 42.
Because each stitch goes into a space instead of on top of a post, the mesh forms the diamond net you see in the photo.
Round 3 (teal, wider mesh)
Work this round exactly like Round 2, but use ch 3 instead of ch 2 before each of the 14 dc on each side. Use ch 2 before every sc and hdc.
Count: 42 posts and 42 spaces. On each side, 14 of the 20 spaces are ch-3 sps and 6 are ch-2 sps.
The longer chains let the wide middle of the leaf lie flat as the edge gets longer. Fasten off Color A.
Edging (Gold Holly Points)
The edging is the leaf’s border, and it creates the holly outline. It is worked in groups of 4 spaces, and each group makes 1 lobe:
- the 1st space makes the shallow valley,
- the next space climbs,
- the 3rd space makes the picot point,
- the 4th space comes back down.
Each side has 20 spaces, and 20 ÷ 4 = 5. So each side gets exactly 5 lobes, with nothing left over.
Round 4 (Color B)
Join Color B with a sl st in the first sp of Side A. Sc in the same sp.
Side A (work this group of 4 spaces 5 times; the first time, the sl st and sc above count as the 1st space):
– 1st sp: (sl st, sc)
– 2nd sp: (sc, hdc)
– 3rd sp: (hdc, dc, picot, dc)
– 4th sp: (hdc, sc)
Tip: In the tip ch-3 sp, work (sc, hdc, dc, picot, dc, hdc, sc).
Side B (the same group in mirror order, worked 5 times):
– 1st sp: (sc, hdc)
– 2nd sp: (hdc, dc, picot, dc, hdc)
– 3rd sp: (hdc, sc)
– 4th sp: (sc, sl st)
Stem: 3 sc in the stem sp. Sl st in the first sl st to join. Fasten off, leaving a 6 in (15.2 cm) tail for sewing.
Count per lobe: 10 sts + 1 picot.
Count per side: 50 sts + 5 picots.
Tip: 6 sts + 1 picot.
Stem: 3 sc.
Round total: 50 + 6 + 50 + 3 = 109 sts + 11 picots.
Why the math works: On Side A, counted from the stem, the points fall in spaces 3, 7, 11, 15 and 19. Counted from the tip, those same points are in spaces 2, 6, 10, 14 and 18, which is exactly where the Side B points fall when you count Side B from the tip. So the two sides mirror each other across the vein.
Putting only 2 stitches in most ch-3 sps pulls the valleys in a little. That makes the notches deeper and helps the points stand out.
Edging gauge: The edging adds 0.125 in (0.3 cm) on each side at the valleys, so the leaf goes from 1.75 in (4.4 cm) to 2 in (5.1 cm) wide. It adds 0.25 in (0.6 cm) at the tip, so the leaf goes from 4.25 in (10.8 cm) to 4.5 in (11.4 cm) long.
Berries (Make 3)
With Color B:
- Rnd 1: Work 6 sc in a MR. (6)
- Rnd 2: 2 sc in each st around. (12)
- Rnds 3–4: Sc in each st around. (12)
- Rnd 5: Stuff the berry firmly with gold thread scraps or a pinch of fiberfill. Then sc2tog 6 times. (6)
Fasten off, leaving a 6 in (15.2 cm) tail. Thread the tail through the front loops of the 6 sts and pull tight to close. Each berry is 0.5 in (1.3 cm) across.
The tight single crochet in metallic thread gives the berries the slightly knobbly, beaded look shown in the photo.
Hanging Cord (Make 1)
Hold 1 strand of Color A and 1 strand of Color B together. Ch 43.
Row 1: Sl st in the back bump of the 2nd ch from the hook and of each ch across. (42 sl sts)
Fasten off and leave both tails. The cord measures 6 in (15.2 cm). Folded in half, it makes a 3 in (7.6 cm) loop. Twist the cord a few times before you fold it so the two colors spiral, as they do in the photo.
Make All Pieces
- Color A and Color B together: 2 leaves (teal mesh, gold vein and edging)
- Color B only: 3 berries
- Colors A and B held together: 1 cord
Assembly layout (front view):
            [ cord loop ]
                 ||
               ( B1 )
           ( B2 )  ( B3 )
      [ Leaf L ]\ /[ Leaf R ]
       (front)   V   (behind, 0.5 in lower)
Joining (Assembly)
Block both leaves before you assemble the ornament (see Final Blocking).
- Leaves: Lay Leaf R face up. Place Leaf L on top of it so the two stem ends overlap by 0.5 in (1.3 cm). Rotate them so they open into a V of about 30 degrees, with Leaf R hanging 0.5 in (1.3 cm) lower than Leaf L. Using the stem tail, whipstitch through the 3 stem sc of Leaf L and the matching 3 stem sc of Leaf R, so each stitch joins one stitch from each leaf. Tack the overlapping vein ends together with 2 more stitches.
- Berries: Sew B2 and B3 side by side over the joined stems, so they hide the stem seam. Sew B1 centered above them, touching both. Pass the needle through the touching sides of the berries so the triangle stays firm.
- Cord: Fold the cord in half and line up the two ends. Sew them to the back of B1 with 4 to 5 stitches through the cord and the berry’s back loops.
Tension: Pull the stitches just firm enough to close any gaps. If you pull harder, the lace near the stem will pucker.
Size checkpoint: The ornament should measure 8 in (20.3 cm) from the top of the loop to the tip of Leaf R, and 3.5 in (8.9 cm) across the widest points.
Final Blocking
- Before you assemble, pin each leaf face up on the blocking board.
- Pin the vein in a straight line 4 in (10.2 cm) long.
- Pin the tip and the stem so the leaf measures 4.5 in (11.4 cm) from end to end.
- Pin out every picot point on both sides, so the leaf measures 2 in (5.1 cm) across the middle points.
- Push each valley slightly in toward the vein to sharpen the holly notches.
- Spray with starch until damp, open the mesh with a pin tip, and let the leaf dry completely.
- Assemble the ornament, then lightly mist the berry cluster and gently reshape the berries with your fingers.
Final Quality-Control Checklist
- [ ] Vein has 41 sc and measures 4 in (10.2 cm)
- [ ] Rounds 1–3 each have 42 spaces, with 20 per side
- [ ] Each leaf has 5 points per side plus a tip point, for 11 picots
- [ ] The points on the two sides of each leaf mirror each other
- [ ] Both leaves measure 4.5 in (11.4 cm) × 2 in (5.1 cm)
- [ ] Berries are firm, round and 0.5 in (1.3 cm) across
- [ ] Loop is 3 in (7.6 cm) long and evenly twisted
- [ ] Ornament is 8 in (20.3 cm) × 3.5 in (8.9 cm)
- [ ] All ends are woven in and none show on the front
Troubleshooting
- Leaf curls into a tube: Your mesh rounds are too tight. Loosen your chains, or use a 1.75 mm hook for Rounds 2–3 only.
- Edge ruffles: You probably have extra stitches in some spaces. Recount Round 4 against the 10-sts-per-lobe rule.
- Points look rounded: Pin each picot outward and starch it more heavily.
- Metallic thread frays: Cut shorter lengths, about 20 in (50.8 cm), and secure the ends with a tiny dot of fabric glue.
- Berries look lumpy: Add more stuffing before Rnd 5 and spread it evenly.
- The two sides of the leaf don’t match: Check that Side B follows the mirrored lobe order.
Care
Spot-clean gently with cool water and re-block the leaves if they lose their shape. Don’t leave the ornament on a hot dashboard for long periods, because heat can fade the thread and soften the starch.

Final Notes
The measurements build on each other. A 41-sc vein measures 4 in (10.2 cm). Three mesh rounds of 42 spaces bring the leaf to 4.25 in × 1.75 in (10.8 cm × 4.4 cm). The edging adds 5 points per side and brings it to 4.5 in × 2 in (11.4 cm × 5.1 cm). Two leaves, three 0.5 in (1.3 cm) berries and a 3 in (7.6 cm) loop then make an ornament 8 in × 3.5 in (20.3 cm × 8.9 cm). If each stage matches its checkpoint, the next one will work too. Happy crocheting!