

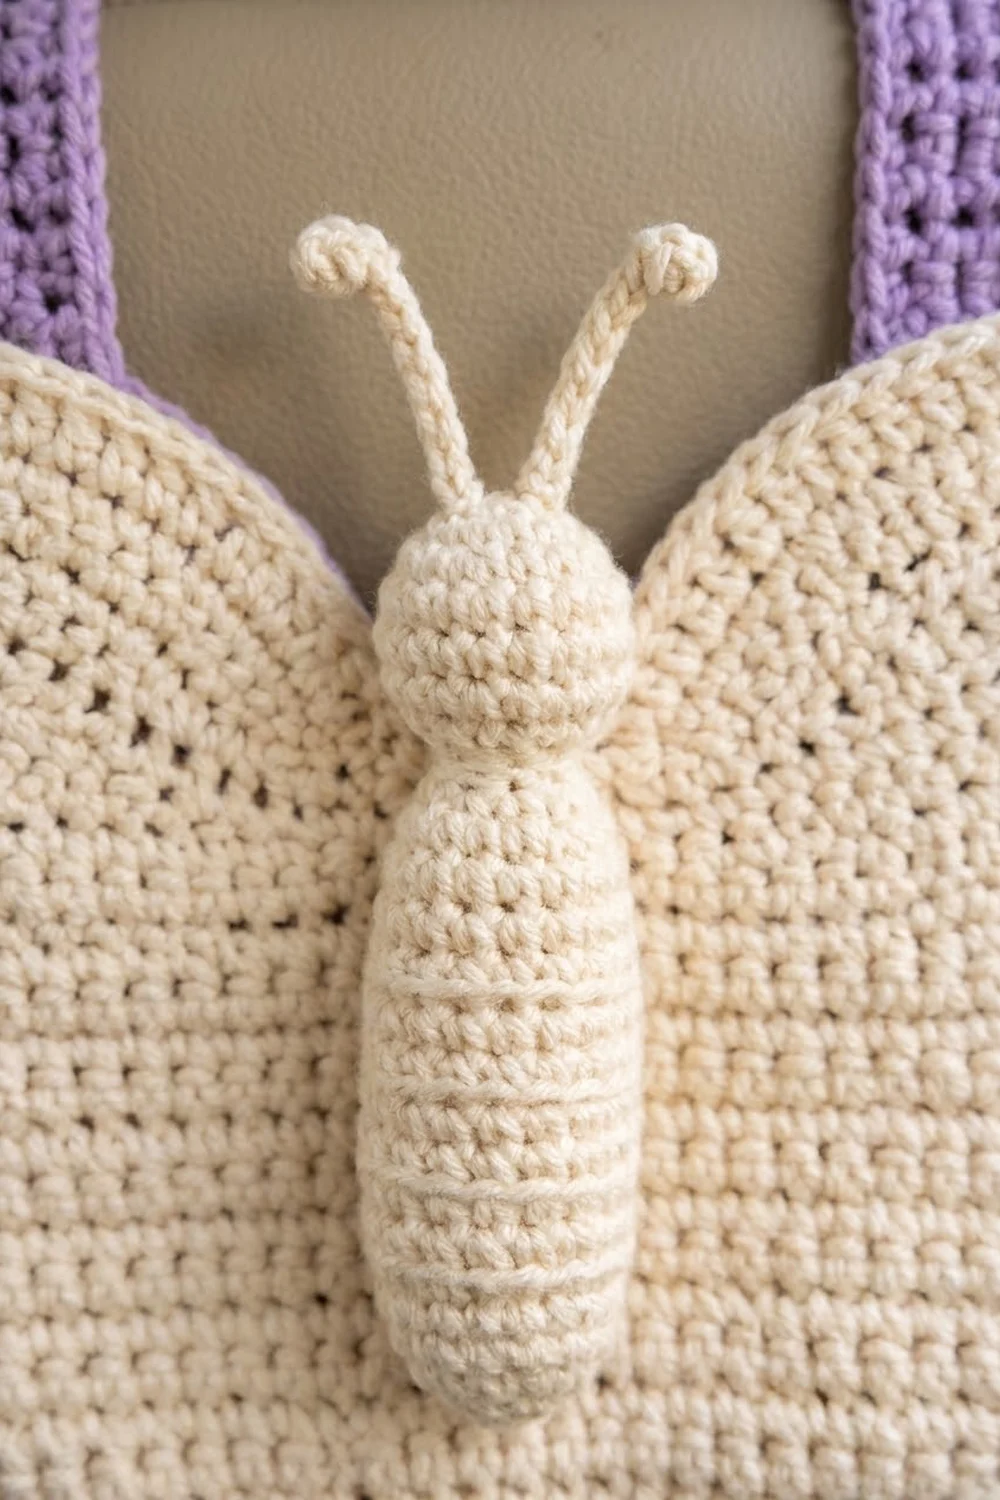
The Lavender Flutter organizer is a butterfly that hangs on the back of a car seat and holds the small things that usually roll under it. Two lavender upper wings and two dark purple lower wings frame a raised cream body. A deep cream pocket with a scalloped rim sits across the front, and little pink and purple flowers finish the look.
The colors are soft and a little playful: lavender, deep plum-purple, warm cream and pale blush pink. The look sits between amigurumi and home décor. The body and antennae are 3D, while the wings and pocket are flat and sturdy.
This pattern uses US crochet terms. The finished organizer measures about 16 in (40.6 cm) wide and 13.5 in (34.3 cm) tall, not counting the straps. The pocket opening is about 11.25 in (28.6 cm) wide and 2 in (5.1 cm) deep.
Construction is simple and modular. The wings are oval rounds shaped with taller stitches at the outer end. The body is worked in a spiral, and the pocket starts as an oval base that is built up into walls. The flowers and straps are quick extras. Everything is sewn together at the end.
Finished Size and Construction
- Finished size: 16 in (40.6 cm) wide × 13.5 in (34.3 cm) tall, without straps
- Skill level: Intermediate
- Terminology: US
- Yarn weight: Worsted (#4) cotton
- Hook: 4.5 mm (US 7)
- Number of pieces: 16 (4 wings, 1 body, 2 antennae, 1 pocket, 2 straps, 6 flowers)
- Layout: Upper wings overlap the lower wings, the body covers the center seam, and the pocket sits across the lower half
- Upper wing: 9.25 in (23.5 cm) long × 7.25 in (18.4 cm) wide
- Lower wing: 7.25 in (18.4 cm) long × 5.25 in (13.3 cm) wide
- Pocket before border: 11.25 in (28.6 cm) wide × 5.5 in (14.0 cm) tall
- Border depth: about 0.75 in (1.9 cm) of rim, for a finished pocket height of 6 in (15.2 cm)
Materials
Use a smooth worsted-weight cotton or cotton blend of about 85 m per 50 g. Cotton keeps its shape when loaded with a phone and does not stretch in a warm car.
- Lavender: 80 g (136 m), for upper wings and straps
- Dark purple: 40 g (68 m), for lower wings, two flowers, and the pink flowers’ centers
- Cream: 120 g (204 m), for body, antennae, pocket, and the purple flowers’ centers
- Pale pink: 15 g (26 m), for petals on four flowers
Tools:
– 4.5 mm (US 7) hook
– Tapestry needle
– 6 stitch markers
– Rust-proof pins
– About 15 g of fiberfill
– 2 buttons, 0.75 in (1.9 cm)
– Optional: fabric stiffener for the antennae
All quantities include a margin of about 20%.
Abbreviations (US Terms)
- ch – chain
- sl st – slip stitch
- sc – single crochet
- hdc – half double crochet
- dc – double crochet
- inc – 2 sc in the same stitch
- dec – sc2tog (single crochet two together)
- BLO – back loop only
- MR – magic ring
- st(s) – stitch(es)
- sk – skip
Special stitch – Scallop: sk 1 st, 3 dc in the next st, sk 1 st. With the sc before it, one scallop repeat uses 4 stitches.
Gauge and Checkpoints
Gauge: 14 sc × 15 rows = 4 in (10.2 cm).
Test one piece first. Make one lower wing before anything else. It is small, flat, and shows quickly whether your tension matches.
- Lower wing after Rnd 9: 4.75 in (12.1 cm) wide × 6 in (15.2 cm) long
- Upper wing after Rnd 6: 3.25 in (8.3 cm) × 5 in (12.7 cm)
- Upper wing after Rnd 12: 6.5 in (16.5 cm) × 8 in (20.3 cm)
- Pocket base after Rnd 4: 11.25 in (28.6 cm) × 2 in (5.1 cm)
- Strap: 1.75 in (4.4 cm) wide
If your piece is too big, go down to a 4.0 mm hook. If it is too small, go up to a 5.0 mm hook. If it cups, your increases are tight, so loosen up at the ends. If it ruffles, check that each end really has only 3 increases per round.
Upper Wings (make 2, Lavender)
Work in joined rounds. Ch 1 at the start of each round does not count as a stitch. Join each round with a sl st to the first sc.
The two curved ends are called End B (the inner end, at the body) and End A (the outer end, which flares). The straight stretches between them are the sides.
Ch 9.
Rnd 1: 3 sc in 2nd ch from hook (End B), sc in next 6 ch, 3 sc in last ch (End A). Working along the opposite side of the chain, sc in next 6 ch. Join. (18)
Rnd 2: [inc] ×3, sc 6, [inc] ×3, sc 6. (24)
Rnd 3: [sc 1, inc] ×3, sc 6, [sc 1, inc] ×3, sc 6. (30)
Rnds 4–12: On round number k, work [sc (k−2), inc] ×3, sc 6, [sc (k−2), inc] ×3, sc 6. Each round’s total is 6k + 12.
| Rnd | 4 | 5 | 6 | 7 | 8 | 9 | 10 | 11 | 12 |
|---|---|---|---|---|---|---|---|---|---|
| Total sts | 36 | 42 | 48 | 54 | 60 | 66 | 72 | 78 | 84 |
After Rnd 12, each end has 36 sts and each side has 6.
Rnd 13 (flare round):
– sc 36 across End B
– sc 6
– across End A: hdc 6, [dc in next st, 2 dc in next st] ×12, hdc 6
– sc 6
Join. (84 worked 1-per-stitch + 12 added = 96)
Rnd 14: sc in each st around. Join. (96) Fasten off.
The wing should now measure 9.25 in (23.5 cm) × 7.25 in (18.4 cm). The outer end is fuller than the inner end, which gives the teardrop shape.
Lower Wings (make 2, Dark Purple)
Ch 7.
Rnd 1: 3 sc in 2nd ch from hook (End B), sc in next 4 ch, 3 sc in last ch (End A). Working along the opposite side, sc in next 4 ch. Join. (14)
Rnd 2: [inc] ×3, sc 4, [inc] ×3, sc 4. (20)
Rnds 3–9: On round number k, work [sc (k−2), inc] ×3, sc 4, [sc (k−2), inc] ×3, sc 4. Each round’s total is 6k + 8.
| Rnd | 3 | 4 | 5 | 6 | 7 | 8 | 9 |
|---|---|---|---|---|---|---|---|
| Total sts | 26 | 32 | 38 | 44 | 50 | 56 | 62 |
After Rnd 9, each end has 27 sts and each side has 4.
Rnd 10 (flare round):
– sc 27 across End B
– sc 4
– across End A: hdc 4, [dc in next st, 2 dc in next st] ×10, hdc 3
– sc 4
Join. (62 worked 1-per-stitch + 10 added = 72)
Rnd 11: sc in each st around. (72) Fasten off.
The wing should measure 7.25 in (18.4 cm) × 5.25 in (13.3 cm).
Body (make 1, Cream)
Work in a continuous spiral and move a marker up to the first stitch of each round.
- Rnd 1: 6 sc in MR. (6)
- Rnd 2: inc ×6. (12)
- Rnd 3: [sc 1, inc] ×6. (18)
- Rnds 4–6: sc around. (18)
- Rnd 7: [sc 1, dec] ×6. (12) This is the neck. Stuff the head firmly.
- Rnd 8: [sc 1, inc] ×6. (18)
- Rnds 9–11: sc around. (18)
- Rnd 12: [sc 1, dec] ×6. (12) This pinch separates the segments.
- Rnd 13: [sc 1, inc] ×6. (18)
- Rnd 14: [sc 2, inc] ×6. (24)
- Rnds 15–26: sc around. (24) Work Rnds 18 and 22 in BLO. The unused front loops form the ridge rings on the abdomen.
- Rnd 27: [sc 2, dec] ×6. (18) Stuff lightly so the back stays flat.
- Rnd 28: [sc 1, dec] ×6. (12)
- Rnd 29: dec ×6. (6)
Fasten off and close the opening. The body measures 7.75 in (19.7 cm) long and about 2.25 in (5.7 cm) wide at the abdomen.
Antennae (make 2, Cream)
Ch 15. Work 3 sc in 2nd ch from hook (this makes the knob), then sc in each of the next 13 ch. (16)
Fasten off, leaving a long tail. Single crochet worked along a chain curls naturally, which forms the curved tip. Each antenna is about 3.75 in (9.5 cm) long.
Flowers (make 6)
Center: Make 5 sc in MR and join. (5) Fasten off.
Petals: Join the petal color in any sc. Work [ch 2, 2 dc in the same st, ch 2, sl st in the same st, sl st in the next st] ×5. (5 petals, 10 dc) Fasten off.
Each flower is about 1.5 in (3.8 cm) across.
- 4 flowers: dark purple center, pale pink petals
- 2 flowers: cream center, dark purple petals
Pocket (make 1, Cream)
The pocket uses joined rounds. Its sections are End B, the front, End A, and the back.
Ch 35.
Rnd 1: 3 sc in 2nd ch from hook, sc in next 32 ch, 3 sc in last ch. Working along the opposite side, sc in next 32 ch. Join. (70)
Rnd 2: [inc] ×3, sc 32, [inc] ×3, sc 32. (76)
Rnd 3: [sc 1, inc] ×3, sc 32, [sc 1, inc] ×3, sc 32. (82)
Rnd 4: [sc 2, inc] ×3, sc 32, [sc 2, inc] ×3, sc 32. (88)
Now each end has 12 sts and the front and back have 32 sts each. Place a marker at the start of each of the four sections.
Rnd 5: sc in BLO around. (88) This makes the fold ridge where the walls begin.
Rnds 6–24: sc around. (88)
Do not fasten off. The walls should measure about 5.25 in (13.3 cm) above the ridge.
Straps (make 2, Lavender)
Ch 7.
Row 1: sc in 2nd ch from hook and in each ch across. (6)
Rows 2–36: ch 1, turn, sc 6. (6)
Row 37: ch 1, turn, sc 2, ch 2, sk 2, sc 2. (4 sc + ch-2 space)
Row 38: ch 1, turn, sc 2, 2 sc in the ch-2 space, sc 2. (6)
Rows 39–40: ch 1, turn, sc 6. (6) Fasten off.
Each strap measures 1.75 in (4.4 cm) × 10.75 in (27.3 cm).
Make All Pieces
| Color | Pieces |
|---|---|
| Lavender | 2 upper wings, 2 straps |
| Dark purple | 2 lower wings, petals for 2 flowers, centers for 4 flowers |
| Cream | 1 body, 2 antennae, 1 pocket, centers for 2 flowers |
| Pale pink | petals for 4 flowers |
Layout (front view):
        [Strap]               [Strap]
 [Upper wing L]  [Head]  [Upper wing R]
   pink + purple [Body]   pink + purple
 [Lower wing L] [=POCKET=] [Lower wing R]
   pink flower              pink flower
Joining
Finish the pocket rim (see Border below) before Step 5.
- Wing pairs. Lay each upper wing at about a 25° upward angle, with End B pointing toward the center. Tuck a lower wing behind it so they overlap by 1.25 in (3.2 cm). From the front, sew the lower wing on with lavender yarn, taking one running stitch per Rnd 14 stitch through both layers.
- Center. Overlap the two End B tips by 1 in (2.5 cm) and whipstitch them together.
- Body and antennae. Center the body over the seam, with the head level with the top of the wings. Sew it down along both long edges, one stitch every second round. Sew the antennae to the top of the head, 0.5 in (1.3 cm) apart, with the tips curling outward.
- Flowers. Sew one pink flower near the top of each upper wing and one purple flower 1.5 in (3.8 cm) below it, toward the outer edge. Sew one pink flower near the outer edge of each lower wing.
- Pocket. Center the pocket over the lower body, with its base ridge 1 in (2.5 cm) above the bottom of the lower wings. Whipstitch the back wall to the wings along the base ridge, up both end curves, and across Rnd 22. Work one whipstitch per back-wall stitch, so the 32 back stitches catch 32 points on the wings.
- Straps. Sew the bottom 1.5 in (3.8 cm) of each strap to the back of an upper wing. The strap centers should be 4 in (10.2 cm) from the center line. Sew each button 4.5 in (11.4 cm) below its buttonhole.
Tension: Pull every stitch snug enough to close the gap, but not so tight that the fabric puckers.
Checkpoint: The assembled piece should measure 16 in (40.6 cm) × 13.5 in (34.3 cm).
Border: Scalloped Pocket Rim
Border gauge: One scallop repeat uses 4 stitches and spans about 1.1 in (2.8 cm).
Border Rnd 1: Continuing from the pocket, sc in each st around. Join. (88)
| Section | Front | End A | Back | End B |
|---|---|---|---|---|
| Sts | 32 | 12 | 32 | 12 |
Border Rnd 2: [sc in next st, Scallop] ×22. Join with a sl st and fasten off. (22 sc + 66 dc = 88 sts)
| Section | Front | End A | Back | End B |
|---|---|---|---|---|
| Scallops | 8 | 3 | 8 | 3 |
Why the math works: 32 ÷ 4 = 8 and 12 ÷ 4 = 3. Each section therefore holds a whole number of repeats, and 22 × 4 = 88 matches the stitch count exactly. The rim adds 0.75 in (1.9 cm), so the pocket’s finished height is 6 in (15.2 cm).
Final Blocking
- Spray the whole organizer lightly with water. Keep the body dry.
- Pin it flat on a blocking mat at 16 in (40.6 cm) × 13.5 in (34.3 cm).
- Pin each wing’s outline smooth, especially the flared outer ends.
- Stuff the pocket with a folded towel so it dries square.
- Shape the antenna curls and, if you like, brush on fabric stiffener.
- Let everything dry completely before unpinning.
Final Quality-Control Checklist
- Upper wings have 96 sts and lower wings have 72.
- The wing outlines curve smoothly, with no cupping or ruffles.
- The body has a flat back and two visible ridge rings.
- The pocket has 88 sts and 22 even scallops: 8 front, 3 per end, 8 back.
- All six flowers are secure, and no ends show.
- The straps button easily around the headrest posts.
- The finished size is 16 in (40.6 cm) × 13.5 in (34.3 cm).
Troubleshooting
- The wing cups: Your increases are too tight. Go up a hook size for the end sections.
- The wing ruffles: Recount the ends. Each round should have exactly 3 increases per end.
- The scallops don’t fit: Your pocket count is off 88. Fix Rnd 4 before you start the walls.
- The pocket sags: Add a second line of whipstitches across Rnd 14 of the back wall.
- The body looks lumpy: Pull out some stuffing and smooth the rest.
- The antennae droop: Use fabric stiffener, or run a few stitches to anchor them to the head.
Care
Spot-clean with mild soap and cool water. Reshape the piece and let it dry flat.

Final Notes
The measurement chain is short and easy to check. Match a gauge of 14 sc × 15 rows = 4 in (10.2 cm) and confirm it on one lower wing at 7.25 in (18.4 cm) × 5.25 in (13.3 cm). Then check the upper wings at 9.25 in (23.5 cm) × 7.25 in (18.4 cm) and the pocket base at 11.25 in (28.6 cm) × 2 in (5.1 cm), with exactly 88 stitches. The 88 stitches divide cleanly into 22 scallops, and the assembled organizer comes out at 16 in (40.6 cm) × 13.5 in (34.3 cm).
Happy crocheting!