

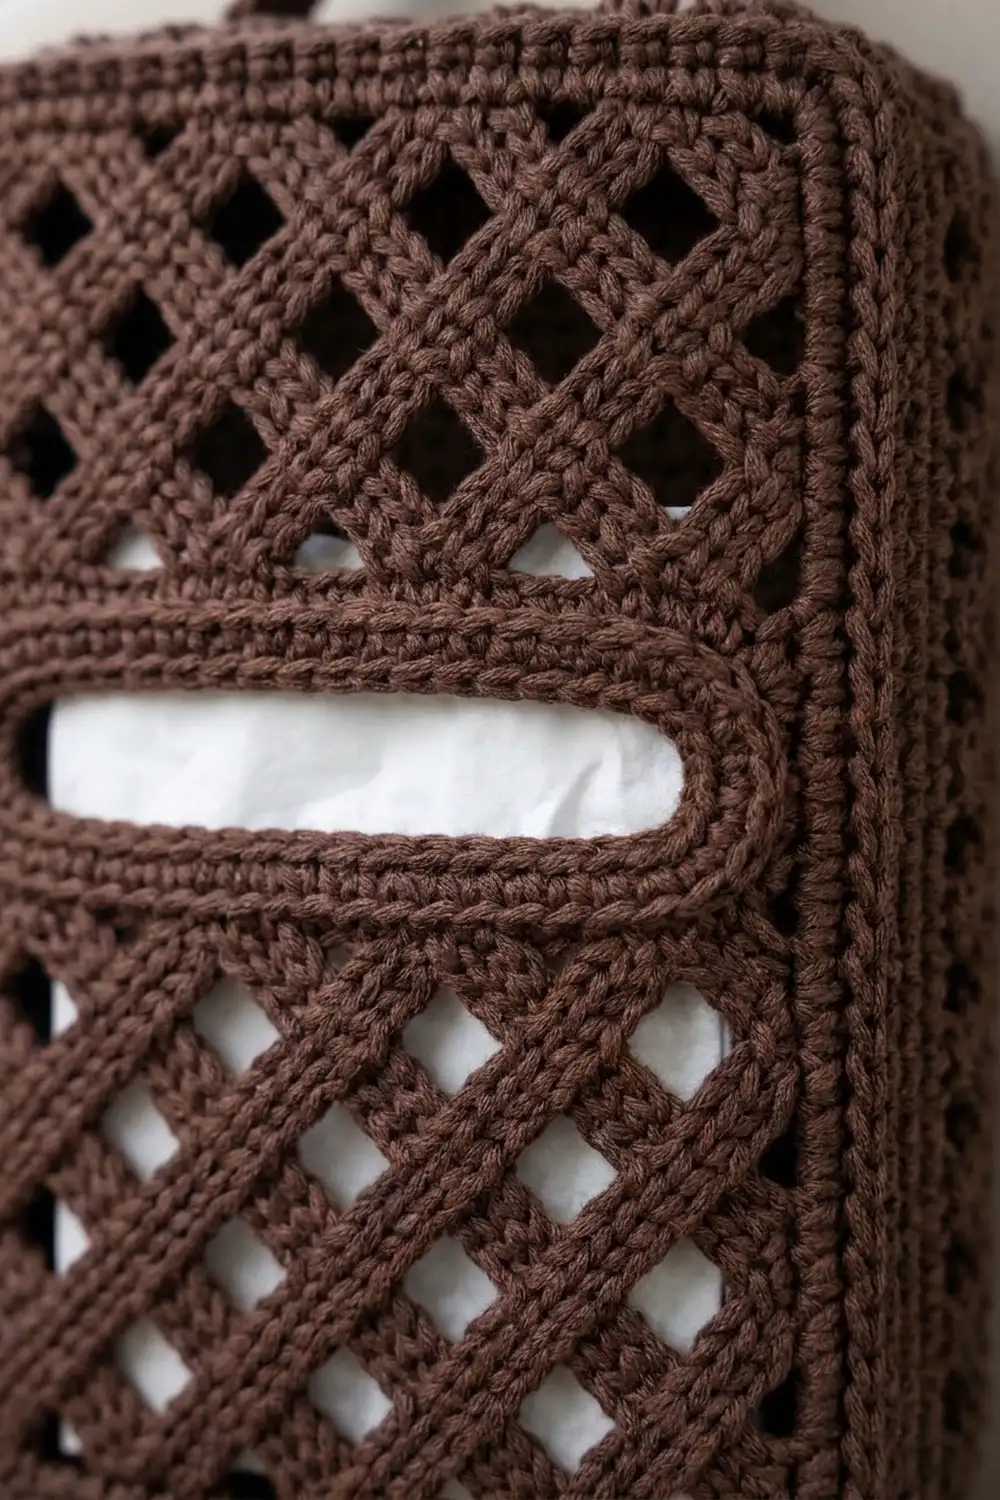
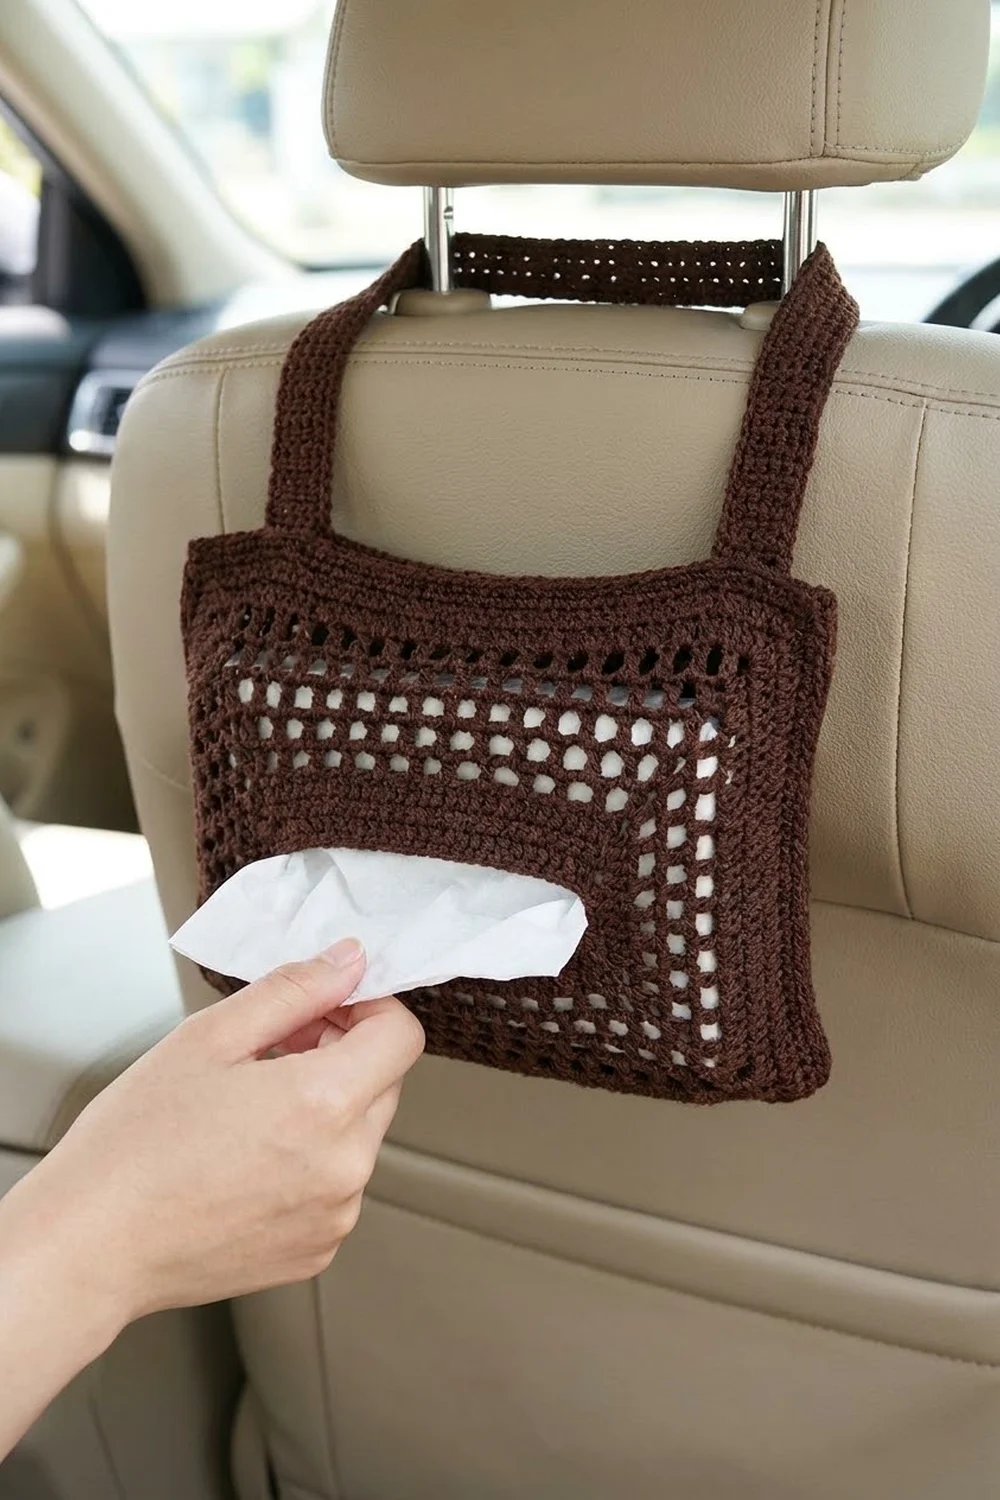
The Cocoa Lattice Car Tissue Holder is a tidy, box-shaped tissue cover that hangs from a car headrest hook. The walls are an openwork lattice: diagonal bars of stitches with small square windows in a checkerboard pattern. Solid single crochet rims hold the box square, and solid columns run up all four corners.
It is worked in one color, a rich chocolate brown, so the texture is what stands out. A solid frame surrounds the horizontal tissue slot on the front, and a short flat strap at the top loops over a hook or headrest post.
The pattern uses US crochet terms. The finished holder measures 5.5 in wide × 2.5 in deep × 8.5 in tall (14.0 × 6.4 × 21.6 cm), not counting the strap. It fits a slim soft pack of tissues about 5 × 2 × 8 in (12.7 × 5.1 × 20.3 cm).
Construction is simple. You work a flat single crochet base, then turn up the walls and work them in joined rounds, building the slot into the front as you go. Next you make a matching lid, join it on three sides (the back edge stays open for refills), and sew on the strap. Last comes a slip stitch trim around the slot.
Finished Size and Construction
- Finished size: 5.5 × 2.5 × 8.5 in (14.0 × 6.4 × 21.6 cm)
- Skill level: Intermediate
- Terminology: US crochet terms
- Yarn weight: Worsted (#4) cotton
- Hook: 4.0 mm (US G-6)
- Number of pieces: 1 finished item, built from 3 parts: the body (with its base), the lid and the strap
- Layout: Upright box with the slot centered on the front face and the strap centered on the lid
- Base/lid size: 5.5 × 2.5 in (14.0 × 6.4 cm), 64 stitches around
- Size before border: 5.5 × 2.5 × 8.5 in (14.0 × 6.4 × 21.6 cm)
- Border depth: Surface slip stitch trim only, so it adds 0 in (0 cm) to the outside size
- Strap: 1 × 8 in (2.5 × 20.3 cm) before attaching
Materials
Choose a smooth, firm worsted cotton or cotton blend. Mercerized or tightly plied cotton gives the crisp, cord-like definition shown and holds the box shape much better than soft acrylic. Pick a dark, solid shade so the lattice reads clearly.
Yarn (worsted cotton, about 190 m per 100 g):
– Chocolate Brown: 150 g (285 m)
Rough use: the body takes about 105 g, the lid about 12 g and the strap about 8 g. These quantities include a margin of roughly 20% for your gauge swatch and small tension differences.
Tools:
– 4.0 mm (US G-6) crochet hook
– 4 locking stitch markers
– Tapestry needle
– Scissors
– Measuring tape
– Rust-proof pins and a spray bottle or steamer
– A box-shaped blocking form, such as a cardboard box or foam block cut to 5.5 × 2.5 × 8.5 in (14.0 × 6.4 × 21.6 cm)
Abbreviations (US Terms)
- ch – chain
- sl st – slip stitch
- sc – single crochet
- dc – double crochet
- sk – skip
- sp – space
- st(s) – stitch(es)
- BLO – back loop only
- rnd(s) – round(s)
Special stitch: Lattice Mesh. This is an offset mesh of single double crochets and ch-1 spaces. Every ch-1 counts as 1 st in all counts.
– Lattice A: dc in next st, ch 1, sk next st across the section.
– Lattice B: ch 1, sk next dc, dc in next ch-1 sp (or st) across the section.
Alternating A and B makes the holes sit in a checkerboard, so the solid parts read as diagonal bars.
Surface sl st: Hold the yarn behind the work, insert the hook from front to back between stitches, pull up a loop and draw it through the loop on the hook.
Gauge and Checkpoints
- Single crochet: 16 sts and 20 rows = 4 in (10.2 cm)
- Lattice Mesh in rounds: 16 sts and 8 rnds = 4 in (10.2 cm)
Use the base as your test piece. Your gauge is right if it measures 5.5 × 2.5 in (14.0 × 6.4 cm) after its edging round. Check it before you start the walls.
Checkpoints:
– Base after Row 10: 5.0 × 2.0 in (12.7 × 5.1 cm)
– Base after edging: 5.5 × 2.5 in (14.0 × 6.4 cm), 64 sts
– Walls after Rnd 2: 0.4 in (1.0 cm) tall
– After Rnd 8: 3.4 in (8.6 cm) tall
– After Rnd 11 (slot done): 4.9 in (12.4 cm) tall
– After Rnd 17: 7.9 in (20.1 cm) tall
– After Rnd 20: 8.5 in (21.6 cm) tall; the walls lie flat around a perimeter of 16 in (40.6 cm)
If your base is too big, go down 0.5 mm in hook size. If it is too small, go up 0.5 mm. If only the walls come out too tall, work the dc a little shorter by pulling the first loop up less. If the walls are too short, add 1 Lattice round before Rnd 9 and 1 after Rnd 11, keeping the A/B order.
Base
Ch 21.
Row 1: Sc in 2nd ch from hook and in each ch across, turn. (20 sc)
Rows 2–10: Ch 1, sc in each st across, turn. (20 sc)
Checkpoint: 5.0 × 2.0 in (12.7 × 5.1 cm).
Edging Rnd (conversion): Ch 1, do not turn. Work around the base as follows:
– Across Row 10: 3 sc in first st, sc in next 18 sts, 3 sc in last st. (24)
– Down the side: sc in the row ends of Rows 9 through 2. (8)
– Across the foundation ch: 3 sc in first ch, sc in next 18 ch, 3 sc in last ch. (24)
– Up the other side: sc in the row ends of Rows 2 through 9. (8)
– Join with sl st to first sc.
Count: (20 + 20 + 8 + 8 = 56 sts worked 1 per existing st or row end) + (8 extra corner sts) = 64 sc.
Mark the sections. Each “corner group” is the 3 sc worked into one corner stitch. Going around from the first sc, the order is:
Corner A (3) – Back face (18) – Corner B (3) – Side (8) – Corner C (3) – Front face (18) – Corner D (3) – Side (8) = 64.
Put a marker in the center sc of each corner group.
Body Walls
Work in joined rounds with the right side facing. Do not turn.
Rnd 1: Ch 1, sc in BLO of each st around, join. (64 sc) This makes the crisp fold between the base and the walls.
Rnd 2: Ch 1, sc in each st around, join. (64 sc)
Checkpoint: 0.4 in (1.0 cm) tall.
Rnd 3 (Lattice A): Ch 3 (counts as dc), dc in next 2 sts (Corner A). Then work:
– Back: (dc, ch 1, sk 1) 9 times
– Corner B: dc in each of next 3 sts
– Side: (dc, ch 1, sk 1) 4 times
– Corner C: dc in each of next 3 sts
– Front: (dc, ch 1, sk 1) 9 times
– Corner D: dc in each of next 3 sts
– Side: (dc, ch 1, sk 1) 4 times
– Join to top of ch-3.
Count: 38 dc + 26 ch-1 = 64 sts.
Rnd 4 (Lattice B): Ch 3, dc in next 2 dc (Corner A). Work every face as (ch 1, sk dc, dc in ch-1 sp). Work 9 repeats on the back and front and 4 on each side, with 3 dc in each corner group. Join. (64 sts)
The corners become solid columns that are 3 dc wide. Every face starts and ends with a hole on alternating rounds, which keeps the checkerboard even.
Rnds 5–8: Work Lattice A, B, A, B. (64 sts each)
Checkpoint: 3.4 in (8.6 cm) tall.
Slot Frame (Rnds 9–11)
Front-face positions are numbered 1–18 from Corner C to Corner D. Work all other sections in pattern as usual.
Rnd 9 (A, bottom of frame): On the front, work (dc, ch 1, sk 1) over positions 1–2. Then dc in each of the next 14 sts, working dc into the ch-1 sps as well (positions 3–16). Finish with (dc, ch 1, sk 1) over positions 17–18. (Front 18; round 64)
Rnd 10 (B, slot opening): On the front, work ch 1, sk dc, dc in ch-1 sp (positions 1–2). Dc in next 2 sts (3–4). Ch 10, sk next 10 sts (5–14). Dc in next 2 sts (15–16). Ch 1, sk dc, dc in ch-1 sp (17–18). (Front 18, with the ch-10 counting as 10; round 64)
Rnd 11 (A, top of frame): On the front, work dc in first st and ch 1, sk 1 (positions 1–2). Dc in next 2 dc (3–4). Dc in each of the 10 ch (5–14). Dc in next 2 dc (15–16). Dc in ch-1 sp, ch 1, sk 1 (17–18). (Front 18; round 64)
You now have a solid block 14 sts wide and 3 rnds tall, which is 3.5 × 1.5 in (8.9 × 3.8 cm). It has a 10-st slot through its middle round, sitting 3.9–4.4 in (9.9–11.2 cm) up from the base, which is the vertical center of the box.
Checkpoint: 4.9 in (12.4 cm) tall.
Rnd 12 (B): Work Lattice B all around. Above the solid block, keep your position count: ch 1 and sk at odd positions, dc at even positions. (64 sts)
Rnds 13–17: Work Lattice A, B, A, B, A. (64 sts each)
Checkpoint: 7.9 in (20.1 cm) tall.
Top Rim
Rnd 18 (conversion): Ch 1, sc in each dc and in each ch-1 sp around, join.
Count: (38 sc in dc + 26 sc in ch-1 sps, worked 1 per existing st) + (0 extra) = 64 sc.
Rnds 19–20: Ch 1, sc in each st around, join. (64 sc) Fasten off.
Checkpoint: 8.5 in (21.6 cm) tall.
Lid
Work Rows 1–10 and the Edging Rnd exactly as for the base. (64 sc) Do not fasten off.
Closing the top: Hold the lid on top of the body with wrong sides together. Line up the four corner groups and the matching faces. Working through both layers at once, sc stitch for stitch:
– Corner B (3), Side (8), Corner C (3), Front (18), Corner D (3), Side (8), Corner A (3)
That is 46 sc joined. Fasten off.
The 18 back-face sts of the lid and the 18 back-face sts of Rnd 20 stay unjoined, so they form the refill opening. When the holder hangs, this edge rests against the seat back.
Strap
Ch 5.
Row 1: Sc in 2nd ch from hook and in each ch across, turn. (4 sc)
Rows 2–40: Ch 1, sc in each st across, turn. (4 sc)
Strap edging: Ch 1. Sl st in each st across the last row (4), in each row end down the side (40), in each foundation ch (4), and in each row end up the other side (40). Join. (88 sl st)
Checkpoint: 1 × 8 in (2.5 × 20.3 cm). Fasten off, leaving a 16 in (40.6 cm) tail.
Attach: Center the strap across the 2.5 in (6.4 cm) depth of the lid, leaving 0.75 in (1.9 cm) on each side. Lay the last 4 rows of each end flat on the lid, 0.8 in (2.0 cm) per end, with the two ends 1 in (2.5 cm) apart along the lid’s length. Whipstitch all the way around each end.
This leaves 6.4 in (16.3 cm) of strap to form an arch about 3 in (7.6 cm) tall.
Border: Slot Trim
The body needs no outer border because the solid sc rims at the base and top already finish it. The slot gets 2 rounds of surface trim.
Border gauge: Work 1 sl st per stitch along the top or bottom of stitches. Along the side of a dc round, work 2 sl st per round.
Border Rnd 1 (slot edge): Join yarn at the lower right corner of the slot and sl st loosely all the way around the opening:
– Bottom: 10 sl st, one in each of the 10 skipped Rnd 9 sts
– Left end: 2 sl st around the end dc post
– Top: 10 sl st, one in each free loop of the ch-10
– Right end: 2 sl st around the other end dc post
Join. (24 sl st) Count per side: 10 / 2 / 10 / 2.
Border Rnd 2 (frame outline): Work surface sl st along the line where the solid block meets the lattice:
– 14 along the bottom
– 6 up the left end (2 per round × 3 rounds)
– 14 along the top
– 6 down the right end
Join. (40 sl st) Count per side: 14 / 6 / 14 / 6. Fasten off.
Why the math works: The slot was made by skipping 10 sts and chaining 10, so its top and bottom each have exactly 10 stitches to work into. Each end is one dc round tall, which matches 2 sl st by the border gauge. The outline frames the 14-st solid block (positions 3–16) across its 3 rounds: 14 + 6 + 14 + 6 = 40.
Because the trim sits on the surface, the opening stays open and the outside size stays at 5.5 × 2.5 × 8.5 in (14.0 × 6.4 × 21.6 cm).
Final Blocking
- Weave in all ends inside the box along the solid corner columns, where they stay hidden.
- Spray the holder evenly with water until damp, but not soaked.
- Slide it over your box form, measuring 5.5 × 2.5 × 8.5 in (14.0 × 6.4 × 21.6 cm).
- Pull the corner columns straight and square up the base and lid rims.
- Gently open the lattice holes so they line up in clean diagonals.
- Pin the slot frame flat and even, and open the slot to its full width of about 2.5 in (6.4 cm).
- Lay the strap flat and pin it to 1 in (2.5 cm) wide.
- Let everything dry completely on the form, then remove it.
Final Quality-Control Checklist
- The base and lid each have 64 sts and measure 5.5 × 2.5 in (14.0 × 6.4 cm).
- Every wall round has 64 sts.
- All 4 corner columns are 3 dc wide and run straight.
- The holes alternate in a clean checkerboard with no doubled holes.
- The slot is centered at 3.9–4.4 in (9.9–11.2 cm) up from the base.
- The 46-st lid seam is even, and the back 18 sts are open.
- The strap is 1 in (2.5 cm) wide and its ends are sewn down firmly.
- Total height is 8.5 in (21.6 cm).
Troubleshooting
- The walls flare or lean in: Your Lattice gauge doesn’t match your sc gauge. Recount 64 sts and adjust the height of your dc, not the stitch count.
- The holes stack in columns instead of a checkerboard: You worked A twice in a row. Rip back and keep odd rounds as A and even rounds as B.
- The slot frame is off-center: Check the position count on the front face (1–18) in Rnds 9–11.
- The slot gapes or puckers: Rework Border Rnd 1 more loosely, or with a hook 0.5 mm larger.
- The lid corners don’t meet: Line up the center corner sc of each corner group before you join.
- The strap stretches: Use a smaller hook for the strap, or add the sl st edging on both long sides as written.
Care
Hand wash in cool water with mild soap, press out the water in a towel, and dry it flat or over its form. Don’t tumble dry, which can soften the box shape.
Final Notes
The measurement chain is simple to follow:
1. The base reaches 5.5 × 2.5 in (14.0 × 6.4 cm) with 64 sts.
2. Those 64 sts carry straight up the walls.
3. 2 sc rounds give 0.4 in (1.0 cm).
4. 15 Lattice rounds add 7.5 in (19.1 cm), with the slot frame built in at the center.
5. 3 sc rounds add 0.6 in (1.5 cm), for a total of 8.5 in (21.6 cm).
6. The lid matches the base stitch for stitch, and the surface trim finishes the slot without changing the size.
Check your size at each step and the box will come out square, sturdy and ready for the headrest. Happy crocheting!