

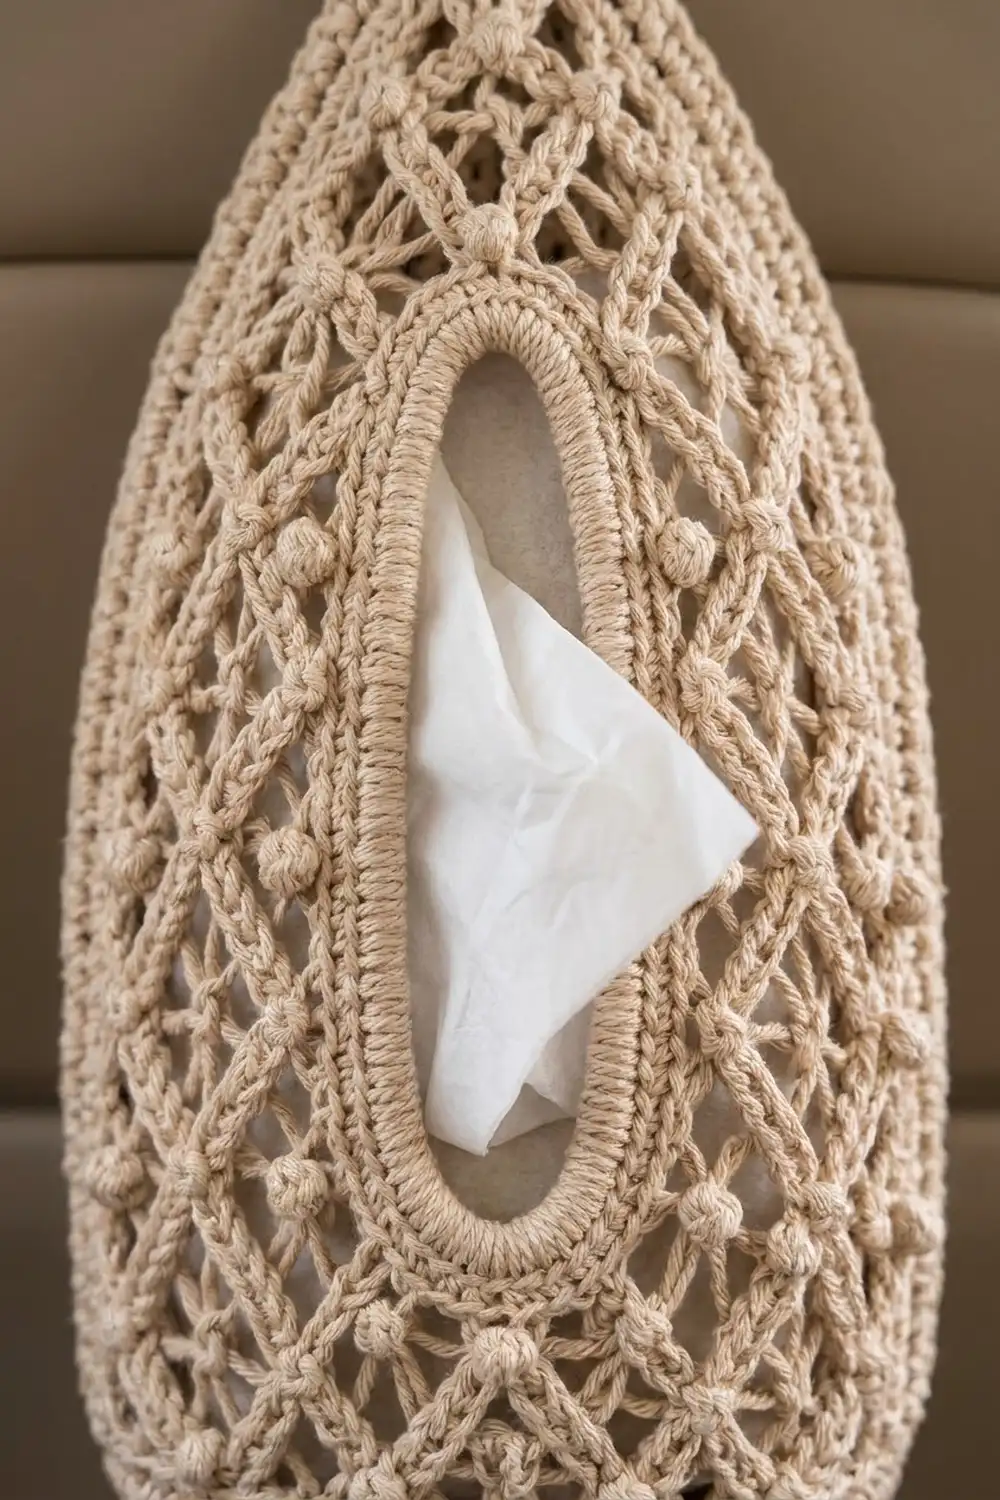
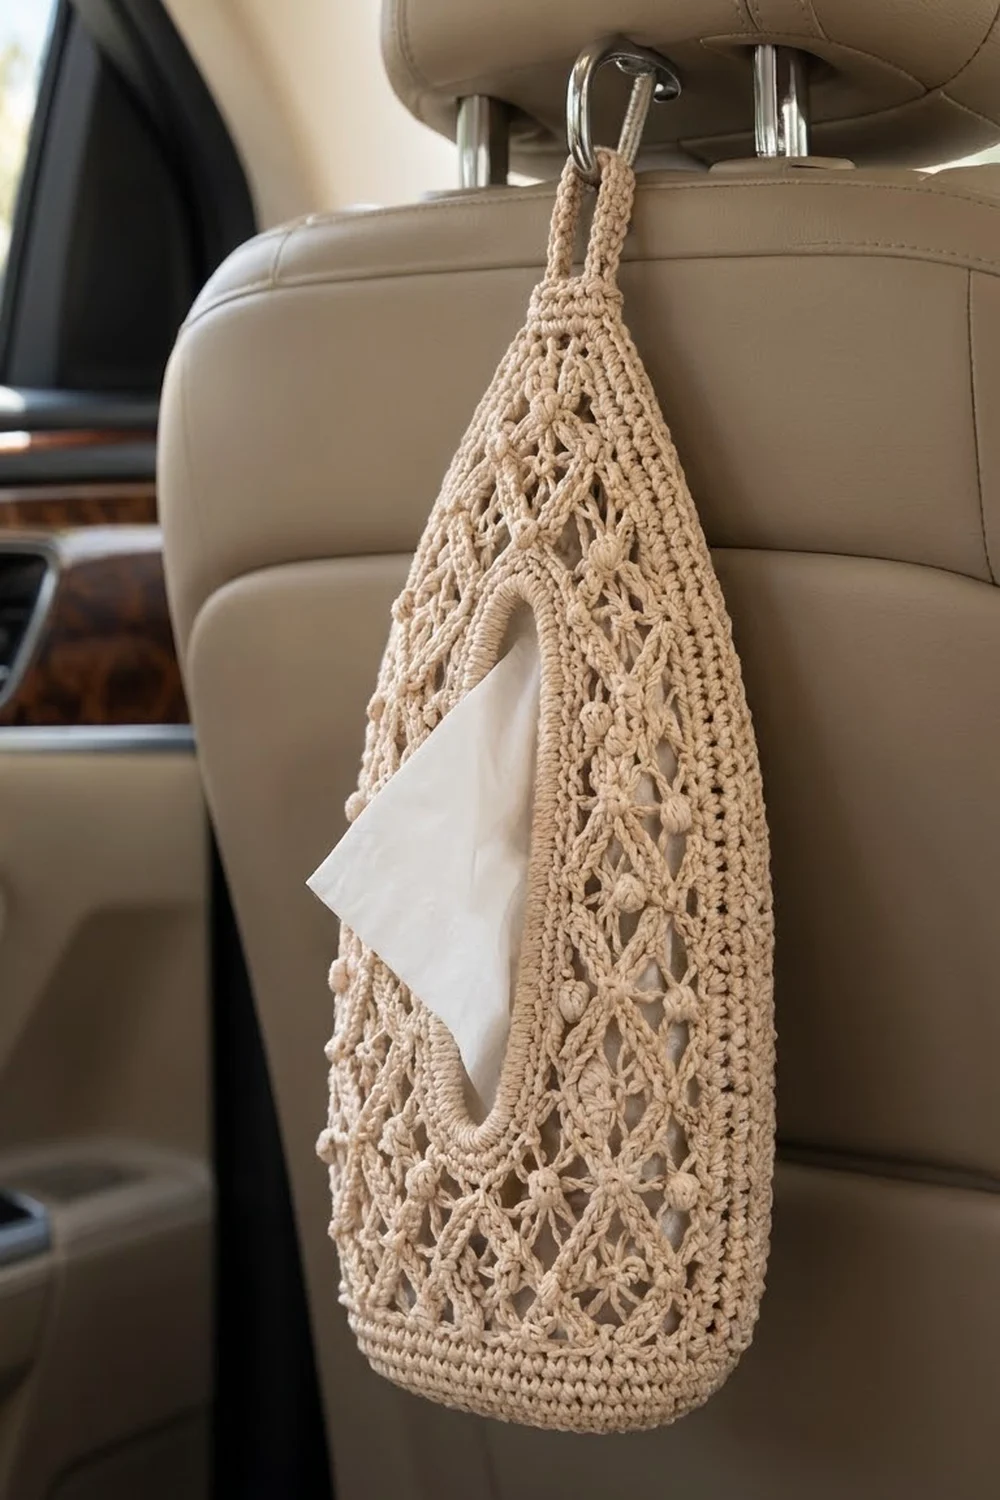
This hanging tissue holder is made to clip onto a car headrest post and keep tissues within reach of the back seat. It has a rounded teardrop body, an open diamond lattice dotted with small “pearl” puffs, and a smooth oval opening on the front where tissues pull through one at a time.
The sample is worked in one natural beige cotton cord. A single neutral color shows off the lattice texture and looks at home against tan, gray, or black car interiors. Cotton also holds its shape well and doesn’t stretch out the way acrylic can when the holder hangs full.
This pattern uses US crochet terms. The finished holder is about 6.5 in (16.5 cm) wide laid flat and 12 in (30.5 cm) tall from base to top, with a hanging loop of about 3 in (7.6 cm), for an overall length of about 15 in (38.1 cm).
It’s made in one seamless piece, from the bottom up. You start with a flat circle, turn up a short solid band, and work the lattice mesh in rounds. For a few rows you work back and forth to leave the oval opening, then close the gap and go back to rounds. The top tapers into a solid cap and a narrow strap that folds into the loop. Last, you add a two-round rim around the opening.
Finished Size and Construction
- Finished size: 6.5 in (16.5 cm) wide flat × 12 in (30.5 cm) tall, plus a 3 in (7.6 cm) loop
- Skill level: Intermediate
- Terminology: US crochet terms
- Yarn weight: Worsted (#4) cotton or cotton cord
- Hook: 4.0 mm (US G-6)
- Number of pieces: 1 (seamless)
- Layout: Single hanging piece; no assembly
- Base diameter: 4.25 in (10.8 cm)
- Size before rim: opening gap 1.75 in × 4.5 in (4.4 × 11.4 cm)
- Rim depth: 2 rounds, about 0.4 in (1.0 cm); the finished opening is about 1 in × 3.75 in (2.5 × 9.5 cm)
Materials
Yarn: Use a smooth, firmly plied worsted-weight cotton or a 3 mm cotton cord. Tightly twisted fibers make the puffs look rounder and the lattice lines crisper. Avoid fuzzy or splitty yarns, because they blur the mesh.
- Natural beige: 130 g, about 210 m (230 yd)
That amount includes a margin of about 15% for your gauge swatch and tension differences.
Tools:
– 4.0 mm (US G-6) crochet hook
– 4 locking stitch markers
– Tapestry needle
– Measuring tape
– Scissors
– Rustproof pins and a small towel for blocking
Abbreviations (US Terms)
- ch – chain
- sc – single crochet
- dc – double crochet
- sl st – slip stitch
- st(s) – stitch(es)
- sk – skip
- inc – 2 sc in the same stitch
- sc2tog – single crochet 2 together
- BLO – back loop only
- MR – magic ring
- RS / WS – right side / wrong side
Special stitch: Puff (pearl puff). Work this into a ch-loop or a stitch. (Yo, insert hook into the loop, pull up a loop to about 0.5 in / 1.3 cm tall) 3 times, so you have 7 loops on the hook. Yo, pull through all 7 loops, then ch 1 to close. The closing ch 1 is part of the puff, not an extra chain.
Gauge and Checkpoints
Single crochet gauge: 18 sc × 20 rounds = 4 in (10.2 cm).
Mesh gauge: 1 mesh round = 0.5 in (1.3 cm), and 4 mesh rounds = 2 in (5.1 cm). Each ch-5 loop spans about 0.9 in (2.3 cm) around the tube.
Since this is a one-piece design, the base works as your gauge swatch. Make Rounds 1–10 and measure before you go on.
Checkpoints:
– After Round 10, the base is 4.25 in (10.8 cm) across.
– After Round 16, the solid band stands 1.2 in (3.0 cm) tall.
– After Round 21, the body is 3.7 in (9.4 cm) tall.
– After Row 30, the body is 8.2 in (20.8 cm) tall, and the opening gap is 4.5 in (11.4 cm) tall.
– After Round 34, the body is 10.2 in (25.9 cm) tall.
– After Round 40 plus the flattening row, the body is 12 in (30.5 cm) tall.
If your base is too big (over 4.5 in / 11.4 cm), switch to a 3.5 mm hook and start again. If it’s too small (under 4 in / 10.2 cm), switch to a 4.5 mm hook. Mesh rounds that run tall are usually caused by loose puffs. Pull each puff’s loops up to an even 0.5 in (1.3 cm) and no taller.
Pattern
Base
Join each round with a sl st to the first sc. Ch 1 at the start of each round doesn’t count as a stitch.
Rnd 1: 6 sc in MR. (6)
Rnd 2: inc in each st around. (12)
Rnd 3: (sc 1, inc) 6 times. (18)
Rnd 4: (sc 2, inc) 6 times. (24)
Rnd 5: (sc 3, inc) 6 times. (30)
Rnd 6: (sc 4, inc) 6 times. (36)
Rnd 7: (sc 5, inc) 6 times. (42)
Rnd 8: (sc 6, inc) 6 times. (48)
Rnd 9: (sc 7, inc) 6 times. (54)
Rnd 10: (sc 8, inc) 6 times. (60)
Checkpoint: the base is 4.25 in (10.8 cm) across and lies flat.
Solid Band
Rnd 11: Sc in BLO of each st around. (60) This makes the crisp folded edge where the base turns up into the walls.
Rnds 12–16: Sc in each st around. (60)
Checkpoint: the band is 1.2 in (3.0 cm) tall, and the tube is 13.3 in (33.8 cm) around, so it measures 6.7 in (17.0 cm) laid flat.
Lattice Mesh, Lower Body
Rnd 17 (setup): Ch 1, sc in first st, (ch 5, sk 3, sc in next st) 14 times, ch 5, sk 3, join to first sc. (15 sc anchors, 15 ch-5 loops; 15 × 4 sts = 60 ✓)
Rnd 18 (pearl round): Sl st into next ch-5 loop, ch 2 (doesn’t count), puff in same loop, (ch 5, puff in next loop) 14 times, ch 5, join to top of first puff. (15 puffs, 15 loops)
Rnd 19 (plain round): Sl st into next loop, ch 1, sc in same loop, (ch 5, sc in next loop) 14 times, ch 5, join to first sc. (15 sc, 15 loops)
Rnd 20: Repeat Rnd 18. (15 puffs, 15 loops)
Rnd 21: Repeat Rnd 19. (15 sc, 15 loops)
Each round anchors into the middle of the loops below it, so the chains cross on the diagonal and form the diamond lattice. The puffs sit at every other set of crossing points.
Checkpoint: the body is 3.7 in (9.4 cm) tall.
Tissue Opening (Worked in Rows)
Place markers in the last 2 loops of Rnd 21. These will stay unworked and form the bottom of the opening, so this is the front center of the holder.
Row 22 (RS): Sl st into next loop, ch 2 (doesn’t count), puff in same loop, (ch 5, puff in next loop) 12 times. Turn. (13 puffs, 12 loops; 2 marked loops left unworked)
Row 23 (WS): Ch 5 (counts as dc + ch 2), sc in next ch-5 loop, (ch 5, sc in next loop) 11 times, ch 2, dc in top of last puff. Turn. (12 sc, 11 full loops, 2 half loops at the edges)
Row 24 (RS): Ch 2 (doesn’t count), puff in first dc, (ch 5, puff in next full ch-5 loop) 11 times, ch 5, puff in 3rd ch of turning ch. Turn. (13 puffs, 12 loops)
Rows 25, 27, 29: Repeat Row 23.
Rows 26, 28: Repeat Row 24.
Row 30: Repeat Row 24, but do not turn.
Checkpoint: the opening gap is 4.5 in (11.4 cm) tall and about 1.75 in (4.4 cm) wide, and the body is 8.2 in (20.8 cm) tall.
Closing the Opening
Rnd 31 (join, plain): Ch 9 across the gap, sl st in top of the first puff of Row 30. Ch 1, sc in same puff, (ch 5, sc in next loop) 12 times, ch 5, sc in last puff, ch 5, sc in 5th ch of the ch-9 bridge, ch 5, join to first sc. (15 sc: 1 + 12 + 1 + 1; 15 loops ✓)
The ch-9 bridge forms the top edge of the opening. The sc in its 5th chain keeps the lattice at 15 loops all the way around.
Rnd 32: Repeat Rnd 18. (15 puffs, 15 loops)
Rnd 33: Repeat Rnd 19. (15 sc, 15 loops)
Rnd 34: Repeat Rnd 18. (15 puffs, 15 loops)
Checkpoint: the body is 10.2 in (25.9 cm) tall.
Taper and Top
Rnd 35: Sl st into next loop, ch 1, sc in same loop, (ch 4, sc in next loop) 14 times, ch 4, join. (15 sc, 15 ch-4 loops)
Rnd 36: Sl st into next loop, ch 1, sc in same loop, (ch 3, sc in next loop) 14 times, ch 3, join. (15 sc, 15 ch-3 loops)
The shorter chains in these two rounds start the teardrop shoulder.
Checkpoint: the body is 11.0 in (27.9 cm) tall.
Rnd 37 (conversion): Ch 1, (sc in next sc, sc in next ch-3 loop) 15 times, join. (15 sc worked 1 per existing sc + 15 sc added in the loops = 30)
Rnd 38: (Sc 3, sc2tog) 6 times. (24)
Rnd 39: (Sc 2, sc2tog) 6 times. (18)
Rnd 40: (Sc 1, sc2tog) 6 times. (12)
Row 41 (flatten): Flatten the top so the opening is centered on the front, with 6 sts on the front layer and 6 on the back. Ch 1, sc through both layers 6 times. Turn. (6)
Checkpoint: the body is 12 in (30.5 cm) tall.
Hanging Strap
Row 42: Ch 1, sc2tog, sc 2, sc2tog. Turn. (4)
Rows 43–72: Ch 1, sc in each st across. Turn. (4) That’s 30 rows, about 6 in (15.2 cm).
Fasten off and leave a 10 in (25.4 cm) tail. Fold the strap in half toward the back and sew the last row firmly behind Row 42. This makes a loop about 3 in (7.6 cm) long and 0.9 in (2.3 cm) wide.
Border (Opening Rim)
Rim gauge: 4 sc per 1 in (2.5 cm) along the side edges, slightly tighter than the 4.5 sc per inch of the fabric.
Rnd 1: With RS facing, join yarn in the first marked loop at the bottom of the opening. Work:
– Bottom: 5 sc in each of the 2 marked loops. (10)
– First side: 2 sc in each row-end of Rows 22–30. (9 rows × 2 = 18)
– Top: 1 sc in each free loop on the underside of the ch-9 bridge. (9)
– Second side: 2 sc in each row-end of Rows 30–22. (18)
Join to the first sc. (10 + 18 + 9 + 18 = 55)
Rnd 2: Ch 1, sc in each st around, join. (55) Fasten off and weave in the ends.
Why the math works: each side is 4.5 in (11.4 cm) tall and gets 18 sc, which is 4 sc per inch. That’s a little under fabric gauge, so the rim pulls in slightly and rolls into a firm cord instead of rippling. The bottom gets 10 sc over 2 loops, which is denser and rounds the lower curve. The top gets 9 sc across the bridge, which shapes the upper curve. The two rounds of rim cover about 0.4 in (1.0 cm) on each edge, leaving a finished opening of about 1 in × 3.75 in (2.5 × 9.5 cm). That’s narrow enough to hold a tissue in place and wide enough to pull one out easily.
Final Blocking
- Weave in all the ends along the solid stitches, not through the mesh, where they would show.
- Wet the holder in cool water, then gently press the water out with a towel. Don’t wring it.
- Stuff the body with a rolled hand towel or a travel tissue pack wrapped in plastic. This fills out the teardrop shape and opens up the diamonds.
- Lay it flat. Pin the width to 6.5 in (16.5 cm) at the widest point and the body length to 12 in (30.5 cm).
- Pinch each puff round and pull the lattice diagonals straight with your fingers.
- Shape the rim into a smooth oval, 1 in × 3.75 in (2.5 × 9.5 cm).
- Let it dry completely, usually 24 hours, before you remove the pins.
Final Quality-Control Checklist
- The base measures 4.25 in (10.8 cm) across and sits flat.
- The BLO ridge forms a clean fold all the way around.
- Every mesh round has 15 anchors and 15 loops.
- The puffs line up on alternate crossing points with no gaps or doubled puffs.
- The opening is centered on the front and runs vertically.
- Rim Rnds 1 and 2 each have 55 sc.
- The body is 12 in (30.5 cm) tall and 6.5 in (16.5 cm) wide.
- The strap loop is firmly sewn and about 3 in (7.6 cm) long.
Troubleshooting
The base cups or ruffles. If it cups, your stitches are too tight, so go up a hook size. If it ruffles, they’re too loose, so go down a size.
The mesh slants in a spiral. Make sure you join every round and start each one with a sl st into the next loop, not the same loop.
The puffs are flat or uneven. Pull all 3 loops up to the same height, then close the puff with a firm ch 1.
The opening is off-center or tilted. Before Row 22, check that the marked loops are directly in line with the center of the base and the strap.
The rim flares. Redo Rnd 1 with fewer stitches: work 2 sc in every row-end except every third one, which gets 1.
The holder stretches when full. Rework Rnds 35–36 with ch-3 and ch-2 loops for a snugger shoulder.
Care
Hand wash in cool water with mild soap, press out the water in a towel, and reshape it to dry flat. Don’t tumble dry, because heat can shrink cotton and distort the lattice.
Final Notes
The measurement chain is: a 4.25 in (10.8 cm) base, a 1.2 in (3.0 cm) solid band, 2.5 in (6.4 cm) of lower mesh, a 4.5 in (11.4 cm) opening section, 2 in (5.1 cm) of upper mesh, and 1.8 in (4.6 cm) of taper and top, adding up to a 12 in (30.5 cm) body plus a 3 in (7.6 cm) loop. The whole design depends on keeping 15 loops in every mesh round, so count your anchors on each round. If each checkpoint measures correctly, the finished holder will hang straight and hold a full stack of tissues.
Happy crocheting!