

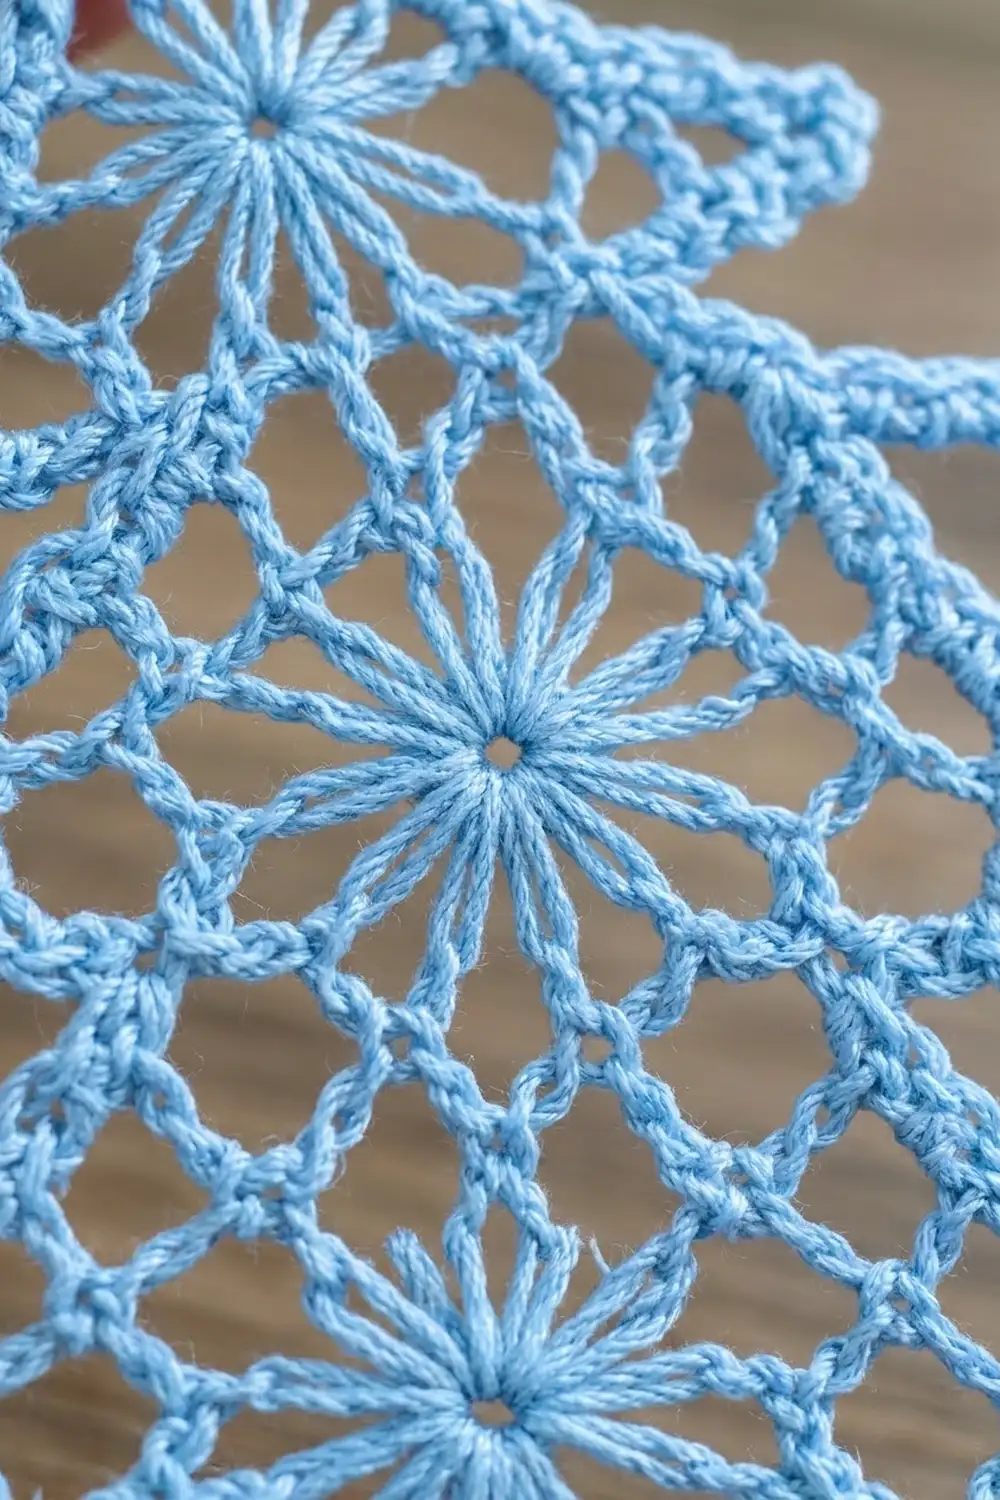
The Frosted Spruce is a delicate lace tree ornament with three tiers. Its open mesh, scalloped tier edges and a starburst wheel in each tier make it look like frost on a window. Worked in a soft ice-blue thread, it looks just as good on a tree branch as it does hanging in sunlight.
This pattern uses US crochet terms. The finished ornament measures 4 in (10.2 cm) wide and 4 7/8 in (12.4 cm) tall from the top point to the bottom of the trunk. The hanging loop adds 3/4 in (1.9 cm) more.
The tree is one piece, worked from the top down in rows of double crochet mesh. Each starburst is made in two rows. A seven-leg cluster pulls the spokes together, and a seven-stitch fan in the next row opens them out again. The tiers step inward with slip stitches. Next you add a short single crochet trunk, and one border round finishes the edge with sides, scallops, picot tips and a covered loop.
Make one as a test, block it, and then make as many as you like for gift toppers or window hangings.
Finished Size and Construction
- Finished size: 4 in (10.2 cm) wide x 4 7/8 in (12.4 cm) tall, plus a 3/4 in (1.9 cm) loop
- Skill level: Intermediate
- Terminology: US
- Yarn weight: Size 10 crochet thread (Lace, 0)
- Hook: 1.75 mm (US steel 6)
- Number of pieces: 1
- Layout: Three stacked tiers + trunk, worked in one piece
- Piece size: 4 in x 4 7/8 in (10.2 cm x 12.4 cm)
- Size before border: 3.75 in x 4.75 in (9.5 cm x 12.1 cm)
- Border depth: 1/8 in (0.3 cm)
Materials
Choose a mercerized cotton thread. It holds the spokes crisp and takes starch well. A pale blue, white or silver-gray gives the frosted look shown here.
- Light ice blue, size 10 cotton thread: 5 g, about 25 m (27 yd) per ornament
Tools:
- 1.75 mm (US steel 6) crochet hook
- Fine tapestry needle
- Small sharp scissors
- Blocking mat and rust-proof pins
- Spray starch or fabric stiffener
- Optional: clear thread or ribbon for hanging
The quantities include a margin of roughly 20% for swatching and weaving in ends.
Abbreviations (US Terms)
- ch – chain
- sl st – slip stitch
- sc – single crochet
- hdc – half double crochet
- dc – double crochet
- sp(s) – space(s)
- tch – turning chain
- st(s) – stitch(es)
Special stitches
- CL (star cluster): dc7tog worked over 3 ch-2 sps. Work a partial dc (yarn over, insert hook, pull up a loop, yarn over, pull through 2 loops), placing the legs like this: 2 in the next ch-2 sp, 1 in the next dc, 1 in the next sp, 1 in the next dc, 2 in the next sp. You now have 8 loops on the hook. Yarn over and pull through all 8.
- Fan: 7 dc in the top of the CL.
- Scallop: (sc, hdc, dc, hdc, sc) in one ch-2 sp.
- Picot: ch 3, sl st in the 3rd ch from the hook.
In this pattern, ch 5 at the start of a row counts as dc + ch 2, and ch 6 counts as dc + ch 3.
Gauge and Checkpoints
Mesh gauge: 4 ch-2 spaces and 4 dc rows = 1 in (2.5 cm).
Test first: work Rows 1–6 (Tier 1) and measure before you go on.
- After Row 6: 2.25 in (5.7 cm) wide x 1.5 in (3.8 cm) tall
- After Row 12: 3.25 in (8.3 cm) wide x 3 in (7.6 cm) tall
- After Row 17: 3.75 in (9.5 cm) wide x 4.25 in (10.8 cm) tall
- After the trunk: 4.75 in (12.1 cm) total height; trunk 3/4 in (1.9 cm) wide
If your test tier is too big, go down to a 1.5 mm hook or work with tighter chains. If it is too small, go up to a 2.0 mm hook. Size 10 thread shrinks and stretches very little, so most of the difference comes from your hook and tension.
Pattern
Hanging Loop and Tier 1
Loop: Ch 20, sl st in the first ch to form a loop.
Row 1: Ch 5, dc in the same ch as the sl st. (2 dc, 1 sp)
Row 2 (Inc): Ch 5, turn, dc in the first dc, ch 2, dc in the 3rd ch of the tch, ch 2, dc in the same ch. (4 dc, 3 sps)
Every Inc Row after this works the same way: ch 5, turn, dc in the first dc, ch 2, dc in the next dc across, working the last dc in the 3rd ch of the tch, ch 2, dc in the same ch. Each Inc Row adds 1 sp at each end.
Row 3 (Cluster): Ch 6, turn, CL over the 3 sps, ch 3, dc in the 3rd ch of the tch. (2 dc, 1 CL, 2 ch-3 sps)
Row 4 (Fan): Ch 5, turn, dc in the first dc, ch 3, Fan in the CL, ch 3, dc in the 3rd ch of the tch, ch 2, dc in the same ch. (4 dc + Fan, 4 sps)
Row 5 (Settle): Ch 5, turn, dc in the first dc, ch 2, dc in the next dc, ch 3, dc in the 2nd dc of the Fan, ch 2, dc in the 6th dc of the Fan, ch 3, dc in the next dc, ch 2, dc in the 3rd ch of the tch, ch 2, dc in the same ch. (8 dc, 7 sps)
The cluster’s legs make the spokes above the center. The Fan makes the spokes below it. Together they form a 14-spoke starburst about 1/2 in (1.3 cm) across, and the ch-3 spaces around it frame it as a wheel.
Row 6 (Inc): (10 dc, 9 sps)
Checkpoint: 2.25 in (5.7 cm) wide x 1.5 in (3.8 cm) tall.
Tier 2
Row 7 (Step-In): Turn, sl st in the first dc, 2 sl st in the next ch-2 sp, sl st in the next dc twice. Ch 5, dc in the next dc, ch 2, dc in the next dc until 2 sps remain, and leave those unworked. (6 dc, 5 sps)
The 2 sps left at each end become the scalloped ledge of Tier 1.
Row 8 (Cluster): Ch 5, turn, dc in the next dc, ch 3, CL over the next 3 sps, ch 3, dc in the next dc, ch 2, dc in the 3rd ch of the tch. (4 dc, 1 CL, 4 sps)
Row 9 (Fan): Ch 5, turn, dc in the first dc, ch 2, dc in the next dc, ch 3, Fan in the CL, ch 3, dc in the next dc, ch 2, dc in the 3rd ch of the tch, ch 2, dc in the same ch. (6 dc + Fan, 6 sps)
Row 10 (Settle): Ch 5, turn, dc in the first dc, (ch 2, dc in the next dc) twice, ch 3, dc in the 2nd dc of the Fan, ch 2, dc in the 6th dc of the Fan, ch 3, dc in the next dc, (ch 2, dc in the next dc) twice, working the last dc in the 3rd ch of the tch, ch 2, dc in the same ch. (10 dc, 9 sps)
Row 11 (Inc): (12 dc, 11 sps)
Row 12 (Inc): (14 dc, 13 sps)
Checkpoint: 3.25 in (8.3 cm) wide x 3 in (7.6 cm) tall.
Tier 3
Row 13 (Step-In): Work as for Row 7. (10 dc, 9 sps)
Row 14 (Cluster): Ch 5, turn, dc in the next dc, (ch 2, dc in the next dc) twice, ch 3, CL over the next 3 sps, ch 3, dc in the next dc, (ch 2, dc in the next dc) 3 times, working the last dc in the 3rd ch of the tch. (8 dc, 1 CL, 8 sps)
Row 15 (Fan): Ch 5, turn, dc in the first dc, (ch 2, dc in the next dc) 3 times, ch 3, Fan in the CL, ch 3, dc in the next dc, (ch 2, dc in the next dc) 3 times, working the last dc in the 3rd ch of the tch, ch 2, dc in the same ch. (10 dc + Fan, 10 sps)
Row 16 (Settle): Ch 5, turn, dc in the first dc, (ch 2, dc in the next dc) 4 times, ch 3, dc in the 2nd dc of the Fan, ch 2, dc in the 6th dc of the Fan, ch 3, dc in the next dc, (ch 2, dc in the next dc) 4 times, working the last dc in the 3rd ch of the tch, ch 2, dc in the same ch. (14 dc, 13 sps)
Row 17 (Inc): (16 dc, 15 sps). Fasten off.
Checkpoint: 3.75 in (9.5 cm) wide x 4.25 in (10.8 cm) tall.
Trunk
Row 17 has 6 sps, then 3 center sps, then 6 sps. Join the thread with a sl st in the 7th dc from either end.
Trunk Row 1: Ch 1, sc in the same dc, (2 sc in the next sp, sc in the next dc) 3 times. This gives 4 sc worked 1 per dc + 6 sc added (2 per ch-2 sp) = 10 sc.
Trunk Rows 2–6: Ch 1, turn, sc in each sc across. (10 sc)
Fasten off.
Checkpoint: the trunk is 3/4 in (1.9 cm) wide x 1/2 in (1.3 cm) long, and the total height is 4.75 in (12.1 cm).
Border
Border gauge: 12 sc = 1 in (2.5 cm).
Join the thread with a sl st at the base of the hanging loop, then ch 1. Work one round as follows.
Loop: 30 sc into the hanging loop.
Side A, going down:
- Tier 1 side: 3 sc in each row end of Rows 1–6 (18 sc), then a picot at the corner
- Tier 1 ledge: a Scallop in each of the 2 outer sps of Row 6, working over the sl sts (10 sts)
- Tier 2 side: 3 sc in each row end of Rows 7–12 (18 sc), then a picot
- Tier 2 ledge: a Scallop in each of the 2 outer sps of Row 12 (10 sts)
- Tier 3 side: 3 sc in each row end of Rows 13–17 (15 sc), then a picot
- Tier 3 ledge: a Scallop in each of the 6 outer sps of Row 17 (30 sts)
Trunk:
- 1 sc in each row end (6 sc)
- Along the bottom: 3 sc in the first sc, sc in the next 8 sc, 3 sc in the last sc (14 sc)
- 1 sc in each row end up the other side (6 sc)
Side B, going up: a Scallop in each of the 6 outer sps of Row 17 (30 sts), picot, 15 sc up Tier 3, Scallops in the 2 Row 12 sps (10 sts), picot, 18 sc up Tier 2, Scallops in the 2 Row 6 sps (10 sts), picot, 18 sc up Tier 1. Sl st to the first sc and fasten off.
Per-side count: 18 + 10 + 18 + 10 + 15 + 30 = 101 sts and 3 picots.
Total: 30 (loop) + 101 (Side A) + 26 (trunk) + 101 (Side B) = 258 sts plus 6 picots.
Why the math works:
- Each dc row end is 1/4 in (0.6 cm) tall. At 12 sc per inch, 3 sc fill it exactly.
- Each sc row in the trunk is 1/12 in, so 1 sc per row end matches the same gauge.
- The tier corners get a picot instead of extra sc, so no corner stitches are counted twice.
- The trunk’s 10 sc already include both corner stitches. Each corner just gets 2 extra sc to turn it.
- The Scallop’s mix of stitch heights makes it curve out without ruffling.
The border adds 1/8 in (0.3 cm) to each edge. The width becomes 4 in (10.2 cm) and the height becomes 4 7/8 in (12.4 cm).
Final Blocking
- Weave in all ends along the dc posts and trim them close.
- Wet the ornament, then roll it in a towel to remove extra water.
- Pin it to the mat at 4 in (10.2 cm) wide x 4 7/8 in (12.4 cm) tall.
- Pin each picot tip outward so the corners come to a point. Place one pin in the center of each scallop.
- Ease each starburst round and keep the trunk square at 3/4 in (1.9 cm).
- Spray it well with starch and let it dry completely before you unpin it.
Final Quality-Control Checklist
- The width is 4 in (10.2 cm) and the height is 4 7/8 in (12.4 cm), not counting the loop.
- All three starbursts sit on the center line, with 14 spokes each.
- Each side has 3 picot tips, and the tiers are mirror images of each other.
- The ledges have 2, 2 and 6 scallops on each side.
- The trunk is centered, with 6 open sps on either side of it.
- The loop is fully covered and measures 3/4 in (1.9 cm).
Troubleshooting
- Starburst is off-center: Recount the sps on each side of the CL. The two sides must match.
- CL gaps or puckers: Pull up each partial dc to the full height before you close the cluster.
- Sides ripple: Your sc are too loose. Work 2 sc in some row ends, or use a smaller hook for the border.
- Sides pull in: Check that every row end has 3 sc.
- Tiers lean: You probably missed an increase at one end. Check the stitch counts for each row.
- Trunk flares: Work Trunk Rows 2–6 more tightly.
Care
Hand wash in cool water and lay flat to dry. Re-starch it each season and store it flat between tissue sheets.

Final Notes
Here is the measurement chain:
- The test tier is 2.25 in (5.7 cm) wide.
- Tier 2 reaches 3.25 in (8.3 cm).
- Tier 3 reaches 3.75 in (9.5 cm) at 4.25 in (10.8 cm) tall.
- The trunk brings the height to 4.75 in (12.1 cm).
- The 1/8 in (0.3 cm) border finishes the tree at 4 in x 4 7/8 in (10.2 cm x 12.4 cm).
If you hit each checkpoint, the border math will work out exactly.
Happy crocheting!