

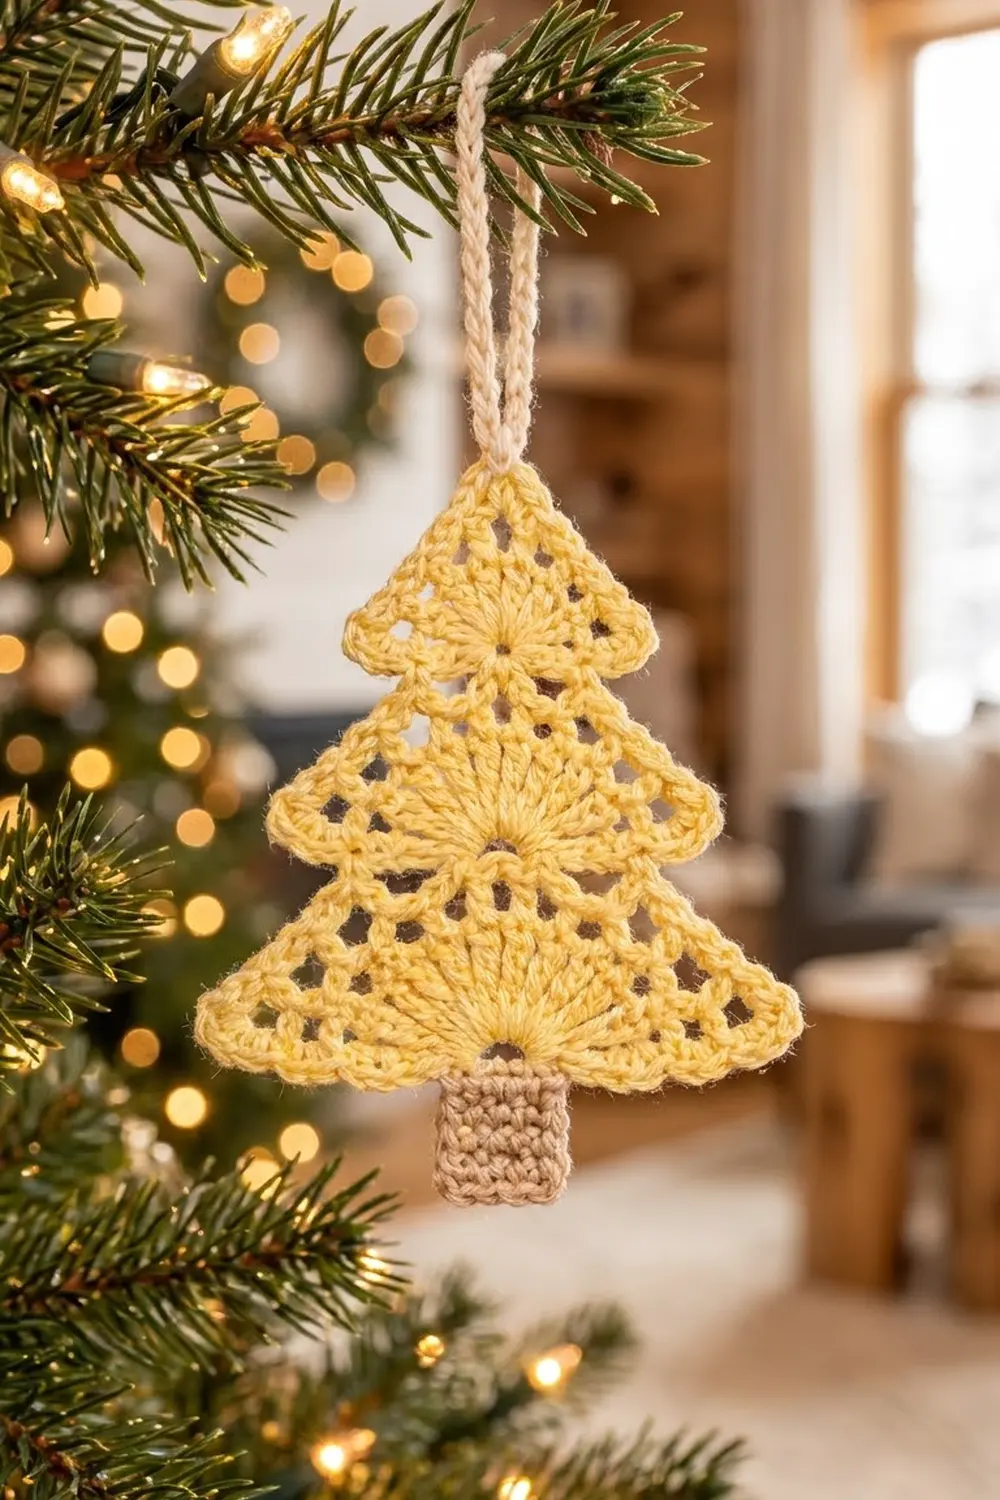
This little tree ornament is made from three layered lace triangles in soft butter yellow. A small tan trunk sits under the bottom tier, and a cream loop is ready to hang. Each tier opens from a tiny arch at its base into a sunburst fan, then grows into a triangle through rows of square mesh and solid single crochet.
The colors are deliberately quiet: yellow for the tree, light tan for the trunk, and cream for the loop. Against green branches and warm lights, the open lace catches the glow and reads as gold without using metallic yarn.
The pattern uses US crochet terms. The finished ornament measures 4.25 in (10.8 cm) wide by 5.75 in (14.6 cm) tall without the loop. The loop adds 1.5 in (3.8 cm).
Construction is simple. You work three triangle tiers that start the same way and differ only in how many rows you add. Each tier gets a two-round border. You then make a trunk square and a slip-stitch cord, block everything, and stack the tiers.
Finished Size and Construction
- Finished size: 4.25 in (10.8 cm) wide x 5.75 in (14.6 cm) tall, plus a 1.5 in (3.8 cm) loop
- Skill level: Easy to Intermediate
- Terminology: US terms
- Yarn weight: Sport (#2) mercerized cotton
- Hook: 2.5 mm (US B/1 or C/2)
- Number of pieces: 1 ornament, made from 3 tiers, 1 trunk and 1 loop
- Layout: tiers stacked vertically, small on top, with overlap
- Tier sizes (bordered): top 2.5 x 2.0 in (6.4 x 5.1 cm); middle 3.25 x 2.75 in (8.3 x 7.0 cm); bottom 4.25 x 3.5 in (10.8 x 8.9 cm)
- Tier sizes before border: top 2.0 x 1.5 in (5.1 x 3.8 cm); middle 2.75 x 2.25 in (7.0 x 5.7 cm); bottom 3.75 x 3.0 in (9.5 x 7.6 cm)
- Border depth: about 0.25 in (0.6 cm) on every edge
Materials
Choose a smooth, mercerized cotton in sport weight. It shows the fan and mesh clearly and holds a crisp edge after blocking. Acrylic will work, but the lace will look softer.
- Color A, butter yellow (tiers): 10 g / 33 m
- Color B, light tan (trunk): 2 g / 7 m
- Color C, cream (loop): 2 g / 7 m
Tools:
- 2.5 mm crochet hook
- Tapestry needle
- Scissors
- Stitch marker
- Blocking mat, rust-proof pins, and spray bottle
- Ruler or measuring tape
All quantities include a margin of about 20 percent. One ornament uses about 8 g of Color A.
Abbreviations (US Terms)
- ch – chain
- sl st – slip stitch
- sc – single crochet
- dc – double crochet
- tr – treble crochet
- sp(s) – space(s)
- st(s) – stitch(es)
- rev sc – reverse single crochet
- RS – right side
Special stitch – Reverse single crochet (rev sc): Work from left to right (if you crochet right-handed). Insert the hook into the next stitch to the right, yarn over, pull up a loop, then yarn over and pull through both loops. This makes the twisted, rope-like edge on every tier.
Gauge and Checkpoints
Gauge: 14 sc = 2 in (5.1 cm) and 16 sc rows = 2 in (5.1 cm), in Color A.
Make the top tier first and use it as your gauge piece. It is quick and uses every stitch in the larger tiers.
Checkpoints for any tier:
- After Row 1: fan is 1.0 in (2.5 cm) wide and 0.5 in (1.3 cm) tall
- After Row 3: 2.0 in (5.1 cm) wide x 1.5 in (3.8 cm) tall
- After Row 5: 2.75 in (7.0 cm) wide x 2.25 in (5.7 cm) tall
- After Row 7: 3.75 in (9.5 cm) wide x 3.0 in (7.6 cm) tall
If your tier is more than 0.25 in (0.6 cm) too big, use a hook 0.25 mm smaller. If it is too small, use a hook 0.25 mm larger. If only the height is off, check how tall you make your tr and dc. Pulling the first loop up taller or shorter fixes most row-height problems.

Tier Pattern
All three tiers use the same rows. Work them in Color A.
- Top tier: Rows 1–3
- Middle tier: Rows 1–5
- Bottom tier: Rows 1–7
Turning chains count as stitches throughout.
Row 1 (fan): Ch 6, sl st in first ch to form a ring. Ch 4 (counts as tr), then work 12 tr into the ring, packing them onto the upper half only. Turn. (13 tr)
The lower half of the ring stays bare. This is the small open arch at the center of the base.
Row 2 (mesh): Ch 5 (counts as dc + ch 2), dc in first tr (base corner made). Ch 2, skip next tr, dc in next tr; repeat from * 2 more times, ending in the 7th tr. Ch 3, dc again in the 7th tr (apex made). Ch 2, skip next tr, dc in next tr; repeat once more. Ch 2, skip next tr, (dc, ch 2, dc) in last tr (base corner made). Turn.
(10 dc, 8 ch-2 sps, 1 ch-3 apex sp; each side has 5 dc and 4 ch-2 sps)
Row 3 (solid band): Ch 1, sc in first dc, 2 sc in next ch-2 sp. Sc in next dc, 2 sc in next ch-2 sp; repeat to the apex, ending with sc in the apex dc. (2 sc, ch 2, 2 sc) in apex ch-3 sp. Continue with sc in each dc and 2 sc in each ch-2 sp to the end, finishing with sc in 3rd ch of turning ch-5. Turn.
(30 sc: 15 per side, plus the ch-2 apex sp)
Each side has 5 sc from dc + 8 sc from ch-2 sps + 2 apex sc = 15.
The top tier stops here. Fasten off, leaving a 6 in (15.2 cm) tail for sewing.
Row 4 (mesh): Ch 5 (counts as dc + ch 2), dc in first sc. Ch 2, skip 2 sc, dc in next sc; repeat from * 3 more times. Ch 2, skip last 2 sc, (dc, ch 3, dc) in apex ch-2 sp. Ch 2, skip 2 sc, dc in next sc. Ch 2, skip 2 sc, dc in next sc; repeat from * 2 more times. Ch 2, skip 2 sc, (dc, ch 2, dc) in last sc. Turn.
(14 dc, 12 ch-2 sps, 1 ch-3 apex sp; each side has 7 dc and 6 ch-2 sps)
Row 5 (solid band): Work as Row 3.
(42 sc: 21 per side, plus the ch-2 apex sp)
Each side has 7 + 12 + 2 = 21.
The middle tier stops here. Fasten off with a 6 in (15.2 cm) tail.
Row 6 (mesh): Ch 5, dc in first sc. Ch 2, skip 2 sc, dc in next sc; repeat from * 5 more times. Ch 2, skip last 2 sc, (dc, ch 3, dc) in apex sp. Ch 2, skip 2 sc, dc in next sc. Ch 2, skip 2 sc, dc in next sc; repeat from * 4 more times. Ch 2, skip 2 sc, (dc, ch 2, dc) in last sc. Turn.
(18 dc, 16 ch-2 sps, 1 ch-3 apex sp; each side has 9 dc and 8 ch-2 sps)
Row 7 (solid band): Work as Row 3.
(54 sc: 27 per side, plus the ch-2 apex sp)
Each side has 9 + 16 + 2 = 27. Fasten off with a 6 in (15.2 cm) tail.
The mesh rows work because every solid row has a multiple of 3 sc per side (15, 21, 27). Each “ch 2, skip 2, dc in next” uses exactly 3 stitches, so the last dc always lands on the base corner.
Trunk
With Color B, ch 8.
Row 1: Sc in 2nd ch from hook and in each ch across. Turn. (7 sc)
Rows 2–8: Ch 1, sc in each sc across. Turn. (7 sc)
Fasten off, leaving an 8 in (20.3 cm) tail. The trunk is 1 in (2.5 cm) square: 7 sc at 7 sts per inch and 8 rows at 8 rows per inch.
Hanging Loop
With Color C, ch 30. Sl st in the back bump of the 2nd ch from hook and in each ch across. (29 sl st)
Fasten off, keeping both tails. The cord should be about 3.5 in (8.9 cm) long. Add or remove chains if needed.
Border and Assembly
Border gauge: 7 sts per inch (2.5 cm) along every edge, the same as the body. Border each tier separately before you assemble the ornament. If you have already fastened off, rejoin Color A at the base corner where the last row ended.
Round 1 (sc): With RS facing, do not turn. Ch 1. Work across the base into the row ends: 1 sc in each sc row end, 2 sc in each dc row end, and 3 sc in the tr row end. Work 5 sc over the bare lower half of the ring. Repeat the row-end sequence on the other half of the base. Ch 1 at the base corner. Sc in each sc up the first side, (sc, ch 2, sc) in apex sp, then sc in each sc down the second side. Ch 1 at the corner and sl st to first sc.
| Tier | Base row ends per half | Base total | Each side (S + 1 apex sc) | Round total |
|---|---|---|---|---|
| Top | 1 + 2 + 3 = 6 | 6 + 5 + 6 = 17 | 15 + 1 = 16 | 49 sc |
| Middle | 1 + 2 + 1 + 2 + 3 = 9 | 9 + 5 + 9 = 23 | 21 + 1 = 22 | 67 sc |
| Bottom | 12 | 12 + 5 + 12 = 29 | 27 + 1 = 28 | 85 sc |
Each round also has 2 ch-1 base corners and 1 ch-2 apex sp.
Round 2 (rev sc): Ch 1, do not turn. Rev sc in each sc around, working 1 rev sc in each ch-1 corner sp and (rev sc, ch 1, rev sc) in the apex ch-2 sp. Sl st to first st and fasten off.
- Top: base 17, each side 17 (16 + 1 apex rev sc), corners 2 = 53 rev sc
- Middle: base 23, each side 23, corners 2 = 71 rev sc
- Bottom: base 29, each side 29, corners 2 = 89 rev sc
Why the math works: On the sides, you work 1 sc into each existing sc, so the edge can’t ruffle or pull in. On the base, each row end gets 1, 2, or 3 sc to match the height of that row, which keeps the base straight. The 5 sc over the arch ease around the curve without closing it. After Round 2, all three edges of a tier have the same count (17, 23, or 29). At 7 sts per inch, that is 2.4, 3.3, and 4.1 in (6.1, 8.4, and 10.4 cm). Blocking opens the tiers to 2.5, 3.25, and 4.25 in (6.4, 8.3, and 10.8 cm) wide.
Assembling the ornament (after blocking, below):
- Lay the bottom tier RS up. Center the middle tier on top so its base edge sits 2.0 in (5.1 cm) below the bottom tier’s apex.
- Use the middle tier’s tail to whipstitch its base edge to the bottom tier, working through the back loops of Round 2.
- Place the top tier so its base sits 1.25 in (3.2 cm) below the middle tier’s apex, and sew it the same way.
- Center the trunk behind the bottom tier’s arch with a 0.25 in (0.6 cm) overlap and sew around the overlap. This leaves 0.75 in (1.9 cm) of trunk showing.
- Fold the cord in half. Sew 0.25 in (0.6 cm) of each end to the back of the top tier’s apex, leaving a 1.5 in (3.8 cm) loop.
Visible heights are 1.5 in (3.8 cm) of bottom tier, 1.5 in (3.8 cm) of middle tier, 2.0 in (5.1 cm) of top tier, and 0.75 in (1.9 cm) of trunk. Together they make 5.75 in (14.6 cm).
Final Blocking
- Weave in all ends except the sewing tails.
- Draw the three bordered tier sizes as triangles on paper and place them under a clear sheet.
- Spray each tier evenly until damp but not dripping.
- Pin the apex and both base corners first, then the middle of each edge.
- Open each mesh square with a pin tip. Smooth the fan strands so they spread evenly from the arch.
- Let the tiers dry completely, about 4–6 hours.
- Assemble the ornament. Give it a light spray and press it flat under a towel for 1 hour.
Final Quality-Control Checklist
- Row 1 has 13 tr and the arch is open
- Solid rows have 15, 21, and 27 sc per side
- The last dc of every mesh row lands on the base corner
- Border Round 2 counts are 53, 71, and 89
- Tiers are 2.5, 3.25, and 4.25 in (6.4, 8.3, and 10.8 cm) wide
- Overlaps are 2.0 in (5.1 cm) and 1.25 in (3.2 cm)
- Trunk is centered under the arch
- Ornament is 4.25 x 5.75 in (10.8 x 14.6 cm)
- No sewing stitches show from the front
Troubleshooting
- Fan cups upward: The tr are too crowded. Make the ring chains looser.
- Arch closes up: The tr slid around the ring. Keep them all on the upper half.
- Mesh dc misses the base corner: Recount the solid row. It needs a multiple of 3 sc per side.
- Base edge curves: Recheck the Round 1 row-end counts (1 per sc, 2 per dc, 3 per tr).
- Edges ruffle: The rev sc is too loose. Use a hook 0.25 mm smaller for the border.
- Tiers twist after stacking: Block before you sew, and pin both layers flat while sewing.
Care
Hand wash in cool water with mild soap. Press out the water in a towel, reshape the points, and dry flat. Store the ornament flat or hanging, away from heavy decorations.
Final Notes
The measurement chain is short. At a gauge of 7 sc per inch, the tiers are 2.0, 2.75, and 3.75 in (5.1, 7.0, and 9.5 cm) wide before the border. The border adds about 0.25 in (0.6 cm) per edge, which brings them to 2.5, 3.25, and 4.25 in (6.4, 8.3, and 10.8 cm). Stack them with 2.0 in (5.1 cm) and 1.25 in (3.2 cm) overlaps and 0.75 in (1.9 cm) of trunk showing. The finished ornament is 4.25 x 5.75 in (10.8 x 14.6 cm).
Happy crocheting!