

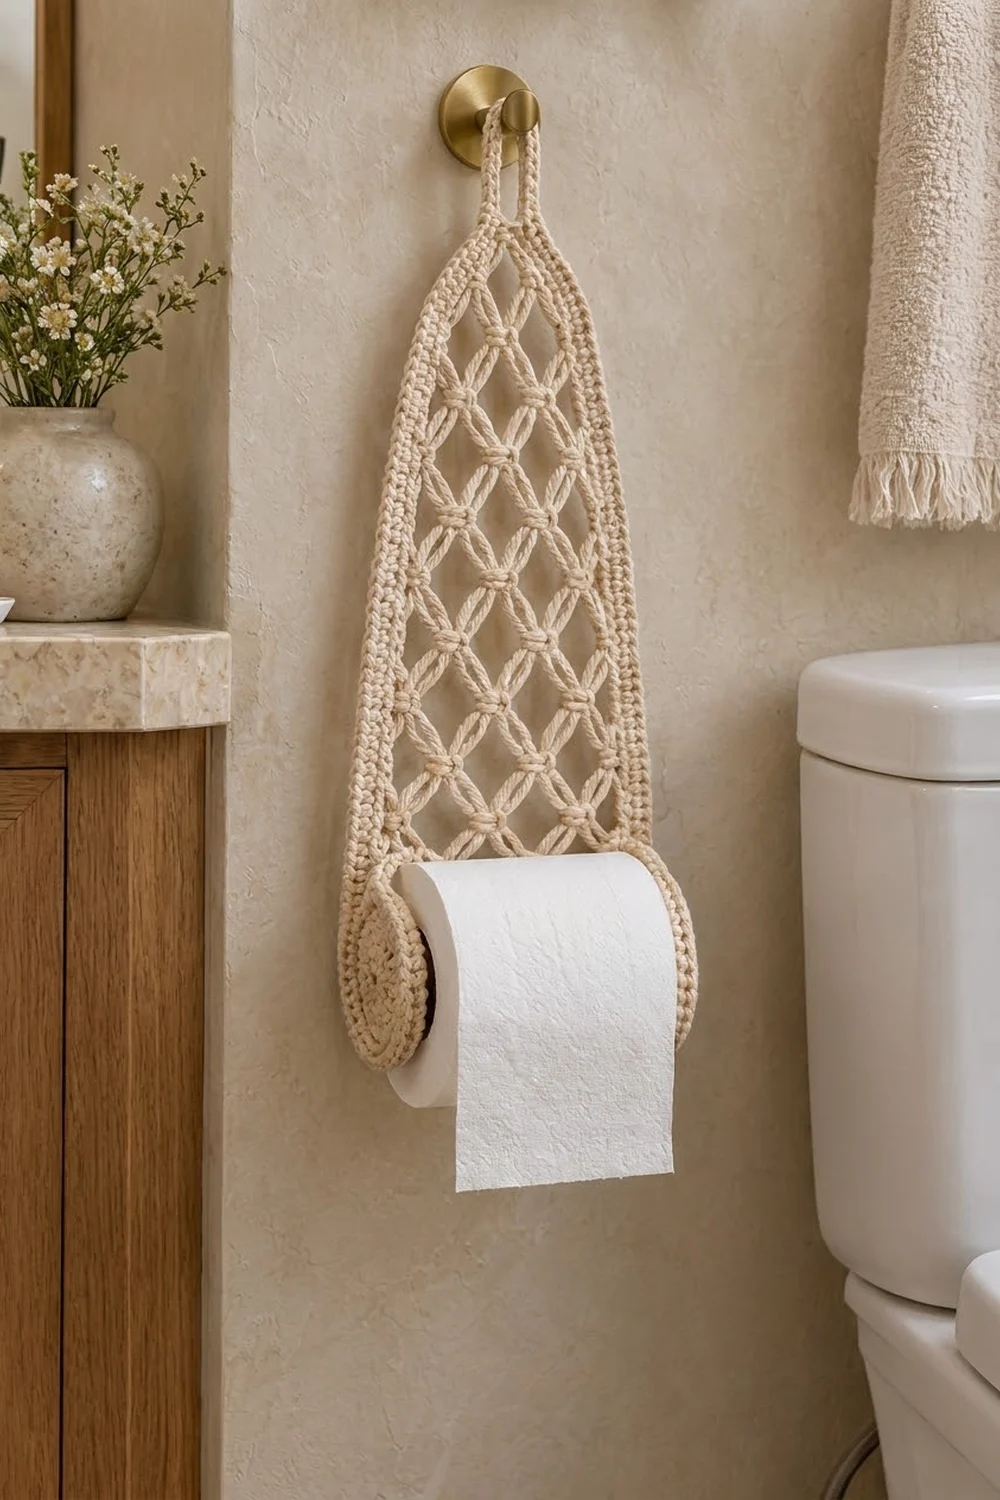
This hanging toilet paper holder brings a soft macramé look to the bathroom wall. A tall lattice panel narrows to a pointed arch and hangs from a slim loop. At the bottom, two round discs and a padded roll bar hold a standard roll.
The whole piece is worked in one cream cotton, so the texture does the work. The lattice is made of chain loops anchored with small knots, which gives the diamond pattern its rope-like look. A three-round border with a crab-stitch edge gives the panel a firm, twisted frame.
This pattern uses US crochet terms. The finished holder measures 6.75 in (17.1 cm) wide and 16.25 in (41.3 cm) tall without the loop, or 19.25 in (48.9 cm) tall with it. It holds a standard roll up to 4.25 in (10.8 cm) wide.
Construction is simple. You work the panel flat from the bottom up and add the border in rounds. You make two double-layer discs and a stuffed tube with a rigid core, then sew everything together. One disc has a short collar, so the roll bar slides out when you change the roll.
Finished Size and Construction
- Finished size: 6.75 in × 16.25 in (17.1 cm × 41.3 cm), plus a 3 in (7.6 cm) hanging loop
- Skill level: Intermediate
- Terminology: US
- Yarn weight: Worsted (#4) cotton
- Hook: 5.0 mm (H-8)
- Number of pieces: 6 crocheted pieces (1 panel, 4 disc circles, 1 tube) assembled into 1 holder
- Layout: Panel at the back, one two-layer disc at each lower corner, roll bar between the discs
- Panel size before border: 5.25 in × 14.75 in (13.3 cm × 37.5 cm)
- Border depth: 0.75 in (1.9 cm) on every edge
- Disc diameter: 3.5 in (8.9 cm)
- Roll bar: 5 in (12.7 cm) long, 1.4 in (3.6 cm) across
Materials
Use a smooth, firmly twisted worsted-weight cotton or cotton blend. Cotton holds the lattice shape and doesn’t stretch much under the weight of the roll. Avoid acrylic, which can sag over time.
- Cream / ecru: 130 g, about 220 m (240 yd)
- Panel and loop: about 60 g / 102 m
- Four disc circles: about 24 g / 41 m
- Tube and collar: about 14 g / 24 m
These quantities include roughly a 30% margin for your gauge swatch and tension differences.
Tools:
– 5.0 mm (H-8) crochet hook
– Tapestry needle
– Stitch markers
– Rigid tube for the roll bar core, 1.25 in (3.2 cm) across and cut to 4.75 in (12.1 cm) long (PVC pipe or tightly rolled, taped cardboard)
– A small amount of fiberfill
– Rust-proof pins, a blocking mat, and a spray bottle
Abbreviations (US Terms)
- ch – chain
- sl st – slip stitch
- sc – single crochet
- dc – double crochet
- inc – 2 sc in the same stitch
- dec – sc2tog
- sk – skip
- sp – space
- BLO / FLO – back loop only / front loop only
- MR – magic ring
- tch – turning chain
- rev sc – reverse single crochet (crab stitch), worked left to right
Special stitch – Knot (kn): Work (sc, ch 1, sc) in the indicated ch-5 space. This makes the small horizontal bar you see where the lattice loops cross.
Gauge and Checkpoints
- Solid gauge: 16 sc × 16 rows = 4 in (10.2 cm). Each sc row or round is 0.25 in (0.6 cm).
- Mesh gauge: 4 lattice loops = 4 in (10.2 cm) wide, and 4 mesh rows = 3 in (7.6 cm) tall. Each mesh row is 0.75 in (1.9 cm).
Make one disc circle first (Rounds 1–6 below). It should measure 3 in (7.6 cm) across. If it’s bigger, go down 0.5 mm in hook size. If it’s smaller, go up 0.5 mm. Keep that circle as one of your four.
Panel checkpoints:
– After Row 1: 5.25 in (13.3 cm) wide
– After Row 12: 8.5 in (21.6 cm) tall
– After Row 21: 14.75 in (37.5 cm) tall
– After the border: 6.75 in × 16.25 in (17.1 cm × 41.3 cm)
If the mesh is too tall, pull each ch-5 snug before you work the knot. If it’s too short, relax your chains. Don’t change the number of chains.
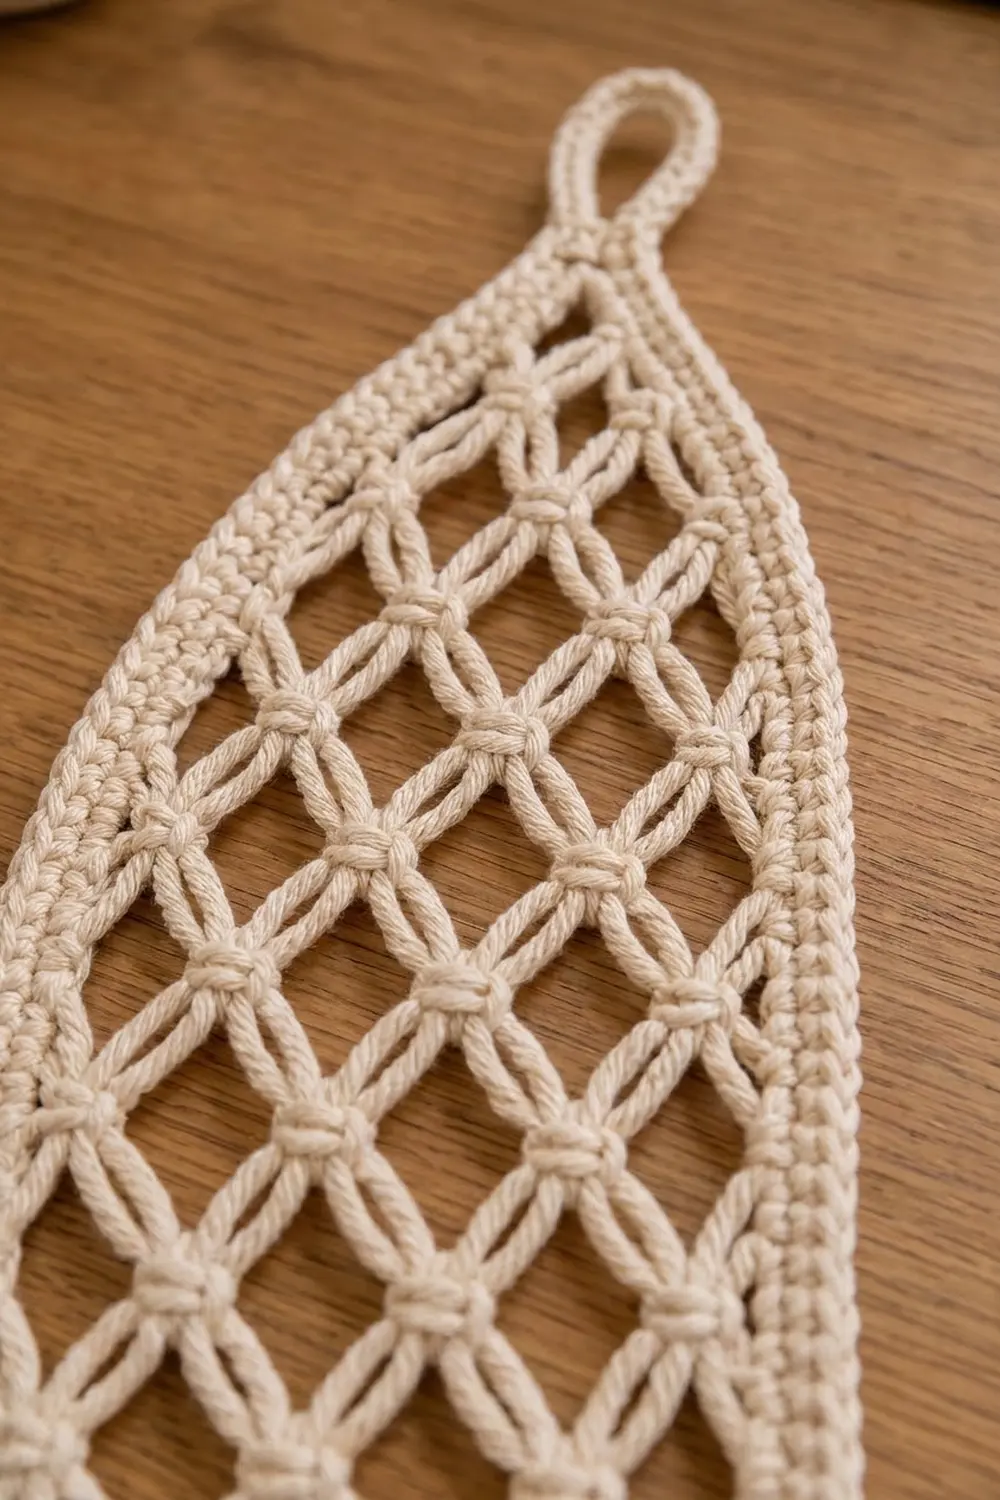
Panel
Foundation: Ch 22.
Row 1: Sc in the 2nd ch from hook and in each ch across, turn. (21 sc)
Row 2 (A row): Ch 1, sc in the first sc, *ch 5, sk 3 sc, sc in the next sc; rep from * 4 more times, turn. (5 ch-5 loops)
Row 3 (B row): Ch 5 (counts as dc + ch 2), kn in the first ch-5 sp, *ch 5, kn in the next ch-5 sp; rep from * 3 more times, ch 2, dc in the last sc, turn. (4 full loops + 2 half loops)
Row 4 (A row): Ch 1, sc in the first dc, *ch 5, kn in the next ch-5 sp; rep from * 3 more times, ch 5, sc in the 3rd ch of the tch, turn. (5 loops)
Rows 5–12: Repeat Rows 3–4 four more times. Row 12 ends with 5 loops.
Checkpoint: The panel is 5.25 in (13.3 cm) wide and 8.5 in (21.6 cm) tall.
Taper
A D row (decrease row) starts and ends in the center of a loop, so it drops one loop and moves each edge in by 0.5 in (1.3 cm).
Row 13 (D): Ch 1, sl st in the first sc and in the next 3 ch, sc in the same ch-5 sp, *ch 5, kn in the next ch-5 sp; rep from * 2 more times, ch 5, sc in the last ch-5 sp, turn. Leave the rest of the edge loop unworked. (4 loops)
Row 14 (B): Ch 5 (counts as dc + ch 2), kn in the first ch-5 sp, *ch 5, kn in the next ch-5 sp; rep from * 2 more times, ch 2, dc in the last sc, turn. (3 full + 2 half loops)
Row 15 (A): Ch 1, sc in the first dc, *ch 5, kn in the next ch-5 sp; rep from * 2 more times, ch 5, sc in the 3rd ch of the tch, turn. (4 loops)
Row 16 (D): Ch 1, sl st in the first sc and in the next 3 ch, sc in the same sp, ch 5, kn in the next sp, ch 5, sc in the last sp, turn. (3 loops)
Row 17 (B): Ch 5, kn in the first sp, ch 5, kn in the next sp, ch 5, kn in the next sp, ch 2, dc in the last sc, turn. (2 full + 2 half loops)
Row 18 (A): Ch 1, sc in the first dc, (ch 5, kn in the next sp) twice, ch 5, sc in the 3rd ch of the tch, turn. (3 loops)
Row 19 (D): Ch 1, sl st in the first sc and in the next 3 ch, sc in the same sp, ch 5, kn in the next sp, ch 5, sc in the last sp, turn. (2 loops)
Row 20 (D): Ch 1, sl st in the first sc and in the next 3 ch, sc in the same sp, ch 5, sc in the last sp, turn. (1 loop)
Row 21 (tip): Ch 1, sl st in the first sc and in the next 3 ch, ch 1, 5 sc in the same loop. (5 sc) Don’t fasten off.
Checkpoint: The panel is 14.75 in (37.5 cm) tall, with 5 loops across the lower half and a stepped point at the top.
Make All Pieces
| Piece | Quantity | Color |
|---|---|---|
| Lattice panel with border and loop | 1 | Cream |
| Disc circle (plain) | 3 | Cream |
| Disc circle with BLO Round 4 (Disc B front) | 1 | Cream |
| Roll bar tube | 1 | Cream |
Disc Circle (make 4)
Round 1: 6 sc in MR. (6)
Round 2: Inc in each st around. (12)
Round 3: (Sc, inc) 6 times. (18)
Round 4: (Sc 2, inc) 6 times. (24) On one circle, work this round in BLO. This becomes the Disc B front.
Round 5: (Sc 3, inc) 6 times. (30)
Round 6: (Sc 4, inc) 6 times. (36) Sl st to join.
Fasten off three of the circles. On the fourth, leave the yarn attached.
Checkpoint: Each circle measures 3 in (7.6 cm) across.
Join each pair: Pair the BLO circle with one plain circle (Disc B) and the other two plain circles together (Disc A), wrong sides together. Working through both layers:
Round 7: (Sc 5, inc) 6 times. (42) Sl st to join and fasten off.
Checkpoint: Each disc is 3.5 in (8.9 cm) across and about 0.4 in (1.0 cm) thick.
Disc B collar: Join yarn in any free front loop of Round 3 on the BLO face.
– Collar Round 1: (Sc 8, inc) twice. (20)
– Collar Rounds 2–3: Sc in each st. (20)
Fasten off. The collar is 0.75 in (1.9 cm) deep.
Roll Bar Tube
Round 1: 6 sc in MR. (6)
Round 2: Inc in each st. (12)
Round 3: (Sc, inc) 6 times. (18)
Rounds 4–23: Sc in BLO in each st. (18) That’s 20 rounds, or 5 in (12.7 cm). The BLO rounds make the ring ridges.
Insert the rigid core and push a little fiberfill into each end so it feels firm.
Round 24: (Sc, dec) 6 times. (12)
Round 25: Dec 6 times. (6) Close the end and fasten off.
Checkpoint: The tube is 1.4 in (3.6 cm) across and slides freely through a roll core of about 1.65 in (4.2 cm).
Layout Grid
            ( loop )
              /\
             /  \
            | ◇◇ |
            |◇◇◇◇|
            |◇◇◇◇◇|
  [Disc A]==tube=====[collar|Disc B]
  |<----- 5 in (12.7 cm) ----->|
Joining
Use mattress stitch and a long tail, about 18 in (45.7 cm).
- Tube to Disc A: Center the closed Round 1–3 end of the tube on one face of Disc A. Sew the 18 stitches of tube Round 3 to the disc, one to one, so the tube stands straight out.
- Discs to panel: Place each disc at a lower corner, standing straight out from the front of the panel. The bottom edge of each disc should line up with the bottom of the border, and each disc should sit 0.5 in (1.3 cm) in from its side edge. Disc B’s collar faces Disc A.
- Sew 6 stitches of each disc’s Round 7 rim, which is about 1.5 in (3.8 cm) of rim, to the border, picking up one border stitch for each rim stitch.
- Keep the inner faces of the discs exactly 5 in (12.7 cm) apart, so the free end of the tube seats 0.75 in (1.9 cm) into the collar.
Keep your sewing firm but flat. If you pull too tight, the border will pucker behind the discs.
Size checkpoint: With the tube seated, there are 4.25 in (10.8 cm) between Disc A and the collar rim.
Border
The border goes around the panel only, worked into the stitches and row ends of that one piece. Its gauge is the solid gauge: 4 sc per 1 in (2.5 cm).
Round 1: Continuing from Row 21, place stitches as follows:
– Tip: Sc in the first 2 sc, 3 sc in the center sc, sc in the last 2 sc. That’s 5 stitches worked one each, plus 2 extra, for 7.
– First side: Work down the side edge with 4 sc in each D-row end (Rows 20, 19, 16, 13) and 3 sc in each other row end of Rows 18–2. Work 1 sc in the end of Row 1. That’s 16 + 12 + 33 + 1 = 62 sc.
– Bottom: Working in the foundation chain, 3 sc in the first st, sc in the next 19, 3 sc in the last st. That’s 21 stitches worked one each, plus 4 extra, for 25. This count includes both corner groups.
– Second side: Work up the other side to match, for 62 sc.
Sl st to the first sc. (156 sts: 7 + 62 + 25 + 62)
Round 2: Ch 1, sc in each st, working 3 sc in the center st of the tip and of each bottom corner. That’s 156 stitches worked one each, plus 6 extra. (162 sts: tip 9, sides 62 each, bottom 29)
Round 3: Ch 1, rev sc in each st around. That’s 162 stitches worked one each, plus 0 extra. (162) Sl st to join. Don’t fasten off.
Why the math works: The straight section is 8.5 in (21.6 cm) tall, and 8.5 × 4 = 34 sc. That matches 1 + (11 × 3) = 34. The taper edge is a diagonal, so it’s longer than its 6 in (15.2 cm) of height. The extra stitch on each D-row end covers that. Along the bottom, 21 sc span 5.25 in (13.3 cm), and the corner increases let the border turn flat. Three rounds at 0.25 in (0.6 cm) each add 0.75 in (1.9 cm) per edge. So 5.25 + 1.5 = 6.75 in (17.1 cm) wide, and 14.75 + 1.5 = 16.25 in (41.3 cm) tall.
Hanging loop: Sl st to the center tip st, ch 20, sl st in the same st. Work 28 sc into the loop and sl st to join. Fasten off. The loop extends 3 in (7.6 cm).
Final Blocking
- Before you attach the discs, spray the panel until it’s evenly damp.
- Pin it flat to 6.75 in × 16.25 in (17.1 cm × 41.3 cm).
- Pin the center of each lattice diamond so the loops open evenly, with the knots lined up in straight diagonals.
- Pin the border straight along the sides, and the point sharp at the tip.
- Let it dry completely, then assemble.
- If you like, give the discs a light steam so they sit flat.
Final Quality-Control Checklist
- The panel measures 6.75 in × 16.25 in (17.1 cm × 41.3 cm).
- Every lattice crossing has a visible knot bar.
- The border counts are 156, 162, and 162, with no ripples.
- Both discs are 3.5 in (8.9 cm) across, flat, and firm.
- The tube is 5 in (12.7 cm) long, rigid, and turns freely in a roll core.
- The disc inner faces are exactly 5 in (12.7 cm) apart.
- The tube seats snugly into the collar.
- The loop is securely stitched at the tip.
- All ends are woven in through solid stitches, not through the lattice.
Troubleshooting
- The lattice leans to one side. You probably skipped a half loop on a B row. Count 2 half loops on every B row.
- The border ripples on the taper. Use 3 sc on the D-row ends instead of 4, and take out the same number on the other side.
- The border cups. Your tension is tight. Go up a hook size for Rounds 2–3.
- The tube is loose in the collar. Work Collar Round 1 as sc 18 with no increases.
- The tube won’t fit the roll core. Use a thinner core, or a tighter tension on the tube.
- The panel sags under the roll. Re-block it. Cotton firms up again after damp blocking.
Care
Hand wash in cool water and roll it in a towel to remove moisture. Then lay it flat to dry, pinned to its blocked size. Remove the rigid core before washing if you can.
Final Notes
Every measurement here builds on the one before it. The 21-stitch foundation sets a 5.25 in (13.3 cm) lattice width, and 21 rows build 14.75 in (37.5 cm) of height. The three border rounds add 0.75 in (1.9 cm) per edge, for 6.75 in × 16.25 in (17.1 cm × 41.3 cm). Discs of 3.5 in (8.9 cm) set 5 in (12.7 cm) apart, with the 5 in (12.7 cm) roll bar between them, hold a roll up to 4.25 in (10.8 cm) wide. Check each stage as you go and the holder will hang straight and look tidy.
Happy crocheting!