

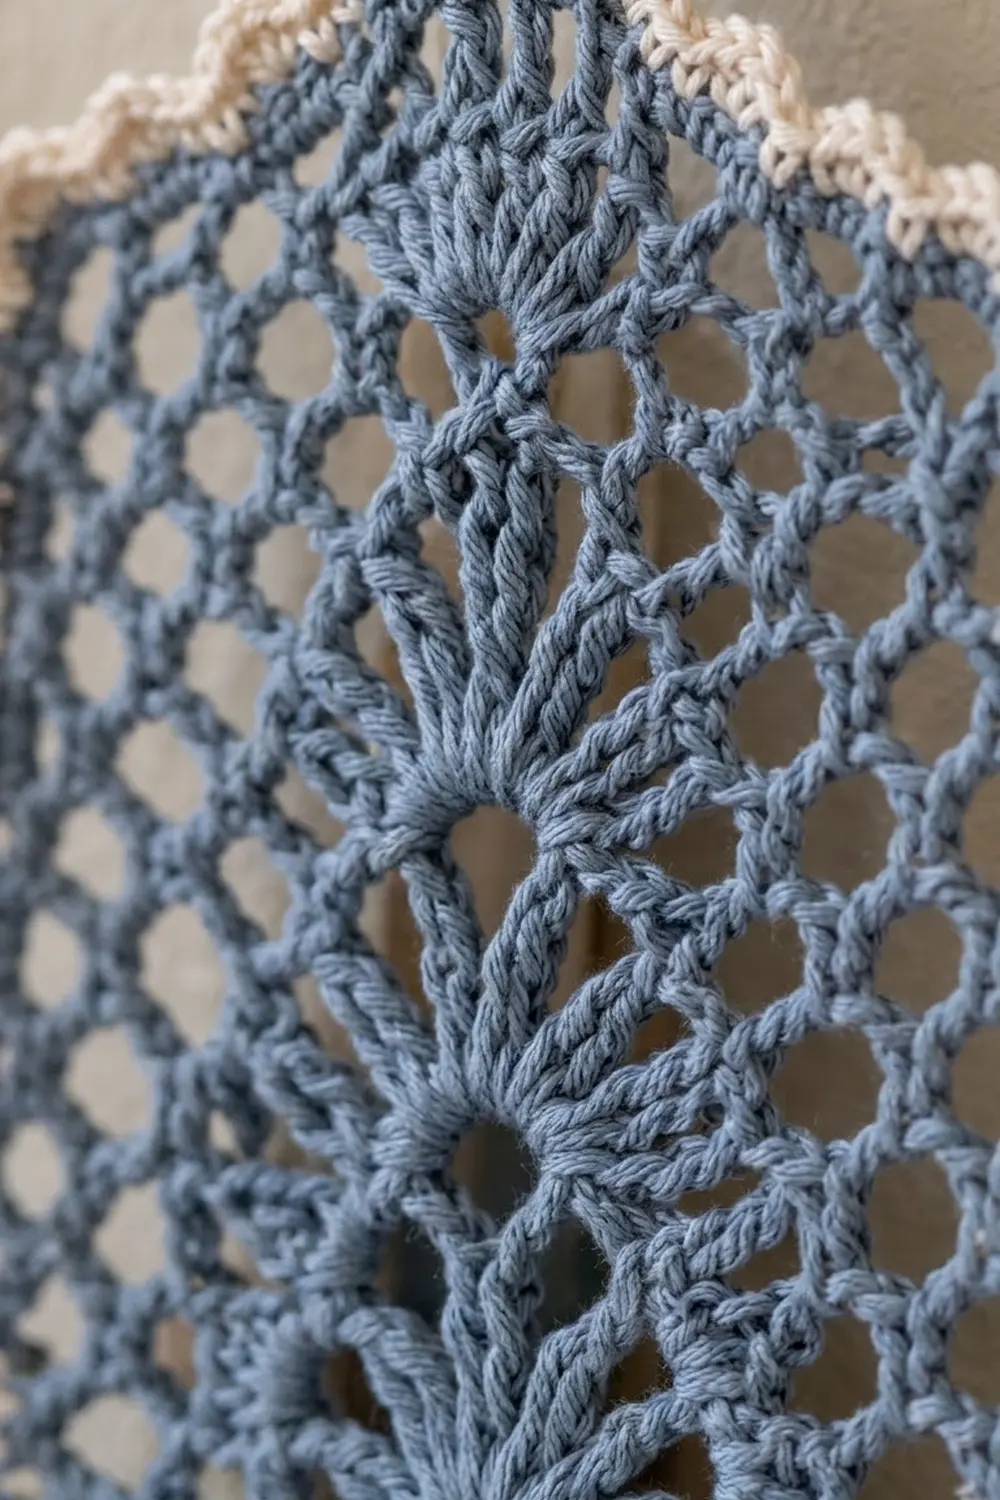
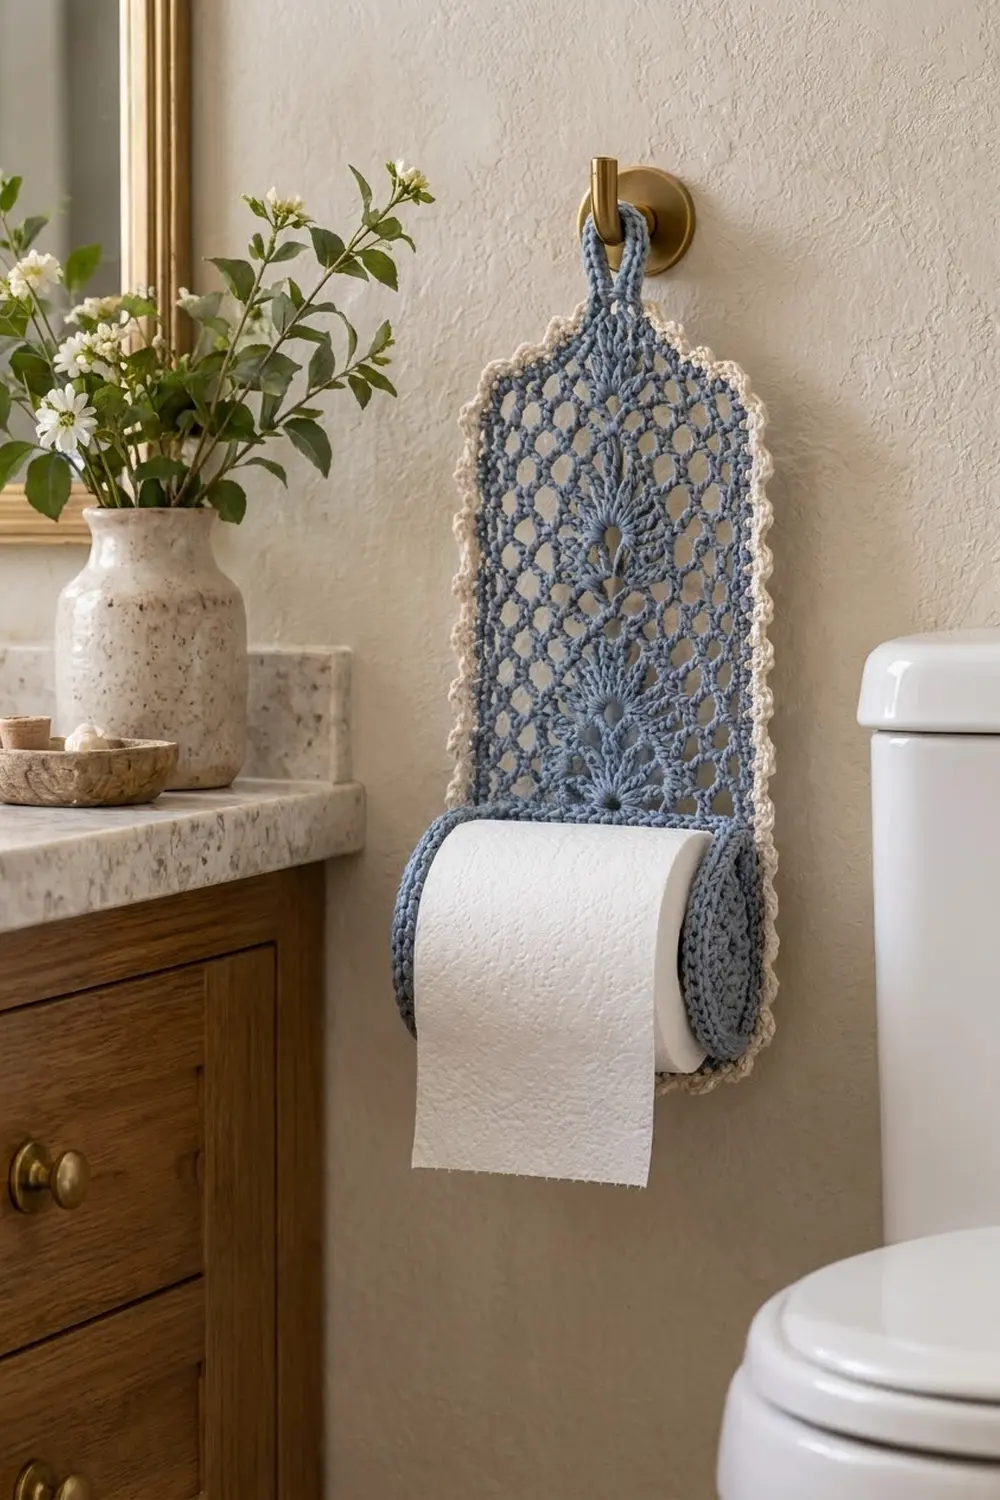
This hanging toilet paper holder pairs a tall lace back panel with a sturdy roll cradle. The panel is dusty blue open mesh with a column of fan motifs, framed by a soft cream scalloped edge. The cradle is dense single crochet with flat spiral discs at both ends. It holds the roll securely and keeps the front open for easy tearing.
The style is calm and slightly vintage: one cool blue, one warm cream and a lot of airy texture. It looks good on a plain wall above a vanity or beside the tank. You can hang it from any sturdy hook.
This pattern uses US crochet terms. The finished holder is about 6.75 in (17.1 cm) wide and 18.5 in (47.0 cm) tall including the hanging loop. The roll cradle is about 5 in (12.7 cm) in diameter.
Construction is simple. You work the back panel flat in rows from the bottom up, then add a two-row cream border along the sides and top. Next you add a blue hanging loop. Separately, you make a single crochet rectangle for the cradle and two spiral discs, join the discs to the cradle’s long edges, and sew the cradle to the bottom of the panel.
Finished Size and Construction
- Finished size: 6.75 in (17.1 cm) wide × 18.5 in (47.0 cm) tall with loop
- Skill level: Intermediate
- Terminology: US crochet terms
- Yarn weight: Worsted (#4) cotton
- Hook: 4.5 mm (US 7)
- Number of pieces: 4 (1 back panel, 1 cradle, 2 end discs)
- Layout: panel vertical; cradle sewn across the bottom 3 in (7.6 cm)
- Panel size before border: 5.75 in (14.6 cm) × 15.5 in (39.4 cm)
- Border depth: 0.5 in (1.3 cm) on sides and top (no border on the bottom edge)
- Cradle: 11 in (27.9 cm) × 4.4 in (11.2 cm) flat; each disc is 5 in (12.7 cm) across
Materials
Use a smooth, mercerized or combed worsted-weight cotton. Cotton holds the lace shape, resists bathroom humidity and washes well. Avoid fuzzy blends, which blur the mesh.
- Dusty blue (Color A): 120 g / 216 m
- Cream (Color B): 20 g / 36 m
These quantities include a margin of about 25% for gauge swatches and a little extra.
Tools:
– 4.5 mm (US 7) crochet hook
– Tapestry needle
– 4 locking stitch markers
– Scissors
– Measuring tape
– Blocking mat and rustproof pins
– Spray bottle
Abbreviations (US Terms)
- ch – chain
- sl st – slip stitch
- sc – single crochet
- hdc – half double crochet
- dc – double crochet
- sk – skip
- st(s) – stitch(es)
- sp – space
- RS / WS – right side / wrong side
Special stitch – Scallop: (hdc, dc, hdc) all in the same stitch.
Mesh row: Ch 4 (counts as dc + ch 1), sk next st, dc in next st, *ch 1, sk next st, dc in next st; repeat from * to end, working the last dc into the top of the turning chain. You get 12 dc + 11 ch-1 spaces = 23 sts.
Stitch numbering: Each panel row has 23 positions. Position 1 is the turning chain and position 23 is the last stitch. In mesh rows, the odd positions are dc and the even positions are ch-1 spaces. Each ch-1 space counts as 1 stitch.
Gauge and Checkpoints
- Dc gauge (panel): 16 sts × 8 rows = 4 in (10.2 cm)
- Sc gauge (cradle and discs): 16 sts × 18 rows = 4 in (10.2 cm)
Mesh rows and fan rows match the dc gauge, because each ch-1 space takes up the same width as a dc.
Make the end disc first, since it’s the quickest test piece. It should measure 5 in (12.7 cm) across after Round 11. Then check these points as you go:
- Panel after Row 1: 5.75 in (14.6 cm) wide
- Panel after Row 9: 4.5 in (11.4 cm) tall
- Panel after Row 28: 14 in (35.6 cm) tall
- Panel after Row 31: 15.5 in (39.4 cm) tall; top edge 3.75 in (9.5 cm) wide
- Cradle after Row 20: 11 in (27.9 cm) × 4.4 in (11.2 cm)
Too big? Go down a hook size, for example to 4.0 mm (US G-6).
Too small? Go up a hook size, for example to 5.0 mm (US H-8).
The cradle must fit a standard roll, which is about 4.5 in (11.4 cm) across and 4 in (10.2 cm) wide. Don’t skip the gauge check.
Back Panel
Use Color A.
Row 1 (RS): Ch 25. Dc in 4th ch from hook (the skipped 3 ch count as the first dc) and in each remaining ch. Turn. (23 sts)
Rows 2–3: Work a Mesh row. Turn. (23 sts: 12 dc + 11 ch-1 sps)
Fan Repeat (6 rows)
Fan Row A (block): Ch 4, sk 1, dc in next st, [ch 1, sk 1, dc in next st] 3 times (you are now at position 9). Ch 1, sk 1, dc in each of the next 3 sts (positions 11–13). [Ch 1, sk 1, dc in next st] 5 times. Turn. (23 sts)
Fan Row B (small shell): Ch 4, sk 1, dc in next st, [ch 1, sk 1, dc in next st] 3 times (position 9). Sk next 2 sts, 5 dc in next st (the center dc of the block, position 12), sk next 2 sts, dc in next st (position 15). [Ch 1, sk 1, dc in next st] 4 times. Turn. (23 sts: 9 + 5 + 1 + 8)
Fan Row C (large shell): Ch 4, sk 1, dc in next st, [ch 1, sk 1, dc in next st] 2 times (position 7). Sk next 4 sts, 9 dc in next st (the center dc of the 5-dc shell, position 12), sk next 4 sts, dc in next st (position 17). [Ch 1, sk 1, dc in next st] 3 times. Turn. (23 sts: 7 + 9 + 1 + 6)
Next 3 rows: Work 3 Mesh rows. Turn after each. (23 sts)
The first Mesh row over the 9-dc shell places a dc in every other shell stitch. This splits the fan into separate spokes that open into the surrounding mesh.
Rows 4–27: Work the 6-row Fan Repeat 4 times in total. (23 sts)
This places a fan in Rows 4–6, 10–12, 16–18 and 22–24, with mesh rows between them.
Row 28: Ch 3 (counts as dc), dc in each st and each ch-1 sp across. Turn. (23 sts)
Checkpoint: The panel is now 14 in (35.6 cm) tall and 5.75 in (14.6 cm) wide.
Shoulders
Row 29: Sl st in each of the first 3 sts. Ch 4 (counts as dc + ch 1; it sits on position 3), sk next st, dc in next st, ch 1, sk 1, dc in next st; repeat from * until you have worked into position 21. Leave the last 2 sts unworked. Turn. (19 sts)*
Row 30: Repeat Row 29 over the 19 sts, leaving the last 2 sts unworked. Turn. (15 sts)
Row 31: Ch 3, dc in each st and ch-1 sp across. Fasten off. (15 sts)
Each shoulder steps in 1 in (2.5 cm) over 1 in (2.5 cm) of height. This gives a clean angled top.
Checkpoint: The panel is now 15.5 in (39.4 cm) tall, with a top edge of 3.75 in (9.5 cm).
End Discs (make 2)
Use Color A. Work in a continuous spiral without joining. Move a marker up to the first st of each round as you go.
Rnd 1: Make a magic ring and work 6 sc into it. (6)
Rnd 2: 2 sc in each st. (12)
Rnd 3: Sc in next st, 2 sc in next st; repeat from * around. (18)
Rnd 4: Sc in next 2 sts, 2 sc in next st; repeat around. (24)
Rnds 5–11: Continue the same way, working 1 more sc between increases each round. Each round adds 6 sts, so Rnd 5 has 30, Rnd 6 has 36, Rnd 7 has 42, Rnd 8 has 48, Rnd 9 has 54, Rnd 10 has 60 and Rnd 11 has 66.
To finish, sl st into the next st and fasten off, leaving a 6 in (15.2 cm) tail. Each disc measures 5 in (12.7 cm) across.
Roll Cradle
Use Color A.
Row 1: Ch 45. Sc in 2nd ch from hook and in each remaining ch. Turn. (44 sts)
Rows 2–20: Ch 1, sc in each st across. Turn. (44 sts)
Fasten off. The cradle measures 11 in (27.9 cm) long × 4.4 in (11.2 cm) wide.
The two 44-st long edges (the foundation edge and Row 20) will join the discs. The two short edges are 20 row-ends each.
Make All Pieces
- Color A: 1 back panel, 1 cradle, 2 end discs
- Color B: border only, worked directly onto the panel
Layout, seen from the front:
        [ loop ]
      /  panel   \     <- shoulders, Rows 29–31
     |  fan lace  |
     |  fan lace  |    <- cream border on sides + top
     |  fan lace  |
     |  fan lace  |
  (disc)[ cradle ](disc)  <- bottom 3 in / 7.6 cm
Border
Use Color B. Border gauge is the same sc gauge, about 4 sc per 1 in (2.5 cm). Work 2 sc per dc row-end, since one dc row is about as tall as 2 sc are wide.
Border Row 1 (RS): Join B at the bottom right corner, in the row-end of Row 1. Then work:
- Right side: 56 sc (2 in each row-end of Rows 1–28)
- Right shoulder: 10 sc (2 in each row-end of Rows 29–31 = 6, plus 2 along each of the 2 stepped ledges = 4)
- Top: sc in the first 7 sts, 2 sc in the center st, sc in the last 7 sts = 16 sc
- Left shoulder: 10 sc
- Left side: 56 sc
Turn. (148 sc: 56 + 10 + 16 + 10 + 56)
Border Row 2: Ch 1. Sl st in next st, Scallop in next st; repeat from * across. Fasten off. (74 scallops)*
That gives 28 scallops on each side, 5 on each shoulder and 8 on top (28 + 5 + 8 + 5 + 28 = 74).
Why the math works: Each scallop repeat uses exactly 2 sts, and every section has an even count (56, 10, 16, 10, 56). Each section therefore holds a whole number of scallops, with no half-repeats at the shoulder turns. The single increase at the top center turns 15 sts into 16 so the top also divides evenly. The bottom edge gets no border because the cradle covers it.
Hanging Loop
With the WS facing, join A with a sl st into the center st of Row 31, just behind the border. Ch 20, then sl st into the same st. Ch 1 and work 30 sc around the chain loop. Sl st into the first sc and fasten off.
The loop stands about 2.5 in (6.4 cm) above the border.
Joining
Discs to cradle: On one disc, place markers at st 1 and st 44 of Rnd 11. Sts 1–44 will be joined. The remaining 22 sts stay free and become the open upper front.
Hold the cradle’s foundation edge against disc sts 1–44 with the WS together. Join A and sc through both layers, one cradle st to one disc st, for 44 sc. This makes a neat ridge on the outside, which gives the end the defined rim shown in the photo. Join the second disc to Row 20 the same way, starting directly opposite the first disc’s st 1 so the two discs line up.
Keep your tension even and slightly relaxed. A tight seam will cup the disc inward.
Cradle to panel: The cradle with its two seam ridges is about 4.75 in (12.1 cm) across. This matches panel sts 3–21 (19 sts at 4 sts per inch).
- Whipstitch the short edge nearest st 1 of the discs across the top of panel Row 6, centered over sts 3–21. Ease the row-ends in evenly.
- Let the cradle hang down flat against the panel. Cradle sts 1–12 measure 3 in (7.6 cm) and should reach exactly to the panel’s bottom edge.
- Tack the cradle to the panel foundation at that point with 5–6 small stitches.
Size checkpoint: The cradle opening should accept a standard roll with gentle stretch. The panel should still lie flat at 6.75 in (17.1 cm) wide.
Final Blocking
- Mist the panel and border lightly until damp. Keep the cradle dry.
- Pin the panel face up to 6.75 in (17.1 cm) × 16 in (40.6 cm), excluding the loop.
- Pin each fan open so the spokes radiate evenly and the mesh squares are open.
- Pin each scallop point outward along the sides and top.
- Stuff the cradle with a roll wrapped in plastic so the discs dry round.
- Let everything dry completely, usually 12–24 hours, before you unpin.
Final Quality-Control Checklist
- Panel rows: 23 sts in Rows 1–28, then 19, 15 and 15
- Four fans, evenly spaced and centered on position 12
- Border Row 1 has 148 sc; Border Row 2 has 74 scallops
- Shoulders match in angle and scallop count (5 each)
- Discs are 66 sts and lie flat at 5 in (12.7 cm)
- Each disc seam has 44 sc, and the free 22 sts face the upper front
- Cradle is centered on panel sts 3–21 and tacked at the bottom edge
- Loop is centered and firmly anchored
- All tails woven in through solid stitches, not mesh
Troubleshooting
- Fan is off-center: Recount positions; the shell must sit on position 12. Missing the turning chain as position 1 is the usual cause.
- Mesh leans or slants: Make sure you dc into the top of the turning chain at the end of each row.
- Panel edges wave: Your row-ends may be too loose. Use 2 sc per row-end exactly and keep the border tension firm.
- Disc ruffles: Your tension is too loose; go down a hook size for the discs only.
- Disc cups: Your tension is too tight, or you missed an increase. Recount to 66.
- Roll won’t fit: Block the cradle over a roll, or add 2 rounds to each disc (72, then 78 sts) and join 48 and 52 sts to a matching longer cradle.
- Holder sags on the hook: Reinforce the loop base with a few extra sl sts through Row 31.
Care
Hand wash in cool water with mild soap, press out water in a towel, and reshape to dry flat. Re-pin the fans if they lose definition.
Final Notes
The measurements build on each other in this order:
- The dc gauge of 16 sts per 4 in (10.2 cm) sets a 5.75 in (14.6 cm) panel.
- Thirty-one rows at 0.5 in (1.3 cm) each make it 15.5 in (39.4 cm) tall.
- The 0.5 in (1.3 cm) border brings the width to 6.75 in (17.1 cm).
- The sc gauge makes 5 in (12.7 cm) discs and an 11 in (27.9 cm) cradle.
- Joining those pieces stitch-to-stitch at 44 sts gives a cradle that holds a standard roll.
Check each measurement as you go, and the holder will hang straight and hold its shape. Happy crocheting!