

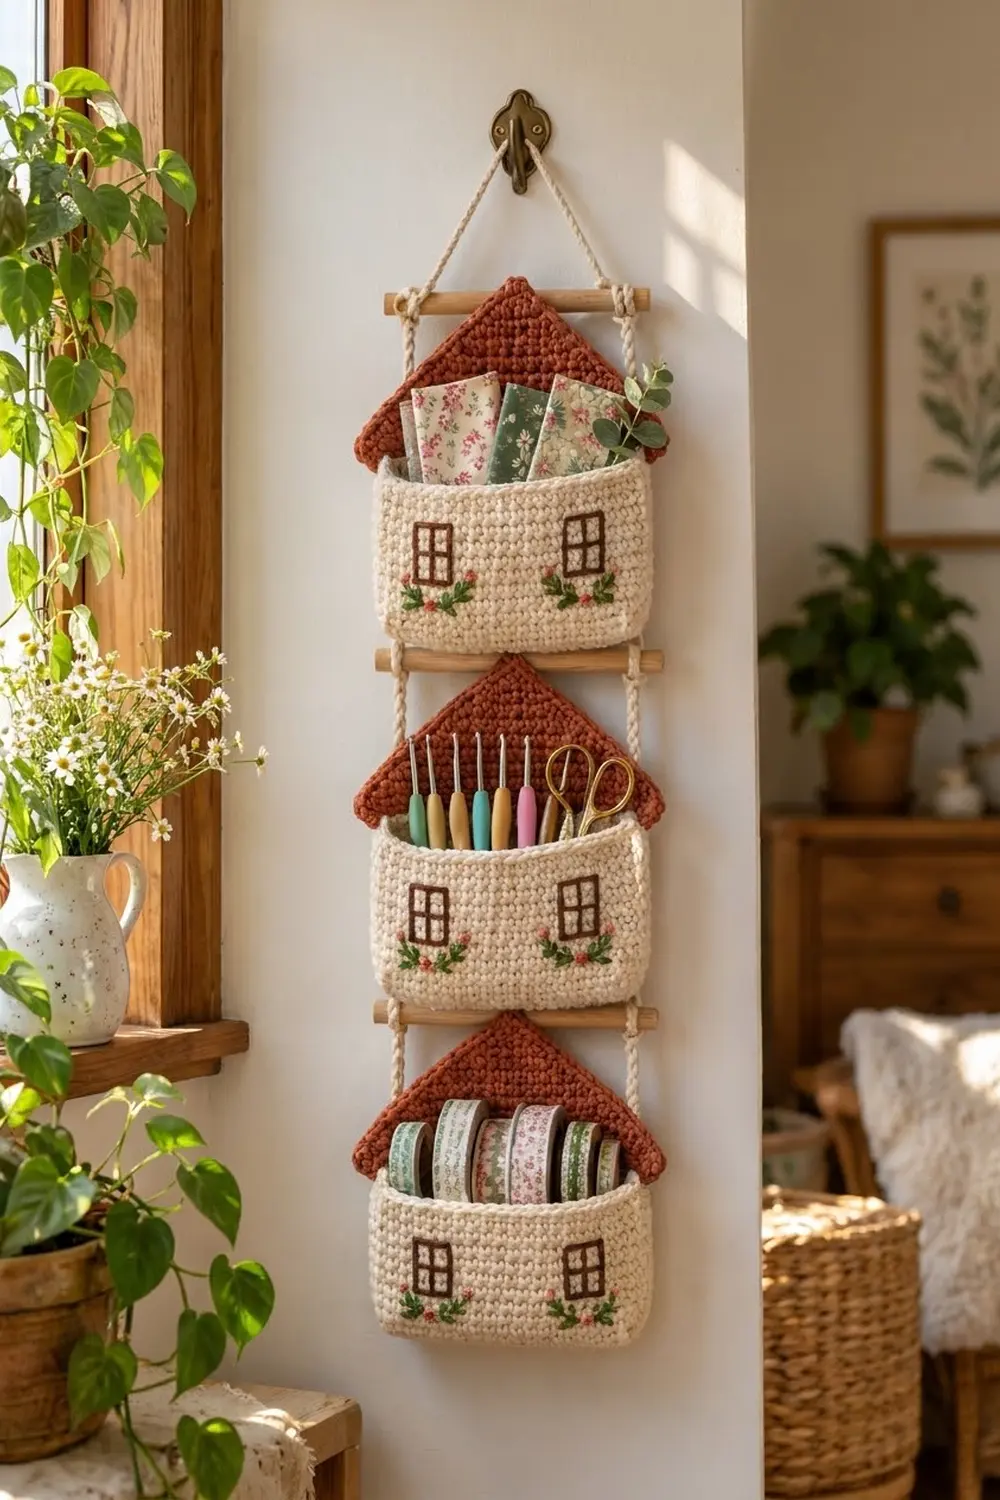
This hanging organizer is a row of three small cottages stacked on a rope ladder. Each cottage is a shallow cream basket with a terracotta roof that rises behind the opening. That gives you a pocket for fabric, hooks, scissors or washi tape, and the back stays tidy.
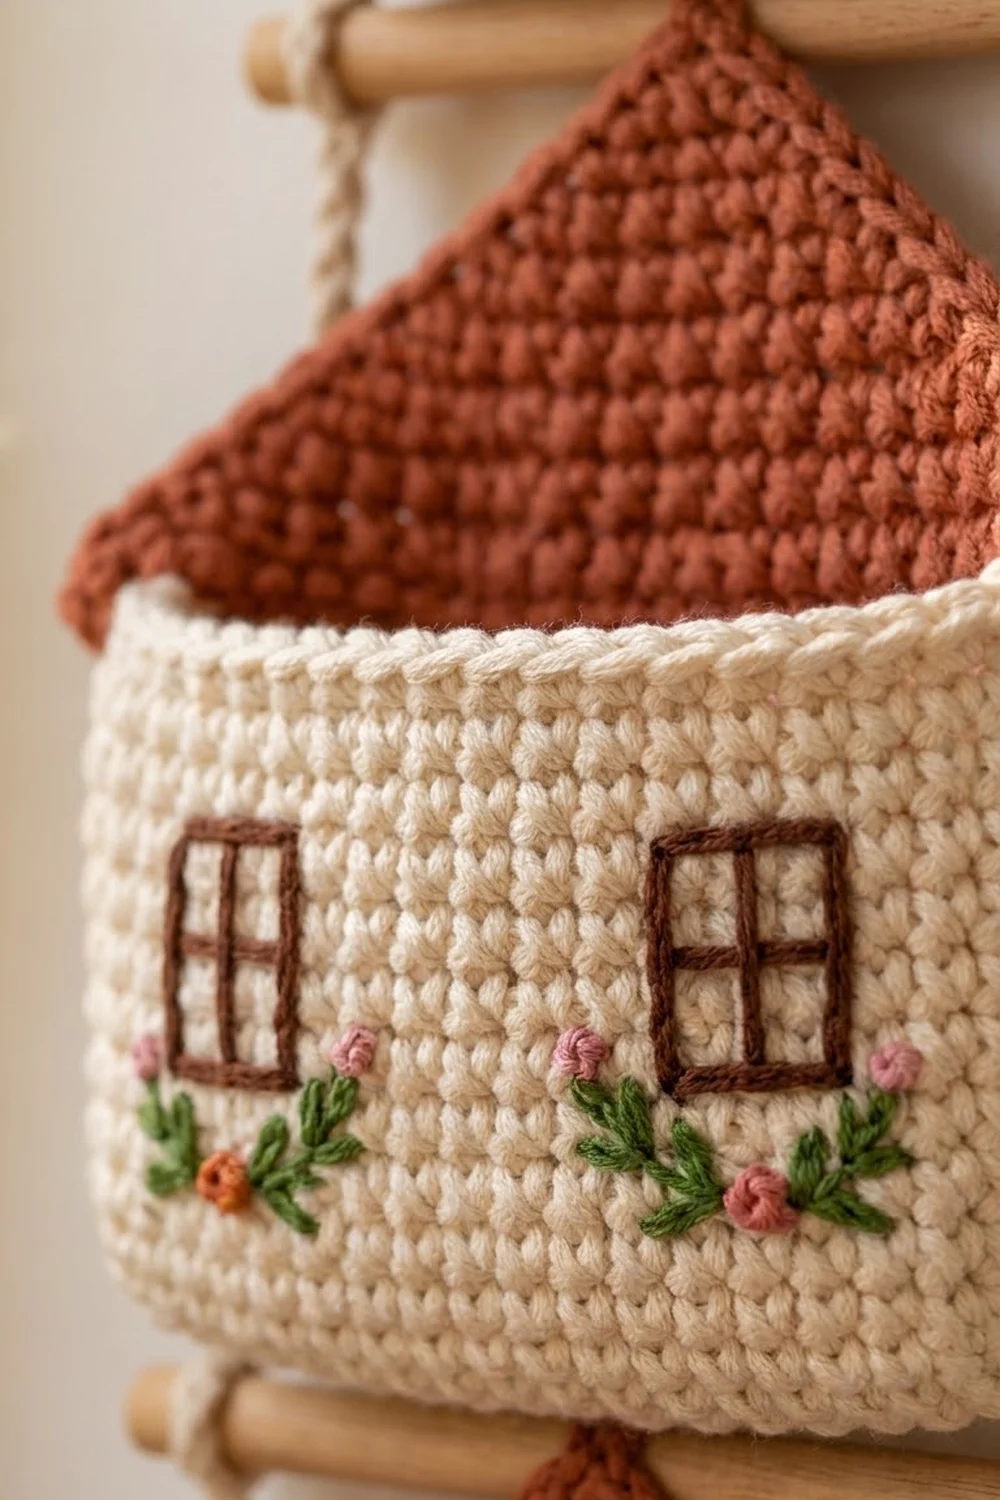
The palette is warm and simple: cream walls, terracotta roofs, dark brown embroidered windows, and tiny green-and-pink flower sprays. The hanger is cream cotton cord tied around three wooden dowels. It fits a farmhouse or cottage-style craft corner.
The pattern uses US crochet terms. Each finished basket is about 9.5 in (24.1 cm) wide, 2.5 in (6.4 cm) deep and 9.5 in (24.1 cm) tall from base to roof peak. The full organizer hangs about 40 in (101.6 cm) long, including the top loop.
Here is the construction. You work a flat rectangular base in rows, then walls in rounds, then a roof triangle in rows off the back wall. Next come a crab-stitch rim on the front and sides, an edging on the roof, and the embroidery. Last, you tie the cord ladder and attach the three baskets.
Finished Size and Construction
- Finished basket size: 9.5 in (24.1 cm) wide × 2.5 in (6.4 cm) deep × 9.5 in (24.1 cm) tall to roof peak
- Front wall height: about 5 in (12.7 cm) with rim
- Full organizer: about 12 in (30.5 cm) wide × 40 in (101.6 cm) long
- Skill level: Easy+ (simple stitches, careful counting)
- Terminology: US
- Yarn weight: Bulky (#5) cotton or cotton blend
- Hook: 5.5 mm (US I-9)
- Number of pieces: 3 identical baskets + 1 cord-and-dowel hanger
- Layout: 1 column × 3 baskets, stacked vertically
- Size before border: 9.4 in (23.9 cm) wide, walls 4.8 in (12.2 cm) tall, roof 4.5 in (11.4 cm) tall
- Border depth: about 0.25 in (0.6 cm) on the rim and on the roof edge
Materials
Use a firm, smooth bulky cotton so the walls stand up on their own. Cotton blends work too. Avoid soft acrylic, which lets the baskets slump.
- Cream (walls): 250 g / about 300 m (328 yd)
- Terracotta (roofs): 60 g / about 72 m (79 yd)
- Dark brown, worsted (windows): 5 g / about 10 m (11 yd)
- Green, worsted (leaves): 5 g / about 10 m (11 yd)
- Pink, worsted (flowers): 3 g / about 6 m (7 yd)
All quantities include a margin of roughly 15%.
Tools and hardware:
– 5.5 mm (US I-9) crochet hook
– Blunt tapestry needle
– 4 locking stitch markers
– 3 wooden dowels, 12 in (30.5 cm) long × 3/8 in (1.0 cm) diameter
– 5 mm cream cotton cord, 2 lengths of 95 in (241.3 cm) each
– Scissors, tape measure, rust-proof pins
Abbreviations (US Terms)
- ch – chain
- sc – single crochet
- sl st – slip stitch
- st(s) – stitch(es)
- BLO – back loop only
- sc2tog – single crochet 2 together (1 st decreased)
- sc3tog – single crochet 3 together (2 sts decreased)
- rev sc – reverse single crochet
- rnd – round
- RS – right side
Special stitch – Reverse single crochet (crab stitch): Work from left to right (right to left if you crochet left-handed). Insert the hook into the next stitch to the right, yarn over, pull up a loop, yarn over and pull through both loops. This makes the twisted, cord-like rim.
Gauge and Checkpoints
Gauge: 14 sc × 15 rows/rnds = 4 in (10.2 cm), worked firmly. That is 3.5 sts and 3.75 rows per inch.
Make one complete basket before you start the other two. The stitch counts here rely on dense fabric. Loose stitches make a floppy basket, and the hanger spacing assumes the sizes below.
Checkpoints:
– After the base (Row 9): 8.9 in (22.6 cm) × 2.4 in (6.1 cm)
– After Rnd 1: perimeter 24 in (61.0 cm)
– After Rnd 19: walls 4.8 in (12.2 cm) tall, front 9.4 in (23.9 cm) wide
– After the roof (Row 17): roof 4.5 in (11.4 cm) from base to peak
Too big? Go down 0.5 mm in hook size, or tighten your tension. Too small? Go up 0.5 mm. Don’t add or remove stitches, because the roof and rim counts are built on 84 wall stitches.
Basket Pattern (Make 3)
Base (Cream)
Ch 32.
Row 1: Sc in 2nd ch from hook and in each ch across, turn. (31 sts)
Rows 2–9: Ch 1, sc in each st across, turn. (31 sts)
The base should measure 8.9 in (22.6 cm) × 2.4 in (6.1 cm). Don’t fasten off.
Walls (Cream)
Rnd 1 (conversion round): Ch 1, don’t turn. Work around the whole rectangle:
– Sc in each of the 31 sts of Row 9. Work 1 more sc in the last st (corner).
– Work 9 sc down the row ends, 1 per row. Work 1 more sc in the first foundation ch (corner).
– Sc in each of the 31 foundation chs.
– Work 1 more sc in the last foundation ch (corner), then 9 sc up the row ends. Work 1 more sc in the first sc of this rnd (corner).
Join with sl st to the first sc.
Count: 80 sts worked 1 per existing st or row end + 4 corner sts = 84 sts.
Place markers. Each corner st belongs to a long panel. That gives:
– Back panel: corner + 31 + corner = 33 sts (along Row 9)
– Side: 9 sts
– Front panel: corner + 31 + corner = 33 sts (along the foundation)
– Side: 9 sts
Check: 33 + 9 + 33 + 9 = 84. Mark the first and last st of the back panel.
Rnd 2: Ch 1, sc in BLO of each st around, join. (84 sts)
Working in the back loop turns the base edge up and leaves the raised ridge along the bottom.
Rnds 3–19: Ch 1, sc in each st around, join. (84 sts)
The walls should be 4.8 in (12.2 cm) tall. Fasten off cream.
Roof (Terracotta)
You work the roof flat over the 33 back-panel sts of Rnd 19, with the RS facing.
Row 1: Join terracotta in the first marked back-panel st. Ch 1, sc in the same st and in each of the next 32 sts, turn. (33 sts)
Rows 2–15: Ch 1, sc2tog, sc in each st to the last 2 sts, sc2tog, turn.
Each row is 2 sts fewer than the row before:
| Row | Sts |
|---|---|
| 2 | 31 |
| 3 | 29 |
| 4 | 27 |
| 5 | 25 |
| 6 | 23 |
| 7 | 21 |
| 8 | 19 |
| 9 | 17 |
| 10 | 15 |
| 11 | 13 |
| 12 | 11 |
| 13 | 9 |
| 14 | 7 |
| 15 | 5 |
Row 16: Ch 1, sc2tog, sc 1, sc2tog, turn. (3 sts)
Row 17: Ch 1, sc3tog. (1 st)
Math check: 33 − (2 × 15) − 2 = 1. Don’t fasten off. The roof edging comes next, in the Border section.
Make All Pieces
Make 3 identical baskets.
| Color | Per basket | For 3 baskets |
|---|---|---|
| Cream | about 75 g | about 225 g |
| Terracotta | about 18 g | about 54 g |
| Brown / Green / Pink | about 1–1.5 g each | 3–5 g each |
Layout grid (front view):
            /\   top loop
           /  \
  O========================O   Dowel 1
  |         /\             |
  |       House 1          |
  O========================O   Dowel 2
  |         /\             |
  |       House 2          |
  O========================O   Dowel 3
  |         /\             |
  |       House 3          |
  knot                   knot
Border
Work the border on each basket separately, before joining. Nothing is crocheted across the baskets, so there is no seam math. Each basket’s border counts stay the same.
Border gauge: Rev sc is worked 1 per st and measures the same width as the sc fabric: 3.5 sts per inch.
Roof Edging (Terracotta, continue from Row 17)
Edging Row: Ch 1. Turn the roof so you can work down the left slant.
– Left slant: Work 3 sc over every 2 row ends for Rows 16 down to 1. That is 8 pairs = 24 sc.
– Fasten off. Rejoin at the right base of the roof, then work 3 sc over every 2 row ends up the right slant (Rows 1–16) = 24 sc.
– Peak: Work 3 sc in the Row 17 st. Sl st to the first sc of the left slant and fasten off.
Total: 24 + 3 + 24 = 51 sts.
Why the math works: Each slant runs from half the roof base, 4.7 in (11.9 cm), up to a 4.5 in (11.4 cm) height. That makes it about 6.5 in (16.5 cm) long. At 3.5 sts per inch, 6.5 in needs about 23 sts. The 24 sts add one stitch of ease, so the eave sits flat with a slight lift and doesn’t pucker. The 3 sc at the peak turn the point without pulling it in.
Rim (Cream)
Work the rim across the open top only: one side, the front and the other side.
Rim Row: With the RS facing, join cream in the first side st after a back-panel marker. Ch 1 and rev sc in each st:
– Side: 9 sts
– Front: 33 sts (including both corner sts)
– Side: 9 sts
Total: 9 + 33 + 9 = 51 sts. Fasten off and sew the ends into the base of the roof.
Why the math works: 84 wall sts − 33 back-panel sts = 51 open-edge sts. Working 1 rev sc per st keeps the rim the same length as the wall, so it won’t flare or tighten. The rim adds about 0.25 in (0.6 cm) in height.
Embroidery
Count the front-panel sts 1–33 from the left corner.
Windows (brown):
– Backstitch a rectangle over sts 6–9 and Rnds 11–15. That is 4 sts × 5 rnds, about 1.1 in × 1.3 in (2.8 cm × 3.3 cm).
– Add 1 vertical line through the center and 1 horizontal line across Rnd 13 to make four panes.
– Repeat over sts 25–28.
Flower sprays:
– Below each window, around Rnds 8–9, stitch 4 green lazy-daisy leaves in a shallow V.
– Add 3 pink French knots among the leaves.
Joining: Assembling the Hanger
Cord ladder:
1. Hold both cords together. At the center, tie an overhand knot that leaves a 3 in (7.6 cm) hanging loop.
2. Measure 8 in (20.3 cm) down each cord. Tie each one to an end of Dowel 1 with a clove hitch, 0.75 in (1.9 cm) in from the dowel end.
3. Measure 10.5 in (26.7 cm) down from each Dowel 1 knot. Tie Dowel 2 the same way.
4. Repeat for Dowel 3, another 10.5 in (26.7 cm) down.
5. Let the cords hang 10 in (25.4 cm) below Dowel 3. Tie an overhand knot in each and trim the tails to 3 in (7.6 cm).
Attaching the baskets:
– Sit each basket between two dowels with its base resting on the lower one. Basket 3 hangs below Dowel 3.
– Stitch-to-stitch logic: Attach only at the back panel’s corner sts, the marked first and last of the 33 sts. Fix each corner at Rnd 2 and at Rnd 19, which gives 4 points per basket.
– At each point, thread cream yarn through the corner st, wrap it 3 times around the cord to make a 0.5 in (1.3 cm) bridge, and knot it securely. Then tack the roof peak to the dowel above with 2 terracotta stitches.
Tension advice: Pull the ties snug, but not so tight that the side walls get drawn toward the cords. Keep each basket level and centered, with equal gaps on both sides.
Size checkpoint: The cords should sit 10.5 in (26.7 cm) apart, and each basket should hang level. The full piece should measure about 12 in (30.5 cm) × 40 in (101.6 cm).
Final Blocking
- Lightly spray each basket with water before you attach it.
- Stuff it firmly with a folded towel or a small box so it holds 9.4 in (23.9 cm) × 2.5 in (6.4 cm).
- Pin the roof flat on a board. Check the height (4.5 in / 11.4 cm) and that both slants match.
- Let the pieces dry completely, for at least 24 hours.
- Steam the rim lightly to set the crab-stitch twist. Don’t press it.
- Attach the baskets to the hanger once they’re dry.
Final Quality-Control Checklist
- [ ] 84 sts on every wall round
- [ ] Roof ends in exactly 1 st after Row 17
- [ ] Roof edging has 51 sts (24 + 3 + 24)
- [ ] Rim has 51 rev sc (9 + 33 + 9)
- [ ] Windows sit symmetrically, over sts 6–9 and 25–28
- [ ] All three baskets match within 0.25 in (0.6 cm)
- [ ] Dowels are level, 10.5 in (26.7 cm) apart
- [ ] All yarn ends are woven in securely
Troubleshooting
- Walls lean outward: Your tension is loose. Go down a hook size, or block the basket over a box.
- Base ridge doesn’t show: Make sure Rnd 2 is worked in BLO.
- Roof curls: Your decreases are tighter than your sc. Loosen them and block the roof flat.
- Roof leans to one side: You’ve missed a decrease. Check the counts against the table.
- Rim ruffles: You’ve worked extra rev sc. Keep strictly to 1 per st.
- Basket tilts on the hanger: Your ties are uneven. Retie them at matching wraps.
Care
Spot clean with mild soap and cool water, then reshape and air dry over a box. Don’t machine dry, because cotton can shrink and lose shape.
Final Notes
The measurement chain runs from start to finish:
– Gauge of 14 sc = 4 in (10.2 cm)
– 31-st base: 8.9 in (22.6 cm)
– 84-st walls: 24 in (61.0 cm) around and 4.8 in (12.2 cm) tall
– 33-st roof: 4.5 in (11.4 cm) tall
– 51-st rim and 51-st roof edging
– Finished basket: 9.5 in (24.1 cm) wide
– Baskets hung on dowels 10.5 in (26.7 cm) apart
If you check each link as you go, all three cottages will match and hang straight.
Happy crocheting!