

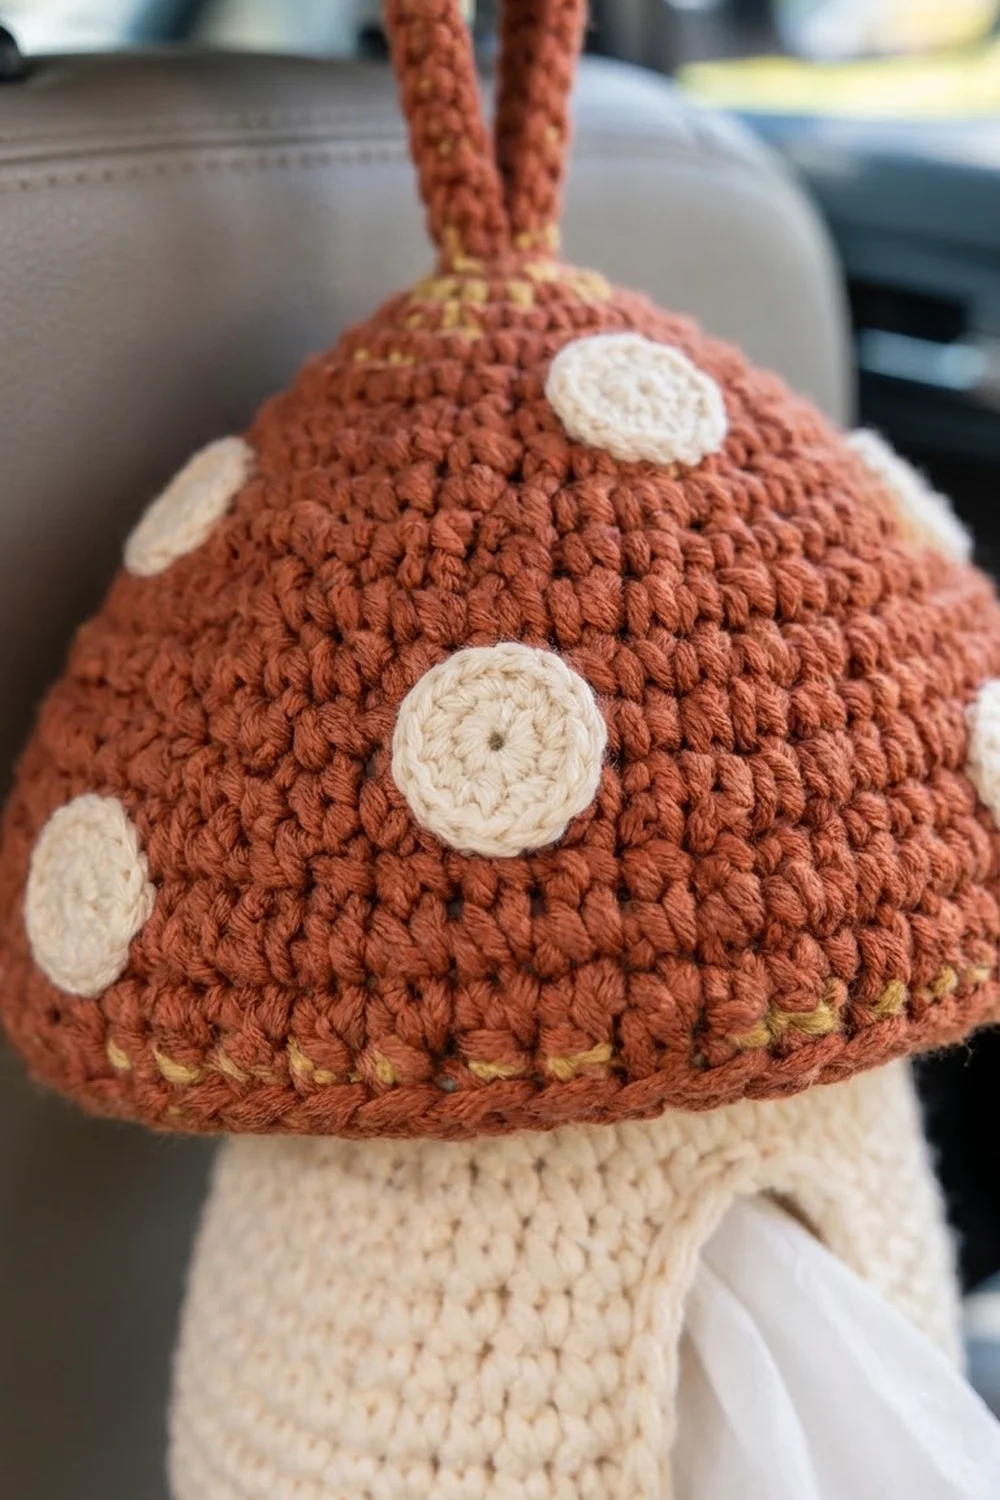
This little mushroom keeps tissues within reach in the car, by the bed or beside a desk. A cream stem holds the tissues and a rust cap with cream dots sits on top. A cord loop at the crown lets you hang it from a headrest hook, a doorknob or a peg.
The colors are warm and simple: creamy off-white for the stem and dots, and a rich rust for the cap and loop. A slightly heathered rust gives the faint golden flecks along the rim. Dense single crochet keeps the cottagecore shape sturdy.
The pattern uses US crochet terms. The finished holder is about 6.75 in (17.1 cm) across the cap and about 9.5 in (24.1 cm) tall without the loop. The loop adds about 3.5 in (8.9 cm).
You crochet the stem bottom up as a seamless pouch, working turned rows to form the front slot. The cap is worked top down as a dome, then folded under into an underside ring. That ring is sewn to the stem stitch for stitch. Then you add a cord loop and 12 dots.
Finished Size and Construction
- Finished size: about 6.75 in (17.1 cm) cap diameter; 9.5 in (24.1 cm) tall, plus a 3.5 in (8.9 cm) loop
- Skill level: Easy-Intermediate
- Terminology: US
- Yarn weight: Worsted (#4), cotton or cotton blend
- Hook: 4.0 mm (G-6)
- Number of pieces: 1 stem, 1 cap, 1 hanging cord, 12 dots (9 large, 3 small), assembled into one item
- Layout: cap sewn on top of the stem, loop at the cap center, dots scattered over the cap
- Stem size: 4.75 in (12.1 cm) wide at the widest point, 6.5 in (16.5 cm) tall
- Slot size before edging: 2 in (5.1 cm) wide x 3.5 in (8.9 cm) tall
- Edging depth: about 0.25 in (0.6 cm), leaving an opening of about 1.5 in x 3 in (3.8 cm x 7.6 cm)
Materials
Choose a smooth worsted-weight cotton or cotton blend. Cotton holds the dome and bulb shapes well and won’t stretch much under the weight of the tissues. Acrylic also works, but it makes a softer holder.
- Cream (stem and dots): 80 g, about 150 m
- Rust (cap and loop): 70 g, about 130 m
Both amounts include a margin of about 15% for your gauge swatch and for weaving in ends.
Tools:
- 4.0 mm (G-6) crochet hook
- 3.5 mm (E-4) hook for the dots (optional)
- Locking stitch markers
- Tapestry needle
- Scissors and measuring tape
- Optional: a 4.25 in (10.8 cm) circle of plastic canvas for the base
- Pins or clips
Abbreviations (US Terms)
- ch: chain
- sc: single crochet
- sl st: slip stitch
- inc: 2 sc in the same stitch
- sc2tog: single crochet 2 together (pull up a loop in each of the next 2 sts, yarn over, pull through all 3 loops)
- BLO: back loop only
- MR: magic ring
- st(s): stitch(es)
- rnd(s): round(s)
Special technique, invisible decrease (optional): insert the hook through the front loops only of the next 2 sts, yarn over and pull through both front loops, then yarn over and pull through 2. It counts as one sc2tog.
Work in continuous spirals unless told otherwise, and move your marker up each round.
Gauge and Checkpoints
Gauge: 16 sc and 18 rnds = 4 in (10.2 cm) in sc worked in the round with a 4.0 mm hook.
Test one piece first. Make Rnds 1–6 of the cap (36 sts). The flat circle should measure 2.75 to 3 in (7.0 to 7.6 cm) across. If it’s larger, go down a hook size. If it’s smaller, go up one. Tight is better than loose, because the pouch needs to be firm.
Checkpoints:
- Stem base after Rnd 10: 4.5 to 4.75 in (11.4 to 12.1 cm) across
- Stem after Rnd 14: circumference 15 in (38.1 cm)
- Slot after Row 30: 3.5 in (8.9 cm) tall, 2 in (5.1 cm) wide
- Stem after Rnd 37: neck circumference 10.5 in (26.7 cm), height 6.5 in (16.5 cm)
- Cap after Rnd 26: rim circumference 21 in (53.3 cm), diameter about 6.75 in (17.1 cm)
If any checkpoint is more than 0.5 in (1.3 cm) off, change hooks before you continue. The stem neck (42 sts) and the cap underside (42 sts) must match.
Stem (Cream)
Base
Rnd 1: MR, 6 sc in ring. (6)
Rnd 2: Inc in each st around. (12)
Rnd 3: (Sc 1, inc) 6 times. (18)
Rnd 4: (Sc 2, inc) 6 times. (24)
Rnd 5: (Sc 3, inc) 6 times. (30)
Rnd 6: (Sc 4, inc) 6 times. (36)
Rnd 7: (Sc 5, inc) 6 times. (42)
Rnd 8: (Sc 6, inc) 6 times. (48)
Rnd 9: (Sc 7, inc) 6 times. (54)
Rnd 10: (Sc 8, inc) 6 times. (60)
The base should measure 4.5 to 4.75 in (11.4 to 12.1 cm) across.
Lower Sides
Rnd 11 (turning round): Sc in BLO of each st around. Count: 60 sc worked 1 per existing st + 0 added = 60. This makes a crisp edge so the base sits flat.
Rnds 12–14: Sc in each st around. (60)
Flatten the piece so the last 8 sts of Rnd 14 sit centered on the front. If they don’t, work a few extra sc (not a full round) to shift your starting point. These 8 sts form the bottom of the slot.
Slot Section (turned rows)
Ch 1 at the start of each row does not count as a stitch.
Row 15: Sc in next 52 sts, leaving the last 8 sts of Rnd 14 unworked. Turn. (52)
Rows 16–18: Ch 1, sc in each st across. Turn. (52)
Row 19 (decrease): Ch 1, sc 4, (sc2tog, sc 6) 5 times, sc2tog, sc 6. Turn. (46)
Rows 20–23: Ch 1, sc in each st across. Turn. (46)
Row 24 (decrease): Ch 1, sc 3, (sc2tog, sc 5) 5 times, sc2tog, sc 6. Turn. (40)
Rows 25–30: Ch 1, sc in each st across. Turn after Rows 25–29 only. (40)
The slot is 16 rows tall, about 3.5 in (8.9 cm), and 8 sts wide, or 2 in (5.1 cm).
Neck
Rnd 31 (closing round): Ch 8 across the slot. Without twisting, sc in the first st of Row 30, then sc in the next 39 sts and in each of the 8 chains. Count: 40 sc in existing sts + 8 sc in chains = 48. Go back to working in spirals.
Rnds 32–34: Sc in each st around. (48)
Rnd 35: (Sc 6, sc2tog) 6 times. (42)
Rnds 36–37: Sc in each st around. (42)
Sl st in the next st and fasten off, leaving a 24 in (61.0 cm) tail. If you’re using the plastic canvas circle, drop it into the base now.
Cap (Rust)
Increase on every other round so the cap rises into a dome.
Rnd 1: MR, 6 sc in ring. (6)
Rnd 2: Inc in each st around. (12)
Rnd 3: (Sc 1, inc) 6 times. (18)
Rnd 4: (Sc 2, inc) 6 times. (24)
Rnd 5: (Sc 3, inc) 6 times. (30)
Rnd 6: (Sc 4, inc) 6 times. (36)
Rnd 7: Sc around. (36)
Rnd 8: (Sc 5, inc) 6 times. (42)
Rnd 9: Sc around. (42)
Rnd 10: (Sc 6, inc) 6 times. (48)
Rnd 11: Sc around. (48)
Rnd 12: (Sc 7, inc) 6 times. (54)
Rnd 13: Sc around. (54)
Rnd 14: (Sc 8, inc) 6 times. (60)
Rnd 15: Sc around. (60)
Rnd 16: (Sc 9, inc) 6 times. (66)
Rnd 17: Sc around. (66)
Rnd 18: (Sc 10, inc) 6 times. (72)
Rnds 19–20: Sc around. (72)
Rnd 21: (Sc 11, inc) 6 times. (78)
Rnd 22: Sc around. (78)
Rnd 23: (Sc 12, inc) 6 times. (84)
Rnds 24–26: Sc around. (84) These rounds form the rim that hangs down.
Underside Ring
Rnd 27 (fold round): Sc in BLO of each st around. Count: 84 sc worked 1 per existing st + 0 added = 84. The unworked front loops form the rounded rim edge.
Rnd 28: (Sc 5, sc2tog) 12 times. (72)
Rnd 29: (Sc 4, sc2tog) 12 times. (60)
Rnd 30: (Sc 3, sc2tog) 12 times. (48)
Rnd 31: (Sc 6, sc2tog) 6 times. (42)
Sl st in the next st and fasten off. The underside curls up into the dome, and that curl gives the cap its overhang.
Hanging Cord (Rust)
Ch 33.
Row 1: Sc in 2nd ch from hook and in each ch across. Turn. (32)
Rows 2–4: Ch 1, sc in each st across. Turn. (32)
Fasten off, leaving a 16 in (40.6 cm) tail. Fold the strip in half lengthwise and whipstitch the long edges together. You’ll have a firm cord about 8 in (20.3 cm) long and 0.5 in (1.3 cm) wide.
Dots (Cream)
Large dot (make 9):
Rnd 1: MR, 6 sc in ring. (6)
Rnd 2: Inc in each st around. (12)
Rnd 3: (Sc 1, inc) 6 times, sl st to first st. (18)
Fasten off, leaving a 10 in (25.4 cm) tail. Each dot is about 1.25 in (3.2 cm) across. The step between Rnds 2 and 3 shows as the faint inner ring.
Small dot (make 3): Work Rnds 1–2, then sl st to the first st. (12) Each dot is about 0.75 in (1.9 cm) across.
Assembly
- Cord: Fold the cord into a U. Push both ends about 0.25 in (0.6 cm) into the cap’s center ring and sew through all layers several times. The loop should stand about 3.5 in (8.9 cm) tall.
- Dots: Pin the 9 large dots in a loose ring around the middle and lower cap. Place the 3 small dots near the crown. Whipstitch around each edge.
- Cap to stem: Turn the cap upside down and set the stem neck (Rnd 37, 42 sts) against the underside ring (Rnd 31, 42 sts). Center the slot on the front. Use the stem tail to whipstitch 1 stem st to 1 cap st all the way around, 42 to 42, with no skipped or doubled stitches. Keep the tension snug but not tight enough to pucker.
Checkpoint: the holder should stand about 9.5 in (24.1 cm) tall without the loop.
Border: Slot Edging (Cream)
Border gauge: Work 1 sc per row end on the sides and 1 sc per stitch or chain on the top and bottom. Single crochet is nearly square (16 sts and 18 rows per 4 in / 10.2 cm), so 1 sc per row end lies flat.
Rnd 1: With the right side facing, join cream at the bottom right corner of the slot.
- Bottom: sc in each of the 8 unworked sts of Rnd 14. (8)
- Corner: 1 extra sc. (1)
- Left side: sc in each of the 16 row ends. (16)
- Corner: 1 extra sc. (1)
- Top: sc in the free loop of each of the 8 chains. (8)
- Corner: 1 extra sc. (1)
- Right side: sc in each of the 16 row ends. (16)
- Corner: 1 extra sc. (1)
Count: 48 sc worked 1 per st or row end (8 + 16 + 8 + 16) + 4 corner sc = 52.
Rnd 2: Sl st in each sc around. Count: 52 sl st worked 1 per existing st + 0 added = 52. Fasten off.
Why the math works: The top and bottom edges match exactly, 8 chains over 8 skipped stitches. Each side has exactly 16 row ends, from Rows 15–30. The 4 corner stitches add just enough ease for the corners to round off into an oval. The edging takes about 0.25 in (0.6 cm) from each edge, which leaves an opening of about 1.5 in x 3 in (3.8 cm x 7.6 cm).
The cap rim needs no border, because the BLO fold in Rnd 27 already forms its edge.
Final Blocking
- Spritz the whole holder until it is damp, not soaked.
- Pack the stem with a rolled towel to round out the bulb. Press the base flat.
- Fill the cap with a crumpled towel and smooth the dome. Ease the rim so it overhangs evenly.
- Shape the slot edging into a smooth oval.
- Let it dry upright for about 24 hours.
- Take out the padding. Feed tissues in through the slot and pull one partway out.
Final Quality-Control Checklist
- Base sits flat and measures 4.5 to 4.75 in (11.4 to 12.1 cm) across
- Slot is centered on the front, and its edging has 52 sts with no gaps at the corners
- Stem neck (42 sts) is sewn 1:1 to the cap underside (42 sts)
- Cap is about 6.75 in (17.1 cm) across with an even overhang
- Cord is sewn through all layers and feels secure
- All 12 dots lie flat with their edges sewn down
- All ends are woven in
- Height is about 9.5 in (24.1 cm) without the loop
Troubleshooting
Base cups or ripples: If it cups, your tension is too tight; if it ripples, it’s too loose. Redo the base with a hook 0.5 mm larger or smaller.
Slot looks crooked: Check the row counts (52, 46, 40) and make sure Row 15 left exactly 8 sts unworked.
Ridge where the rows meet the rounds: This is normal and softens with blocking.
Cap and stem counts don’t match: Recount both edges. If one is 1–2 sts over, sew 2 sts of it into 1 st of the other edge, spread evenly.
Cap feels floppy: Remake it with a smaller hook, or add one extra round of 84 sc before Rnd 27.
Loop stretches: Add a second line of whipstitch along the cord.
Care
Hand wash in cool water with mild soap. Roll it in a towel to press out the water, reshape it while damp and let it dry upright, away from heat.

Final Notes
Everything starts with gauge. At 16 sc to 4 in (10.2 cm), the 60-st base is about 4.75 in (12.1 cm) across. The slot is 8 sts by 16 rows, or 2 in x 3.5 in (5.1 cm x 8.9 cm). The 42-st neck has a 10.5 in (26.7 cm) circumference and matches the 42-st cap underside. The 84-st rim makes a 6.75 in (17.1 cm) cap, and the finished holder is about 9.5 in (24.1 cm) tall. Check each stage against these numbers and your mushroom will come out sturdy and true to size.
Happy crocheting!