

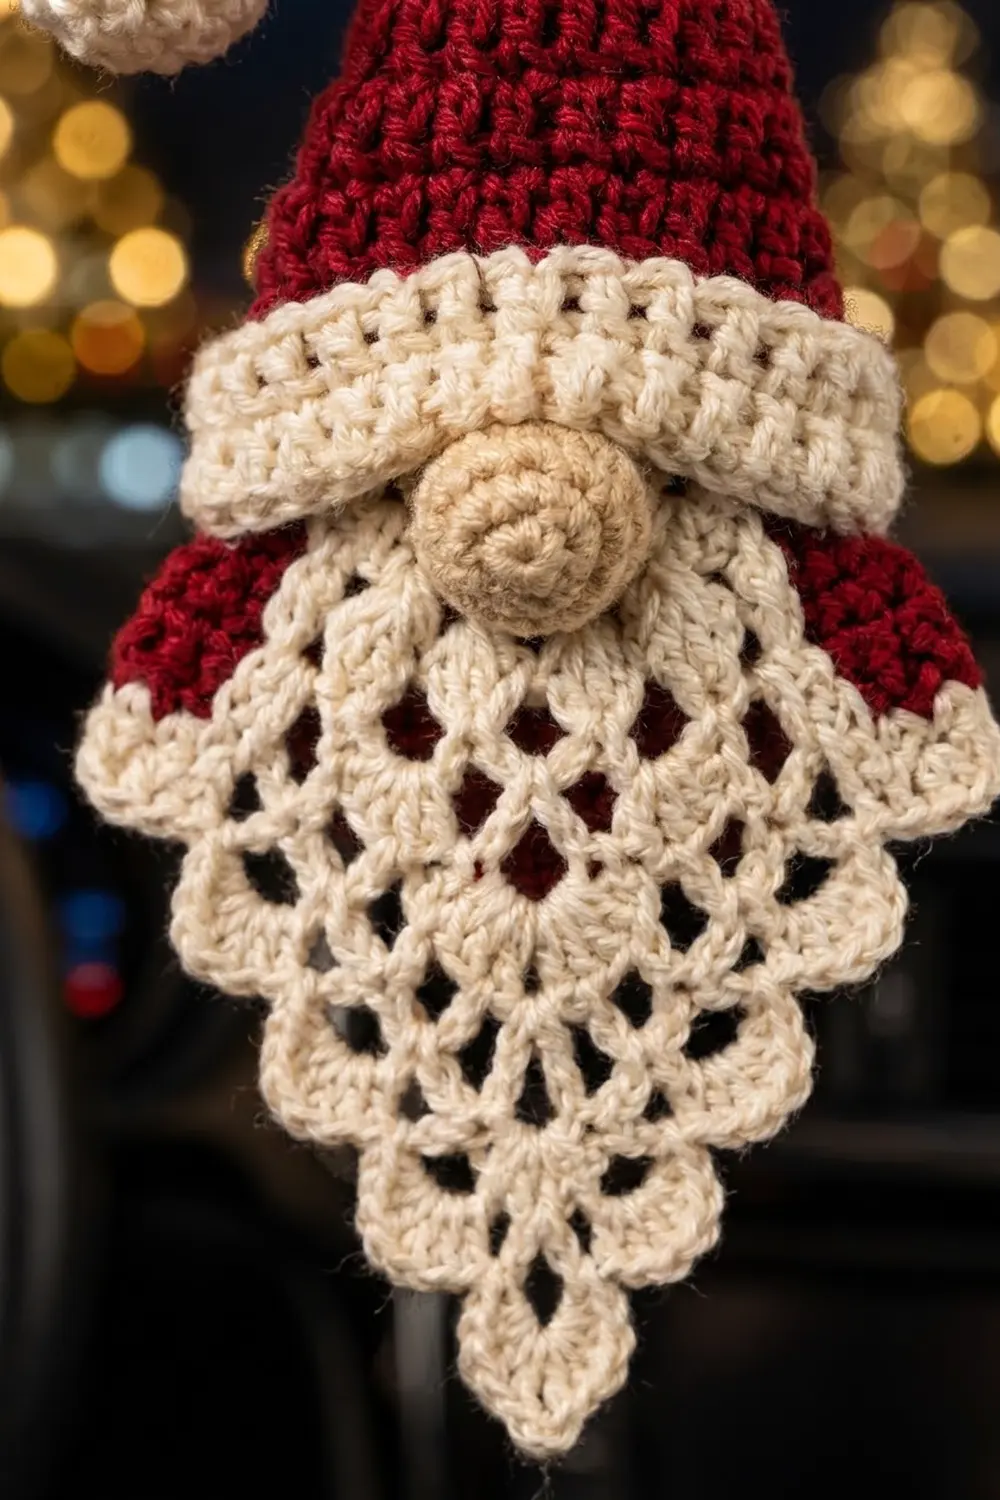
This little Santa gnome is made to hang from a rearview mirror or a tree branch. He has a tall red cone hat with a curled tip, a cream pompom, a ridged cream brim, a round tan nose, and a long lacy beard in cream shell stitch that ends in one neat point.
The colors are classic Christmas: deep red, warm cream, and soft tan. Small red shoulders peek out at each side under the brim, and the same red shows faintly through the top of the beard. A cream chain cord makes the hanging loop.
The pattern uses US crochet terms. The finished ornament measures about 3.4 in (8.6 cm) wide at the brim and about 6.25 in (15.9 cm) tall, not counting the cord.
You work the main piece in one go: first the hat, flat from the brim edge up to the curled tip, then the brim into the bottom of the hat, then the beard down from the brim in shell tiers. A red coat panel is sewn behind the beard, then you add the nose, pompom, and cord. A one-row picot edging finishes the beard.
Finished Size and Construction
- Finished size: about 3.4 in (8.6 cm) wide x 6.25 in (15.9 cm) tall, cord not included
- Skill level: Easy-intermediate
- Terminology: US crochet terms
- Yarn weight: Sport weight (#2 fine) cotton
- Hook: 2.5 mm (US B-1/C-2)
- Number of pieces: 1 ornament: one main piece (hat, brim, and beard) plus 4 small add-ons (coat panel, nose, pompom, cord)
- Layout: Single piece, hung vertically, with no joining
- Main piece size: 3.4 in (8.6 cm) wide at the brim
- Size before border: about 6.1 in (15.5 cm) tall
- Border depth: about 1/8 in (0.3 cm), one row of sc and picots around the beard only
Materials
Choose a smooth, tightly plied cotton. Mercerized cotton gives the beard crisp stitches and holds its shape after blocking. Avoid fuzzy yarn, because it blurs the shell tiers.
- Red: 6 g, about 19 m (hat, curled tip, coat panel)
- Cream: 8 g, about 25 m (brim, beard, border, pompom, cord)
- Tan: 1 g, about 3 m (nose)
These amounts include a small safety margin.
Tools:
- 2.5 mm (US B-1/C-2) crochet hook
- Tapestry needle
- A pinch of fiberfill
- 2 stitch markers
- Scissors
- Rustproof pins and a foam blocking mat
- Spray starch (optional)
Abbreviations (US Terms)
- ch: chain
- sl st: slip stitch
- sc: single crochet
- hdc: half double crochet
- dc: double crochet
- sc2tog / sc3tog: single crochet 2 / 3 together
- blo: back loop only
- MR: magic ring
- sp / lp: space / loop
- st(s): stitch(es)
- RS / WS: right side / wrong side
- rep: repeat
Special stitches:
- Shell: (2 dc, ch 2, 2 dc) in the same space. When a shell starts a row, work ch 3 (counts as dc), then (dc, ch 2, 2 dc) in the same space.
- Picot: ch 3, then sl st in the top of the sc you just made.
Gauge and Checkpoints
Gauge: 26 sc and 28 rows = 4 in (10.2 cm). In the beard, 3 dc rows = about 1 in (2.5 cm).
Use the hat as your test piece. Work hat Rows 1-7 and measure:
- Checkpoint 1: Row 1 (17 sc) measures 2.6 in (6.6 cm) wide.
- Checkpoint 2: Rows 1-7 measure 1 in (2.5 cm) tall.
If the hat base is wider than 2.6 in (6.6 cm), switch to a 2.25 mm hook. If it’s narrower, switch to a 2.75 mm hook. Make the change now, because every later width depends on this one.
Later checkpoints:
- Checkpoint 3: Hat Rows 1-16 measure 2.3 in (5.8 cm) tall.
- Checkpoint 4: The brim is 3.4 in (8.6 cm) wide and 0.6 in (1.5 cm) deep.
- Checkpoint 5: The beard is about 2.9 in (7.4 cm) from the brim to the point.
- Checkpoint 6: The whole ornament is about 6.1 in (15.5 cm) tall before the border.
Part 1: Hat (Red)
Work the hat flat in rows, from the bottom edge up. Decreases at both ends shape the cone.
Foundation: With red, ch 18.
Row 1 (RS): Sc in 2nd ch from hook and in each ch across, turn. (17 sc)
Row 2: Ch 1, sc in each st across, turn. (17 sc)
Row 3 (decrease row): Ch 1, sc2tog, sc in each st to last 2 sts, sc2tog, turn. (15 sc)
Row 4: Ch 1, sc in each st across, turn. (15 sc)
Rows 5-16: Rep Rows 3-4 six more times. Counts after each decrease row: Row 5 (13 sc), Row 7 (11 sc), Row 9 (9 sc), Row 11 (7 sc), Row 13 (5 sc), Row 15 (3 sc). Each even row keeps the count of the row before it, so Row 16 ends with 3 sc.
Check: the hat is a neat triangle, 2.6 in (6.6 cm) at the base and 2.3 in (5.8 cm) tall.
Curled Tip
The tip curls to the left because the right edge is always worked in hdc and the left edge in sl st. The longer edge becomes the outside of the curve.
Row 17 (RS): Ch 2 (does not count), hdc in first st, sc in next st, sl st in last st, turn. (3 sts)
Row 18 (WS): Ch 1, sl st in first st, sc in next st, hdc in last st, turn. (3 sts)
Rows 19-22: Rep Rows 17-18 two more times. (3 sts each row)
Row 23: Ch 1, sc3tog. (1 st) Fasten off and weave in the end.
The tip strip is about 0.9 in (2.3 cm) long and bends to the left.
Part 2: Brim (Cream)
Turn the hat upside down with the RS facing you. You’ll work into the unused loops on the other side of the foundation chain.
Row 1 (RS, conversion row): Join cream in the first ch. Ch 1, 2 sc in first ch, [sc in next 3 ch, 2 sc in next ch] 4 times, turn. (17 sts worked 1 per ch + 5 extra = 22 sc)
Row 2 (WS): Ch 1, sc blo in each st across, turn. (22 sc)
Rows 3-4: Rep Row 2. (22 sc) Don’t fasten off.
The blo rows make the ridges on the brim. Check: the brim is 3.4 in (8.6 cm) wide and 0.6 in (1.5 cm) deep, and it sticks out about 0.4 in (1.0 cm) past each side of the hat base.
Part 3: Beard (Cream)
The beard continues from the last brim row. A reducing row (R) puts shells in the sc between the shells below, so you lose one shell. A keeping row (K) stacks shells on shells. Each R row skips the outer half of the edge shells, which creates the stepped, scalloped sides.
Row 1 (RS): Ch 1, sc in first st, [ch 3, sk 2 sts, sc in next st] 7 times, turn. (8 sc and 7 ch-3 lps; 1 + 7 x 3 = 22 brim sts used)
Row 2: Sl st in first ch-3 lp, ch 3 (counts as dc), (dc, ch 2, 2 dc) in same lp, [ch 1, sc in next lp, ch 1, shell in next lp] 3 times, turn. (4 shells, 3 sc)
Row 3 (R): Sl st in first 2 dc and in ch-2 sp of first shell, ch 1, sc in same sp, [ch 2, shell in next sc, ch 2, sc in ch-2 sp of next shell] 3 times, turn. (3 shells, 4 sc)
Row 4 (K): Sl st in next ch-2 sp, then sl st in first 2 dc of next shell and in its ch-2 sp, ch 3 (counts as dc), (dc, ch 2, 2 dc) in same sp, [ch 1, sc in next sc, ch 1, shell in ch-2 sp of next shell] 2 times, turn. Leave the end sc unworked. (3 shells, 2 sc)
Row 5 (R): Sl st in first 2 dc and in ch-2 sp of first shell, ch 1, sc in same sp, [ch 2, shell in next sc, ch 2, sc in ch-2 sp of next shell] 2 times, turn. (2 shells, 3 sc)
Row 6 (K): Sl st in next ch-2 sp, then sl st in first 2 dc of next shell and in its ch-2 sp, ch 3 (counts as dc), (dc, ch 2, 2 dc) in same sp, ch 1, sc in next sc, ch 1, shell in ch-2 sp of next shell, turn. (2 shells, 1 sc)
Row 7 (R): Sl st in first 2 dc and in ch-2 sp of first shell, ch 1, sc in same sp, ch 2, shell in next sc, ch 2, sc in ch-2 sp of next shell, turn. (1 shell, 2 sc)
Row 8 (K): Sl st in next ch-2 sp, then sl st in first 2 dc of shell and in its ch-2 sp, ch 3 (counts as dc), (dc, ch 2, 2 dc) in same sp, turn. (1 shell)
Row 9 (tip fan, RS): Sl st in first 2 dc and in ch-2 sp, ch 3 (counts as dc), 6 dc in same sp. (7 dc) Fasten off.
The shell counts run 4, 3, 3, 2, 2, 1, 1, then the 7-dc fan. Each side shows 4 tiers, made by the edge shells of Rows 2, 4, 6, and 8. Check: the beard is about 2.9 in (7.4 cm) long.
Part 4: Coat Panel (Red)
This small trapezoid sits behind the top of the beard. It forms the red shoulders and shows through the upper beard.
Foundation: With red, ch 25.
Row 1: Sc in 2nd ch from hook and in each ch across, turn. (24 sc)
Rows 2-8: Ch 1, sc2tog, sc in each st to last 2 sts, sc2tog, turn. Counts: Row 2 (22), Row 3 (20), Row 4 (18), Row 5 (16), Row 6 (14), Row 7 (12), Row 8 (10).
Fasten off, leaving a 12 in (30.5 cm) tail. The panel is 3.7 in (9.4 cm) across the top, 1.5 in (3.8 cm) across the bottom, and 1.1 in (2.8 cm) tall.
Part 5: Nose, Pompom, and Cord
Nose (tan): Work in continuous rounds and mark the first stitch of each round.
- Rnd 1: 6 sc in MR. (6)
- Rnd 2: 2 sc in each st. (12)
- Rnd 3: Sc in each st. (12)
- Rnd 4: Sc2tog 6 times. (6)
Add a pinch of fiberfill. Fasten off with a 6 in (15.2 cm) tail and pull the hole closed. The nose is about 0.6 in (1.5 cm) across.
Pompom (cream):
- Rnd 1: 6 sc in MR. (6)
- Rnd 2: 2 sc in each st. (12)
- Rnds 3-4: Sc in each st. (12)
- Rnd 5: Sc2tog 6 times. (6)
Stuff it firmly, fasten off with a 6 in (15.2 cm) tail, and pull the hole closed. The pompom is about 0.7 in (1.8 cm) across.
Cord (cream): Ch 60. Sl st in the back bump of 2nd ch from hook and in each ch across. (59 sl sts) The cord is about 8.5 in (21.6 cm) long.
Part 6: Assembly
- Coat panel: Lay the main piece RS down. Place the panel on top, also RS down, with its top edge just under Beard Row 1. Center it so 1 st sticks out past the brim at each side. Whipstitch the panel’s top edge to the back of Beard Row 1, then tack its sides to the backs of the Row 3 shells.
- Nose: Turn the piece RS up. Sew the nose centered on the lower edge of the brim, half on Brim Row 4 and half on Beard Row 1.
- Pompom: Sew the pompom to the end of the curled tip. Tack the tip to the left edge of the hat at about Row 10.
- Cord: Fold the cord into a loop about 4.25 in (10.8 cm) long. Sew both ends to the WS of the hat, centered over Rows 13-16.
Weave in all ends on the WS.
Border (Beard Edging, Cream)
Border gauge: 6.5 sc per 1 in (2.5 cm) along the beard edge.
The border goes around the beard only, from one brim corner down to the point and back up to the other corner. Keep the RS facing you.
First side: Join cream with a sc in the end of Beard Row 1 at the brim corner. *Work 3 sc evenly down the outer dc posts of the edge shell, make a picot at the shell’s outer point, then work 1 sc in the ch-2 sp where the edge steps in; rep from * for all 4 tiers. (1 + 4 x 4 = 17 sc, 4 picots)
Tip: Across the 7 dc of the tip fan: sc in first 3 dc, (sc, picot, sc) in 4th dc, sc in last 3 dc. (8 sc, 1 picot)
Second side: *Work 1 sc in the ch-2 sp where the edge steps out, make a picot at the next shell’s outer point, then work 3 sc evenly up its outer dc posts; rep from * for all 4 tiers, then work 1 sc in the end of Beard Row 1. (4 x 4 + 1 = 17 sc, 4 picots)
Sl st to the edge of Brim Row 4 and fasten off. Border total: 17 + 8 + 17 = 42 sc and 9 picots.
Why the math works: Each tier covers 2 dc rows, about 0.67 in (1.7 cm) of edge. Four sc at 6.5 sc per inch cover about 0.6 in (1.5 cm), and the picot adds the extra slack the point needs. That way the edge lies flat without ruffling or pulling in. The border adds about 1/8 in (0.3 cm) at the point, so the height goes from about 6.1 in (15.5 cm) to about 6.25 in (15.9 cm).
Final Blocking
- Mist the ornament with water until it’s damp, not soaked.
- Lay it RS up on the mat and pin the brim corners 3.4 in (8.6 cm) apart.
- Pin the beard point so the total height is 6.25 in (15.9 cm).
- Pin out each picot and each tier point so the sides step evenly.
- Open each shell with a pin so the ch-2 spaces show.
- Don’t flatten the nose, pompom, or curled tip.
- If you want a crisp beard for car-mirror use, spray it lightly with starch.
- Let it dry completely before unpinning.
Final Quality-Control Checklist
- The hat base has 17 sts, and the hat narrows to 3 sts before the curl.
- The tip curls left, and the pompom hangs at the left.
- The brim has 22 sts and 4 ridged rows.
- The beard shell counts run 4, 3, 3, 2, 2, 1, 1, then a 7-dc fan.
- Each beard side shows 4 even tiers, each with a picot.
- The red shoulders show equally at both sides.
- The nose is centered and the cord is sewn firmly.
- The ornament measures about 3.4 in (8.6 cm) x 6.25 in (15.9 cm).
Troubleshooting
The hat leans to one side: Make sure each decrease row has a sc2tog at both ends.
The tip won’t curl: Keep the hdc on the same physical edge in every row. Then tack the tip in place.
The brim ruffles: Recount brim Row 1. It should have exactly 22 sts.
The sides are uneven: Each R row must start in the center of the first shell and end in the center of the last shell.
The border cups: Work 2 sc instead of 3 down each shell edge.
The border ruffles: Leave out the side picots and keep only the tip picot.
Care
Hand wash in cool water with mild soap, roll it in a towel to press out the water, and dry it flat with the beard pinned to shape. Keep it out of long, strong sun, because red cotton can fade.

Final Notes
Every measurement follows from one gauge:
- The 17-sc hat base is 2.6 in (6.6 cm).
- The 16 hat rows are 2.3 in (5.8 cm).
- The 22-st brim is 3.4 in (8.6 cm) wide and 0.6 in (1.5 cm) deep.
- The 9-row beard is 2.9 in (7.4 cm).
- The ornament is about 6.1 in (15.5 cm) before the border and about 6.25 in (15.9 cm) finished.
If the hat base measures right, the rest of the ornament will follow.
Happy crocheting!