

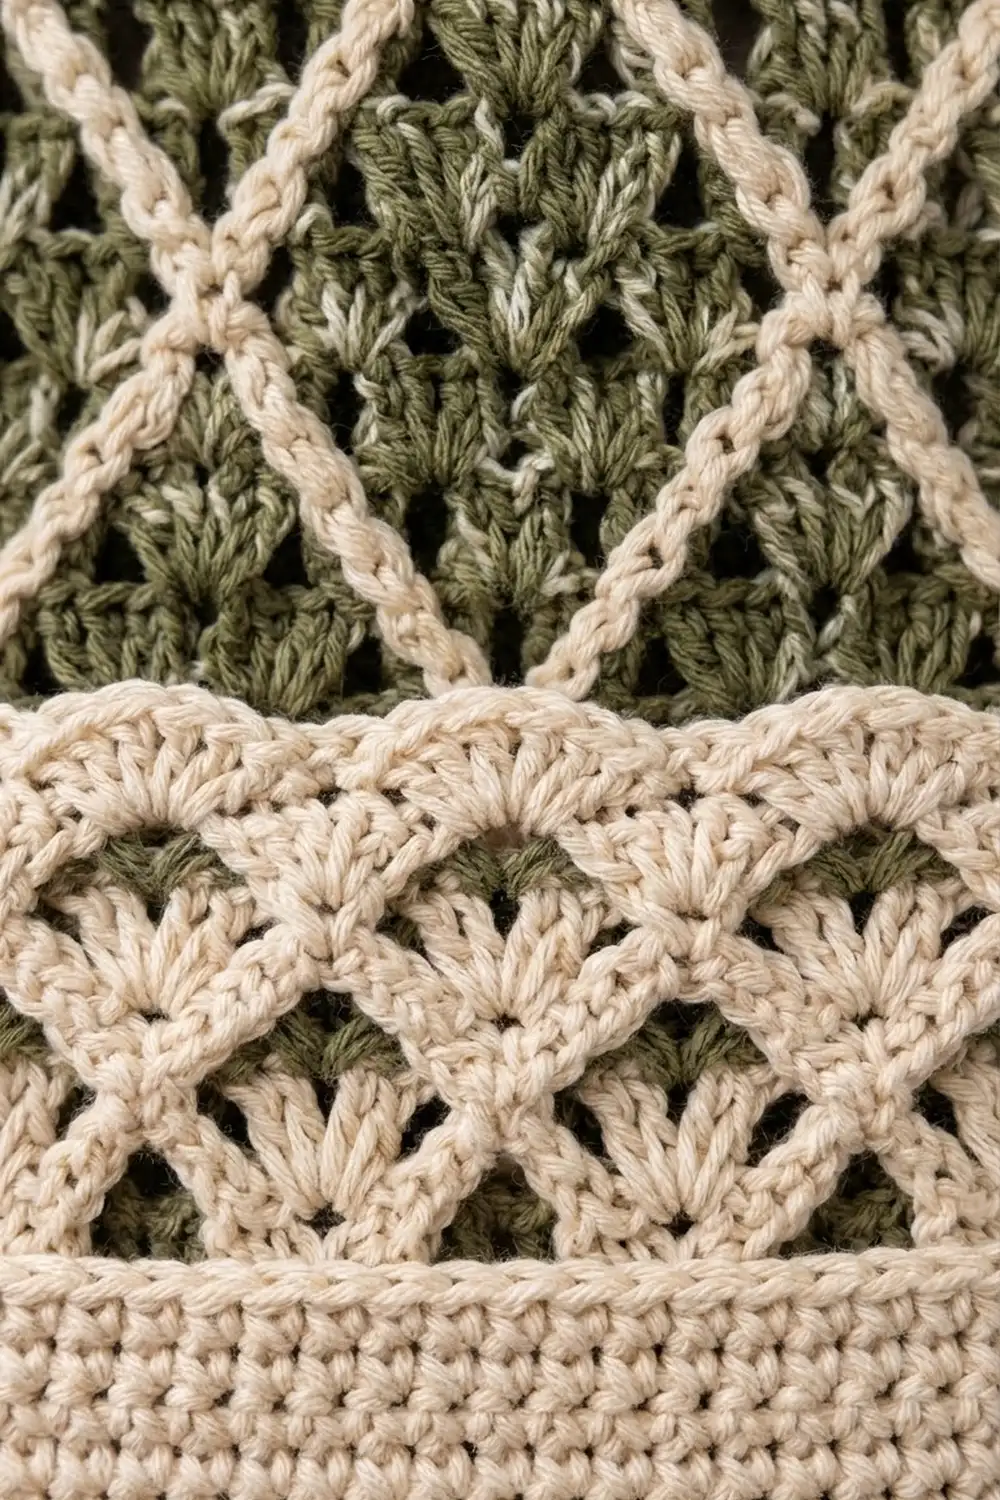
This seat-back organizer pairs soft olive green with warm cream for a calm, natural look that suits any car interior. The back panel is a staggered shell lace topped with a raised cream diamond lattice. A deep cream pocket with a scalloped fan edge holds a phone, pens, sunglasses and other small items.
The style is farmhouse-meets-macramé: the fabric has plenty of texture, but it is sturdy enough for daily use. The pattern is written in US crochet terms throughout.
The finished organizer measures 14.25 in (36.2 cm) wide by 18.75 in (47.6 cm) tall, not counting the straps. The strap loops add about 3.5 in (8.9 cm) above the top edge.
You will make the panel from the top down, finish it with a stepped point, add the lattice with surface slip stitch and then work a two-round border. Next you crochet the pocket bottom-up, make two straps and sew everything together.
Finished Size and Construction
- Finished size: 14.25 in x 18.75 in (36.2 cm x 47.6 cm), plus strap loops
- Skill level: Intermediate
- Terminology: US
- Yarn weight: Worsted (#4)
- Hook: 5.0 mm (H-8)
- Number of pieces: 4 (1 back panel, 1 pocket, 2 straps)
- Layout: pocket centered on the lower panel; straps at the top edge
- Panel before border: 13.25 in x 17.75 in (33.7 cm x 45.1 cm)
- Pocket: 12.25 in x 5.75 in (31.1 cm x 14.6 cm)
- Strap: 1.5 in x 10 in (3.8 cm x 25.4 cm)
- Border depth: 0.5 in (1.3 cm)
Materials
Choose a worsted cotton or cotton blend. Cotton holds its shape under the weight of a phone and does not stretch out over time. The amounts below assume about 180 m per 100 g.
- Olive green: 150 g (270 m), for the panel, border and straps
- Cream: 80 g (144 m), for the pocket, the lattice lines and sewing
These quantities include a safety margin of about 20 percent.
Tools:
– 5.0 mm (H-8) crochet hook
– Tapestry needle
– Stitch markers
– Smooth contrasting thread for basting the lattice guide lines
– Ruler or tape measure
– Rust-proof pins and a blocking mat
– Spray bottle
Abbreviations (US Terms)
- ch chain
- sc single crochet
- dc double crochet
- sl st slip stitch
- st(s) stitch(es)
- sp space
- tch turning chain
- RS / WS right side / wrong side
Special stitches:
– Shell: 3 dc in the same st or sp.
– Half shell: 2 dc in the same st.
– Fan: 5 dc in the same st (used on the pocket only).
– Surface slip stitch: Hold the yarn under the fabric (on the WS) and insert the hook from the RS through the fabric. Pull up a loop and draw it through the loop on your hook.
Gauge and Checkpoints
- Shell Pattern: 4 shells = 4 in (10.2 cm) wide, and 8 shell rows = 4 in (10.2 cm) tall.
- Single crochet: 16 sc and 16 rows = 4 in (10.2 cm).
Test first: Ch 22 and work Row 1 (21 sc). Then work 8 shell rows, using 5 shells on the even rows and 4 shells plus half shells on the odd rows. The swatch should measure 5.25 in (13.3 cm) wide by 4.25 in (10.8 cm) tall.
Checkpoints:
– Panel Row 1: 13.25 in (33.7 cm) wide
– Panel after Row 10: 4.75 in (12.1 cm) tall
– Panel after Row 30: 14.75 in (37.5 cm) tall
– Panel after the point: 17.75 in (45.1 cm) tall
– Pocket after Row 12: 12.25 in x 3 in (31.1 cm x 7.6 cm)
If your gauge is off: If the swatch is too big, go down half a hook size. If it is too small, go up half a size. A 0.25 in (0.6 cm) error across the swatch grows to about 0.6 in (1.6 cm) across the panel.
Back Panel (Olive)
The panel is worked from the top edge down.
Ch 54.
Row 1 (RS): Sc in the 2nd ch from the hook and in each ch across, turn. (53 sc)
Row 2: Ch 3 (counts as dc). Skip the next sc. [Shell in next sc, skip next 3 sc] 12 times. Shell in next sc, skip next sc, dc in last sc, turn. (13 shells + 2 edge dc = 41 dc)
Row 3: Ch 3 (counts as dc), dc in the first dc (half shell). Shell in each sp between shells across (12 sps). Work 2 dc in the top of the tch, turn. (12 shells + 2 half shells = 40 dc)
Row 4: Ch 3 (counts as dc). Shell in the sp between the half shell and the first shell. [Shell in next sp between shells] 11 times. Shell in the sp before the last half shell, then dc in the top of the tch, turn. (13 shells + 2 edge dc = 41 dc)
Rows 5–30: Repeat Rows 3 and 4 thirteen more times, ending after an even row.
Checkpoint: Row 30 has 41 dc, and the panel is 13.25 in x 14.75 in (33.7 cm x 37.5 cm).
Point
Each point row slips across the outer shells so that the edge steps inward.
Row 31: Turn. Sl st in the first 4 dc, then sl st in the sp between shells 1 and 2. Ch 3 (counts as dc) and work 2 dc in the same sp. [Shell in next sp between shells] 11 times. Leave the last shell and the edge dc unworked, turn. (12 shells, 36 dc)
Row 32: Sl st in the next 3 dc and the next sp, then in the next 3 dc and the next sp. Ch 3 and work 2 dc in the same sp. [Shell in next sp] 8 times, turn. (9 shells, 27 dc)
Row 33: Sl st in the next 3 dc and the next sp. Ch 3 and work 2 dc in the same sp. [Shell in next sp] 7 times, turn. (8 shells, 24 dc)
Row 34: Work as Row 32, but repeat the bracket 4 times. (5 shells, 15 dc)
Row 35: Work as Row 33, but repeat the bracket 3 times. (4 shells, 12 dc)
Row 36: Sl st across 1 shell, the next sp, the next shell and the next sp. Ch 3 and work 2 dc in the same sp. (1 shell, 3 dc) Fasten off.
The panel is now 17.75 in (45.1 cm) tall.
Block the panel flat to 13.25 in x 17.75 in (33.7 cm x 45.1 cm) and let it dry before adding the lattice.
Cream Lattice
Number the 13 shell columns 1 to 13, from left to right. Measure depth down from the top edge of Row 1. Mark these dots with pins:
- Columns 1, 4, 7, 10 and 13: at depths 0, 6 and 12 in (0, 15.2 and 30.5 cm)
- Gaps between columns 2–3, 5–6, 8–9 and 11–12: at depths 3, 9 and 15 in (7.6, 22.9 and 38.1 cm)
Baste straight diagonal lines with contrasting thread to join each dot to its nearest diagonal neighbors. Each step moves 1.5 in (3.8 cm) sideways for every 3 in (7.6 cm) down, which makes tall diamonds. Run the lines to the panel edges. The two center lines meet at the tip.
With cream, work surface slip stitch along each basted line, spacing the stitches about 0.25 in (0.6 cm) apart. That works out to about 13 sl sts per dot-to-dot segment. Push the hook through the gaps between dc wherever you can.
Keep the loops relaxed: the lines should lie flat without pulling the lace. Leave the yarn tails on the WS at the edges, and remove the basting thread.
Pocket (Cream)
The pocket is worked bottom-up. Increases in the first rows round off the bottom corners.
Ch 42.
Row 1 (RS): Sc in the 2nd ch from the hook and in each ch across, turn. (41 sc)
Row 2: Ch 1, 2 sc in the first st, sc across to the last st, 2 sc in the last st, turn. (43 sc)
Row 3: Repeat Row 2. (45 sc)
Row 4: Repeat Row 2. (47 sc)
Row 5: Repeat Row 2. (49 sc)
Rows 6–12: Ch 1, sc in each st across, turn. (49 sc)
Checkpoint: the pocket is 12.25 in x 3 in (31.1 cm x 7.6 cm).
Skip all ch-2 sps in the rows that follow.
Row 13: Ch 1, sc in the first st. [Skip 2 sts, fan in next st, skip 2 sts, sc in next st] 8 times, turn. (8 fans + 9 sc = 49 sts)
Row 14: Ch 5 (counts as dc and ch 2), sc in the center dc of the first fan. [Ch 2, dc in next sc, ch 2, sc in center dc of next fan] 7 times. Ch 2, dc in the last sc, turn. (9 dc, 8 sc, 16 ch-2 sps)
Row 15: Ch 3 (counts as dc), 2 dc in the first dc. [Sc in next sc, fan in next dc] 7 times. Sc in the next sc, then work 3 dc in the 3rd ch of the tch, turn. (7 fans + 2 three-dc half fans + 8 sc = 49 sts)
Row 16: Ch 1, sc in the first dc. [Ch 2, dc in next sc, ch 2, sc in center dc of next fan] 7 times. Ch 2, dc in the next sc, ch 2, sc in the top of the tch, turn. (9 sc, 8 dc, 16 ch-2 sps)
Row 17: Ch 1, sc in the first sc. [Fan in next dc, sc in next sc] 8 times, turn. (8 fans + 9 sc = 49 sts)
Row 18 (scallop finish): Ch 1, sc in the first sc. [Sc in next 2 dc, 3 sc in center dc, sc in next 2 dc, sc in next sc] 8 times. (49 sts worked + 16 extra = 65 sc) Fasten off.
The finished pocket measures 12.25 in x 5.75 in (31.1 cm x 14.6 cm), and the lace section is about 2.5 in (6.4 cm) deep.
Straps (Make 2, Olive)
Ch 7.
Row 1: Sc in the 2nd ch from the hook and in each ch across, turn. (6 sc)
Rows 2–40: Ch 1, sc in each st, turn. (6 sc)
Fasten off, leaving a 12 in (30.5 cm) tail for sewing. Each strap is 1.5 in x 10 in (3.8 cm x 25.4 cm).
Make All Pieces
- Olive: 1 back panel and 2 straps
- Cream: 1 pocket, plus the lattice lines on the panel
Layout:
        [Strap]              [Strap]
   +-----------------------------------+
   |      Back panel, cream lattice    |
   |                                   |
   |  +-----------------------------+  |
   |  |   Pocket: fan lace (top)    |  |
   |  |   Pocket: solid sc (bottom) |  |
   |  +-----------------------------+  |
    \                                 /
          \                     /
                 \       /
                    tip
Joining
Do the joining after the border is finished (see the next section).
Pocket: Pin the pocket to the RS of the panel. Center it so there is 0.5 in (1.3 cm) of panel on each side, inside the border. Line the pocket’s bottom edge up with Row 30 of the panel, just above where the point begins. The pocket top will then sit 9 in (22.9 cm) below the top of Row 1.
Whipstitch the sides and bottom with cream, through both the pocket and the panel:
- 1 stitch in each sc row end
- 2 stitches in each dc row end
- 1 stitch in each Row 1 st, easing around the curved corners
Leave the top open. Keep the stitches snug but not tight. If the panel puckers, the stitches are too tight.
Straps: Center each strap so its outer edge is 2.5 in (6.4 cm) in from the side of the panel. The straps’ centers will then be 7.75 in (19.7 cm) apart, which suits most headrest posts.
Overlap each strap end 1.5 in (3.8 cm) onto the WS of the panel top and sew it firmly. Fold the strap into a loop and sew the second end directly behind the first.
Size check: The panel should still lie flat at 14.25 in x 18.75 in (36.2 cm x 47.6 cm).
Border (Olive)
Border gauge: about 4 sc per inch (2.54 cm) along every edge.
Round 1: With the RS facing, join olive in the first foundation ch at the top right corner. Work the edges in this order:
- Top corner: 3 sc in the corner.
- Top edge: 51 sc across the foundation ch, 1 in each ch.
- Next top corner: 3 sc in the corner.
- Side: 58 sc down the side, 2 per dc row end for Rows 2–30.
- Diagonal: 28 sc along the stepped edge. Work 4 sc along Row 31, then 6, 3, 6, 3 and 6 sc along Rows 32 to 36. Fill each step so the sc follow a smooth line.
- Tip: 3 sc in the center dc of the tip shell.
- Other diagonal: 28 sc, worked in reverse order.
- Other side: 58 sc up the side.
Sl st to the first sc. (51 + 6 + 116 + 56 + 3 = 232 sc)
Round 2: Ch 1. Sc in each sc around, working 3 sc in the center sc of each 3-sc corner (2 top corners and the tip). Sl st to the first sc. (232 sts worked + 6 extra = 238 sc) Fasten off and weave in all ends under the border.
Why the math works:
– The top edge has 53 foundation sts over 13.25 in (33.7 cm), which is exactly 4 per inch.
– Each dc row is 0.5 in (1.3 cm) tall, so 2 sc per row end also gives 4 per inch.
– Each diagonal is about 7.3 in (18.5 cm) long, so 28 sc gives about 3.9 per inch. That lies flat without cupping.
– The two rounds add 0.5 in (1.3 cm) on every side.
Final Blocking
- Mist the whole organizer until it is damp but not soaked.
- Pin it face up to 14.25 in x 18.75 in (36.2 cm x 47.6 cm).
- Pin the point so both diagonals are straight and the tip sits on the center line.
- Open the pocket fans so each one forms a neat scallop.
- Lay the lattice lines straight with your fingers.
- Let it dry fully, at least 12 hours, before unpinning.
Final Quality-Control Checklist
- Panel: Row 30 has 41 dc, and the point ends in 1 shell.
- Border: 232 sc in Round 1 and 238 sc in Round 2.
- Lattice: the diamonds are even, and the lines meet at the tip.
- Pocket: 49 sts per row, with 8 fans in Row 17 and 65 sc in Row 18.
- Pocket is centered with 0.5 in (1.3 cm) of panel on each side.
- Straps are sewn through all layers and placed evenly.
- Final size is 14.25 in x 18.75 in (36.2 cm x 47.6 cm).
Troubleshooting
- Panel is too wide: Your shells are loose. Go down a hook size, or skip the sp exactly as written.
- Point is lopsided: Count the slipped sts on both ends of every point row so that each side skips the same number of sps.
- Lattice puckers: The surface slip stitches are too tight. Redo them with a hook one size larger.
- Border ruffles on the diagonals: Work 26 sc per diagonal instead of 28, and adjust the stitch total.
- Pocket gapes: Sew the side seams 0.25 in (0.6 cm) higher, or block the pocket again while pinned snugly in place.
Care
Hand wash in cool water with mild soap and press out the water in a towel. Dry it flat and reshape the point while it is damp.

Final Notes
Here is the measurement chain to check as you work:
- Gauge: 4 shells per 4 in (10.2 cm)
- Panel: 13.25 in (33.7 cm) wide, 14.75 in (37.5 cm) tall at Row 30 and 17.75 in (45.1 cm) after the point
- Border: 0.5 in (1.3 cm) added on every side, for 14.25 in x 18.75 in (36.2 cm x 47.6 cm)
- Pocket: 12.25 in x 5.75 in (31.1 cm x 14.6 cm)
- Straps: 10 in (25.4 cm) long
If each checkpoint matches, the finished organizer will hang straight and hold everything securely.
Happy crocheting!