

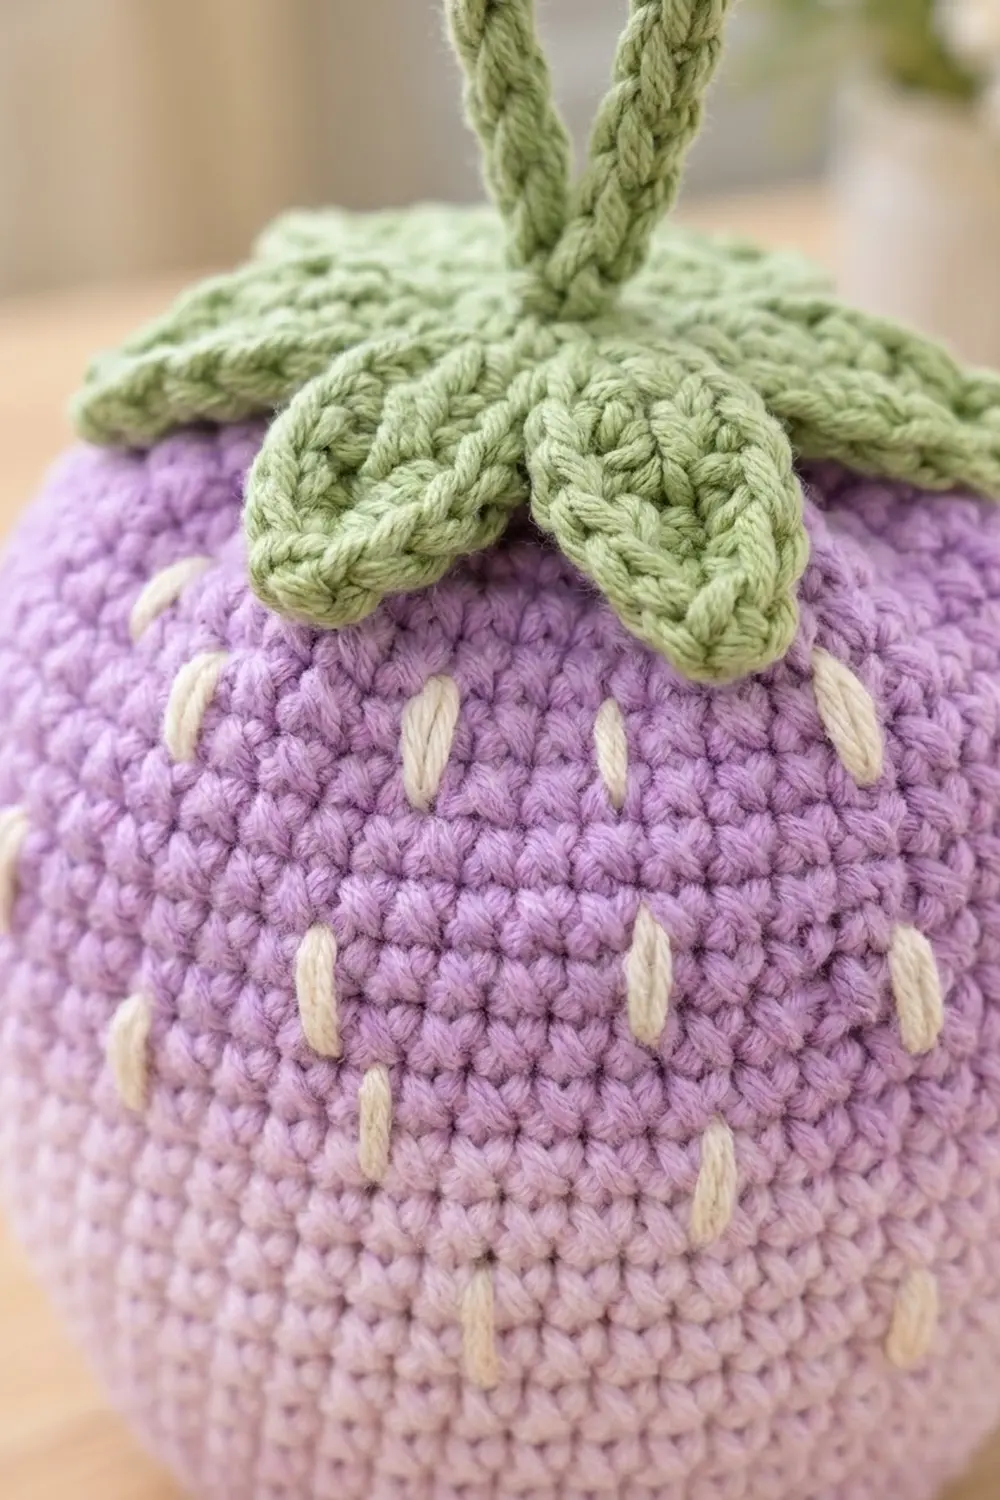
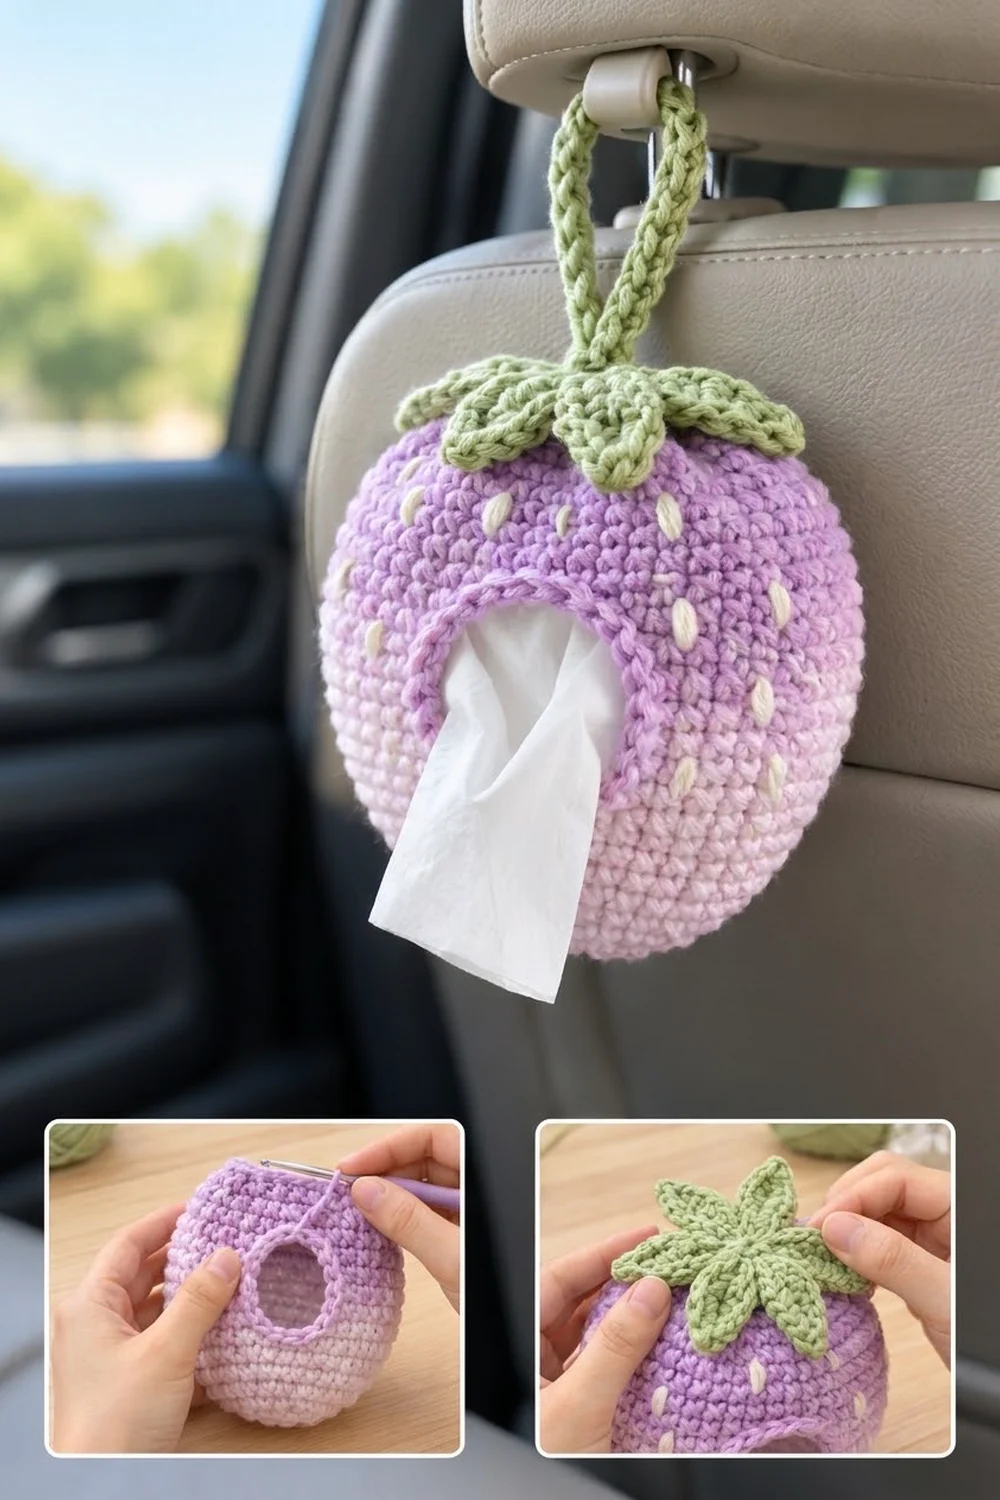
This little berry hangs from your car headrest and keeps a pack of tissues within reach. The body is a plump strawberry shape that shades from pale lilac at the base to soft lavender at the top. Cream embroidered seeds, a green leaf calyx and a sturdy green hanging loop finish it off.
The style is classic amigurumi: tight single crochet, clean shaping, and no stuffing. The tissue pack does the stuffing for you. An arch-shaped opening on the lower front lets you pull out one tissue at a time.
The pattern uses US crochet terms. The finished body measures about 6.5 in (16.5 cm) tall and 6 in (15.2 cm) wide when flat. With the loop, the total hanging height is about 10 in (25.4 cm).
You will work the body from the bottom up in joined rounds. The opening is made by working rows back and forth over part of the body, then closing the gap with a chain. Next you shape the top, add an edging round to the opening, embroider the seeds, and attach the calyx and loop.
Finished Size and Construction
- Finished size: 6.5 in (16.5 cm) tall x 6 in (15.2 cm) wide flat; about 10 in (25.4 cm) including loop
- Skill level: Easy (confident beginner)
- Terminology: US crochet terms
- Yarn weight: Worsted (#4)
- Hook: 4.0 mm (G-6) for body and calyx; 5.0 mm (H-8) for loop
- Number of pieces: One holder: body, calyx and loop (calyx and loop are sewn on)
- Layout: Single item, hung vertically
- Opening size before edging: 1.8 in (4.6 cm) wide x 2.2 in (5.6 cm) tall
- Opening size after edging: about 1.4 in (3.6 cm) wide x 1.8 in (4.6 cm) tall
- Edging depth: 1 round of sc, about 0.2 in (0.5 cm)
Materials
Pick a smooth cotton or cotton-blend worsted yarn. It shows the stitches clearly and holds its shape on a warm dashboard. Acrylic also works and is a bit softer. The amounts below assume about 200 m per 100 g.
- Color A – Medium Lavender: 45 g / 90 m (upper body, opening edging)
- Color B – Pale Lilac: 25 g / 50 m (lower body)
- Color C – Sage Green: 12 g / 24 m (calyx and loop)
- Color D – Cream: 3 g / 6 m (seeds)
All amounts include a small safety margin.
Tools:
– 4.0 mm (G-6) and 5.0 mm (H-8) crochet hooks
– Stitch markers (at least 2)
– Tapestry needle
– Scissors
– Measuring tape
– 1 pocket tissue pack, about 4.25 x 2.1 x 1 in (10.8 x 5.3 x 2.5 cm)
Abbreviations (US Terms)
- ch – chain
- sl st – slip stitch
- sc – single crochet
- hdc – half double crochet
- dc – double crochet
- inc – 2 sc in the same stitch
- sc2tog – single crochet 2 together (a decrease)
- MR – magic ring
- st(s) – stitch(es)
- RS / WS – right side / wrong side
Special technique – Joined round: At the end of each round, sl st into the first sc. Ch 1 (this does not count as a stitch) and start the next round in the same stitch. Do not turn unless the pattern tells you to.
Color change: Work the final sl st join of a round with the new color, then carry on. Carry the unused color loosely up the inside, or cut it and weave in the end.
Gauge and Checkpoints
Gauge: 18 sc x 20 rounds = 4 in (10.2 cm) with a 4.0 mm hook. That is 4.5 sts and 5 rounds per inch.
Work Rounds 1–8 of the base first to test your gauge. This test piece becomes your actual base, so nothing is wasted.
- After Round 8 (48 sts): the flat circle measures about 3.2 in (8.1 cm) across.
- After Round 13 (54 sts): the tube is 6 in (15.2 cm) wide when flattened.
- After Row 24: the opening is 1.8 in (4.6 cm) wide and 2.2 in (5.6 cm) tall.
- Finished body: about 6.5 in (16.5 cm) tall.
If your circle is too big, go down half a hook size. If it is too small, go up half a size. The fabric should be firm, and the tissue pack should not show through the gaps.
Body
Start with Color B and the 4.0 mm hook. Use joined rounds throughout.
Base
Rnd 1: 6 sc in MR, join. (6)
Rnd 2: Inc in each st around, join. (12)
Rnd 3: (Sc 1, inc) 6 times, join. (18)
Rnd 4: (Sc 2, inc) 6 times, join. (24)
Rnd 5: (Sc 3, inc) 6 times, join. (30)
Rnd 6: (Sc 4, inc) 6 times, join. (36)
Rnd 7: (Sc 5, inc) 6 times, join. (42)
Rnd 8: (Sc 6, inc) 6 times, join. (48)
Checkpoint: the circle is 3.2 in (8.1 cm) across and lies flat.
Lower Body and Ombre
Rnd 9: (Sc 7, inc) 6 times, join. (54)
This final increase round turns the base into a rounded bottom. From now on the body grows straight up.
Rnd 10: Sc in each st around, join. (54)
Rnd 11 (Color A): Sc around, join. (54)
Rnd 12 (Color B): Sc around, join. (54)
Rnd 13 (Color A): Sc around, join. (54)
Cut Color B. Work the rest of the body in Color A. These alternating rounds blend the two shades into a soft ombre.
Checkpoint: flattened width is 6 in (15.2 cm). The straight section above the base is about 1 in (2.5 cm) tall.
Turn the body so the round’s join line faces you. This will be the front. The opening sits right next to the join, which helps hide the seam.
Opening
You will now work in rows over 46 sts. The last 8 sts of Rnd 13 are left unworked and become the bottom edge of the opening.
Row 14 (RS): Ch 1, sc in the same st as the join and in the next 45 sts. Leave the last 8 sts unworked. Turn. (46)
Rows 15–24: Ch 1, sc in each st across, turn. (46)
That makes 11 rows in total. Row 24 is a RS row, so you finish at the edge of the gap with the RS facing.
The texture may change slightly where you switch from rounds to rows. Once the opening is edged, you will barely see it.
Checkpoint: the gap is 1.8 in (4.6 cm) wide and 2.2 in (5.6 cm) tall.
Closing the Opening
Joining chain: Do not turn after Row 24. Ch 8, then sl st into the first sc of Row 24 on the other side of the gap.
Rnd 25: Ch 1, sc in each of the 46 sc, then sc in each of the 8 chains, join. (46 + 8 = 54)
Rnd 26: Sc around, join. (54)
Top Shaping
Rnd 27: (Sc 7, sc2tog) 6 times, join. (48)
Rnd 28: (Sc 6, sc2tog) 6 times, join. (42)
Rnd 29: (Sc 5, sc2tog) 6 times, join. (36)
Rnd 30: (Sc 4, sc2tog) 6 times, join. (30)
Rnd 31: (Sc 3, sc2tog) 6 times, join. (24)
Rnd 32: (Sc 2, sc2tog) 6 times, join. (18)
Rnd 33: (Sc 1, sc2tog) 6 times, join. (12)
Rnd 34: Sc2tog 6 times, join. (6)
Fasten off, leaving a 12 in (30.5 cm) tail. Thread the tail through the front loops of the last 6 sts and pull tight. Leave this tail hanging, because you will use it to attach the loop later.
Checkpoint: the body is about 6.5 in (16.5 cm) tall and 6 in (15.2 cm) wide when flat.
Calyx
Use Color C and the 4.0 mm hook.
Rnd 1: 8 sc in MR, join. (8)
Rnd 2: Inc in each st, join. (16)
The center now measures about 0.8 in (2.0 cm) across.
Rnd 3 (leaves): Ch 7. Starting in the 2nd ch from the hook, work sl st, sc, hdc, dc, hdc, sc (6 sts along the chain). Skip the next sc of Rnd 2 and sl st into the following sc. Repeat from * 7 more times. (8 leaves)
Count check: each leaf uses 2 sts of Rnd 2, and 8 leaves x 2 = 16.
Each leaf is about 1.5 in (3.8 cm) long, so the calyx measures about 3.8 in (9.7 cm) across. The bare chain on each leaf forms a slight center vein. Fasten off and leave a 24 in (61.0 cm) tail for sewing.
Hanging Loop
Hold two strands of Color C together and use the 5.0 mm hook.
Foundation: Ch 36, which is about 7.2 in (18.3 cm).
Row 1: Sl st into the back bump of the 2nd ch from the hook and of each ch across. (35 sl sts)
This gives a firm, rounded cord. Fasten off and leave 8 in (20.3 cm) tails at both ends.
Fold the cord in half. Push both ends down through the hole in the center of the calyx.
Opening Edging (Border)
This edging round works like the border on this piece. It firms up the opening and rounds off its square corners into the arch you see in the photo.
Border gauge: 1 sc per edge position, which is 4.5 sts per inch along the stitch edges.
Edge positions around the opening:
– Bottom: 8 unworked sts of Rnd 13
– Right side: 11 row ends
– Top: 8 free loops on the underside of the joining chain
– Left side: 11 row ends
That makes 38 positions in total.
Join Color A in the 2nd bottom st.
Edging Rnd:
– Sc in bottom sts 2–7 (6 sc).
– Sc2tog over bottom st 8 and the first right row end (1).
– Sc in right row ends 2–10 (9 sc).
– Sc2tog over right row end 11 and the first top chain loop (1).
– Sc in top loops 2–7 (6 sc).
– Sc2tog over top loop 8 and left row end 11 (1).
– Sc in left row ends 10–2 (9 sc).
– Sc2tog over left row end 1 and bottom st 1 (1).
– Join to the first sc.
Count: 38 positions worked one per position, minus 4 combined at the corners = 34 sc.
Per side: bottom 6, right 9, top 6, left 9, plus 4 corner sc2togs = 34.
Why the math works: The opening’s outline is 1.8 + 2.2 + 1.8 + 2.2 = 8 in (20.3 cm), which equals 36 sts at gauge. The edging sits about 0.2 in (0.5 cm) inside the opening, so its inner edge is shorter than the outline. Working 38 positions would ruffle. Taking away 4 at the corners gives 34, which lies smooth with a slight raised lip and curves the corners into an arch.
Fasten off and weave in the ends.
Seeds
Thread 18 in (45.7 cm) of Color D onto the tapestry needle.
To make one seed: Bring the needle up at the base of an sc. Go back down at the top of the sc two rounds above it, in the same column. Repeat along the same path once more for a plump seed about 0.4 in (1.0 cm) long.
Work the seeds in staggered bands of 2 rounds each, keeping them spaced evenly around the body:
- Rnds 29–30: 5 seeds
- Rnds 25–26: 6 seeds
- Rnds 20–21: 5 seeds (skip the opening)
- Rnds 15–16: 4 seeds (skip the opening)
- Rnds 10–11: 4 seeds
That makes 24 seeds in total. Shift each band half a space sideways from the band above it. Knot the ends inside the body.
Assembly
- Place the calyx over the closed top of the body.
- Using the body’s Rnd 34 tail, sew through both loop ends and the calyx center, down into the top of the body. Pass through 3–4 times, because this point carries the full weight of the holder.
- Using the calyx tail, whipstitch around the calyx center. Tack the base of each leaf so the leaf tips stay free.
Final Blocking
- Lightly mist the body with water. Do not soak it.
- Fill it with a folded towel to shape the berry. Smooth the bottom curve and pat the top into a dome.
- Use your fingers to round the opening edging into an even arch.
- Lay the calyx leaves flat and pin each tip slightly outward.
- Let everything dry completely, then remove the towel.
- Slide in the tissue pack through the opening, short end first. Turn it so its slot faces the opening and pull up the first tissue. You can also take the tissues out of the wrapper and tuck them in loose.
Final Quality-Control Checklist
- Body is 6.5 in (16.5 cm) tall and 6 in (15.2 cm) wide when flat.
- Final counts are right: 54 sts at the widest point and 6 sts at the top.
- Opening is 1.4 x 1.8 in (3.6 x 4.6 cm) after edging, with 34 edging sc.
- Ombre bands are even, with a clean change at Rnds 11–13.
- All 24 seeds are the same length and none are loose.
- Calyx has 8 leaves, all with free tips.
- Loop is about 3.5 in (8.9 cm) tall and firmly anchored.
- All ends are woven in on the inside.
Troubleshooting
Base curls up like a bowl too early: You may have skipped an increase. Count each round from 1 to 8.
Base ruffles: Your tension is loose. Go down half a hook size.
Gap in the fabric at the corners of the opening: Close it with the yarn tail while weaving in.
Opening edging ruffles: Make sure you worked all 4 corner sc2togs. Skip one more row end on each side if needed.
Opening edging puckers: Work the corners as plain sc, which gives 38 sts.
Holder tilts forward: Move the loop anchor slightly toward the back.
Tissue pack won’t fit: Take the tissues out of the wrapper and tuck them in loose.
Care
Hand wash in cool water with mild soap, press out the water in a towel, and dry flat over a rolled towel to keep the shape. Do not tumble dry.
Final Notes
The measurement chain is simple:
– Base circle of 3.2 in (8.1 cm) at 48 sts
– Body width of 6 in (15.2 cm) at 54 sts
– Opening of 1.8 x 2.2 in (4.6 x 5.6 cm), edged with 34 sc
– Top closed to 6 sts
– Finished berry of 6.5 in (16.5 cm), plus a 3.5 in (8.9 cm) loop
If you match gauge at the first checkpoint, every later checkpoint will follow. Enjoy your little lavender berry on every drive.
Happy crocheting!