

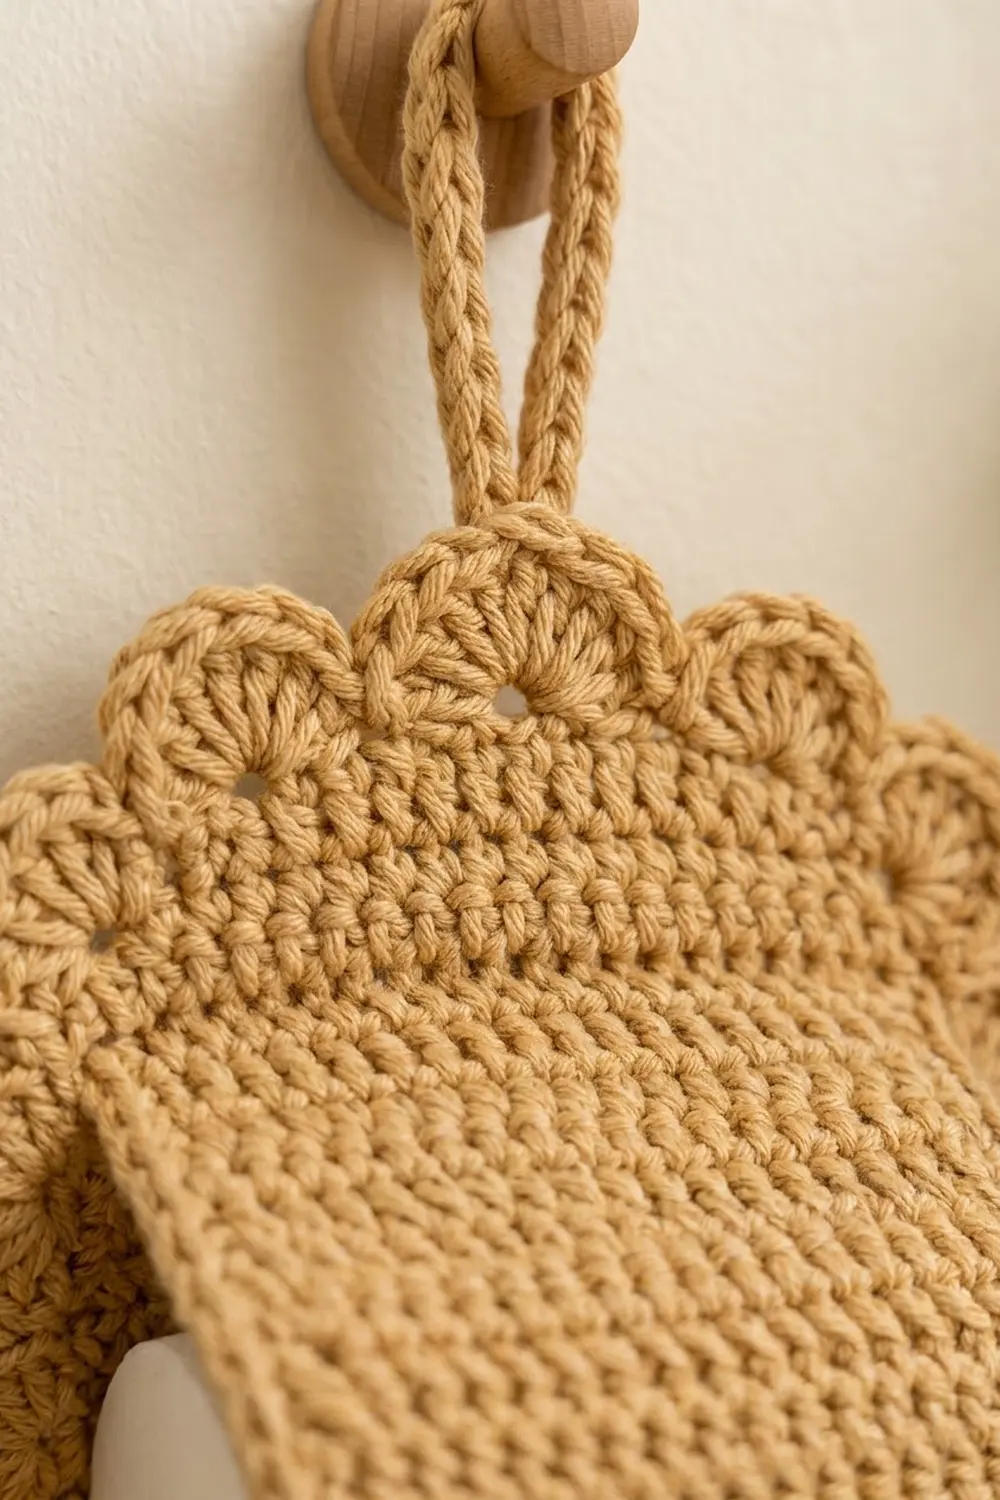
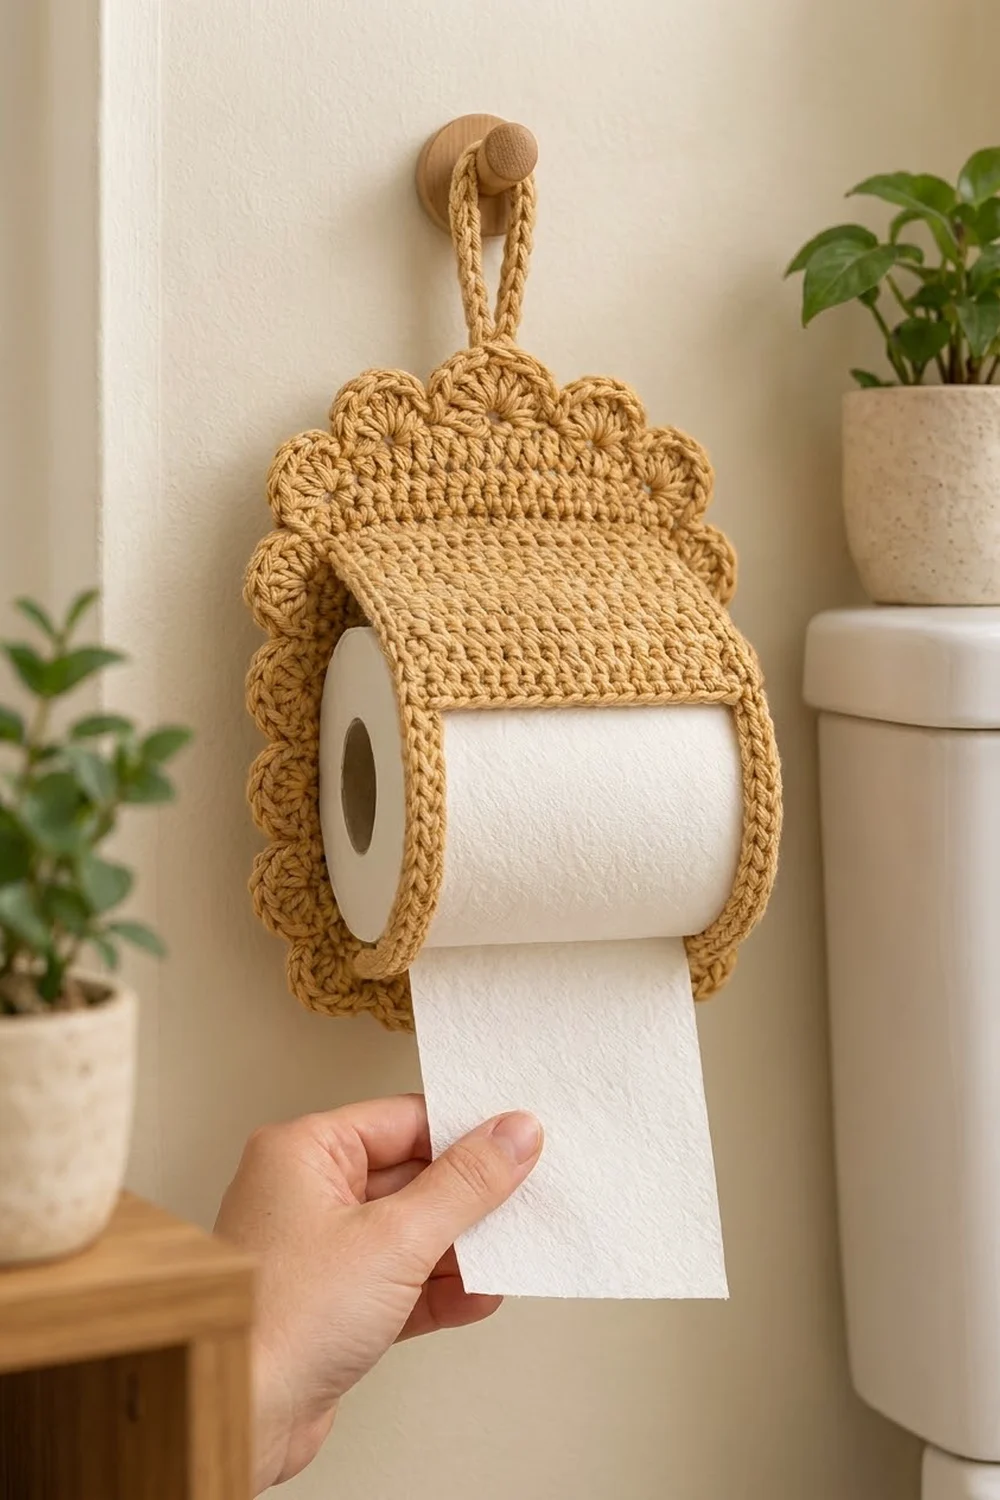
This hanging toilet paper holder gives a plain bathroom wall a soft, handmade focal point. A tall back panel with an arched top hangs from a slim loop. A curved hood holds the roll from above, and two upright side rings hold its ends. A row of fan scallops runs around the whole panel.
The holder uses one warm camel or honey shade of cotton yarn. The single color lets the texture stand out: dense half double crochet rows on the panel and hood, and lacy fans around the edge. The look is cottage-natural and goes well with wood, wicker, and green plants.
The pattern uses US crochet terms. With the border on, the back panel measures 8 in wide x 10.4 in tall (20.3 cm x 26.4 cm). The hanging loop adds about 3.5 in (8.9 cm). It holds a standard roll up to about 4.4 in (11.2 cm) wide.
You make five small parts: the back panel, the hood, two side rings, and the hanging loop. You sew the hood, rings, and loop onto the panel, then work the scalloped border all the way around the panel as the last step.
Finished Size and Construction
- Finished size: 8 in x 10.4 in (20.3 cm x 26.4 cm) panel, plus a loop of about 3.5 in (8.9 cm)
- Skill level: Easy / advanced beginner
- Terminology: US crochet terms
- Yarn weight: Worsted weight (#4) cotton
- Hook: 5.0 mm (H-8)
- Number of pieces: 5 (1 back panel, 1 hood, 2 side rings, 1 hanging loop)
- Layout: Hood across the top of the panel, one ring at each side, loop centered at the top back
- Back panel before border: 6 in x 8.4 in (15.2 cm x 21.3 cm)
- Hood: 6 in x 4.8 in (15.2 cm x 12.2 cm)
- Side ring band: 0.75 in x 9.8 in (1.9 cm x 24.9 cm), joined into a loop
- Border depth: 1 in (2.5 cm) on every side
Materials
Yarn: Use a smooth worsted weight cotton or cotton blend. Cotton keeps its shape, takes the weight of the roll without stretching, and handles bathroom humidity well. Avoid fuzzy or very stretchy acrylics, because they make the hood droop.
- Camel / honey: 100 g, about 190 m (208 yd)
That amount includes a margin of about 20 percent over what the holder actually uses (about 80 g). The extra covers a gauge swatch and any frogging.
Tools:
- 5.0 mm (H-8) crochet hook
- Tapestry needle
- Scissors
- 4 stitch markers
- Measuring tape or ruler
- Rustproof pins and a blocking mat or folded towel
- Spray bottle with water
Abbreviations (US Terms)
- ch – chain
- sl st – slip stitch
- sc – single crochet
- hdc – half double crochet
- dc – double crochet
- hdc2tog – half double crochet 2 together
- sk – skip
- sp – space
- st(s) – stitch(es)
- rep – repeat
Special stitch – hdc2tog: Yarn over, insert hook in next st, yarn over and pull up a loop (3 loops on hook). Yarn over, insert hook in following st, yarn over and pull up a loop (5 loops on hook). Yarn over and pull through all 5 loops. This turns 2 stitches into 1.
Special stitch – Fan: Work (dc, ch 1) 4 times, then dc once more, all in the same stitch. Each fan is 5 dc and 4 ch-1 spaces.
Gauge and Checkpoints
- Hdc gauge: 14 sts and 10 rows = 4 in (10.2 cm)
- Sc gauge: 16 sts and 18 rows = 4 in (10.2 cm)
Make a test piece first. The hood works well for this because it uses the same stitch and width as the panel. Work 10 rows and measure. It should be 6 in (15.2 cm) wide and 4 in (10.2 cm) tall. If it matches, finish it and use it as your hood.
Checkpoints:
- Panel after Row 1: 6 in (15.2 cm) wide
- Panel after Row 10: 4 in (10.2 cm) tall
- Panel after Row 18: 7.2 in (18.3 cm) tall
- Panel after Row 21: 8.4 in (21.3 cm) tall, 4.3 in (10.9 cm) across the top
- Ring band after Row 44: 9.8 in (24.9 cm) long
- After the border: 8 in x 10.4 in (20.3 cm x 26.4 cm)
Too big? Go down to a 4.5 mm hook. Too small? Go up to a 5.5 mm hook. Change the hook, not the stitch counts. All the border math depends on the counts staying exactly as written.
Back Panel
The panel is worked in rows of hdc from the bottom up, and the last three rows shape the arched top. The ch 2 at the start of each row does not count as a stitch.
Foundation: Ch 23.
Row 1: Hdc in 3rd ch from hook and in each ch across. (21 hdc)
Rows 2–18: Ch 2, turn. Hdc in each st across. (21 hdc)
Check the size: the panel should now be 6 in x 7.2 in (15.2 cm x 18.3 cm). Put a marker in the 2nd st and the 20th st of Row 18. These mark the ring positions.
Row 19: Ch 2, turn. Hdc2tog, hdc in next 17 sts, hdc2tog. (19 hdc)
Row 20: Ch 2, turn. Hdc2tog, hdc in next 15 sts, hdc2tog. (17 hdc)
Row 21: Ch 2, turn. Hdc2tog, hdc in next 13 sts, hdc2tog. (15 hdc)
Fasten off, leaving a 6 in (15.2 cm) tail to weave in. You will rejoin later for the border. The top now steps in by 1 st on each side for three rows, and this gives the arch its rounded shoulders.
Hood
The hood is a plain hdc rectangle the same width as the panel. Once it is sewn on, it curves forward over the roll.
Foundation: Ch 23.
Row 1: Hdc in 3rd ch from hook and in each ch across. (21 hdc)
Rows 2–12: Ch 2, turn. Hdc in each st across. (21 hdc)
Fasten off, leaving a 24 in (61.0 cm) tail for sewing. The hood measures 6 in x 4.8 in (15.2 cm x 12.2 cm).
Side Rings (Make 2)
Each ring is a narrow sc band joined into a loop. It stands upright on the panel like a hoop, with its outer face against the panel.
Foundation: Ch 4.
Row 1: Sc in 2nd ch from hook and in each ch across. (3 sc)
Rows 2–44: Ch 1, turn. Sc in each st across. (3 sc)
The band should measure 0.75 in x 9.8 in (1.9 cm x 24.9 cm). Bring Row 44 to the foundation edge without twisting the band. Sl st through both layers across all 3 sts. Fasten off, leaving a 20 in (50.8 cm) tail.
Flatten the ring into a tall oval about 4 in (10.2 cm) high and 1.75 in (4.4 cm) deep. Turn it so the seam sits at the back.
Hanging Loop
Foundation: Ch 30.
Row 1: Sc in 2nd ch from hook and in each ch across. (29 sc)
Fasten off, leaving a 12 in (30.5 cm) tail. The strap is about 7.25 in (18.4 cm) long. It curls a little and looks like a cord, just like the loop in the photo.
Make All Pieces
Before you assemble, check that you have:
- 1 back panel: 21 sts wide, 21 rows, arched top (Camel)
- 1 hood: 21 sts x 12 rows (Camel)
- 2 side rings: 3 sts x 44 rows, joined (Camel)
- 1 hanging loop: 29 sc (Camel)
Layout (front view of the panel):
          [ LOOP ]            <- sewn to back, top center
     (  arched top rows  )    <- Rows 19-21
 [========  HOOD  ========]   <- top edge sewn along Row 18
 [RING]                [RING] <- on st 2 and st 20, Rows 9-18
 [ ring ]   roll here  [ ring ]
 [_______ Rows 1-8 _______]   <- paper hangs in front
Joining
Sew every seam with the tapestry needle in mattress stitch or whipstitch, going through one strand of each piece. Keep the tension snug but not tight. The seams should hold firmly without puckering the panel.
Step 1 – Rings: Lay the panel right side up. Place one ring at the marked 2nd st so its outer face rests on the panel along Rows 9–18. That is 10 rows, or 4 in (10.2 cm). Sew the back of the band to the panel along that column, catching all 3 band sts on each pass. Repeat with the second ring at the 20th st. The inner faces of the rings should be about 4.4 in (11.2 cm) apart.
Step 2 – Hood: Hold the hood foundation edge against the panel along the line between Row 18 and Row 19. Match it stitch for stitch: 21 hood foundation loops to 21 Row 18 sts, so the seam lies flat with no gathering. Sew across. Bring the hood forward and down over the tops of the rings. Sew each hood side edge to the top curve of its ring over the first 4 hood rows, about 1.6 in (4.1 cm). Leave the front edge of the hood free.
Step 3 – Loop: Fold the strap in half. Sew both ends to the back of the panel, centered over the middle 3 sts of Rows 20–21. Overlap each end by about 0.25 in (0.6 cm), so the loop stands about 3.5 in (8.9 cm) above the panel.
Size checkpoint: Without its border, the panel should still be 6 in x 8.4 in (15.2 cm x 21.3 cm). The rings and hood must not overlap the outermost stitch column. That column stays free for the border.
Border
Border gauge: Round 1 is worked at about 4 sc per inch along every edge. This matches the sc gauge, so the border lies flat without ruffling or cupping.
Round 1 (sc foundation): With the right side facing, join yarn in the first st of Row 21 (top right corner).
- Top edge: Ch 1, 2 sc in first st, sc in next 13 sts, 2 sc in last st. (17 sc)
- Left side: Working in row ends, work 2 sc in each of Rows 21, 20, and 19 (6 sc). Then work 3 sc over every 2 row ends from Row 18 to Row 1 (9 pairs = 27 sc). (33 sc)
- Bottom edge: Working in the foundation ch loops, 3 sc in first loop, sc in next 19 loops, 3 sc in last loop. (25 sc)
- Right side: Work up the side the same way as the left side, mirrored. (33 sc)
Sl st to the first sc. Total: 17 + 33 + 25 + 33 = 108 sc. These counts already include the extra corner stitches. Do not add any more at the corners.
Round 2 (fans): Ch 1. Sc in same st as join, sk 2 sts, Fan in next st, sk 2 sts, sc in next st. Rep from * around, ending the last rep with sk 2 sts. Sl st to the first sc. (18 fans and 18 sc: 18 sc + 90 dc + 72 ch-1 sps)
Round 3 (outline): Sl st into the first dc of the first fan. Sc in each of the 5 dc and in each of the 4 ch-1 sps of the fan, sl st in the next sc between fans. Rep from * around. Sl st to the first sc and fasten off. (90 sc in the dc + 72 sc in the ch-1 sps + 18 sl sts = 180 sts)
Why the math works: Each fan repeat uses exactly 6 stitches of Round 1: 1 sc, 2 skipped, 1 fan, and 2 skipped. 108 divided by 6 is 18, so the fans close evenly with no partial repeat. Round 1 adds 0.25 in (0.6 cm), the fans add 0.6 in (1.5 cm), and the outline adds 0.15 in (0.4 cm). Together that is 1 in (2.5 cm) per side. So 6 in plus 2 in gives 8 in wide (20.3 cm), and 8.4 in plus 2 in gives 10.4 in tall (26.4 cm).
Final Blocking
- Weave in all remaining tails along seams or inside the ring bands.
- Lay the holder face up on a blocking mat or folded towel.
- Spray the panel and border until damp but not soaked. Keep the hood and rings mostly dry so they keep their shape.
- Ease the panel to 8 in x 10.4 in (20.3 cm x 26.4 cm). Check that the side edges are straight and parallel.
- Pin the center top of each fan so the scallops sit as even half circles.
- Stuff the hood lightly with a dry cloth or slip in an empty roll so it dries in a curve.
- Let it dry completely, usually 6 to 12 hours, before you unpin.
Final Quality-Control Checklist
- Panel is 8 in x 10.4 in (20.3 cm x 26.4 cm) with the border
- 18 fans, evenly spaced, with no gaps or crowding at the corners
- The arched top is rounded on both shoulders and symmetrical
- Hood is centered and sewn stitch for stitch along Row 18
- The rings are the same height and about 4.4 in (11.2 cm) apart
- The loop is centered and sewn securely through several strands
- All tails are woven in and nothing shows on the front
- A roll slides in and out easily but does not fall forward
Troubleshooting
Border ruffles: Round 1 has too many stitches. Recount each side against 17, 33, 25, and 33.
Border cups or pulls the panel: Round 1 is too tight. Work it with a hook one size larger, keeping the same counts.
Fans do not close evenly: Round 1 is not exactly 108. Count it, fix it, and work Round 2 again.
Hood droops: The hood was sewn too loosely or the yarn is too stretchy. Add a second line of stitching along the Row 18 seam, or work the hood with a hook one size smaller.
Roll is too tight between rings: Move one ring outward by half a stitch, keeping it off the border column.
Panel is too narrow: Your hdc is tight. Remake it with a larger hook rather than adding stitches.
Care
Hand wash in cool water with a mild soap, press out the water in a towel, and dry flat, reshaping the hood. Do not hang it while wet.
Final Notes
The measurements build on each other. A gauge of 14 hdc per 4 in (10.2 cm) gives a 21-stitch panel that is 6 in (15.2 cm) wide. Twenty-one rows bring it to 8.4 in (21.3 cm) tall. The 21-stitch hood matches Row 18 stitch for stitch, and the 44-row rings stand 4.4 in (11.2 cm) apart. A 108-stitch sc round divides into 18 fans, and the 1 in (2.5 cm) border brings the holder to 8 in x 10.4 in (20.3 cm x 26.4 cm). Check each step, and the finished holder will match the plan.
Happy crocheting!