

Meet Lily Pad Pal, a cheerful frog organizer that hangs from the back of a car headrest. A wide frog face peeks over a roomy cream pocket. A green leaf with a scalloped cream edge decorates the front, and two little frog feet dangle below.
The colors are soft and calm: sage green, cream, black and a touch of pink. A beige fabric lining keeps the pocket neat inside. The style is cute but practical. The pocket holds tissues, wipes, a small book or snacks.
This pattern uses US crochet terms. The finished organizer is 8 in (20.3 cm) wide and about 13 in (33.0 cm) tall, not counting the straps. Each strap is 14 in (35.6 cm) long.
You will crochet 11 small pieces: a head, two eyes, two cheeks, a pocket, a leaf, two feet and two straps. The head and leaf are ovals worked in rounds. The pocket starts as a flat base and is then worked in rounds straight up. After a little embroidery, everything is sewn together.
Finished Size and Construction
- Finished size: 8 in (20.3 cm) wide × 13 in (33.0 cm) tall, excluding straps
- Skill level: Intermediate beginner
- Terminology: US crochet terms
- Yarn weight: Worsted weight (#4) cotton
- Hook: 4.0 mm (G-6)
- Number of pieces: 11 crocheted pieces, plus an optional fabric lining
- Layout: Head over the pocket, eyes on top of the head, leaf on the pocket front, feet below the pocket, straps on the back of the head
- Head size: 7.0 in (17.8 cm) × 4.8 in (12.2 cm)
- Pocket size: 8 in (20.3 cm) wide × 1.8 in (4.6 cm) deep × 7 in (17.8 cm) tall
- Leaf size before border: 6.5 in (16.5 cm) × 5.2 in (13.2 cm)
- Leaf border depth: 0.6 in (1.5 cm) on each edge
- Leaf size with border: 7.7 in (19.6 cm) × 6.4 in (16.3 cm)
Materials
Use a smooth worsted-weight cotton or cotton blend, about 85 m per 50 g. Cotton holds its shape, so the pocket won’t sag when it is full.
- Cream: 110 g (187 m)
- Sage green: 60 g (102 m)
- Black: 5 g (9 m)
- Soft pink: 3 g (5 m)
These amounts include a margin of about 20 percent.
Tools:
– 4.0 mm (G-6) crochet hook
– Tapestry needle
– Stitch markers
– Two buttons, 0.75 in (1.9 cm)
– Pins
– Optional: beige cotton fabric, 11 in × 17 in (27.9 cm × 43.2 cm), plus matching sewing thread
Abbreviations (US Terms)
- ch = chain
- sc = single crochet
- dc = double crochet
- sl st = slip stitch
- st(s) = stitch(es)
- sk = skip
- inc = 2 sc in the same st
- BLO = back loop only
- rnd = round
- MR = magic ring
Crab stitch (reverse sc): Work sc from left to right (right to left if you are left-handed). Insert the hook into the next st to the right, pull up a loop, yarn over and pull through both loops. This makes a corded edge.
Toe: Sl st in the next st, ch 3, then work a 4-dc bobble in the 3rd ch from the hook. To make the bobble, (yarn over, insert hook, pull up a loop, yarn over, pull through 2 loops) 4 times, then yarn over and pull through all 5 loops. Finish with a sl st in the same pad st.
Gauge and Checkpoints
Gauge: 18 sc and 20 rows = 4 in (10.2 cm). That is 4.5 sts and 5 rows per inch.
Make the head first, because it is your test piece. Each round of an oval adds about 0.2 in (0.5 cm) on every edge.
Checkpoints:
– Head after Rnd 8: 5.4 in × 3.2 in (13.7 cm × 8.1 cm)
– Head after Rnd 12: 7.0 in × 4.8 in (17.8 cm × 12.2 cm)
– Eye after Rnd 6: 2.4 in (6.1 cm) across
– Leaf after Rnd 13: 6.5 in × 5.2 in (16.5 cm × 13.2 cm)
– Pocket base: 8 in × 1.8 in (20.3 cm × 4.6 cm)
– Pocket height: 7 in (17.8 cm)
If your pieces come out too big, go down a hook size. If they come out too small, go up a hook size. If an oval ruffles, your tension is too tight on the increases. If it cups, you are working too loosely.
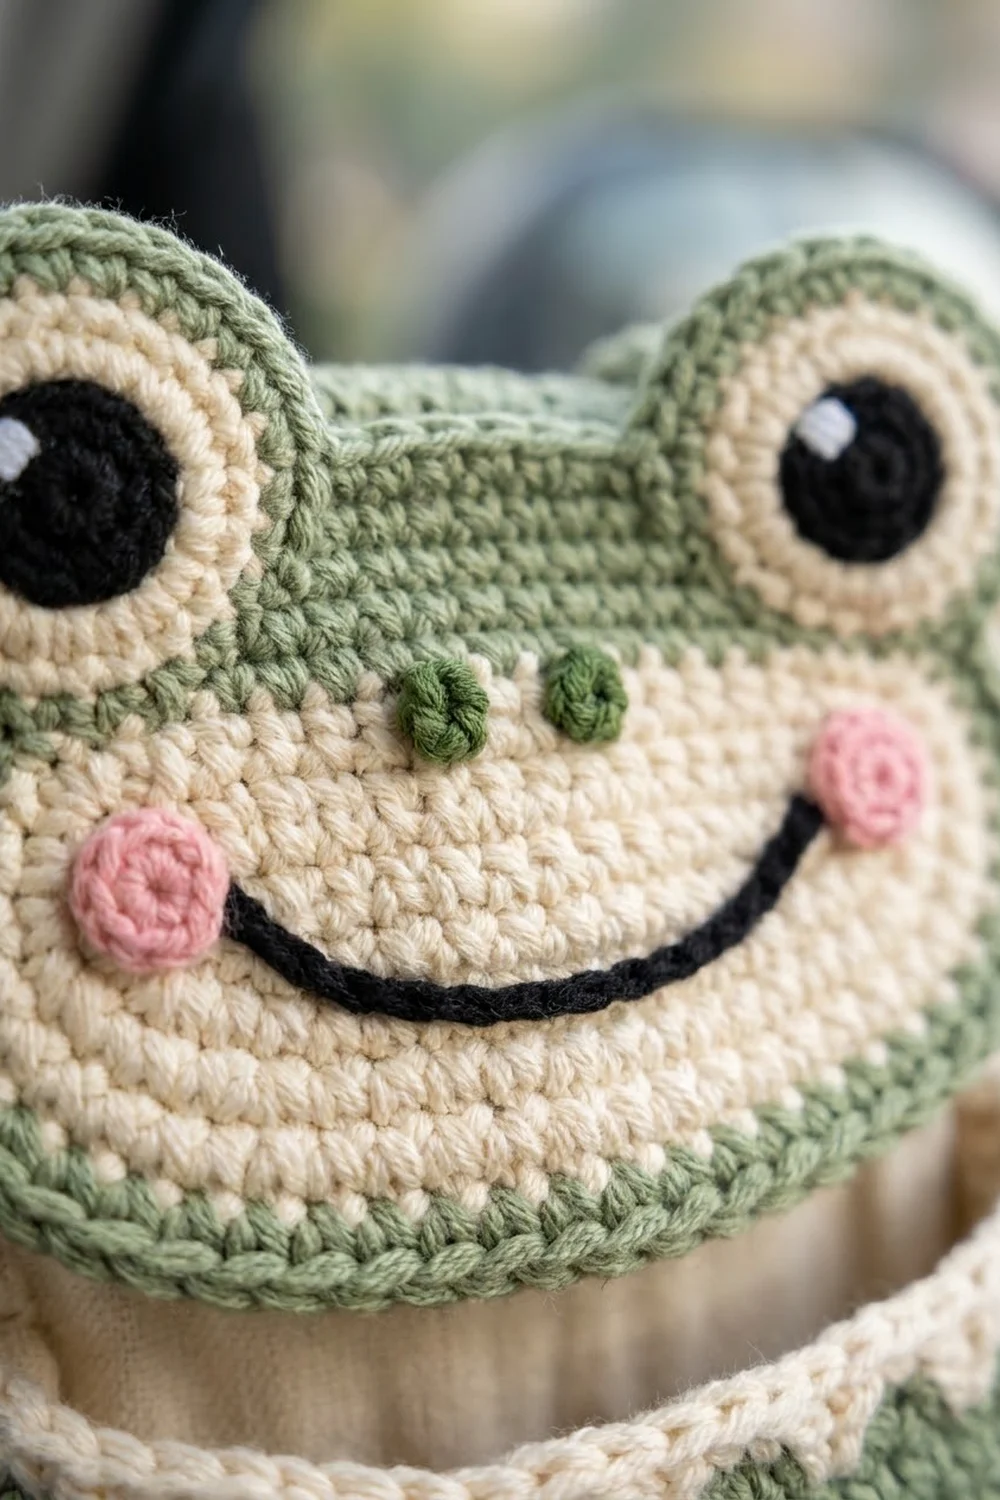
Head (Make 1)
With cream, ch 13.
Rnd 1: 3 sc in the 2nd ch from the hook, sc in the next 10 ch, 3 sc in the last ch. Rotate the work and sc in the next 10 ch along the other side of the chain. Do not join. Place a marker in the first st and move it up each round. (26 sts)
The round is now laid out as four sections: end, side, end, side.
Rnd 2: [2 sc in each of the next 3 sts, sc in the next 10 sts] twice. (32 sts)
Rnd 3: [(sc in next st, inc) 3 times, sc in the next 10 sts] twice. (38 sts)
Rnds 4–8: In each round, work [(sc in the next X sts, inc) 3 times, sc in the next 10 sts] twice. X is the round number minus 2.
– Rnd 4: 44 sts
– Rnd 5: 50 sts
– Rnd 6: 56 sts
– Rnd 7: 62 sts
– Rnd 8: 68 sts
Check: the head measures 5.4 in × 3.2 in (13.7 cm × 8.1 cm). Change to green.
Rnds 9–12: Continue the same pattern with green.
– Rnd 9: 74 sts
– Rnd 10: 80 sts
– Rnd 11: 86 sts
– Rnd 12: 92 sts
Sl st in the next st and fasten off. The head measures 7.0 in × 4.8 in (17.8 cm × 12.2 cm).
Each round adds exactly 6 sts, 3 at each curved end. The 10-st straight sides never change.
Face embroidery:
1. Smile: With black, backstitch a smooth upward curve about 3.5 in (8.9 cm) wide across Rnds 3–5, below the center of the face.
2. Nostrils: With green, make two French knots 0.6 in (1.5 cm) apart, just above the center chain.
3. Cheeks: These are crocheted pieces and are sewn on later.
Eyes (Make 2)
Rnd 1: With black, MR, 6 sc. (6 sts)
Rnd 2: Inc in each st. (12 sts) Change to cream.
Rnd 3: (Sc in next st, inc) 6 times. (18 sts)
Rnd 4: (Sc in next 2 sts, inc) 6 times. (24 sts) Change to green.
Rnd 5: (Sc in next 3 sts, inc) 6 times. (30 sts)
Rnd 6: (Sc in next 4 sts, inc) 6 times. (36 sts)
Sl st in the next st and fasten off, leaving a long tail for sewing. Each eye measures 2.4 in (6.1 cm) across.
Cheeks (Make 2)
With pink, MR, 8 sc, and join with a sl st. (8 sts) Fasten off, leaving a tail. Each cheek is about 0.5 in (1.3 cm) across.
Pocket (Make 1)
Base: With cream, ch 37.
Row 1: Sc in the 2nd ch from the hook and in each ch across. (36 sts)
Rows 2–9: Ch 1, turn, sc in each st. (36 sts)
The base now measures 8 in × 1.8 in (20.3 cm × 4.6 cm). Do not fasten off.
Walls: Work in rounds from here.
Rnd 1 (BLO): Work this round in the back loop only, because it forms the fold at the bottom of the pocket.
1. Ch 1 and sc in each st across Row 9. (36 sts)
2. Work 8 sc evenly across the 9 row ends.
3. Sc in each unused loop of the foundation chain. (36 sts)
4. Work 8 sc evenly across the other 9 row ends.
Place a marker in the first st. (88 sts)
The round has 36 + 8 + 36 + 8 sts. Each short side has 8 sts, which is 1.8 in (4.6 cm). That matches the 9-row base depth, so the corners sit flat.
Rnds 2–34: Sc in each st. (88 sts)
Stop and finish the rim in the Border section below. The pocket is 7 in (17.8 cm) tall when the rim is done.
Leaf (Make 1)
With green, ch 9.
Rnd 1: 3 sc in the 2nd ch from the hook, sc in the next 6 ch, 3 sc in the last ch. Rotate and sc in the next 6 ch along the other side of the chain. (18 sts)
Rnds 2–13: Work [(sc in the next X sts, inc) 3 times, sc in the next 6 sts] twice. X is the round number minus 2. In Rnd 2, X is 0, so you work 2 sc in each of the 3 end sts.
– Rnd 2: 24 sts
– Rnd 3: 30 sts
– Rnd 4: 36 sts
– Rnd 5: 42 sts
– Rnd 6: 48 sts
– Rnd 7: 54 sts
– Rnd 8: 60 sts
– Rnd 9: 66 sts
– Rnd 10: 72 sts
– Rnd 11: 78 sts
– Rnd 12: 84 sts
– Rnd 13: 90 sts
The green leaf measures 6.5 in × 5.2 in (16.5 cm × 13.2 cm). Finish Rnd 13 at the start of a curved end, and fasten off green.
Feet (Make 2)
Rnd 1: With green, MR, 6 sc. (6 sts)
Rnd 2: Inc in each st. (12 sts)
Rnd 3: (Sc in next st, inc) 6 times. (18 sts)
Rnd 4: Sc in the next 13 sts, toe in the next st, sc in the next st, toe in the next st, sc in the next st, toe in the next st. (18 sts on the pad: 15 sc + 3 toe bases, plus 3 toes)
Fasten off. Each foot is about 1.6 in (4.1 cm) long, toes included.
Straps (Make 2)
With green, ch 8.
Row 1: Sc in the 2nd ch from the hook and in each ch across. (7 sts)
Rows 2–65: Ch 1, turn, sc across. (7 sts)
Row 66 (buttonhole): Ch 1, turn, sc in the next 2 sts, ch 3, sk 3 sts, sc in the next 2 sts. (4 sc + ch-3 space)
Row 67: Ch 1, turn, sc in the next 2 sts, 3 sc in the ch-3 space, sc in the next 2 sts. (7 sts)
Rows 68–70: Ch 1, turn, sc across. (7 sts)
Fasten off. Each strap is 1.5 in (3.8 cm) wide and 14 in (35.6 cm) long.
Make All Pieces
| Piece | Qty | Colors |
|---|---|---|
| Head | 1 | Cream, green |
| Eyes | 2 | Black, cream, green |
| Cheeks | 2 | Pink |
| 1 | Cream | |
| Leaf | 1 | Green, cream |
| Feet | 2 | Green |
| Straps | 2 | Green |
Assembly layout (front view):
     [STRAP]                 [STRAP]
   ( EYE )                     ( EYE )
  [============ HEAD ==============]
  [ (cheek)    ~~smile~~    (cheek)]
 [|========== POCKET RIM ==========|]
 [|      [  LEAF with veins  ]     |]
 [|      [  scalloped edge   ]     |]
 [|================================|]
      (FOOT)                (FOOT)
Joining
Use whipstitch with a matching color for all seams. Pin every piece in place before you sew.
- Cheeks: Sew one cheek at each end of the smile, on Rnds 4–5 of the head.
- Eyes: Center each eye 0.4 in (1.0 cm) in from a side edge of the head, with its lower half overlapping the green rim. Sew around the overlapping half and through the green Rnd 6 of the eye.
- Leaf: Center the leaf on the front wall of the pocket with its bottom scallops 0.25 in (0.6 cm) above the base fold. Stitch through the sc of Rnd 14, between the scallops. The shells stay free and stand out.
- Head: Slide the bottom 1 in (2.5 cm) of the head inside the pocket, against the back wall. Center it so that 0.5 in (1.3 cm) of pocket shows on each side. Sew the head to the back wall, one head st to one wall st, along a single row of the wall.
- Straps: Sew Rows 1–8 of each strap to the back of the head, behind each eye. Sew a button to the outside of each strap at Row 25.
- Feet: Sew the top half of each foot pad to the base fold, 1 in (2.5 cm) in from each front corner, so the toes hang down.
Keep your sewing tension snug, but don’t pull until the fabric puckers. Weave each tail into a solid area of the same color.
Size checkpoint: The assembled organizer is 8 in (20.3 cm) wide and 13 in (33.0 cm) from the eye tops to the toes. That adds up as 1.2 in of eye + 3.8 in of head + 7 in of pocket + 1 in of feet.
Border
The borders use the same gauge as the rest of the piece: 4.5 sts per inch. The shell round adds a scallop about 0.4 in (1.0 cm) deep.
Leaf border, Rnd 14: Join cream at the start of a curved end. Work [(sc in the next 11 sts, inc) 3 times, sc in the next 6 sts] twice. (96 sts)
Counts per section: 42 on each end and 6 on each straight side (42 + 6 + 42 + 6).
Leaf border, Rnd 15 (shells): [Sc in the next st, sk 2 sts, 5 dc in the next st, sk 2 sts] 16 times. Sl st in the first sc and fasten off. (16 repeats of 1 sc + 5 dc = 96 sts; 0 added)
Shells per section: 7 on each end and 1 on each straight side (7 + 1 + 7 + 1 = 16 shells).
Why the math works: Each shell uses exactly 6 sts. Rnd 14 has 96 sts, and 96 ÷ 6 = 16, so there are no leftover sts. Each straight side holds exactly one repeat. Each 42-st end holds exactly seven. The 6 extra sts in Rnd 14 keep the curve growing at the normal rate, so the leaf lies flat under the shells.
Leaf veins: Hold cream yarn behind the leaf and work surface slip stitches on the front:
– one main vein, 5 in (12.7 cm) long, running diagonally from the lower left toward the center right
– one side vein, 2 in (5.1 cm) long, branching up from the middle of the main vein
– one side vein, 2 in (5.1 cm) long, following the curve near the left edge
Pocket rim, Rnd 35: Crab stitch in each st and join. (88 sts)
Counts per side: front 36, side 8, back 36, side 8. You work exactly one crab stitch into each st, so the rim keeps the full 19.6 in (49.8 cm) opening without flaring.
Optional lining: Cut two pieces of fabric, each 11 in × 8.5 in (27.9 cm × 21.6 cm).
1. Sew the sides and bottom with 0.5 in (1.3 cm) seams.
2. Box the bottom corners so the base is 1.8 in (4.6 cm) deep. This gives a 20 in (50.8 cm) circumference.
3. Fold the top edge under and slip the lining inside the pocket.
4. Hand-sew the lining to the top of Rnd 34, just below the rim.
Final Blocking
- Lightly mist the head and leaf with water.
- Pin the head flat to 7.0 in × 4.8 in (17.8 cm × 12.2 cm), and pin the leaf scallops so they sit open.
- Stuff the pocket with a folded towel to square up its 8 in × 1.8 in (20.3 cm × 4.6 cm) base.
- Let everything dry completely.
- Steam the straps flat from 1 in (2.5 cm) away, without touching the iron to the yarn.
Final Quality-Control Checklist
- Head is 92 sts around and the eyes are 36 sts each
- Leaf Rnd 14 is 96 sts, with 16 even shells
- Pocket rounds are 88 sts, with 36 + 8 + 36 + 8 per side
- Smile is centered, and the cheeks mirror each other
- Eyes sit at the same height
- Leaf is centered and the veins are smooth
- Feet are evenly spaced
- Buttonholes fit the buttons
- All tails are woven in securely
Troubleshooting
- Oval looks like it has corners: Shift where the increases fall in each round so they don’t stack up in the same spots.
- Leaf ruffles under the shells: Count Rnd 14 again; it must be exactly 96 sts.
- Pocket walls lean outward: Your tension is loose. Check that every round is 88 sts.
- Smile is lopsided: Mark both ends with pins before you start stitching.
- Straps stretch: Go down one hook size for the straps only.
Care
Hand wash in cool water and lay flat to dry. If you added a lining, remove it before washing or spot clean the organizer.

Final Notes
Every measurement in this pattern builds on the gauge of 4.5 sts per inch:
– The 36-st base makes the 8 in (20.3 cm) width.
– 35 rounds make the 7 in (17.8 cm) pocket.
– 12 oval rounds make the 7.0 in × 4.8 in (17.8 cm × 12.2 cm) head.
– 13 green rounds plus a 96-st shell border make the 7.7 in × 6.4 in (19.6 cm × 16.3 cm) leaf.
– With the eyes and feet added, the organizer comes to 13 in (33.0 cm) tall.
Check each stage as you go and the final piece will fit together easily. Happy crocheting!